Blog

  • Zesty Chipotle Lime Shrimp Bowls: A Quick Weeknight Dinner

    Zesty Chipotle Lime Shrimp Bowls: A Quick Weeknight Dinner

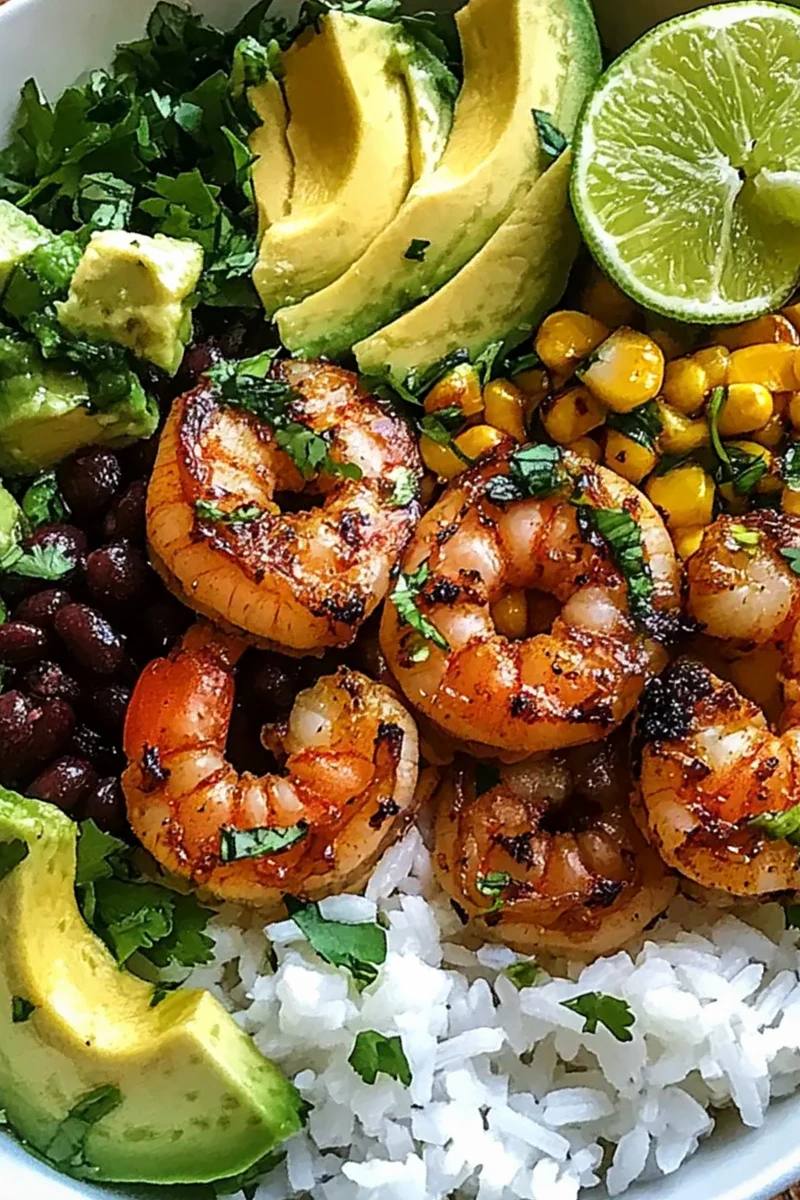
    This vibrant meal combines smoky chipotle peppers and fresh lime juice for a balanced, nutrient-dense dinner. It is designed for efficiency, allowing you to prepare a complete seafood bowl in just 30 minutes.

    Recipe image

    List of ingredients

    • 2 tablespoons olive oil – provides a rich base; substitute with avocado oil for higher heat cooking.
    • 1 minced chipotle pepper – adds smoky heat; use smoked paprika for a milder version.
    • 1 tablespoon adobo sauce – deepens the smoky flavor; replace with lime juice if unavailable.
    • 3 cloves garlic, minced – provides aromatic depth; garlic powder is an acceptable alternative.
    • 1 tablespoon lime juice – adds essential acidity; fresh lime is highly recommended.
    • 1 teaspoon ground cumin – adds an earthy tone; coriander can be used as a substitute.
    • 1 teaspoon chili powder – contributes warmth and color; use cayenne for more intensity.
    • Salt and black pepper, to taste – essential for balancing all flavors.
    • 1 pound shrimp, peeled and deveined – the primary protein; can be replaced with chicken or firm tofu.
    • 2 cups cooked rice – serves as the base; brown rice or cauliflower rice are healthy alternatives.
    • 1 cup black beans, drained and rinsed – adds fiber and plant-based protein.
    • 1 cup corn kernels – adds sweetness; frozen corn is a convenient option.
    • 1/4 cup chopped cilantro – adds a fresh herbal finish; parsley or green onions work as well.
    • 1/2 cup sour cream – provides a cooling element; plain Greek yogurt is a healthier swap.
    • 1 sliced avocado – adds creamy texture and healthy fats.
    • Lime wedges – used for final garnishing to brighten the dish.

    step-by-step instructions

    1. Prepare the marinade: In a medium bowl, whisk together the olive oil, minced chipotle pepper, adobo sauce, minced garlic, lime juice, ground cumin, chili powder, salt, and black pepper until the mixture is smooth.
    2. Marinate the shrimp: Add the peeled and deveined shrimp to the marinade and toss until every piece is thoroughly coated. Cover the bowl and let it sit at room temperature for 10 minutes to absorb the flavors.
    3. Cook the protein: Heat a large skillet over medium-high heat with a small amount of olive oil. Add the shrimp in a single layer and cook for 2-3 minutes per side until they are pink, opaque, and slightly charred.
    4. Warm the base ingredients: In the same skillet used for the shrimp, add the cooked rice, black beans, and corn. Stir occasionally for 3-5 minutes until the mixture is heated through and the rice is fluffy.
    5. Assemble the bowls: Divide the warm rice, bean, and corn mixture evenly among four serving bowls. Artfully arrange the cooked chipotle shrimp on top of the base.
    6. Add final garnishes: Top each bowl with sliced avocado, a sprinkle of chopped cilantro, and a dollop of sour cream or Greek yogurt. Serve immediately with lime wedges on the side for extra zest.

    Professional Cooking Tips

    Maintain Optimal Marination Time

    Marinate the shrimp for at least 10 minutes to ensure the flavors penetrate the protein. However, do not exceed 30 minutes, as the acidity in the lime juice can begin to break down the shrimp texture, making it mushy.

    Ensure a High-Heat Sear

    Heat your skillet until the oil is shimmering before adding the shrimp. Cooking in a single layer prevents overcrowding, which ensures the shrimp sear and char rather than steaming in their own juices.

    Select High-Quality Shrimp

    Choose shrimp that are firm and translucent with a mild sea-salt scent. If using frozen shrimp, thaw them completely in the refrigerator and pat them dry before marinating to prevent the marinade from becoming diluted.

    Prioritize Fresh Aromatics

    Use freshly minced garlic and squeezed lime juice rather than bottled versions. Fresh aromatics contain volatile oils that provide a significantly more vibrant and pungent flavor profile to the final dish.

    Ingredient Substitutions

    Alternative Protein Choices

    For a different protein, use skinless chicken breast or extra-firm tofu. If using chicken, ensure it reaches an internal temperature of 165°F. For tofu, press it to remove excess water before marinating and sautéing.

    Low-Carb Base Options

    Replace white or brown rice with cauliflower rice for a lower-calorie, grain-free alternative. Sauté the cauliflower rice briefly in the skillet with the beans and corn to maintain a consistent texture.

    Adjusting the Heat Level

    To reduce the spice, replace the minced chipotle pepper with smoked paprika and omit the adobo sauce. To increase the heat, add a pinch of cayenne pepper or finely diced fresh jalapeños to the marinade.

    Healthier Creamy Toppings

    Swap the traditional sour cream for plain Greek yogurt to increase the protein content and add a tangier flavor. For a dairy-free version, use a dollop of cashew cream or an extra slice of avocado.

    Creative Flavor Variations

    Adding Garden Vegetables

    Incorporate diced red bell peppers or shredded carrots into the rice mixture for additional crunch and nutrition. These vegetables can be sautéed along with the corn and black beans.

    Switching the Grain Base

    Use quinoa instead of rice to add a nuttier flavor and a complete plant-based protein source. Quinoa absorbs the pan juices well, making it an excellent vehicle for the chipotle flavors.

    Enhancing the Spice Profile

    Toss in a teaspoon of honey or maple syrup to the marinade for a sweet-and-spicy contrast. This caramelizes slightly during the cooking process, adding a deeper complexity to the shrimp.

    Serving Suggestions

    Pairing with Side Dishes

    Serve these bowls with a side of creamy guacamole or crispy corn tortilla chips for added texture. A zesty cabbage slaw with lime and cilantro also provides a refreshing crunch that balances the smoky shrimp.

    Complementary Non-Alcoholic Drinks

    Pair this meal with sparkling lime water or a chilled hibiscus tea. These beverages offer a tart, refreshing quality that cuts through the richness of the avocado and sour cream.

    Light Dessert Pairings

    Finish the meal with a light lime sorbet or fresh mango slices. The citrus and tropical notes cleanse the palate after the bold, spicy flavors of the chipotle marinade.

    Storage and Reheating

    Refrigeration Guidelines

    Store the shrimp, rice, and vegetable mixture in separate airtight containers to maintain quality. When stored this way, the components will remain fresh in the refrigerator for up to 3 days.

    Freezing Instructions

    Freeze the cooked shrimp and rice in separate freezer-safe bags for up to 3 months. Thaw them in the refrigerator overnight before reheating to prevent the shrimp from becoming rubbery.

    Best Reheating Methods

    Warm the rice, beans, and corn in a microwave or skillet until heated through. Reheat the shrimp gently on medium heat for 1-2 minutes to avoid overcooking them.

    Meal Prep Strategies

    Prepping the Marinade

    You can whisk the chipotle lime marinade up to 24 hours in advance and store it in a sealed jar. This allows the spices to meld, creating a more cohesive flavor when you finally add the shrimp.

    Advance Grain Preparation

    Cook a large batch of rice, black beans, and corn at the start of the week. Store them together in a container so you only need to heat the mixture in the skillet before assembling the bowls.

    Efficient Weekly Assembly

    For a structured meal prep, divide the base mixture into four containers. Store the marinated shrimp separately and cook them fresh each day to ensure the best texture and flavor.

    Troubleshooting Common Issues

    Preventing Tough Shrimp

    Tough shrimp are usually the result of overcooking. Stick to the 2-3 minute per side rule and remove them from the heat the moment they turn opaque and form a C-shape.

    Improving Bland Rice

    If the rice feels tasteless, stir in a teaspoon of lime juice and a pinch of salt while warming it in the skillet. This aligns the flavor of the base with the zesty profile of the shrimp.

    Managing Excess Moisture

    If the bowl becomes too watery, ensure you drain and rinse the canned black beans thoroughly. Additionally, pat the shrimp dry before adding them to the marinade to prevent excess liquid in the pan.

    Frequently Asked Questions

    How do I select the best shrimp for this dish?

    Look for shrimp that are firm, translucent, and smell like the ocean. Avoid any shrimp with dark spots or a strong fishy odor, as these are signs of spoilage.

    What is the best way to store leftover bowl components?

    Keep the shrimp, rice, and vegetables in separate airtight containers in the fridge. This prevents the rice from absorbing too much moisture and keeps the shrimp texture intact.

    Can I freeze any components of the bowl?

    Yes, you can freeze the cooked rice and the shrimp separately for up to 3 months. Always thaw them in the refrigerator before reheating to preserve the best quality.

    What should I do if my shrimp become tough while cooking?

    If shrimp become tough, they have likely been cooked too long. In the future, use a timer and remove them from the pan as soon as they lose their translucency.

    Is this recipe customizable for different dietary needs?

    Yes, this recipe is highly adaptable. Use tofu for a vegetarian version, cauliflower rice for a low-carb diet, and Greek yogurt for a higher-protein, dairy-based topping.

    Print
    clock clock iconcutlery cutlery iconflag flag iconfolder folder iconinstagram instagram iconpinterest pinterest iconfacebook facebook iconprint print iconsquares squares iconheart heart iconheart solid heart solid icon
    Chipotle Lime Shrimp Bowl: Quick, Zesty Weeknight Delight

    Zesty Chipotle Lime Shrimp Bowls: A Quick Weeknight Dinner


    5 Stars 4 Stars 3 Stars 2 Stars 1 Star

    No reviews

    • Author: imageuploader
    • Total Time: 30 minutes
    • Yield: 4 bowls 1x
    • Diet: General

    Description

    This Chipotle Lime Shrimp Bowl is a quick, customizable dinner that bursts with flavor, making it perfect for busy weeknights.


    Ingredients

    Scale
    • 2 tablespoons olive oil
    • 1 minced chipotle pepper
    • 1 tablespoon adobo sauce
    • 3 cloves garlic
    • 1 tablespoon lime juice
    • 1 teaspoon ground cumin
    • 1 teaspoon chili powder
    • salt & black pepper to taste
    • 1 pound shrimp
    • 2 cups cooked rice
    • 1 cup black beans
    • 1 cup corn kernels
    • 1/4 cup chopped cilantro
    • 1/2 cup sour cream
    • sliced avocado
    • lime wedges

    Instructions

    1. Prepare Marinade: In a medium bowl, whisk together 2 tablespoons of olive oil, 1 minced chipotle pepper, 1 tablespoon of adobo sauce, 3 cloves of minced garlic, the juice of 1 lime, 1 teaspoon of ground cumin, 1 teaspoon of chili powder, and a pinch of salt and black pepper.
    2. Marinate Shrimp: Add 1 pound of peeled and deveined shrimp to the marinade, ensuring each piece is well coated. Cover the bowl with plastic wrap or a lid and let it rest at room temperature for about 10 minutes.
    3. Cook Shrimp: Heat a large skillet or frying pan over medium-high heat and drizzle in a touch of olive oil. Once hot, carefully add the marinated shrimp in a single layer. Cook for 2-3 minutes on each side until the shrimp are pink, opaque, and slightly charred.
    4. Warm Sides: In the same skillet, add 2 cups of cooked rice, 1 cup of drained and rinsed black beans, and 1 cup of corn kernels. Stir occasionally to warm everything through, about 3-5 minutes.
    5. Assemble Bowls: Divide the warmed rice, black beans, and corn mixture among serving bowls. In each bowl, artfully arrange the cooked shrimp.
    6. Garnish: Top each bowl with sliced avocado, a sprinkle of chopped cilantro for freshness, and a dollop of sour cream or Greek yogurt for creaminess. Serve with lime wedges on the side.

    Notes

    Ensure to marinate the shrimp for at least 10 minutes to absorb the chipotle lime flavors, but it should not exceed 30 minutes to maintain tenderness. Use fresh lime juice and garlic for best flavor.

    • Prep Time: 10 minutes
    • Cook Time: 20 minutes
    • Category: Dinner
    • Method: Sautéing
    • Cuisine: Mexican

    Nutrition

    • Serving Size: 1 bowl
    • Calories: 550 kcal
    • Sugar: 5 g
    • Sodium: 750 mg
    • Fat: 20 g
    • Saturated Fat: 4 g
    • Unsaturated Fat: 14 g
    • Trans Fat: 0 g
    • Carbohydrates: 65 g
    • Fiber: 10 g
    • Protein: 30 g
    • Cholesterol: 200 mg
  • Quick Shrimp Rice Bowls with Spicy Mayo

    Quick Shrimp Rice Bowls with Spicy Mayo

    These shrimp rice bowls are a fast and nutritious option for busy evenings. Combining seasoned seafood with a creamy sauce, they offer a balanced meal in under 30 minutes.

    Recipe image

    List of ingredients

    • 1 lb medium shrimp, peeled and deveined – pat dry for better searing.
    • 1 tablespoon olive oil – used for sautéing the shrimp.
    • 1 teaspoon smoked paprika – adds a deep, woody flavor.
    • 1/2 teaspoon garlic powder – provides consistent seasoning.
    • 1/2 teaspoon onion powder – enhances the savory profile.
    • 1/2 teaspoon salt – basic seasoning.
    • 1/4 teaspoon black pepper – adds a subtle heat.
    • 1/4 teaspoon cayenne pepper (optional) – for extra heat.
    • 1/2 cup mayonnaise – the creamy base for the sauce.
    • 1-2 tablespoons sriracha – adjusts the spice level of the mayo.
    • 1 teaspoon lime juice – adds acidity to balance the richness.
    • 2 cups cooked jasmine or brown rice – the hearty base of the bowl.
    • 1 tablespoon rice vinegar (optional) – for seasoning the rice.
    • 1 cup shredded carrots – adds color and crunch.
    • 1 avocado, sliced – provides creamy texture.
    • 1 cup cucumber slices – adds a refreshing element.
    • 2 green onions, chopped – used for garnish and flavor.
    • 2 tablespoons sesame seeds (optional) – for a nutty finish.
    • Soy sauce or tamari (optional) – for an extra umami drizzle.

    step-by-step instructions

    1. Prepare the Sauce: In a mixing bowl, combine mayonnaise, sriracha, and lime juice. Mix until well blended and adjust the sriracha based on your heat preference.
    2. Season the Shrimp: In a skillet over medium heat, add olive oil. Toss the shrimp with smoked paprika, garlic powder, onion powder, salt, black pepper, and cayenne pepper until evenly coated.
    3. Cook the Shrimp: Add the seasoned shrimp to the hot skillet. Cook for about 3–4 minutes per side until they turn pink and opaque.
    4. Assemble the Bowls: Place a generous portion of cooked rice into serving bowls. Top with the cooked shrimp, shredded carrots, avocado slices, cucumber slices, and chopped green onions.
    5. Final Garnish: Drizzle the spicy mayo over each bowl. Sprinkle with sesame seeds and serve with soy sauce or tamari on the side.

    Professional Cooking Tips

    Preventing Rubbery Shrimp

    Avoid overcooking the shrimp by monitoring them closely in the pan. They are done the moment they curl into a ‘C’ shape and turn opaque. Cooking them too long will make the texture tough and rubbery.

    Achieving a Better Sear

    Pat the shrimp completely dry with paper towels before adding the seasonings. Excess moisture creates steam in the pan, which prevents the shrimp from browning. A dry surface ensures a better crust and deeper flavor.

    Optimizing Rice Texture

    Rinse your jasmine or brown rice under cold water until the water runs clear before cooking. This removes excess surface starch and prevents the grains from sticking together. This results in fluffy, separate grains for your bowls.

    Balancing the Sauce Acidity

    Start with one teaspoon of lime juice in the spicy mayo and taste before adding more. The acidity helps cut through the fat of the mayonnaise and avocado. Adjust the lime or sriracha to balance the creaminess with zest.

    Managing Pan Temperature

    Ensure the olive oil is shimmering but not smoking before adding the shrimp. If the oil is too cold, the shrimp will absorb the fat and become greasy. If it is too hot, the spices may burn before the shrimp are cooked through.

    Customization and Substitutions

    Using Alternative Protein Sources

    You can replace shrimp with cubed firm tofu or salmon chunks using the same seasoning mix. For tofu, press out the excess water first to ensure it sears properly. Salmon requires slightly longer cooking times depending on the cube size.

    Swapping the Grain Base

    If you prefer a lower-carbohydrate option, replace the rice with quinoa or cauliflower rice. Quinoa adds more protein and a nuttier taste. Cauliflower rice can be steamed or sautéed quickly in the same pan used for the shrimp.

    Adding Sweet Elements

    Diced mango or pineapple chunks pair well with the spicy mayo and shrimp. These fruits add a natural sweetness that contrasts the heat of the sriracha. Place them alongside the cucumbers for a tropical twist.

    Modifying the Vegetable Mix

    Substitute shredded carrots with thinly sliced red cabbage or julienned bell peppers. Red cabbage provides a stronger crunch and a vibrant purple color. Bell peppers add a mild sweetness and additional vitamin C.

    Adjusting the Spice Level

    For a milder version, replace sriracha with a small amount of ketchup and a pinch of paprika. For those who want more heat, add chopped fresh jalapeños or a dash of gochujang to the mayo. Always taste the sauce before drizzling it over the bowls.

    Suggested Side Pairings

    Nutritious Legume Sides

    Steamed edamame seasoned with sea salt is a classic accompaniment. It provides extra plant-based protein and a different texture. Serve them in a small side bowl or mix them directly into the rice bowl.

    Warm Savory Soups

    A light miso soup helps balance the richness of the spicy mayo. Use a microbial-rennet based miso paste for a clean flavor profile. The warmth of the soup complements the cool temperature of the raw vegetables.

    Refreshing Seaweed Salads

    A chilled seaweed salad adds a salty, umami element to the meal. The contrast between the crisp seaweed and the tender shrimp enhances the overall dining experience. Use a light sesame oil dressing for the salad.

    Tangy Pickled Vegetables

    Include pickled radishes or pickled ginger on the side to provide a sharp contrast. The acetic acid in pickled vegetables cleanses the palate between bites. This makes the flavors of the shrimp and mayo stand out more.

    Hearty Garlic Noodles

    If you need a more filling meal, serve the bowls with a side of garlic noodles. Sauté noodles with minced garlic and a touch of vegetable broth. This adds a savory, comforting element to the fresh components of the bowl.

    Storage and Reheating Instructions

    Refrigerator Storage Guidelines

    Store the cooked shrimp and rice in airtight containers in the refrigerator. For the best quality, keep the spicy mayo and fresh vegetables in separate containers. This prevents the vegetables from wilting and the rice from becoming soggy.

    Freezing the Components

    Freeze the cooked shrimp and rice separately in freezer-safe bags or containers. They can be stored for up to three months. Do not freeze the fresh avocado, cucumber, or the mayo sauce, as their textures will change significantly.

    Microwave Reheating Method

    Heat the rice and shrimp on medium power in 30-second intervals. Stir occasionally and add a teaspoon of water to the rice to restore moisture. Add the cold vegetables and fresh sauce only after the shrimp and rice are hot.

    Oven Reheating Process

    Preheat your oven to 350°F (175°C). Place the shrimp and rice on a baking sheet and cover with foil to trap moisture. Heat for 10-15 minutes until warmed through before assembling with the fresh toppings.

    Stovetop Refreshing Technique

    Warm the shrimp in a skillet over medium heat with a small splash of water or vegetable broth. This gently heats the seafood without overcooking it. Serve immediately over freshly steamed or reheated rice.

    Troubleshooting Common Issues

    Solving Bland Flavor Profiles

    If the dish tastes bland, increase the amount of salt or add a drizzle of soy sauce. The shrimp rely on the dry rub for their base flavor. Ensure the seasonings are pressed into the shrimp before they hit the pan.

    Fixing Watery Vegetables

    If the cucumbers or carrots release too much water, pat them dry with a paper towel before adding them to the bowl. You can also lightly salt the cucumbers and let them sit for five minutes, then drain the excess liquid.

    Managing Sauce Consistency

    If the spicy mayo is too thick, stir in a few drops of lime juice or water until it reaches a drizzlable consistency. If it is too thin, add a tablespoon more of mayonnaise. The goal is a creamy sauce that holds its shape slightly.

    Preventing Rice Clumping

    If your refrigerated rice has become a hard block, sprinkle it with water before microwaving. Cover the bowl with a damp paper towel to create a steam effect. This softens the starches and makes the rice fluffy again.

    Frequently Asked Questions

    Can I use other proteins instead of shrimp?

    Yes, you can substitute chicken breast, tofu, or salmon. Ensure you cut them into bite-sized pieces and use the same seasoning blend for a consistent flavor profile.

    How spicy is the spicy mayo?

    The spice level is customizable based on the amount of sriracha you use. One tablespoon provides a mild kick, while two or more tablespoons create a significantly spicier sauce.

    What toppings can I add to my shrimp rice bowl?

    Beyond the recipe, you can add sliced radishes, fresh cilantro, shredded purple cabbage, or pickled ginger. These additions provide extra texture and a variety of fresh flavors.

    How long does it take to make Shrimp Rice Bowls with Spicy Mayo?

    The total time is approximately 25 minutes. This includes 10 minutes for preparation and 15 minutes for cooking the shrimp and assembling the bowls.

    Print
    clock clock iconcutlery cutlery iconflag flag iconfolder folder iconinstagram instagram iconpinterest pinterest iconfacebook facebook iconprint print iconsquares squares iconheart heart iconheart solid heart solid icon
    Shrimp Rice Bowls with Spicy Mayo

    Quick Shrimp Rice Bowls with Spicy Mayo


    5 Stars 4 Stars 3 Stars 2 Stars 1 Star

    No reviews

    • Author: imageuploader
    • Total Time: 25 minutes
    • Yield: 4 servings 1x
    • Diet: General

    Description

    Shrimp Rice Bowls with Spicy Mayo are a delectable solution for busy weeknights or casual get-togethers. This quick and satisfying meal features succulent shrimp seasoned to perfection, served over a bed of fragrant rice and drizzled with creamy spicy mayo.


    Ingredients

    Scale
    • 1 lb medium shrimp (peeled and deveined)
    • 2 cups cooked jasmine or brown rice
    • ½ cup mayonnaise
    • 12 tablespoons sriracha
    • 1 tablespoon olive oil
    • 1 teaspoon smoked paprika
    • ½ teaspoon garlic powder
    • ½ teaspoon onion powder
    • ½ teaspoon salt
    • ¼ teaspoon black pepper
    • ¼ teaspoon cayenne pepper
    • 1 teaspoon lime juice
    • 1 cup shredded carrots
    • 1 avocado, sliced
    • 1 cup cucumber slices
    • 2 green onions, chopped

    Instructions

    1. Prepare the Spicy Mayo: In a mixing bowl, combine mayonnaise, sriracha, and lime juice.
    2. Season the Shrimp: Season shrimp with smoked paprika, garlic powder, onion powder, salt, black pepper, and cayenne pepper.
    3. Cook the Shrimp: Heat olive oil in a skillet over medium heat. Cook seasoned shrimp for about 3–4 minutes on each side until pink and opaque.
    4. Assemble Your Bowls: In serving bowls, layer cooked rice and top with shrimp, shredded carrots, avocado slices, cucumber, and drizzle with spicy mayo.

    Notes

    Customizable with toppings like sesame seeds or soy sauce. Store in an airtight container for 2-3 days.

    • Prep Time: 10 minutes
    • Cook Time: 15 minutes
    • Category: Main
    • Method: Stovetop
    • Cuisine: Asian

    Nutrition

    • Serving Size: 1 bowl (approximately 400g)
    • Calories: 550 kcal
    • Sugar: 2 g
    • Sodium: 850 mg
    • Fat: 28 g
    • Saturated Fat: 4 g
    • Unsaturated Fat: 24 g
    • Trans Fat: 0 g
    • Carbohydrates: 60 g
    • Fiber: 5 g
    • Protein: 20 g
    • Cholesterol: 160 mg
  • Succulent Slow Cooker Lemon Herb Chicken and Rice

    Succulent Slow Cooker Lemon Herb Chicken and Rice

    This slow cooker lemon herb chicken and rice provides a simple way to prepare a nutritious meal with minimal active effort. It is designed for those who need a set-it-and-forget-it dinner that maintains high protein and fresh citrus flavors.

    Recipe image

    List of ingredients

    • 4 pieces chicken breasts (boneless and skinless) – provides lean protein.
    • 1 lemon (juiced and zested) – adds essential acidity and brightness.
    • 2 tbsp olive oil – ensures the chicken remains moist.
    • 1 tsp garlic powder – adds a concentrated savory element.
    • 1 tsp dried oregano – provides a Mediterranean herbal note.
    • 1 tsp dried thyme – adds an earthy depth to the sauce.
    • salt and pepper (to taste) – used for basic seasoning.
    • 2 cups chicken broth – acts as the cooking medium for the rice.
    • 1 cup long-grain rice – the primary starch that absorbs the flavors.
    • fresh herbs (for garnish, optional) – enhances the visual presentation.

    step-by-step instructions

    1. Prepare the Marinade: In a small bowl, whisk together the lemon juice, lemon zest, olive oil, garlic powder, oregano, thyme, salt, and pepper. Mix until the spices are well distributed in the oil and juice.
    2. Season the Chicken: Place the chicken breasts in the bottom of the slow cooker. Pour the lemon herb mixture over the chicken and rub it in to ensure complete coverage on all sides.
    3. Add Rice and Liquid: Pour the chicken broth into the slow cooker around the chicken. Add the long-grain rice, pouring it in an even layer.
    4. Distribute Ingredients: Gently stir the rice into the broth. Avoid over-mixing; just ensure the rice is submerged and not clumped together.
    5. Slow Cook: Cover the slow cooker with the lid. Cook on the low setting for 360 minutes or on the high setting for 180 minutes.
    6. Final Touch: Remove the lid and use a fork to gently fluff the rice. Let the dish rest for a few minutes before serving to allow the remaining liquid to settle.

    Cooking Performance Tips

    Coat Chicken Thoroughly to Prevent Dry Spots

    Rubbing the lemon herb marinade directly into the chicken ensures that the seasoning penetrates the meat. This prevents the breasts from tasting bland in the center and creates a flavor barrier that helps retain moisture. Use your hands or a brush to cover every inch of the chicken surface.

    Avoid Over-stirring the Rice During Cooking

    Once you have distributed the rice in the broth, leave it alone until the cooking cycle is complete. Stirring the rice while it cooks can release too much starch, leading to a gummy or sticky texture. Only fluff the rice with a fork at the very end of the process.

    Use a Tight-Fitting Lid to Retain Moisture

    Slow cookers rely on trapped steam to cook the rice and tenderize the meat. If the lid does not seal properly, the liquid will evaporate too quickly, leaving the rice undercooked or burnt at the edges. Check that your lid is seated correctly before starting the timer.

    Let the Dish Rest After Cooking

    Allowing the chicken and rice to sit for 5 to 10 minutes after turning off the heat helps the rice finish absorbing any excess liquid. This resting period also allows the juices in the chicken to redistribute, resulting in a more tender bite. Gently fluffing after this rest ensures a light texture.

    Recommended Ingredient Substitutions

    Swap Chicken Breasts for Boneless Skinless Thighs

    Using chicken thighs instead of breasts can result in a more succulent texture because thighs have a higher fat content. They are more resistant to overcooking in a slow cooker, which prevents the meat from becoming stringy. Ensure the thighs are skinless to keep the dish lean and the rice texture clean.

    Replace Long-Grain White Rice with Quinoa

    Quinoa is an excellent alternative for those seeking a higher protein and fiber content. Since quinoa typically cooks faster than long-grain rice, you may need to reduce the cooking time by 30 to 60 minutes. Adjust the broth ratio slightly if the quinoa appears too dry upon completion.

    Use Avocado Oil for a Higher Smoke Point

    While olive oil provides a classic flavor, avocado oil is a great substitute for those who prefer a neutral taste. Avocado oil is stable and healthy, ensuring that the lemon and herbs remain the dominant flavors of the dish. Use the same measurement of two tablespoons for a consistent result.

    Substitute Garlic Powder with Freshly Minced Garlic

    Fresh garlic provides a sharper, more pungent flavor than the powdered version. Use three to four cloves of minced garlic to replace one teaspoon of garlic powder. Stir the fresh garlic into the oil and lemon juice mixture before pouring it over the chicken.

    Flavor and Nutrient Variations

    Incorporate Frozen Peas and Diced Carrots

    Adding frozen peas or diced carrots introduces color and essential vitamins to the meal. To prevent the vegetables from becoming mushy, stir them in during the last hour of the cooking process. This ensures they maintain a slight crunch and a vibrant appearance.

    Add Red Pepper Flakes for Spicy Notes

    For a zesty kick, add a half-teaspoon of crushed red pepper flakes to the lemon herb marinade. The heat from the pepper complements the acidity of the lemon and adds complexity to the savory chicken. Adjust the amount based on your personal heat tolerance.

    Substitute Chicken Broth with Coconut Milk

    Replacing the chicken broth with full-fat coconut milk creates a creamy, tropical version of this dish. This variation pairs exceptionally well with the lemon zest and adds a rich, velvety texture to the rice. Use the same two-cup measurement to maintain the liquid ratio.

    Use Fresh Rosemary instead of Dried Thyme

    Fresh rosemary offers a piney, aromatic quality that elevates the overall scent of the meal. Finely chop one tablespoon of fresh rosemary needles and mix them into the marinade. This change gives the dish a more rustic, gourmet flavor profile.

    Serving and Pairing Suggestions

    Pair with Steamed Broccoli or Green Beans

    Steamed green vegetables provide a necessary crunch and a fresh contrast to the soft texture of the rice and chicken. Broccoli or snap peas are ideal choices as they do not overpower the lemon notes. Lightly season them with salt and a squeeze of lemon juice for cohesion.

    Serve with a Lemon-Vinaigrette Mixed Green Salad

    A crisp salad with a light vinaigrette cleanses the palate between bites of the savory chicken. Use a mix of arugula and spinach topped with cucumbers and cherry tomatoes. The acidity of the salad dressing mirrors the lemon in the main dish, creating a balanced meal.

    Accompany with Toasted Garlic Bread

    Toasted garlic bread is perfect for scooping up any remaining lemon-herb broth at the bottom of the plate. Use a whole-grain baguette brushed with garlic butter and toasted until golden brown. This adds a satisfying carbohydrate element and a savory aroma.

    Pair with Sparkling Water or Iced Tea

    A refreshing beverage like sparkling water with a lime wedge or a glass of unsweetened iced tea complements the bright citrus flavors. These options provide hydration without adding heavy sugars that could mask the delicate herbs. Avoid heavy creams or sugary drinks to keep the meal light.

    Storage and Reheating Guidelines

    Refrigerate in Airtight Containers for Three Days

    Store any leftovers in a sealed glass or plastic container to prevent the rice from drying out. Keep the chicken and rice together so the meat stays moist from the surrounding starch. The meal will maintain its quality and flavor for up to 72 hours when chilled.

    Freeze in Vacuum-Sealed Bags for Three Months

    For long-term storage, portion the meal into vacuum-sealed bags or freezer-safe containers. Remove as much air as possible to prevent freezer burn on the chicken breasts. Note that the rice texture may change slightly upon thawing, becoming softer than originally cooked.

    Use Extra Broth when Reheating in the Microwave

    Rice tends to absorb remaining moisture during storage, which can make it seem dry when reheated. Add one to two tablespoons of chicken broth or water to the dish before microwaving. Cover the container with a damp paper towel to steam the food and restore its original texture.

    Troubleshooting Common Results

    Resolve Undercooked Rice Grains

    If the rice is still firm after the cooking time, add a splash of warm chicken broth and cook on high for another 30 minutes. Ensure the lid is sealed tightly to create the necessary steam. Avoid stirring too aggressively, as this can break the grains.

    Fix Overcooked or Mushy Rice Texture

    Mushy rice usually occurs due to too much liquid or excessive stirring. If this happens, you can try to save the dish by letting it sit uncovered for 10 minutes to allow some moisture to evaporate. In the future, ensure you are using a true long-grain rice, which holds its shape better.

    Correct Bland Flavor Profiles

    If the dish lacks punch, stir in an additional teaspoon of lemon zest or a pinch of salt right before serving. Fresh lemon juice added at the end can brighten the flavors that may have dimmed during the slow cooking process. A sprinkle of fresh parsley can also add a needed fresh note.

    Frequently Asked Questions

    How long can I store the leftovers?

    You can safely store this chicken and rice in the refrigerator for up to three days. Ensure it is placed in an airtight container within two hours of cooking to maintain food safety standards.

    Can I use brown rice instead of white rice?

    Yes, you can use brown rice, but it requires more liquid and a longer cooking time. Increase the chicken broth by half a cup and ensure you cook on the low setting for the full six hours, as brown rice takes longer to soften.

    Is this recipe suitable for a gluten-free diet?

    This recipe is naturally gluten-free as long as the chicken broth you use is certified gluten-free. Always check the labels on your store-bought broth and spices to ensure there are no hidden gluten additives.

    Can I add other vegetables to the pot?

    Yes, you can add root vegetables like diced carrots or parsnips at the beginning of the cooking process. For softer vegetables like peas or spinach, add them during the final hour of cooking to prevent them from overcooking.

    Print
    clock clock iconcutlery cutlery iconflag flag iconfolder folder iconinstagram instagram iconpinterest pinterest iconfacebook facebook iconprint print iconsquares squares iconheart heart iconheart solid heart solid icon
    Succulent Slow Cooker Lemon Herb Chicken Rice for Busy Nights

    Succulent Slow Cooker Lemon Herb Chicken and Rice


    5 Stars 4 Stars 3 Stars 2 Stars 1 Star

    No reviews

    • Author: imageuploader
    • Total Time: 6 hours 15 minutes
    • Yield: 4 servings 1x
    • Diet: General

    Description

    Enjoy Slow Cooker Lemon Herb Chicken Rice: Easy Healthy Crock Pot Meal, a vibrant dish for busy weeknights.


    Ingredients

    Scale
    • 4 pieces chicken breasts (boneless and skinless)
    • 1 lemon (juiced and zested)
    • 2 tbsp olive oil
    • 1 tsp garlic powder
    • 1 tsp dried oregano
    • 1 tsp dried thyme
    • salt and pepper (to taste)
    • 2 cups chicken broth
    • 1 cup long-grain rice
    • fresh herbs (for garnish, optional)

    Instructions

    1. Step 1: In a small bowl, combine the lemon juice, zest, olive oil, garlic powder, oregano, thyme, salt, and pepper.
    2. Step 2: Place your chicken breasts in the slow cooker, then pour the lemon herb mixture over them.
    3. Step 3: Pour in the chicken broth and add the long-grain rice to the slow cooker.
    4. Step 4: Gently mix the ingredients to ensure that the rice is evenly distributed.
    5. Step 5: Secure the lid on your slow cooker. Cook on low for 360 minutes or high for 180 minutes.
    6. Step 6: Once cooked, remove the lid and fluff the rice gently with a fork.

    Notes

    Ensure each chicken breast is well-coated for maximum flavor. Adjust seasonings based on personal preference.

    • Prep Time: 15 minutes
    • Cook Time: 6 hours
    • Category: Healthy Recipes
    • Method: Slow Cooking
    • Cuisine: American

    Nutrition

    • Serving Size: 1 serving
    • Calories: 450 kcal
    • Sugar: 1 g
    • Sodium: 600 mg
    • Fat: 12 g
    • Saturated Fat: 2 g
    • Unsaturated Fat: 10 g
    • Trans Fat: 0 g
    • Carbohydrates: 50 g
    • Fiber: 2 g
    • Protein: 40 g
    • Cholesterol: 100 mg
  • Viral Ground Beef Bowls: High-Protein Meal Prep with Rice and Veggies

    Viral Ground Beef Bowls: High-Protein Meal Prep with Rice and Veggies

    These high-protein ground beef bowls are designed for efficient meal prep and balanced nutrition. They combine savory seasoned beef with fresh vegetables and a creamy sauce for a complete, satisfying meal.

    Recipe image

    List of ingredients

    • 1 lb lean ground beef (93% lean) – provides the protein base.
    • 1 cup cooked jasmine or brown rice – serves as the hearty foundation.
    • 1 1/2 cups shredded cabbage or slaw mix – adds crisp texture and fiber.
    • 1/2 cup shredded carrots – provides color and sweetness.
    • 2 eggs (fried or soft-boiled) – adds richness and extra protein.
    • 1 tbsp olive oil – used for cooking.
    • 3 tbsp soy sauce or tamari – adds umami and saltiness.
    • 1 tbsp brown sugar – balances the savory flavors.
    • 2 cloves garlic, minced – provides aromatic depth.
    • 1 tsp sesame oil – adds a toasted, nutty aroma.
    • 1/2 tsp chili flakes (optional) – introduces a mild heat.
    • 1/4 cup Greek yogurt or mayo – base for the creamy sauce.
    • 1 tbsp sriracha – provides spicy heat.
    • 1 tsp honey – adds a hint of sweetness to the sauce.
    • Juice of 1/2 lime – adds brightness and acidity.

    step-by-step instructions

    1. Cook the Rice: Prepare the jasmine or brown rice according to the package instructions until fluffy.
    2. Sauté the Beef: Heat sesame oil in a skillet over medium-high heat. Add the ground beef, minced garlic, soy sauce, brown sugar, and optional chili flakes, cooking until the beef is browned and well-coated in the sauce.
    3. Prepare the Vegetables: While the beef is cooking, shred the cabbage and carrots into thin strips.
    4. Whisk the Sauce: In a small mixing bowl, combine Greek yogurt or mayo, sriracha, honey, and lime juice until smooth.
    5. Cook the Eggs: Fry or soft-boil the eggs to your preferred level of doneness.
    6. Assemble the Bowls: Divide the cooked rice among four bowls, then top with the seasoned beef, shredded vegetables, and a cooked egg. Drizzle the spicy mayo sauce over the top and garnish with sesame seeds or green onions.

    Professional Cooking Tips for Better Results

    Brown the Beef Thoroughly for Maximum Flavor

    Allow the ground beef to sear without stirring too frequently. This creates caramelized edges and deepens the flavor through the Maillard reaction. Avoid crowding the pan to ensure the meat browns rather than steams.

    Undercook Rice Slightly for Meal Prep

    If you are prepping these bowls for the week, cook the rice until it is just tender. This prevents the grains from becoming mushy when reheated in the microwave. A slightly firmer grain holds up better against the sauces and beef juices.

    Maintain Vegetable Crispness

    Keep the shredded cabbage and carrots raw to provide a refreshing textural contrast. If you prefer cooked vegetables, sauté them separately and quickly over high heat. This preserves the bright color and prevents them from releasing too much water into the bowl.

    Emulsify the Sauce for Smoothness

    Whisk the Greek yogurt and lime juice thoroughly before adding the honey and sriracha. This ensures a consistent texture without streaks of oil or acidity. Using a small whisk or fork helps incorporate the honey properly.

    Prepare Components in Bulk

    Cook a larger batch of beef and rice to streamline your weekly routine. Store the protein and grains together, but keep the vegetables and sauce in separate containers. This prevents the fresh ingredients from wilting or the rice from becoming soggy.

    Flexible Ingredient Alternatives

    Substitute Grains for Different Nutrition

    Swap jasmine rice for quinoa to increase protein and fiber content. For a lower-carbohydrate option, use cauliflower rice. If you prefer a nuttier flavor, brown rice or farro are excellent alternatives that provide more chew.

    Use Alternative Lean Proteins

    Substitute ground beef with ground turkey or ground chicken for a lighter version. For a plant-based alternative, use crumbled tempeh or cooked lentils. Maintain the same seasoning proportions to keep the flavor profile consistent.

    Swap the Creamy Sauce Base

    If you cannot use Greek yogurt or mayo, try mashed avocado for a healthy fat alternative. Tahini mixed with lemon juice and sriracha also provides a creamy, nutty consistency. This keeps the bowl satisfying while adjusting the dietary profile.

    Replace the Sweeteners

    Use maple syrup or honey instead of brown sugar in the beef seasoning for a different depth of sweetness. For a sugar-free version, use a small amount of stevia or omit the sweetener entirely and increase the garlic. This adjusts the balance of the umami flavors.

    Adjust the Acidity Source

    If lime is unavailable, use lemon juice or a small splash of rice vinegar. These provide the necessary acidity to cut through the richness of the beef and yogurt. Ensure the amount remains similar to maintain the sauce balance.

    Creative Flavor Variations

    Create an Asian-Inspired Profile

    Stir in a tablespoon of hoisin sauce and freshly grated ginger while browning the beef. This adds a thick, sweet-savory glaze that mimics restaurant-style beef bowls. Finish the dish with toasted sesame seeds and sliced scallions.

    Develop a Tex-Mex Fusion Twist

    Season the beef with cumin, smoked paprika, and chili powder instead of soy sauce. Replace the cabbage and carrots with corn, black beans, and diced avocado. Use a lime-cilantro yogurt sauce to complete the flavor transition.

    Optimize for Low-Carb and Keto

    Eliminate the rice and brown sugar, using cauliflower rice as the base. Increase the proportion of cabbage and shredded carrots to add volume. Use a full-fat mayo base for the sauce and omit the honey.

    Adapt for Plant-Based Diets

    Use plant-based ground crumbles or sautéed mushrooms as the primary protein. Substitute the eggs with sliced tofu or roasted chickpeas for added texture. Use a vegan mayo or cashew cream for the spicy drizzle.

    Increase the Heat Level

    Incorporate Gochujang or sambal oelek into the beef seasoning for a deeper, more fermented spice. Add sliced fresh jalapeños or serrano peppers to the top of the assembled bowl. This provides a sharp kick that complements the cooling yogurt sauce.

    Storage and Reheating Guidelines

    Refrigeration for Weekly Prep

    Store the beef and rice in airtight containers for up to four days. Keep the shredded vegetables and the spicy mayo in separate small containers. This prevents the cabbage from losing its crunch and the rice from absorbing all the sauce.

    Freezing the Beef Mixture

    The cooked seasoned beef can be frozen for up to two months in a freezer-safe bag. Thaw the beef overnight in the refrigerator before reheating. Do not freeze the fresh vegetables or the yogurt sauce, as their textures will degrade.

    Reheating for Optimal Texture

    Microwave the beef and rice together for 1-2 minutes until heated through. Add a teaspoon of water to the rice before heating to restore moisture. Always add the fresh vegetables, egg, and sauce after the reheating process is complete.

    Maintaining Sauce Freshness

    Store the spicy mayo in a glass jar with a tight lid to prevent oxidation. Shake the jar before using to re-incorporate the ingredients. The sauce will stay fresh in the refrigerator for about five days.

    Common Cooking Mistakes and Fixes

    Preventing Dry or Crumbly Beef

    Avoid overcooking the meat beyond the point where it is browned. Remove the beef from the heat as soon as the pink color disappears and the sauce has thickened. Adding a splash of water or beef broth if the pan becomes too dry can restore moisture.

    Fixing Flat or Bland Flavor

    If the dish tastes dull, add a small squeeze of fresh lime juice or a pinch of salt at the end. Acidity brightens the other flavors and makes the umami notes of the soy sauce stand out. Seasoning in layers throughout the cooking process also prevents blandness.

    Avoiding Soggy Meal Prep Bowls

    Never add the sauce or fresh vegetables to the bowl before storing it in the fridge. The moisture from the vegetables and the acidity in the sauce break down the rice and cabbage. Assemble the components just before serving for the best experience.

    Managing Excessive Grease

    If the beef releases too much fat, carefully drain the excess oil from the pan before adding the soy sauce and brown sugar. This prevents the bowl from feeling heavy or greasy. Using 93% lean beef typically minimizes this issue.

    Frequently Asked Questions

    Are viral ground beef bowls healthy?

    Yes, these bowls are well-balanced when made with lean beef and a high volume of vegetables. They provide a combination of complex carbohydrates, lean protein, and essential vitamins. Controlling the portion of rice and the amount of sugar in the sauce further improves the nutritional profile.

    How much protein is in one bowl?

    A typical serving contains approximately 25 to 35 grams of protein. This amount comes primarily from the lean ground beef and the egg, with additional protein contributed by the Greek yogurt in the sauce. This makes it an effective meal for muscle recovery and satiety.

    Can these bowls be made without soy?

    Yes, replace the soy sauce or tamari with coconut aminos. Coconut aminos provide a similar salty and sweet flavor profile but are soy-free and typically lower in sodium. The rest of the recipe remains the same.

    What is the best rice to use for these bowls?

    Jasmine rice is recommended for its fragrance and soft texture, which complements the savory beef. Brown rice is a great alternative for those seeking more fiber and a nuttier taste. Cauliflower rice is the best choice for low-carb requirements.

    How do I keep the cabbage crunchy?

    Keep the cabbage raw and store it separately from the warm beef and rice. If you must store them together, place the cabbage on top of the rice and keep the beef in a separate compartment. Avoid mixing the cabbage into the hot beef until you are ready to eat.

    Are these bowls suitable for weight loss?

    These bowls can support weight loss when portioned carefully. By increasing the ratio of vegetables to rice and using Greek yogurt instead of mayo, you can reduce calories while maintaining high protein levels. This helps keep you full and reduces the likelihood of snacking.

    Print
    clock clock iconcutlery cutlery iconflag flag iconfolder folder iconinstagram instagram iconpinterest pinterest iconfacebook facebook iconprint print iconsquares squares iconheart heart iconheart solid heart solid icon
    High-Protein Viral Ground Beef Bowls for Easy Meal Prep

    Viral Ground Beef Bowls: High-Protein Meal Prep with Rice and Veggies


    5 Stars 4 Stars 3 Stars 2 Stars 1 Star

    No reviews

    • Author: imageuploader
    • Total Time: 25 minutes
    • Yield: 4 servings 1x
    • Diet: High-Protein

    Description

    These viral ground beef bowls are everything you want in a quick, clean, and protein-packed meal. Featuring seasoned ground beef, fluffy rice, crunchy veggies, and a creamy-spicy drizzle, this bowl is bursting with flavor and perfect for weekly meal prep, healthy family dinners, or post-workout recovery.


    Ingredients

    Scale
    • 1 lb lean ground beef (93% lean)
    • 1 cup cooked jasmine or brown rice
    • 1 1/2 cups shredded cabbage (or slaw mix)
    • 1/2 cup shredded carrots
    • 2 eggs (fried or soft-boiled)
    • 1 tbsp olive oil
    • 3 tbsp soy sauce or tamari
    • 1 tbsp brown sugar
    • 2 cloves garlic (minced)
    • 1 tsp sesame oil
    • 1/2 tsp chili flakes (optional)
    • 1/4 cup Greek yogurt or mayo
    • 1 tbsp sriracha
    • 1 tsp honey
    • Juice of 1/2 lime

    Instructions

    1. Cook the Rice: Start your rice according to package instructions.
    2. Sauté the Beef: In a skillet, heat sesame oil. Add ground beef, garlic, soy sauce, brown sugar, and chili flakes. Cook until browned and saucy.
    3. Prep the Veggies: While the beef cooks, shred your cabbage and carrots.
    4. Make the Sauce: In a small bowl, whisk together Greek yogurt, sriracha, honey, and lime juice.
    5. Cook the Eggs: Fry or soft-boil the eggs to your liking.
    6. Assemble Your Bowl: Layer rice, beef, veggies, egg, and a big drizzle of spicy mayo. Garnish with green onions or sesame seeds if you like.

    Notes

    Season ground beef generously with aromatics for richness. Use jasmine or basmati rice for better texture. Store beef, rice, veggies, and sauce in separate containers for meal prep to keep ingredients fresh and prevent sogginess.

    • Prep Time: 10 minutes
    • Cook Time: 15 minutes
    • Category: Dinner, Lunch, Meal Prep
    • Method: Sautéing
    • Cuisine: Asian-Inspired, Fusion

    Nutrition

    • Serving Size: 1 bowl
    • Calories: 520 kcal
    • Sugar: 8 g
    • Sodium: 620 mg
    • Fat: 25 g
    • Saturated Fat: 8 g
    • Unsaturated Fat: 17 g
    • Trans Fat: 0 g
    • Carbohydrates: 40 g
    • Fiber: 5 g
    • Protein: 32 g
    • Cholesterol: 210 mg
  • Ultra Tender Creamy Garlic Chicken Breast

    Ultra Tender Creamy Garlic Chicken Breast

    This method ensures your chicken breasts remain juicy and flavorful every time you cook them. By combining a searing technique with a creamy sauce, you can avoid dry meat for your weeknight dinners.

    Recipe image

    List of ingredients

    • 2 large boneless, skinless chicken breasts – pounded to 1/2-inch thickness for even cooking.
    • Cream cheese, softened to room temperature – creates a rich, velvety sauce.
    • Low-sodium chicken broth – provides a savory base for the sauce.
    • 3-4 cloves of freshly minced garlic – adds aromatic depth.
    • Fresh lemon juice – brightens the rich cream sauce.
    • Dried Italian seasoning – a blend of oregano, basil, thyme, and rosemary.
    • Olive oil – used for searing the meat.
    • Salt – for seasoning to taste.
    • Black pepper – adds a subtle spice.

    step-by-step instructions

    1. Prepare the Chicken: Place chicken breasts between two pieces of plastic wrap or in a large resealable bag. Use a meat mallet or rolling pin to pound them to an even 1/2-inch thickness, pat dry with paper towels, and season both sides with salt and pepper.
    2. Sear the Meat: Heat 1 tablespoon of olive oil in a large skillet over medium-high heat. Once the oil shimmers, sear the chicken for 3-4 minutes per side until golden brown, then remove the breasts to a plate.
    3. Sauté the Aromatics: Reduce the heat to medium and add another teaspoon of olive oil if the pan is dry. Add minced garlic and cook for 30-60 seconds, stirring constantly to prevent burning.
    4. Build the Creamy Sauce: Pour in the chicken broth and scrape the browned bits from the pan bottom. Bring to a gentle simmer, then lower the heat and whisk in the softened cream cheese until the sauce is smooth.
    5. Season the Sauce: Stir in the dried Italian seasoning and an additional pinch of salt and pepper. Taste the sauce and adjust the seasonings to your preference.
    6. Simmer the Chicken: Return the seared chicken breasts to the skillet and nestle them into the sauce. Cover the pan and simmer for 8-12 minutes, or until the internal temperature reaches 165°F (74°C).
    7. Finish and Serve: Remove the skillet from the heat and stir in the fresh lemon juice and optional fresh herbs. Let the chicken rest in the sauce for a few minutes before serving.

    Advanced Techniques for Maximum Tenderness

    The Importance of Pounding the Meat

    Chicken breasts are naturally tapered, with one end significantly thicker than the other. Pounding the meat to a uniform 1/2-inch thickness ensures that the entire piece cooks at the same rate. This prevents the thinner end from overcooking and drying out while the center reaches a safe temperature.

    Using an Instant-Read Thermometer

    Overcooking chicken breast happens quickly, often within a window of just two or three minutes. Using a digital thermometer is the only way to guarantee the meat is cooked to exactly 165°F (74°C). This precision prevents the muscle fibers from tightening too much, which is what causes the meat to feel tough or dry.

    Allowing the Meat to Rest in Sauce

    Resting the chicken for a few minutes after removing it from the heat allows the internal juices to redistribute. When meat is heated, the juices move toward the center; resting lets them flow back toward the edges. Keeping the chicken in the sauce during this process also prevents the surface from drying out.

    Customizing the Sauce Flavor Profile

    Adding Fresh Vegetables

    You can enhance the nutritional value and flavor by sautéing sliced mushrooms or sun-dried tomatoes with the garlic. If using fresh spinach, stir it into the sauce at the very end of the cooking process. The residual heat will wilt the spinach quickly without overcooking it.

    Integrating Different Fresh Herbs

    While Italian seasoning provides a solid base, fresh herbs added at the end offer a brighter taste. Chopped parsley, chives, or fresh dill complement the creaminess of the cheese. Stir these in after the heat is turned off to preserve their volatile oils and vibrant color.

    Increasing the Heat Level

    For a spicy version of this dish, add a pinch of crushed red pepper flakes when sautéing the garlic. The oil will infuse the heat into the base of the sauce. You can also add a small amount of cayenne pepper for a deeper, more lingering heat.

    Enhancing with Parmesan Cheese

    Stirring in a handful of freshly grated Parmesan cheese along with the cream cheese adds a salty, nutty dimension. This thickens the sauce further and creates a more complex flavor profile. Ensure the Parmesan is finely grated to avoid clumps in the emulsion.

    Ingredient Substitutions and Alternatives

    Using Vegetable Broth

    If chicken broth is unavailable, vegetable broth serves as an excellent substitute. It provides a similar savory depth without altering the overall structure of the sauce. Low-sodium versions are recommended to maintain control over the final salt levels.

    Low-Fat Dairy Options

    Reduced-fat cream cheese can be used for a lighter version of the sauce. Note that low-fat versions may have a slightly different melting point and might require more whisking to achieve a smooth texture. You may need a splash more broth to reach the desired consistency.

    Alternative Searing Oils

    While olive oil is standard, oils with higher smoke points like avocado or canola oil are ideal for searing. These oils prevent the fat from breaking down at the medium-high temperatures needed for caramelization. This ensures the chicken gets a brown crust without the oil smoking.

    Bottled Lemon Juice Alternatives

    Fresh lemon juice is preferred for its zest, but bottled juice works in a pinch. If neither is available, a small amount of white wine vinegar or apple cider vinegar can provide the necessary acidity. Acidity is crucial because it cuts through the richness of the cream cheese.

    Recommended Serving Pairings

    Starchy Bases for Sauce Absorption

    This dish produces a generous amount of sauce that is best paired with absorbent sides. Fluffy white rice, creamy mashed potatoes, or buttered egg noodles are traditional choices. These options soak up the creamy garlic sauce, ensuring none of the flavor is wasted.

    Light Vegetable Accompaniments

    To balance the richness of the cream sauce, serve the chicken with steamed green beans or roasted asparagus. A crisp garden salad with a light vinaigrette also provides a refreshing contrast. These options add texture and brightness to the plate.

    Bread for Dipping

    Serving a side of toasted sourdough or a warm French baguette is highly recommended. The crusty bread is perfect for scooping up the remaining sauce from the plate. Brushing the bread with garlic butter before toasting enhances the overall flavor theme.

    Storage and Preservation Guidelines

    Refrigeration Procedures

    Once the dish has cooled completely, transfer the chicken and sauce into an airtight glass or plastic container. Store it in the refrigerator for up to three to four days. The sauce will naturally thicken as it cools, which is normal for dairy-based sauces.

    Safe Reheating Methods

    The best way to reheat this meal is in a skillet over low heat on the stovetop. Add a small splash of chicken broth or water to the pan to loosen the sauce as it warms. Stir occasionally to ensure the heat is distributed evenly without scorching the bottom.

    Microwave Reheating Tips

    If using a microwave, heat the chicken in short 30 to 60-second bursts. Stir the sauce between each interval to prevent hot spots and avoid separating the dairy. Be careful not to overheat, as the microwave can quickly dry out the lean breast meat.

    Freezing and Thawing Considerations

    Freezing is generally not recommended for cream cheese-based sauces because the emulsion can break. This may result in a grainy texture upon thawing. If you must freeze it, use a freezer-safe container for up to three months and thaw slowly in the refrigerator before reheating.

    Troubleshooting Common Cooking Issues

    Fixing a Sauce That Is Too Thick

    If the sauce becomes too thick during the simmering process, simply whisk in more chicken broth one tablespoon at a time. Continue adding liquid until the sauce reaches a consistency that coats the back of a spoon. Keep the heat low to avoid boiling the cream.

    Thickening a Thin Sauce

    If the sauce is too runny, simmer it uncovered for a few extra minutes to allow moisture to evaporate. Alternatively, create a cornstarch slurry by mixing one teaspoon of cornstarch with one tablespoon of cold water. Whisk this slurry into the simmering sauce and cook for one minute until thickened.

    Preventing Garlic from Burning

    Garlic burns quickly at medium heat, which creates a bitter taste. To prevent this, keep the garlic moving constantly in the pan with a spatula. If the pan seems too hot, remove it from the burner for a few seconds before adding the broth.

    Avoiding Sauce Separation

    Dairy sauces can separate if they are boiled too vigorously. Always reduce the heat to low before adding the cream cheese and maintain a gentle simmer. Whisking constantly helps the fat and liquid emulsify into a smooth, stable sauce.

    Frequently Asked Questions

    Can I use frozen chicken breasts for this recipe?

    Yes, you can use frozen breasts, but they must be completely thawed in the refrigerator before cooking. Thawing them ensures the meat pounds evenly and sears properly. Cooking frozen chicken directly will lead to uneven cooking and a steamed texture.

    Which type of skillet is best for this method?

    A large stainless steel or cast iron skillet is ideal because these materials hold heat well for searing. Non-stick pans work for the sauce, but they do not produce the same level of browned bits (fond) that add flavor to the final sauce.

    Can this recipe be adapted for a slow cooker?

    While you can slow cook chicken, you will lose the benefits of searing and sauce reduction. To adapt it, sear the chicken in a pan first, then place it in the slow cooker with the broth and seasonings. Stir in the cream cheese and lemon juice only during the last 30 minutes of cooking.

    How do I check for doneness without a thermometer?

    You can pierce the thickest part of the breast with a knife; the juices should run clear rather than pink. However, this is less reliable than a thermometer. The meat should also feel firm to the touch and spring back when pressed.

    Print
    clock clock iconcutlery cutlery iconflag flag iconfolder folder iconinstagram instagram iconpinterest pinterest iconfacebook facebook iconprint print iconsquares squares iconheart heart iconheart solid heart solid icon
    Juicy and Tender Creamy Chicken Breast

    Ultra Tender Creamy Garlic Chicken Breast


    5 Stars 4 Stars 3 Stars 2 Stars 1 Star

    No reviews

    • Author: imageuploader
    • Total Time: 35 minutes
    • Yield: 2 servings 1x
    • Diet: General

    Description

    This Melt In Your Mouth Chicken Breast recipe transforms bland poultry into an incredibly tender and juicy dish. It’s simple to prepare and perfect for both weeknight dinners and special occasions.


    Ingredients

    Scale
    • 2 large boneless, skinless chicken breasts
    • Cream cheese (softened to room temperature)
    • Low-sodium chicken broth
    • 34 cloves of freshly minced garlic
    • Fresh lemon juice
    • Dried Italian seasoning
    • Olive oil
    • Salt
    • Black pepper

    Instructions

    1. Prepare the Chicken: Pound chicken breasts to about 1/2-inch thickness, pat dry, and season generously with salt and black pepper.
    2. Sear the Chicken: Heat 1 tablespoon of olive oil in a skillet and sear chicken for 3-4 minutes per side until golden brown; remove and set aside.
    3. Sauté the Aromatics: Heat another teaspoon of olive oil if needed and cook minced garlic for 30-60 seconds until fragrant.
    4. Build the Creamy Sauce: Pour in chicken broth, bring to a simmer, then whisk in softened cream cheese until smooth.
    5. Season the Sauce: Stir in dried Italian seasoning, salt, and pepper.
    6. Simmer the Chicken: Return chicken to the skillet, cover, and simmer for 8-12 minutes until the internal temperature reaches 165°F (74°C).
    7. Finish and Serve: Remove from heat, stir in fresh lemon juice, and let the chicken rest for a few minutes before serving.

    Notes

    Pounding the chicken breasts to an even thickness is critical for tenderness and even cooking. Use an instant-read thermometer to ensure chicken reaches 165°F without overcooking. Let the chicken rest in the sauce for a few minutes to allow juices to redistribute.

    • Prep Time: 15 minutes
    • Cook Time: 20 minutes
    • Category: Dinner
    • Method: Searing
    • Cuisine: American

    Nutrition

    • Serving Size: 1 chicken breast with sauce
    • Calories: 400 kcal
    • Sugar: 2 g
    • Sodium: 600 mg
    • Fat: 25 g
    • Saturated Fat: 10 g
    • Unsaturated Fat: 15 g
    • Trans Fat: 0 g
    • Carbohydrates: 5 g
    • Fiber: 0 g
    • Protein: 40 g
    • Cholesterol: 120 mg
  • One-Pan Ground Turkey Taco Skillet

    One-Pan Ground Turkey Taco Skillet

    This high-protein dinner combines lean ground turkey with vibrant vegetables and melted cheese in a single pan. It is an efficient, nutrient-dense meal that comes together in just 30 minutes.

    Recipe image

    List of ingredients

    • 1 tablespoon olive oil – used for sautéing vegetables.
    • 1 onion, diced – provides a savory aromatic base.
    • 1 red bell pepper, diced – adds sweetness and color.
    • 1 green bell pepper, diced – adds a mild, earthy flavor.
    • 1 pound ground turkey – the primary lean protein source.
    • 1 tablespoon chilli powder – provides classic taco flavor.
    • 1 tablespoon smoked paprika – adds a deep, smoky undertone.
    • 1 teaspoon garlic powder – enhances the overall savory profile.
    • 1 teaspoon cumin – gives the dish an authentic Tex-Mex aroma.
    • 1/4 teaspoon crushed chillies (optional) – adds a touch of heat.
    • 1 teaspoon salt – balances and enhances all flavors.
    • 1 can (15 ounces) diced tomatoes – adds moisture and acidity.
    • 1 can (15 ounces) black beans, drained and rinsed – increases fiber and protein.
    • 1 cup frozen corn – adds texture and natural sweetness.
    • 1 cup shredded Havarti or Monterey Jack cheese – creates a creamy, melted topping.
    • Cilantro, chopped – for a fresh finish.
    • Green onions, chopped – adds a mild onion bite.
    • Avocado, sliced – provides healthy fats and creaminess.
    • Limes, cut into wedges – used for a bright, citrusy squeeze.

    step-by-step instructions

    1. Prepare Oven: Preheat your oven to 400°F to ensure it is ready for the final melting phase.
    2. Sauté Vegetables: Heat the olive oil in a large pan or cast-iron skillet over medium heat. Add the diced onion and bell peppers, cooking for 3-4 minutes until they become tender.
    3. Brown the Turkey: Add the ground turkey to the skillet. Cook for 5-6 minutes, using a wooden spoon or spatula to break the meat into small crumbles until it is mostly cooked through.
    4. Season the Meat: Stir in the chili powder, smoked paprika, garlic powder, cumin, crushed chilies, and salt. Cook for 30 seconds to 1 minute until the spices become fragrant.
    5. Simmer with Vegetables: Mix in the diced tomatoes, black beans, and frozen corn. Let the mixture cook for 2-3 minutes, then taste and adjust the salt and pepper as needed.
    6. Melt the Cheese: Spread the shredded cheese evenly over the top of the mixture. Transfer the skillet to the oven for 5-10 minutes until the cheese is melted and golden brown.
    7. Garnish and Serve: Remove the skillet from the oven and let it cool slightly. Serve with chopped cilantro and your preferred toppings.

    Protein and Meat Substitutions

    Using Ground Chicken as an Alternative

    Ground chicken is an excellent substitute for turkey if you prefer a slightly different flavor profile. It maintains a similar lean texture and absorbs the taco spices just as effectively.

    Switching to Ground Beef

    For a richer, more traditional taco taste, you can use ground beef. If using a higher-fat percentage of beef, you may want to drain the excess grease after browning before adding the spices.

    Plant-Based Protein Options

    To make this dish vegetarian or vegan, replace the turkey with plant-based meat crumbles or extra black beans and lentils. Ensure the plant-based substitute is seasoned well to maintain the depth of flavor.

    Vegetable and Legume Variations

    Substituting Black Beans with Pinto Beans

    Pinto beans are a great alternative to black beans and offer a creamier texture. Ensure they are thoroughly rinsed and drained to keep the skillet from becoming too watery.

    Using Canned Corn instead of Frozen

    Canned corn works perfectly in this recipe if frozen corn is unavailable. Drain the corn well and rinse it under cold water to remove excess sodium before adding it to the pan.

    Adding Extra Mixed Vegetables

    You can increase the nutrient density by adding diced zucchini, carrots, or spinach. Sauté these along with the onions and bell peppers to ensure they are tender before adding the meat.

    Using Fire-Roasted Tomatoes

    Swapping standard diced tomatoes for fire-roasted diced tomatoes adds a charred, smoky flavor. This complements the smoked paprika and enhances the overall depth of the dish.

    Cheese and Dairy Alternatives

    Selecting the Best Melting Cheeses

    Havarti and Monterey Jack are recommended for their superior meltability. However, sharp cheddar or a Mexican blend also work well for a bolder, saltier cheese flavor.

    Making the Recipe Dairy-Free

    To remove dairy, simply omit the cheese or use a plant-based shredded cheese alternative. Nutritional yeast can also be sprinkled on top for a savory, cheesy flavor without the dairy.

    Achieving a Perfect Cheese Crust

    For a crispier topping, you can switch the oven setting to broil for the last 2 minutes. Keep a close eye on the skillet to prevent the cheese from burning.

    Serving Suggestions and Pairings

    Serving with Rice Bases

    This skillet is highly versatile and pairs well with white or brown rice. The rice absorbs the juices from the tomatoes and spices, making it a filling meal.

    Low-Carb Cauliflower Rice Option

    For a lower-calorie or keto-friendly version, serve the mixture over sautéed cauliflower rice. This maintains the volume of the meal while significantly reducing the carbohydrates.

    Using Tortilla Chips for Dipping

    Serving the skillet with a side of corn tortilla chips turns the meal into a dip-style dinner. This is a family-friendly approach that allows everyone to scoop their own portions.

    Wrapping in Corn Tortillas

    Warm a few corn tortillas on the stovetop and fill them with the skillet mixture. This transforms the one-pan meal into traditional tacos with all the same flavors.

    Enhanced Topping Ideas

    Adding Creamy Elements

    Slices of fresh avocado or a dollop of guacamole add essential healthy fats. Sour cream or Greek yogurt can also be used to balance the heat of the chili powder.

    Using Fresh Herbs and Aromatics

    Chopped cilantro and green onions provide a fresh contrast to the cooked ingredients. Adding these at the very end preserves their bright color and sharp taste.

    Integrating Citrus for Acidity

    Squeezing fresh lime wedges over the finished dish is crucial for balancing the richness of the cheese and meat. The acidity brightens the overall flavor profile.

    Incorporating Spicy Condiments

    For those who prefer more heat, top the skillet with your favorite salsa or a few dashes of hot sauce. Pickled jalapeños are also a great addition for an extra kick.

    Adding Pickled Red Onions

    Pickled red onions provide a tangy crunch and a pop of color. They cut through the heaviness of the beans and cheese, adding a gourmet touch to the meal.

    Storage and Reheating Guide

    Refrigerating Leftovers

    Once the skillet has cooled completely, transfer the leftovers to an airtight container. The mixture will stay fresh in the refrigerator for up to 4 days.

    Freezing for Long-Term Storage

    This recipe freezes exceptionally well for up to 3 months. Allow the dish to cool and freeze it in freezer-safe containers or vacuum-sealed bags.

    Microwave Reheating Instructions

    To reheat in the microwave, place a portion in a bowl and cover it with a damp paper towel. Heat for 2-3 minutes, stirring halfway through to ensure even warming.

    Oven Reheating for Texture

    For the best texture, reheat leftovers in the oven at 350°F for 10-20 minutes. This helps the cheese regain its melt and prevents the vegetables from becoming mushy.

    Cooking Troubleshooting and FAQs

    Can I use a pre-made taco seasoning packet?

    Yes, you can replace the individual spices (chili powder, paprika, garlic powder, cumin, and crushed chilies) with 3 tablespoons of a store-bought taco seasoning blend.

    How do I prevent the ground turkey from drying out?

    Avoid overcooking the turkey during the browning phase. Adding the tomatoes and beans shortly after seasoning helps lock in moisture through simmering.

    What is the best skillet for this recipe?

    A cast-iron skillet is ideal because it can transition seamlessly from the stovetop to the oven. A large oven-safe stainless steel pan also works well.

    Can I make this dish without an oven?

    Yes, you can melt the cheese on the stovetop. Simply cover the pan with a lid for 2-3 minutes after adding the cheese until it is fully melted.

    How can I make the dish more spicy?

    Increase the amount of crushed red pepper flakes or add diced fresh jalapeños during the vegetable sauté step. You can also add a dash of cayenne pepper to the spice mix.

    Can I add more vegetables to the skillet?

    Yes, you can add diced zucchini, yellow squash, or spinach. Sauté them at the beginning of the process to ensure they are properly cooked before the meat is added.

    Print
    clock clock iconcutlery cutlery iconflag flag iconfolder folder iconinstagram instagram iconpinterest pinterest iconfacebook facebook iconprint print iconsquares squares iconheart heart iconheart solid heart solid icon
    One-Pan Ground Turkey Taco Skillet

    One-Pan Ground Turkey Taco Skillet


    5 Stars 4 Stars 3 Stars 2 Stars 1 Star

    No reviews

    • Author: imageuploader
    • Total Time: 30 minutes
    • Yield: 4 servings 1x
    • Diet: Gluten-Free

    Description

    Ready in one pan in 30 minutes, this ground turkey taco skillet is a quick, easy, and healthy dinner idea. Serve it with rice or tortilla chips for a tasty family-friendly meal.


    Ingredients

    Scale
    • 1 tablespoon olive oil
    • 1 onion, diced
    • 1 red bell pepper, diced
    • 1 green bell pepper, diced
    • 1 pound ground turkey
    • 1 tablespoon chilli powder
    • 1 tablespoon smoked paprika
    • 1 teaspoon garlic powder
    • 1 teaspoon cumin
    • 1/4 teaspoon crushed chillies (optional)
    • 1 teaspoon salt
    • 1 can (15 ounces) diced tomatoes
    • 1 can (15 ounces) black beans, drained and rinsed
    • 1 cup frozen corn
    • 1 cup shredded Havarti or Monterey Jack cheese
    • Cilantro, chopped
    • Green onions, chopped
    • Avocado, sliced
    • Limes, cut into wedges

    Instructions

    1. Step 1: Preheat the oven to 400°F.
    2. Step 2: In a large pan or cast-iron skillet on medium heat, warm the olive oil, then add the diced onion and bell peppers, and cook for 3-4 minutes until tender.
    3. Step 3: Add the ground turkey and cook, breaking it up with a wooden spoon or spatula, for 5-6 minutes until mostly cooked through.
    4. Step 4: Add the chili powder, paprika, garlic powder, cumin, crushed chilies, and salt, stir to combine with the turkey mixture, and cook for 30 seconds to 1 minute until fragrant.
    5. Step 5: Add the tomatoes, black beans, and frozen corn, stir to combine with the ground turkey mixture, and allow to cook for 2-3 minutes. Taste and adjust seasoning with additional salt and pepper as needed.
    6. Step 6: Top the ground turkey mixture with shredded cheese and then transfer the skillet to the oven for 5-10 minutes until the cheese melts and the top is golden brown.
    7. Step 7: Once the cheese has melted, remove the skillet from the oven and allow to cool slightly before serving with chopped cilantro and toppings of your choice.
    8. Step 8: Any leftovers can be cooled and stored in an airtight container in the fridge for up to 4 days or in the freezer for up to 3 months.

    Notes

    To Use Taco Seasoning: Omit the chili powder, paprika, garlic powder, cumin, and crushed chilies, and use 3 tablespoons of taco seasoning. To use Pinto Beans: Swap the black beans for 1 can (15 ounces) pinto beans.

    • Prep Time: 10 minutes
    • Cook Time: 20 minutes
    • Category: Dinner
    • Method: Stovetop
    • Cuisine: Tex-Mex

    Nutrition

    • Serving Size: 1 serving
    • Calories: 498 kcal
    • Sugar: 10 g
    • Sodium: 950 mg
    • Fat: 23 g
    • Saturated Fat: 9 g
    • Unsaturated Fat: 14 g
    • Trans Fat: 0 g
    • Carbohydrates: 39 g
    • Fiber: 12 g
    • Protein: 39 g
    • Cholesterol: 95 mg
  • Quick and Easy Pasta Salad

    Quick and Easy Pasta Salad

    This refreshing pasta salad is an ideal choice for quick weeknight dinners or as a crowd-pleasing side dish for gatherings. By utilizing a pressure cooker, you can achieve perfectly textured pasta in a fraction of the time.

    Recipe image

    List of ingredients

    • 8 oz pasta (rotini or penne) – use shapes that capture dressing.
    • 1 cup cherry tomatoes, halved – provides a burst of sweetness.
    • 1/2 cup black olives, sliced – adds a salty, briny flavor.
    • 1/2 cup cucumber, diced – contributes a cool, crisp texture.
    • 1/4 cup red onion, finely chopped – adds a subtle sharp kick.
    • 1/2 cup feta cheese, crumbled – use a microbial-rennet variety for creaminess.
    • 1/4 cup Italian dressing – binds all ingredients with herbs and acidity.
    • Salt – to taste.
    • Pepper – to taste.

    step-by-step instructions

    1. Cook the Pasta: Place the pasta in the pressure cooker and add enough water to just cover the noodles. Ensure the sealing ring is securely in place and lock the lid.
    2. Pressure Cook: Set the cooker to the manual setting for 6 minutes. This timing ensures the pasta is tender but retains enough structure to avoid becoming mushy.
    3. Release Steam: Once the timer expires, use the quick release valve to vent the steam immediately. Exercise caution as the escaping steam is extremely hot.
    4. Cool and Drain: Open the lid, drain the pasta, and rinse it thoroughly under cold running water. This stops the cooking process and prepares the pasta for the dressing.
    5. Combine Ingredients: In a large mixing bowl, combine the cooled pasta, halved cherry tomatoes, sliced black olives, diced cucumber, chopped red onion, and crumbled feta.
    6. Dress the Salad: Pour the Italian dressing over the mixture and toss gently to ensure every ingredient is evenly coated.
    7. Season: Taste the salad and add salt and pepper as desired to enhance the overall flavor profile.
    8. Chill: Place the bowl in the refrigerator for at least 15 minutes before serving. This allows the flavors to meld and ensures a refreshing temperature.

    Maximizing Pressure Cooker Efficiency

    Optimal Pasta Selection for Pressure Cooking

    Choose sturdy pasta shapes like rotini, penne, or fusilli for this method. These shapes hold up better under high pressure and provide more surface area for the dressing to cling to. Avoid very thin pastas which can overcook rapidly.

    Ensuring a Proper Seal

    Always inspect your pressure cooker’s sealing ring for cracks or debris before starting. A secure seal is necessary to maintain the internal pressure required for the 6-minute cook time. This prevents leaks and ensures consistent cooking results.

    Safe Steam Management

    The quick release method is essential for pasta to prevent overcooking during the natural depressurization phase. Always use a kitchen utensil or a protective mitt to move the valve to avoid steam burns. Keep your face and hands clear of the vent.

    The Science of Cold Rinsing

    Rinsing pasta under cold water removes excess surface starch and immediately halts the cooking process. This prevents the noodles from sticking together and stops them from absorbing too much dressing. It ensures the salad remains light and fresh.

    Ingredient Substitutions and Alternatives

    Alternative Pasta Varieties

    If you prefer a different base, whole wheat pasta offers more fiber and a nuttier taste. For a gluten-free option, brown rice pasta or chickpea pasta works well, though you may need to reduce the cook time by one minute to avoid mushiness.

    Seasonal Vegetable Swaps

    Swap cucumbers for diced bell peppers during the winter months for a different crunch. You can also replace cherry tomatoes with sun-dried tomatoes for a more concentrated, savory flavor profile.

    Plant-Based Cheese Options

    To make this recipe vegan, replace the feta with a plant-based feta alternative made from coconut oil or almonds. Alternatively, omit the cheese entirely and add extra olives or capers to maintain the salty element.

    Customizing the Dressing

    If you do not have bottled Italian dressing, whisk together olive oil, red wine vinegar, dried oregano, and garlic powder. This homemade version allows you to control the acidity and salt levels of the dish.

    Flavor Variations and Add-ins

    Incorporating Lean Proteins

    Turn this side dish into a main course by adding grilled chicken breast or chickpeas. Canned tuna, drained thoroughly, also pairs well with the Italian flavors and adds significant protein.

    Fresh Herb Enhancements

    Stir in a handful of freshly chopped parsley, basil, or cilantro just before serving. Fresh herbs provide a bright, aromatic quality that complements the tangy dressing and fresh vegetables.

    Adding Zesty Notes

    Grate some fresh lemon zest over the salad to increase the brightness of the dish. A small squeeze of fresh lemon juice can also wake up the flavors if the salad has been sitting in the fridge.

    Adding Nutty Textures

    Toasted pine nuts or slivered almonds add a sophisticated crunch to the salad. Add these immediately before serving to ensure they stay crisp and do not soften in the dressing.

    Serving and Presentation Ideas

    Plating for Large Groups

    For potlucks, serve the salad in a wide, shallow glass bowl to showcase the vibrant colors of the vegetables. Keep a small bowl of extra feta and fresh herbs on the side for guests to garnish their own portions.

    Ideal Meal Pairings

    This salad pairs exceptionally well with grilled fish or roasted vegetables. It also serves as a refreshing contrast to a hearty vegetable soup or a grilled veggie burger.

    Mason Jar Portioning

    For meal prep, layer the dressing at the bottom of a mason jar, followed by the hardest vegetables like carrots or cucumbers. Place the pasta and feta on top to keep the ingredients from getting soggy until they are shaken and served.

    Storage and Preservation Guidance

    Selecting Airtight Containers

    Store the salad in glass airtight containers to prevent the red onion scent from permeating other foods in your fridge. Glass is also less likely to stain from the oil and vinegar in the dressing.

    Maximum Refrigeration Timeline

    The salad remains fresh for up to four days when stored properly in the refrigerator. However, the vegetables will maintain their peak crunch if the salad is consumed within two days of dressing.

    Managing Dressing Absorption

    Pasta tends to absorb dressing over time, which can leave the salad tasting dry. To prevent this, store the dressed pasta and the vegetables separately, mixing them only when you are ready to eat.

    Refreshing and Reheating Advice

    Reviving Dry Pasta

    If the salad seems dry after a day in the fridge, stir in a tablespoon of olive oil or a splash of red wine vinegar. This restores the moisture and brings back the zesty flavor of the dressing.

    Serving Temperature Adjustments

    While this is a cold salad, allowing it to sit at room temperature for 10-15 minutes before serving can enhance the flavors. This makes the aromas of the herbs and onions more pronounced.

    Troubleshooting Common Issues

    Preventing Mushy Noodles

    If your pasta frequently turns out too soft, reduce the pressure cooking time to 5 minutes. Always ensure the cold rinse is thorough enough to drop the temperature of the pasta rapidly.

    Taming Strong Onion Flavors

    If the red onion is too pungent, soak the chopped pieces in cold water for 10 minutes before adding them to the bowl. Drain and pat dry to remove the harsh sulfur compounds while keeping the crunch.

    Balancing Excessive Saltiness

    If the feta and olives make the salad too salty, add more diced cucumber or a squeeze of lemon juice. The acidity and water content of these additions help neutralize the salt on the palate.

    Frequently Asked Questions

    Can I use different pasta shapes?

    Yes, any short pasta like fusilli, shells, or farfalle works well. The key is to choose shapes that can trap the dressing in their folds or hollows.

    Why is rinsing the pasta necessary?

    Rinsing stops the cooking process immediately and removes excess starch. This prevents the pasta from clumping together and ensures the dressing coats the noodles evenly.

    What happens if I don’t have a sealing ring?

    The sealing ring is a critical safety and functional component of a pressure cooker. You cannot safely use the pressure cooking function without it, as the unit will not be able to build pressure.

    Can this recipe be made vegan?

    Yes, simply omit the feta cheese or replace it with a vegan feta alternative. Ensure your Italian dressing is free from honey or dairy products.

    What is the difference between quick and natural release?

    Quick release involves manually venting the steam immediately to stop cooking. Natural release allows the pressure to drop slowly on its own, which is better for delicate foods but would overcook this pasta.

    How can I add protein to this salad?

    You can stir in cooked chicken, canned chickpeas, or flaked tuna. These additions make the salad a more filling meal without altering the base flavor profile.

    Print
    clock clock iconcutlery cutlery iconflag flag iconfolder folder iconinstagram instagram iconpinterest pinterest iconfacebook facebook iconprint print iconsquares squares iconheart heart iconheart solid heart solid icon
    Quick and Easy Pasta Salad

    Quick and Easy Pasta Salad


    5 Stars 4 Stars 3 Stars 2 Stars 1 Star

    No reviews

    • Author: imageuploader
    • Total Time: 20 minutes
    • Yield: 4 servings 1x
    • Diet: Vegetarian

    Description

    This quick and easy pasta salad is perfect for a refreshing meal or side dish. Packed with fresh vegetables, tangy feta cheese, and a flavorful Italian dressing, it’s made even faster using a pressure cooker to perfectly cook the pasta.


    Ingredients

    Scale
    • 8 oz pasta (rotini or penne)
    • 1 cup cherry tomatoes (halved)
    • 1/2 cup black olives (sliced)
    • 1/2 cup cucumber (diced)
    • 1/4 cup red onion (finely chopped)
    • 1/2 cup feta cheese (crumbled)
    • 1/4 cup Italian dressing
    • salt to taste
    • pepper to taste

    Instructions

    1. Step: Pour your pasta into the pressure cooker with enough water to just cover it.
    2. Step: Ensure your sealing ring is in place snug and tight before you lock the lid.
    3. Step: Set your cooker to manual for 6 minutes.
    4. Step: Use the quick release to let the steam out fast.
    5. Step: Drain the pasta and rinse it under cold water.
    6. Step: In a big bowl, toss together your pasta, cherry tomatoes, black olives, cucumber, red onion, and feta cheese.
    7. Step: Pour in your Italian dressing and toss everything gently.
    8. Step: Add salt and pepper as you like.
    9. Step: Store in the fridge for at least 15 minutes so it chills and flavors settle in.

    Notes

    Store your pasta salad in an airtight container in the fridge for up to 4 days. For best texture, add dressing just before serving or consume within 2 days if pre-mixed. Stir gently before serving and add more dressing or lemon if desired.

    • Prep Time: 10 minutes
    • Cook Time: 10 minutes
    • Category: Side Dish
    • Method: Pressure Cooking
    • Cuisine: Italian-inspired

    Nutrition

    • Serving Size: 1 serving
    • Calories: 350 kcal
    • Sugar: 6 g
    • Sodium: 820 mg
    • Fat: 14 g
    • Saturated Fat: 5 g
    • Unsaturated Fat: 9 g
    • Trans Fat: 0 g
    • Carbohydrates: 42 g
    • Fiber: 4 g
    • Protein: 12 g
    • Cholesterol: 35 mg
  • Shrimp Rice Bowls with Spicy Mayo

    Shrimp Rice Bowls with Spicy Mayo

    These shrimp rice bowls are a fast, protein-packed meal perfect for busy weeknights. They combine zesty seasoned shrimp with creamy spicy mayo and fresh vegetables for a balanced dinner.

    Recipe image

    List of ingredients

    • 1 lb medium shrimp, peeled and deveined – pat dry for better searing.
    • 2 cups cooked jasmine or brown rice – serves as the fragrant base.
    • 1/2 cup mayonnaise – provides the creamy foundation for the sauce.
    • 1-2 tablespoons sriracha – adjust based on your heat preference.
    • 1 teaspoon lime juice – adds essential acidity to the mayo.
    • 1 tablespoon olive oil – used for sautéing the shrimp.
    • 1 teaspoon smoked paprika – gives the shrimp a deep, woody flavor.
    • 1/2 teaspoon garlic powder – adds a savory punch.
    • 1/2 teaspoon onion powder – complements the garlic for depth.
    • 1/2 teaspoon salt – enhances all the other seasonings.
    • 1/4 teaspoon black pepper – provides a subtle, sharp heat.
    • 1/4 teaspoon cayenne pepper (optional) – use for an extra spicy kick.
    • 1 cup shredded carrots – adds color and a slight sweetness.
    • 1 avocado, sliced – provides creamy texture and healthy fats.
    • 1 cup cucumber slices – adds a refreshing, cool crunch.
    • 2 green onions, chopped – used for a fresh garnish.
    • 2 tablespoons sesame seeds (optional) – adds a nutty finish.
    • 1 tablespoon rice vinegar (optional) – can be mixed into the rice.
    • Soy sauce or tamari (optional) – for a final salty drizzle.

    step-by-step instructions

    1. Prepare the spicy mayo: In a mixing bowl, combine the mayonnaise, sriracha, and lime juice. Whisk until the mixture is smooth and the flavors are fully integrated.
    2. Season the shrimp: In a skillet over medium heat, add the olive oil. While the pan heats, toss the shrimp with smoked paprika, garlic powder, onion powder, salt, black pepper, and optional cayenne pepper until evenly coated.
    3. Cook the shrimp: Add the seasoned shrimp to the hot skillet in a single layer. Cook for about 3 to 4 minutes on each side until they turn pink and opaque, being careful not to overcook them.
    4. Assemble the bowls: Divide the cooked jasmine or brown rice evenly among four serving bowls. Top the rice with a portion of cooked shrimp, shredded carrots, avocado slices, and cucumber slices.
    5. Add final touches: Drizzle the prepared spicy mayo over each bowl. Garnish with chopped green onions and sesame seeds, and serve with soy sauce or tamari on the side.

    Professional Shrimp Searing Techniques

    Pat Shrimp Dry for a Better Sear

    Moisture on the surface of the shrimp creates steam when it hits the hot pan, which prevents the Maillard reaction. Use a paper towel to firmly pat each shrimp dry before adding seasonings. This ensures a golden-brown crust and a more intense flavor profile.

    Avoid Overcrowding the Pan

    Adding too many shrimp to the skillet at once lowers the pan temperature and releases excess moisture. Cook the shrimp in batches if your pan is small. This prevents the shrimp from boiling in their own juices and ensures they sear properly.

    Monitor Cooking Time Carefully

    Shrimp cook very quickly and can become rubbery if left on the heat for too long. Remove them from the pan as soon as they curl into a ‘C’ shape and become opaque. Avoid letting them curl tightly into an ‘O’ shape, as this is a sign of overcooking.

    Guide to Rice Selection and Preparation

    Using Fragrant Jasmine Rice

    Jasmine rice is ideal for this dish because of its slightly sticky texture and floral aroma. To ensure the best results, rinse the rice under cold water until the water runs clear. This removes excess surface starch and prevents the rice from becoming overly gummy.

    Incorporating Nutrient-Dense Brown Rice

    Brown rice is an excellent substitute for those seeking more fiber and a nuttier flavor. Because brown rice takes longer to cook, prepare it in advance or use a rice cooker. It provides a heartier base that keeps you full for longer periods.

    Substituting with Cauliflower Rice

    For a lower-carbohydrate version, replace the grains with sautéed cauliflower rice. Sauté the cauliflower with a small amount of olive oil and salt for 5-7 minutes. This maintains the bowl’s structure while significantly reducing the calorie count.

    Vegetable Preparation and Pairing

    Slicing Cucumbers for Maximum Crunch

    To get the best texture, slice cucumbers into thin half-moons or matchsticks. Using a Persian or English cucumber reduces the need for peeling and minimizes seediness. Cold, crisp cucumbers provide a vital contrast to the warm shrimp and creamy mayo.

    Preventing Avocado Browning

    Avocados oxidize quickly once sliced and exposed to air. To keep them green, toss the slices in a small amount of lime juice or lemon juice immediately after cutting. Store them in an airtight container with a damp paper towel if prepping in advance.

    Preparing Shredded Carrots

    Use a grater or a julienne peeler to create thin strips of carrots. This ensures they blend well with the other ingredients rather than overpowering the bowl. Shredded carrots add a bright color and a natural sweetness that balances the spicy sauce.

    Customizing Your Flavor Profile

    Adjusting the Heat Level

    The spiciness of the bowl depends entirely on the amount of sriracha used in the mayo. Start with one tablespoon for a mild heat and increase to two or more for a bolder kick. You can also add a pinch of red chili flakes to the shrimp seasoning for layered heat.

    Adding Umami with Soy Sauce

    A light drizzle of soy sauce or tamari adds a salty, savory depth to the dish. This is especially useful if you are using brown rice, which has a more neutral flavor. Use a low-sodium version to keep the dish balanced and avoid excessive saltiness.

    Incorporating Fresh Herbs

    Fresh cilantro or Thai basil can elevate the flavor profile of these bowls. Chop the herbs finely and sprinkle them over the top just before serving. This adds a burst of freshness that cuts through the richness of the mayonnaise.

    Storage and Preservation Tips

    Refrigerating the Components

    For the best quality, store the cooked shrimp, rice, and fresh vegetables in separate airtight containers. The spicy mayo should be kept in a sealed jar in the refrigerator. This prevents the vegetables from wilting and the rice from absorbing the sauce prematurely.

    Freezing Guidelines for Shrimp and Rice

    Cooked shrimp and rice can be frozen separately in freezer-safe bags for up to three months. Avoid freezing the fresh vegetables or the spicy mayo, as their textures will degrade. Thaw the shrimp and rice in the refrigerator overnight before reheating.

    Maintaining Freshness for Meal Prep

    If preparing these bowls for the work week, place the rice at the bottom and the shrimp on top. Keep the sauce in a small separate container and add it only when you are ready to eat. This ensures the ingredients stay crisp and the sauce remains creamy.

    Reheating and Serving Instructions

    Using the Microwave for Quick Heating

    Heat the rice and shrimp on medium power in short 30-second intervals. Stir the ingredients between intervals to ensure even heating. Add a teaspoon of water to the rice to restore moisture that may have been lost during refrigeration.

    Oven Reheating for Better Texture

    Preheat your oven to 350°F (175°C) and place the shrimp and rice in a baking dish. Cover with foil to trap moisture and heat for about 10-15 minutes. This method prevents the shrimp from becoming as rubbery as they might in a microwave.

    Stovetop Reheating Method

    Warm the cooked shrimp in a skillet over medium heat with a tiny splash of oil or water. Heat for 2-3 minutes just until warmed through. This helps maintain the sear on the shrimp while you heat the rice in a separate pot.

    Troubleshooting Common Issues

    Fixing Rubbery Shrimp

    If your shrimp have become tough, it is usually due to overcooking. To prevent this, use a meat thermometer to ensure they reach an internal temperature of 145°F. If they are already rubbery, avoid further reheating and serve them cold as a shrimp salad.

    Balancing a Sauce That Is Too Spicy

    If the spicy mayo is too intense, stir in an extra tablespoon of mayonnaise or a squeeze of fresh lime juice. The fat in the mayo and the acid in the lime help neutralize the capsaicin from the sriracha. Adding a touch of honey can also mellow the heat.

    Correcting Bland Rice

    If the rice tastes plain, stir in a tablespoon of rice vinegar and a pinch of salt while it is still warm. This creates a simple seasoned rice similar to sushi rice. You can also add a teaspoon of toasted sesame oil for a deeper, nuttier aroma.

    Frequently Asked Questions

    Can I use frozen shrimp for this recipe?

    Yes, you can use frozen shrimp. Make sure to thaw them completely in the refrigerator or under cold running water and pat them very dry before seasoning to ensure they sear rather than steam.

    What is the best alternative to sriracha?

    If you do not have sriracha, you can use gochujang for a deeper fermented flavor or a mix of hot sauce and a pinch of sugar. Ensure the substitute has a similar consistency to maintain the creaminess of the mayo.

    How can I make this dish vegan?

    Replace the shrimp with extra-firm pressed tofu or chickpeas, and use a vegan-certified mayonnaise. Ensure the soy sauce used is tamari if you also require the dish to be gluten-free.

    Which type of rice is healthiest?

    Brown rice is the healthiest option as it is a whole grain containing more fiber and micronutrients than white jasmine rice. However, jasmine rice is often preferred for its flavor and texture in Asian-inspired bowls.

    How long do these bowls stay fresh in the fridge?

    When stored in airtight containers, the cooked components stay fresh for 2 to 3 days. For maximum freshness, slice the avocado only right before serving to prevent browning.

    Print
    clock clock iconcutlery cutlery iconflag flag iconfolder folder iconinstagram instagram iconpinterest pinterest iconfacebook facebook iconprint print iconsquares squares iconheart heart iconheart solid heart solid icon
    Shrimp Rice Bowls with Spicy Mayo

    Shrimp Rice Bowls with Spicy Mayo


    5 Stars 4 Stars 3 Stars 2 Stars 1 Star

    No reviews

    • Author: imageuploader
    • Total Time: 25 minutes
    • Yield: 4 servings 1x
    • Diet: General

    Description

    Shrimp Rice Bowls with Spicy Mayo are a delectable solution for busy weeknights or casual get-togethers. This quick and satisfying meal features succulent shrimp seasoned to perfection, served over a bed of fragrant rice and drizzled with creamy spicy mayo.


    Ingredients

    Scale
    • 1 lb medium shrimp (peeled and deveined)
    • 2 cups cooked jasmine or brown rice
    • ½ cup mayonnaise
    • 12 tablespoons sriracha
    • 1 tablespoon olive oil
    • 1 teaspoon smoked paprika
    • ½ teaspoon garlic powder
    • ½ teaspoon onion powder
    • ½ teaspoon salt
    • ¼ teaspoon black pepper
    • ¼ teaspoon cayenne pepper
    • 1 teaspoon lime juice
    • 1 cup shredded carrots
    • 1 avocado, sliced
    • 1 cup cucumber slices
    • 2 green onions, chopped
    • 2 tablespoons sesame seeds
    • Soy sauce or tamari

    Instructions

    1. Prepare the Spicy Mayo: In a mixing bowl, combine mayonnaise, sriracha, and lime juice. Mix until well blended.
    2. Season the Shrimp: In a skillet over medium heat, add olive oil. Season shrimp with smoked paprika, garlic powder, onion powder, salt, black pepper, and cayenne pepper.
    3. Cook the Shrimp: Add seasoned shrimp to the hot skillet. Cook for about 3–4 minutes on each side or until shrimp turn pink and opaque.
    4. Assemble Your Bowls: In serving bowls, place a generous portion of cooked rice. Top with cooked shrimp, shredded carrots, avocado slices, cucumber slices, and green onions.
    5. Drizzle with Sauce: Finish by drizzling spicy mayo over each bowl. Sprinkle sesame seeds on top.

    Notes

    Store in an airtight container in the refrigerator for 2-3 days. To reheat, use a microwave on medium power in short intervals or a skillet over medium heat with a splash of water.

    • Prep Time: 10 minutes
    • Cook Time: 15 minutes
    • Category: Main
    • Method: Stovetop
    • Cuisine: Asian

    Nutrition

    • Serving Size: 1 bowl (approximately 400g)
    • Calories: 550 kcal
    • Sugar: 2 g
    • Sodium: 850 mg
    • Fat: 28 g
    • Saturated Fat: 4 g
    • Unsaturated Fat: 24 g
    • Trans Fat: 0 g
    • Carbohydrates: 60 g
    • Fiber: 5 g
    • Protein: 20 g
    • Cholesterol: 160 mg
  • Cheesy Chicken Broccoli Orzo

    Cheesy Chicken Broccoli Orzo

    This creamy one-pot meal combines tender chicken, fresh broccoli, and orzo pasta in a rich cheddar cheese sauce. It is designed for quick weeknight preparation and requires minimal cleanup since everything cooks in a single skillet.

    Recipe image

    List of ingredients

    • 1 tbsp olive oil – used for sautéing the aromatics.
    • 1 tbsp butter – adds richness to the base sauce.
    • 1/2 medium onion, chopped – provides a savory flavor foundation.
    • 3 cloves garlic, minced – adds a pungent, aromatic depth.
    • 2 cups broccoli florets, bite-sized (about 1-inch pieces) – use fresh or fully thawed and drained frozen florets.
    • 1/2 tsp Italian seasoning – a blend of herbs for a classic savory profile.
    • 1 cup orzo pasta – small rice-shaped pasta that thickens the dish.
    • 2 cups chicken broth – the primary cooking liquid for the pasta.
    • 1 cup heavy cream – creates a thick and velvety texture.
    • 1 tsp Worcestershire sauce – adds a complex, savory umami note.
    • 2 cups cooked shredded chicken – rotisserie chicken is a convenient and flavorful choice.
    • 2 cups shredded cheddar cheese – sharp cheddar is preferred for a bold taste.
    • Salt and pepper to taste – used for final seasoning adjustments.

    step-by-step instructions

    1. Prepare the pan: Heat a large 12-inch skillet over medium heat and melt the olive oil and butter together until bubbling.
    2. Sauté aromatics: Add the chopped onions to the pan and cook for 3 to 4 minutes until they are soft and translucent.
    3. Cook broccoli: Stir in the broccoli florets and cook for about 2 minutes, ensuring they remain bright green and slightly crisp.
    4. Season the base: Incorporate the minced garlic and Italian seasoning, stirring for 30 seconds to release the aromas without burning the garlic.
    5. Toast the pasta: Add the orzo pasta to the skillet and stir constantly for a minute to toast the grains for a nuttier flavor.
    6. Add liquids: Pour in the chicken broth, heavy cream, and Worcestershire sauce, bringing the mixture to a boil before reducing it to a simmer.
    7. Simmer orzo: Cook uncovered for about 10 minutes, stirring often to prevent the pasta from sticking to the bottom. If the sauce becomes too dry, stir in an extra 1/4 cup of broth.
    8. Combine chicken and cheese: Stir in the shredded chicken until it is heated through, then remove the skillet from the heat and fold in the cheddar cheese until melted.
    9. Finish and rest: Season the dish with salt and pepper to taste, then let it sit for 2 to 3 minutes to allow the sauce to thicken before serving.

    Professional Cooking Tips

    Use a Wide Skillet for Even Evaporation

    Using a 12-inch skillet provides a larger surface area for the liquids to reduce. This ensures that the orzo cooks evenly without becoming clumped in the center. It also helps the broccoli sear slightly rather than steaming in a deep pot.

    Toast the Orzo for Better Flavor

    Toasting the dry orzo in butter and oil before adding liquids creates a nutty depth of flavor. This process also helps the pasta maintain its structure, reducing the chance of it becoming mushy. Stir constantly during this step to prevent the pasta from browning too quickly.

    Avoid Overcooking the Broccoli

    Add the broccoli early but keep the cooking time short to maintain a vibrant green color. Overcooked broccoli becomes dull and soft, which ruins the texture of the dish. The residual heat from the simmering pasta will finish cooking the florets perfectly.

    Use Freshly Shredded Cheese

    Grating your own cheddar cheese from a block ensures a smoother melt. Pre-shredded cheeses often contain cornstarch or cellulose to prevent clumping, which can make the sauce feel grainy. Fresh cheese integrates more seamlessly into the cream sauce.

    Ingredient Substitutions

    Vegetable Broth for a Different Base

    You can replace the chicken broth with a high-quality vegetable broth for a different flavor profile. This is a great option if you have vegetable broth on hand or prefer a lighter taste. The liquid ratio remains exactly the same.

    Lighter Cream Alternatives

    If heavy cream is too rich, you can substitute it with half-and-half or whole milk. Note that using milk will result in a thinner sauce, so you may need to simmer the orzo slightly longer. You can also add a teaspoon of cornstarch mixed with water to thicken a thinner sauce.

    Alternative Pasta Shapes

    While orzo is traditional, small shells or ditalini pasta work well in this recipe. These shapes capture the cheese sauce effectively in their curves. Adjust the simmering time based on the specific pasta package instructions.

    Protein Swaps for Variety

    If you do not have shredded chicken, diced turkey or shrimp are excellent alternatives. For shrimp, add them at the very end with the cheese to avoid overcooking. Ensure any substitute protein is already cooked before adding it to the skillet.

    Flavor Variations

    Adding Spicy Elements

    Incorporate crushed red pepper flakes or finely diced jalapeños during the onion sauté phase. This adds a subtle heat that balances the richness of the cheddar and cream. For a stronger kick, drizzle sriracha over the individual servings.

    Incorporating Fresh Greens

    Stir in a handful of fresh baby spinach or chopped kale during the final two minutes of simmering. These greens wilt quickly and add extra nutrients and a pop of color. This variation is particularly good when using a milder cheese like Monterey Jack.

    Adding a Citrus Finish

    Squeeze a teaspoon of fresh lemon juice over the dish just before serving. The acidity cuts through the heavy cream and cheese, brightening the overall flavor. This is especially effective when using fresh broccoli.

    Creating a Three-Cheese Blend

    Mix sharp cheddar with Gruyere and Parmesan for a more sophisticated flavor. Gruyere adds a nutty quality, while Parmesan provides a salty punch. Keep the total amount of cheese at 2 cups to maintain the correct sauce consistency.

    Serving Ideas

    Balanced Side Pairings

    Pair this rich dish with a light side salad featuring a lemon vinaigrette. The crispness of fresh greens and the acidity of the dressing balance the creamy nature of the orzo. Roasted asparagus or sautéed zucchini are also excellent vegetable pairings.

    Garnishing for Presentation

    Top each serving with a sprinkle of freshly chopped parsley or chives for a professional look. A dusting of paprika or extra grated Parmesan can also add visual appeal. These additions provide a fresh contrast to the golden-yellow cheese sauce.

    Family Style Presentation

    Serve the orzo in a large shallow bowl or a cast-iron skillet to keep the meal warm. This encourages a communal dining experience and keeps the cheese sauce fluid. Ensure you serve it immediately while the texture is at its creamiest.

    Storage and Reheating

    Refrigerator Storage Guidelines

    Place leftovers in an airtight container once the dish has cooled to room temperature. It will stay fresh and safe to eat for 3 to 4 days. Keep the container tightly sealed to prevent the pasta from absorbing odors from other foods.

    Safe Freezing Instructions

    Transfer cooled orzo into a freezer-safe bag or container, removing as much air as possible. The dish can be stored in the freezer for up to 3 months. Thaw the meal in the refrigerator overnight before reheating for the best results.

    Reheating for Maximum Creaminess

    Reheat the dish in a saucepan over medium-low heat rather than the microwave. Add a splash of chicken broth or heavy cream to loosen the sauce, as the pasta absorbs liquid during storage. Stir gently to avoid breaking the broccoli florets.

    Make-Ahead Advice

    Pre-Prepping the Vegetables

    Chop the onions, mince the garlic, and cut the broccoli florets a day in advance. Store them in separate containers or a single prep bag in the refrigerator. This reduces the active prep time to almost zero on the night of cooking.

    Pre-Cooking the Chicken

    Using a store-bought rotisserie chicken is the fastest method, but you can poach or grill chicken breasts ahead of time. Shred the meat and store it in its own juices to keep it moist. This ensures the chicken stays tender when stirred into the hot orzo.

    Troubleshooting Common Issues

    Fixing a Sauce That Is Too Thick

    If the sauce becomes too thick or pasty, stir in chicken broth one tablespoon at a time. Continue stirring over low heat until the desired creaminess is restored. This often happens if the orzo is left to sit too long before serving.

    Managing Clumpy Cheese

    If the cheese does not melt smoothly, ensure you have removed the skillet from the heat source. Overheating cheese can cause the fats to separate, leading to a grainy or oily texture. Stirring the cheese into a hot but not boiling mixture is key.

    Preventing Pasta from Sticking

    Stir the skillet frequently during the 10-minute simmering period. Orzo releases starch that can cause it to glue itself to the bottom of the pan. Using a silicone spatula to scrape the bottom helps maintain a smooth sauce.

    Frequently Asked Questions

    Can I use raw chicken instead of shredded?

    Yes, you can use raw diced chicken breast. Sauté the chicken with the onions at the beginning until fully cooked and golden brown. Remove the chicken from the pan, follow the rest of the recipe, and add the cooked chicken back in at the end.

    Is there a gluten-free version of this recipe?

    To make this gluten-free, replace the standard orzo with a certified gluten-free orzo made from rice or corn. Be aware that gluten-free pasta can absorb liquid differently, so check the consistency frequently and add more broth if needed.

    Can I make this recipe dairy-free?

    You can substitute the heavy cream with a dairy-free alternative like cashew cream or full-fat coconut milk. Replace the cheddar cheese with a plant-based cheese alternative that melts well. Ensure the butter is replaced with a vegan butter substitute.

    How do I stop the broccoli from getting mushy?

    Ensure the broccoli is added only after the onions are translucent and cooked for exactly 2 minutes. Do not over-stir the broccoli, as this can break the florets. The brief initial sauté and final simmer are sufficient for perfect texture.

    Print
    clock clock iconcutlery cutlery iconflag flag iconfolder folder iconinstagram instagram iconpinterest pinterest iconfacebook facebook iconprint print iconsquares squares iconheart heart iconheart solid heart solid icon
    Cheesy Chicken Broccoli Orzo

    Cheesy Chicken Broccoli Orzo


    5 Stars 4 Stars 3 Stars 2 Stars 1 Star

    No reviews

    • Author: imageuploader
    • Total Time: 30 minutes
    • Yield: 4 servings 1x
    • Diet: General

    Description

    A comforting dish combining tender chicken, orzo pasta, fresh broccoli, and melty cheddar cheese, perfect for quick dinners or meal prepping.


    Ingredients

    Scale
    • 1 tbsp olive oil
    • 1 tbsp butter
    • 1/2 medium onion, chopped
    • 3 cloves garlic, minced
    • 2 cups broccoli florets, bite-sized
    • 1/2 tsp Italian seasoning
    • 1 cup orzo pasta
    • 2 cups chicken broth
    • 1 cup heavy cream
    • 1 tsp Worcestershire sauce
    • 2 cups cooked shredded chicken
    • 2 cups shredded cheddar cheese
    • Salt and pepper to taste

    Instructions

    1. Heat: Heat a large 12-inch skillet over medium heat and melt the olive oil and butter together.
    2. Sauté: Add the chopped onions and sauté for about 3 to 4 minutes until they become soft and translucent.
    3. Cook Broccoli: Toss in the broccoli florets and cook for another 2 minutes until they are bright green but still crisp.
    4. Season: Stir in the minced garlic and Italian seasoning, cooking for an additional 30 seconds to deepen the flavors.
    5. Toast: Add the orzo pasta to the skillet, stirring it with the vegetables to toast it slightly.
    6. Liquid: Pour in the chicken broth, heavy cream, and Worcestershire sauce. Bring to a boil then reduce to a simmer.
    7. Simmer: Let the mixture simmer uncovered for about 10 minutes, stirring often, until orzo is tender and the sauce remains creamy.
    8. Combine: Stir in the shredded chicken until heated through, then mix in cheddar cheese until melted into a creamy sauce.
    9. Finish: Season with salt and pepper to taste and allow to sit for 2 to 3 minutes to thicken before serving.

    Notes

    Serve the dish as is or with a side salad. Add parsley or red pepper flakes for garnish. Store leftovers in an airtight container in the refrigerator for up to 4 days, or freeze for up to 3 months.

    • Prep Time: 10 minutes
    • Cook Time: 20 minutes
    • Category: Dinner
    • Method: Stovetop
    • Cuisine: American

    Nutrition

    • Serving Size: 1 serving
    • Calories: 600 kcal
    • Sugar: 7 g
    • Sodium: 980 mg
    • Fat: 38 g
    • Saturated Fat: 22 g
    • Unsaturated Fat: 14 g
    • Trans Fat: 0 g
    • Carbohydrates: 36 g
    • Fiber: 5 g
    • Protein: 32 g
    • Cholesterol: 125 mg
  • Savory Low Carb Cheesy Chicken and Vegetable Bake

    Savory Low Carb Cheesy Chicken and Vegetable Bake

    This rich and creamy chicken casserole is an excellent high-protein meal that fits perfectly into a low-carb lifestyle. It combines tender shredded chicken with a velvety cheese sauce and nutrient-dense vegetables for a satisfying dinner. This dish is simple to prepare and works wonderfully for family meals or weekly meal prep.

    Recipe image

    List of ingredients

    • 3 cups cooked, shredded chicken – use rotisserie or leftover roast chicken for convenience.
    • 8 oz cream cheese, softened – ensures a smooth, thick base for the sauce.
    • ½ cup sour cream – adds a slight tang and creamy consistency.
    • ¼ cup mayonnaise – boosts the richness and binds the sauce.
    • 1½ cups shredded cheddar cheese, divided – provides the primary cheesy flavor and golden topping.
    • ¼ cup grated Parmesan cheese – adds a salty, nutty depth to the crust.
    • 2 cups broccoli florets, steamed – adds fiber and texture.
    • 1 cup cauliflower florets, steamed and chopped – a low-carb alternative to traditional pasta or rice.
    • ½ tsp garlic powder – provides a savory aromatic base.
    • ½ tsp onion powder – enhances the overall depth of the sauce.
    • ½ tsp dried thyme or Italian seasoning – adds herbal notes to balance the richness.
    • Salt and pepper to taste – essential for seasoning the sauce and chicken.
    • Fresh parsley – used for a fresh, colorful garnish.

    step-by-step instructions

    1. Prepare the oven and dish: Preheat your oven to 375°F. Grease a 9×13-inch baking dish with nonstick spray or butter to prevent sticking.
    2. Create the cream sauce: In a large mixing bowl, combine the softened cream cheese, sour cream, mayonnaise, garlic powder, onion powder, dried thyme, salt, and pepper. Stir until the mixture is completely smooth and well combined.
    3. Mix in the main ingredients: Gently fold in the cooked shredded chicken, steamed broccoli, steamed cauliflower, and 1 cup of the shredded cheddar cheese. Ensure all ingredients are evenly coated in the creamy sauce.
    4. Assemble the casserole: Transfer the mixture into the prepared baking dish and spread it evenly. Top the surface with the remaining ½ cup of cheddar cheese and the grated Parmesan.
    5. Bake and brown: Bake uncovered for 25–30 minutes until the sauce is bubbly. Turn on the broiler for 2–3 minutes to achieve a golden-brown cheese crust.
    6. Rest and garnish: Let the casserole cool for 5 minutes to allow the sauce to set. Garnish with freshly chopped parsley before serving.

    Alternative Vegetable Options

    Spinach and Kale for Extra Greens

    You can easily stir in two cups of fresh baby spinach or chopped kale. These greens wilt into the sauce during baking, adding significant vitamins and a pop of color. They blend seamlessly with the cheese and chicken.

    Zucchini and Mushrooms for Texture

    Sautéed zucchini slices and mushrooms provide a meatier, more substantial texture. Make sure to sauté them first to remove excess moisture. This prevents the sauce from becoming too thin or watery.

    Green Beans for a Classic Crunch

    Blanched green beans offer a satisfying snap and a fresh flavor. They serve as an excellent replacement for broccoli if you prefer a different vegetable profile. Ensure they are lightly cooked before adding them to the mix.

    Different Cheese Combinations

    Mozzarella for a Gooey Stretch

    Replacing a portion of the cheddar with mozzarella creates a stringier, softer texture. This is ideal for those who prefer a milder cheese flavor and a classic cheese-pull effect. It works well for children who may find sharp cheddar too strong.

    Gruyère for a Nutty Flavor

    Using Gruyère cheese adds a sophisticated, nutty depth to the casserole. This Swiss-style cheese melts very smoothly and pairs exceptionally well with the herbal notes of thyme. It elevates the dish for a more gourmet experience.

    Monterey Jack for Mild Creaminess

    Monterey Jack is a great option for those seeking a buttery, creamy melt. It is a mild cheese that blends well with the cream cheese base without overpowering the chicken. It is a reliable choice for a crowd-pleasing meal.

    Ways to Enhance the Flavor Profile

    Adding Diced Green Chiles for Heat

    Fold in a few tablespoons of diced canned green chiles for a mild Southwestern kick. This adds a bright, tangy contrast that cuts through the richness of the cheese. It transforms the dish into a zesty, spicy comfort meal.

    Buffalo Style Sauce Twist

    Replace the mayonnaise in the recipe with a spicy buffalo wing sauce. Top the casserole with extra parmesan or a dash of cayenne pepper for more heat. This variation creates a bold, tangy flavor profile that is very popular.

    Smoky Paprika for Depth

    Stir in a teaspoon of smoked paprika to mimic a smoky, grilled taste. This provides the deep, savory flavor often found in smoked meats without using animal-derived additives. It complements the cheddar cheese perfectly.

    Adding Fresh Herbs

    Fold in chopped fresh chives or rosemary during the mixing process. Fresh herbs provide a brighter, more aromatic finish than dried versions. They add a professional touch to the final presentation.

    Lemon Zest Incorporation

    Grate a small amount of fresh lemon zest into the cream sauce. The citrus notes brighten the overall dish and help balance the heavy dairy components. This is especially effective when using a lot of cauliflower.

    Professional Tips for the Best Texture

    Ensure Vegetables are Thoroughly Dried

    Always use a clean kitchen towel or paper towels to pat steamed vegetables dry. Excess water from steaming can seep into the sauce during baking. This prevents the casserole from becoming runny or soggy.

    Use Room Temperature Cream Cheese

    Allow the cream cheese to soften completely at room temperature before mixing. If it is too cold, you will encounter small lumps in your sauce. A smooth base ensures a velvety mouthfeel in every bite.

    Shred Cheese Freshly for Better Melting

    Grate your own cheddar from a solid block rather than using pre-bagged shreds. Pre-shredded cheeses are coated in cornstarch to prevent clumping. Freshly shredded cheese melts more smoothly and tastes more authentic.

    Ideal Side Dish Pairings

    Pairing with a Fresh Caesar Salad

    A crisp romaine salad with a creamy Caesar dressing balances the richness of the bake. The acidity and crunch of the salad cut through the heavy cheese. It provides a refreshing contrast to the warm casserole.

    Serving with Keto-Friendly Garlic Bread

    Pair the dish with almond flour-based garlic bread or cauliflower toasts. This satisfies the craving for a side starch while remaining within low-carb limits. It is perfect for scooping up extra sauce.

    Adding Roasted Asparagus on the Side

    Oven-roasted asparagus with a squeeze of lemon and minced garlic is a light accompaniment. It adds an earthy, fresh element to the plate. This pairing ensures the meal feels balanced and nutrient-dense.

    Preserving and Reheating Your Casserole

    Refrigeration Guidelines

    Place any leftover casserole in an airtight glass container immediately after cooling. It will remain fresh and flavorful in the refrigerator for up to four days. Ensure the lid is tight to prevent the cheese from absorbing fridge odors.

    Freezing and Thawing Instructions

    Wrap the cooled casserole tightly in aluminum foil and then in freezer wrap. It can be stored in the freezer for up to two months. Thaw the dish overnight in the refrigerator before reheating for the best results.

    Best Reheating Methods

    Use the oven at 350°F to reheat the dish for the best consistency. If using a microwave, heat in short intervals and stir gently. This prevents the cheese from separating or becoming oily.

    Advance Preparation Strategies

    Assembling in Advance

    You can combine all the ingredients and place them in the baking dish up to 24 hours early. Keep the casserole covered tightly in the refrigerator until you are ready to bake. This saves significant time on busy weeknights.

    Portioning for Work Lunches

    Divide the baked casserole into individual meal-prep containers once cooled. This allows for quick grab-and-go lunches throughout the work week. The flavors often meld and improve after a day in the fridge.

    Solving Common Cooking Issues

    Preventing a Watery Casserole

    If your casserole turns out too liquid, it is usually due to under-steamed or wet vegetables. Next time, increase the draining time or sauté the vegetables briefly. This ensures the sauce stays thick and creamy.

    Fixing a Sauce that Separates

    Sauce separation happens if the heat is too high or the ingredients aren’t fully emulsified. Stir the cream cheese mixture thoroughly before adding the chicken. If it separates during baking, a quick stir can sometimes fix it.

    Achieving a Perfectly Golden Crust

    Use the broiler setting for the final two to three minutes of cooking. Watch the oven closely to ensure the cheese browns without burning. This creates the desired crispy texture on top.

    Adjusting Salt Levels

    If the dish tastes too salty, stir in a small amount of extra sour cream. The tanginess and creaminess of the sour cream help neutralize excess salt. Always taste the sauce before adding the chicken.

    Preventing Overcooking

    Remove the dish from the oven as soon as the edges are bubbling. Overbaking can cause the shredded chicken to become dry and tough. The residual heat will continue to cook the center for a few minutes.

    Frequently Asked Questions

    Can I use raw chicken?

    No, this recipe is designed for pre-cooked chicken because the bake time is too short to safely cook raw meat. Always use pre-cooked, shredded chicken to ensure food safety.

    How do I make this dairy-free?

    You can substitute the dairy with plant-based cream cheese, vegan sour cream, and dairy-free cheese shreds. Coconut-based creams also work well as a base for the sauce.

    Is this recipe suitable for keto?

    Yes, this recipe is naturally keto-friendly as it relies on high-fat, low-carb ingredients. It avoids grains, sugars, and starches completely.

    Can I add eggs as a binder?

    Adding one beaten egg to the sauce can make the texture firmer, similar to a breakfast bake. This is optional and primarily changes the consistency to be more stable.

    Print
    clock clock iconcutlery cutlery iconflag flag iconfolder folder iconinstagram instagram iconpinterest pinterest iconfacebook facebook iconprint print iconsquares squares iconheart heart iconheart solid heart solid icon
    Creamy Low Carb Chicken Casserole

    Savory Low Carb Cheesy Chicken and Vegetable Bake


    5 Stars 4 Stars 3 Stars 2 Stars 1 Star

    No reviews

    • Author: imageuploader
    • Total Time: 40 minutes
    • Yield: 6 servings 1x
    • Diet: Keto

    Description

    This Creamy Low Carb Chicken Casserole is a rich, cheesy, keto-friendly dish made with shredded chicken, broccoli, cauliflower, and a velvety cream cheese sauce. Perfect for weeknight dinners or meal prep.


    Ingredients

    Scale
    • 3 cups cooked, shredded chicken
    • 8 oz cream cheese, softened
    • ½ cup sour cream
    • ¼ cup mayonnaise
    • 1½ cups shredded cheddar cheese (divided)
    • ¼ cup grated Parmesan cheese
    • 2 cups broccoli florets, steamed
    • 1 cup cauliflower florets, steamed and chopped
    • ½ tsp garlic powder
    • ½ tsp onion powder
    • ½ tsp dried thyme or Italian seasoning
    • Salt and pepper to taste
    • Fresh parsley (for garnish)

    Instructions

    1. Step 1: Preheat oven to 375°F. Grease a 9×13-inch baking dish.
    2. Step 2: In a bowl, mix cream cheese, sour cream, mayo, garlic powder, onion powder, thyme, salt, and pepper until smooth.
    3. Step 3: Fold in chicken, broccoli, cauliflower, and 1 cup cheddar cheese.
    4. Step 4: Transfer to casserole dish. Top with remaining cheddar and Parmesan.
    5. Step 5: Bake 25–30 minutes until bubbly. Broil 2–3 minutes for golden top.
    6. Step 6: Cool 5 minutes. Garnish with parsley and serve

    Notes

    To prevent a watery casserole, ensure steamed vegetables are well-drained and patted dry. Use full-fat dairy for the best texture and richness.

    • Prep Time: 10 minutes
    • Cook Time: 30 minutes
    • Category: Dinner
    • Method: Baking
    • Cuisine: American

    Nutrition

    • Serving Size: 1 serving
    • Calories: 490 kcal
    • Sugar: 6 g
    • Sodium: 820 mg
    • Fat: 38 g
    • Saturated Fat: 20 g
    • Unsaturated Fat: 18 g
    • Trans Fat: 0 g
    • Carbohydrates: 10 g
    • Fiber: 4 g
    • Protein: 35 g
    • Cholesterol: 130 mg