Blog

  • High-Protein Philly Cheesesteak Mac and Cheese

    High-Protein Philly Cheesesteak Mac and Cheese

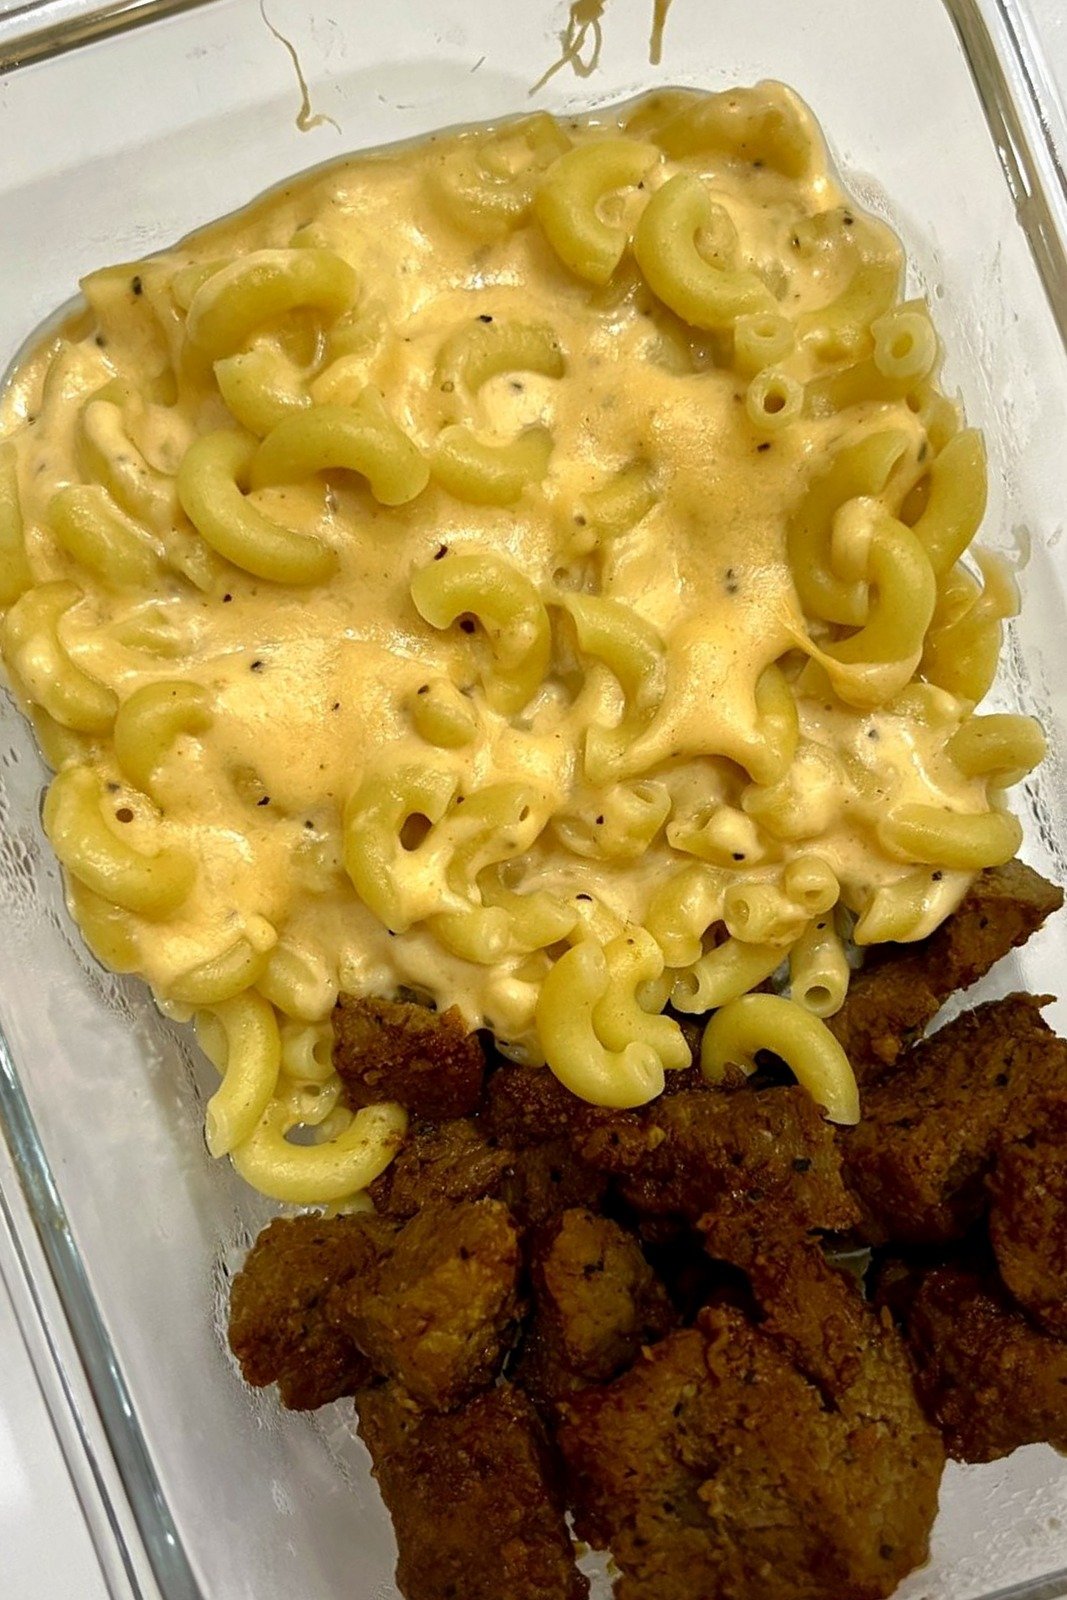
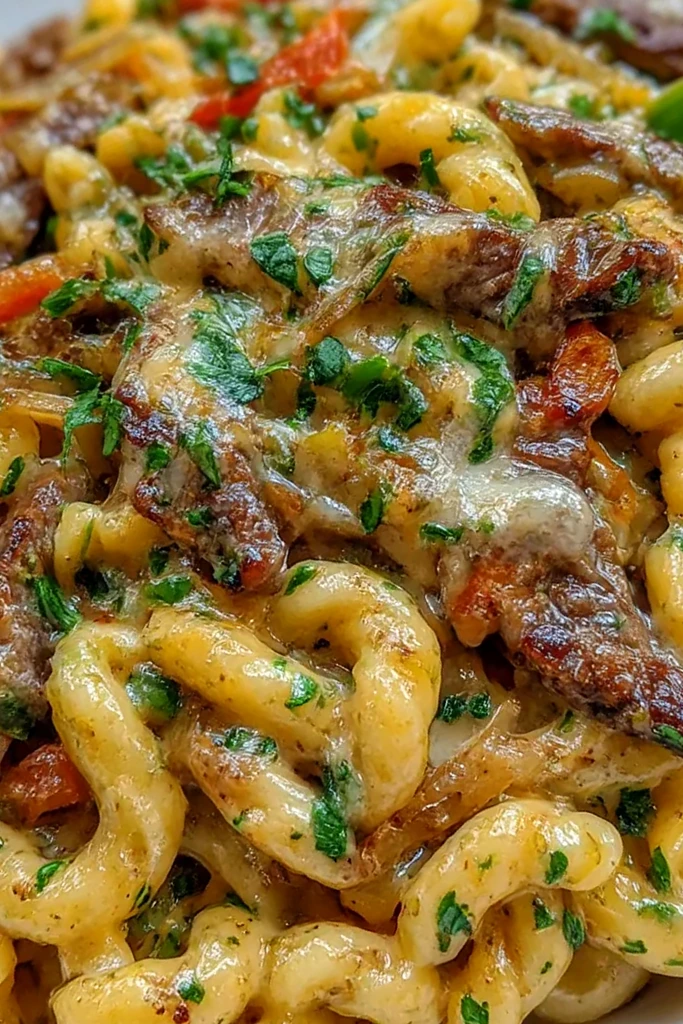
    This nutrient-dense meal combines the bold flavors of a Philadelphia cheesesteak with a creamy pasta base. It is a fast, one-pan dinner that provides a significant amount of protein in under 30 minutes.

    Recipe image

    List of ingredients

    • 8 oz high-protein pasta – use a chickpea or lentil-based variety for maximum protein.
    • 1 lb lean sirloin steak – thinly sliced against the grain for tenderness.
    • 1 tbsp olive oil – for searing the meat and sautéing vegetables.
    • 1 small green bell pepper – thinly sliced to match the steak.
    • 1 small onion – thinly sliced for flavor.
    • 2 cloves garlic – minced finely.
    • 1 tsp Worcestershire sauce – adds a savory, deep flavor profile.
    • ½ tsp salt – to enhance all savory notes.
    • ½ tsp black pepper – for a mild spicy kick.
    • 1 cup low-fat milk – creates the base of the creamy sauce.
    • 1 cup shredded provolone cheese – provides the traditional Philly taste.
    • ½ cup shredded mozzarella cheese – adds stretch and creaminess.
    • 2 oz light cream cheese – acts as a stabilizer for a smooth sauce.

    step-by-step instructions

    1. Cook Pasta: Boil the high-protein pasta according to the package instructions. Drain the water and set the pasta aside.
    2. Sear Steak: Heat olive oil in a large skillet over medium-high heat. Add the sliced sirloin and cook for 2 to 3 minutes until browned. Remove the meat from the pan and set it aside on a plate.
    3. Sauté Vegetables: In the same skillet, add the sliced bell pepper and onion. Cook for 4 to 5 minutes until softened. Stir in the minced garlic and cook for an additional 30 seconds.
    4. Season Meat: Return the browned steak to the skillet with the vegetables. Stir in the Worcestershire sauce, salt, and black pepper until evenly distributed.
    5. Build Sauce: Lower the heat to medium. Pour in the low-fat milk and add the light cream cheese, stirring constantly until the mixture is smooth and slightly thickened.
    6. Melt Cheese: Stir in the shredded provolone and mozzarella. Continue stirring until the cheeses are completely melted and the sauce is creamy.
    7. Combine: Add the cooked pasta to the skillet. Toss the mixture until the pasta is evenly coated and heat for 1 to 2 minutes.
    8. Final Touch: Serve the dish immediately while warm. Garnish with extra cracked black pepper if desired.

    Professional Searing and Sautéing Techniques

    Pat Steak Dry Before Cooking

    Use paper towels to remove excess moisture from the surface of the sirloin slices. Removing surface water prevents the meat from steaming in the pan, allowing it to achieve a deep brown crust through the Maillard reaction.

    Slice Steak Against the Grain

    Identify the muscle fibers of the sirloin and cut perpendicular to them. This shortens the fibers, making the meat much easier to chew and ensuring a tender result even with lean cuts.

    Caramelize Vegetables for Depth

    Allow the onions and peppers to sit undisturbed for a minute or two before stirring. This encourages browning and concentrates the natural sugars, providing a sweeter contrast to the savory cheese sauce.

    Avoid Overcrowding the Skillet

    Cook the steak in batches if the skillet is too small. Overcrowding drops the pan temperature and releases moisture, which leads to gray, boiled meat instead of seared, flavorful beef.

    Ingredient Substitutions and Adaptations

    High-Protein Pasta Alternatives

    Swap wheat-based protein pasta for chickpea or red lentil pasta to increase fiber and protein. Be mindful that these pastas cook faster and can become mushy, so check them 2 minutes before the package suggests.

    Alternative Lean Protein Options

    Replace sirloin with thinly sliced chicken breast or turkey tenderloin for a different flavor profile. These meats require slightly shorter cooking times and pair well with the same provolone and mozzarella blend.

    Dairy-Free Cheese Swaps

    Use a combination of cashew-based cream cheese and vegan mozzarella to make the dish dairy-free. To maintain the thickness, you may need to add a teaspoon of cornstarch slurry to the plant-based milk.

    Low-Sodium Flavor Enhancers

    If reducing salt, replace the Worcestershire sauce with a squeeze of lemon juice and a dash of smoked paprika. This provides the necessary acidity and depth without adding excessive sodium.

    Customizing Flavor and Texture

    Adding Umami with Mushrooms

    Sauté sliced cremini or button mushrooms along with the onions and peppers. Mushrooms add a meaty texture and a rich, earthy flavor that complements the beef and melted provolone.

    Incorporating Fresh Leafy Greens

    Stir in two cups of fresh baby spinach or chopped kale during the final minute of cooking. The residual heat will wilt the greens, adding color and micronutrients without altering the flavor.

    Increasing Heat Levels

    Add a pinch of red pepper flakes or a teaspoon of sriracha to the sauce while melting the cheeses. This adds a spicy layer that cuts through the richness of the cream and cheese.

    Varying the Pepper Profile

    Use a mix of red, yellow, and orange bell peppers for a more vibrant presentation. Different colored peppers offer slightly different sweetness levels, adding complexity to the vegetable base.

    Serving Suggestions and Pairings

    Pairing with Acidic Green Salads

    Serve this rich pasta alongside a simple arugula salad with a lemon-olive oil vinaigrette. The acidity of the dressing helps cleanse the palate between bites of the creamy cheesesteak mac.

    Adding Tangy Vegetable Sides

    Accompany the meal with chilled pickle spears or pickled red onions. The vinegar-based tanginess balances the heavy fats from the cheese and cream cheese.

    Garnishing with Fresh Herbs

    Top the finished dish with freshly chopped parsley or chives. These herbs add a bright, fresh note and a pop of color to the golden-brown pasta.

    Serving with Roasted Roots

    Add a side of roasted carrots or zucchini to increase the vegetable volume. Roasting these vegetables at high heat preserves their structure and adds a charred flavor that fits the Philly theme.

    Storage and Preservation Guidelines

    Refrigeration Best Practices

    Store leftovers in an airtight glass container in the refrigerator for up to three days. Glass containers help maintain the flavor and prevent the pasta from absorbing odors from other foods.

    Preventing Sauce Separation

    When storing, the sauce may thicken or separate slightly. Adding a small splash of milk or water before reheating helps the emulsion come back together for a creamy texture.

    Freezing Components Separately

    Avoid freezing the assembled pasta as the noodles often become grainy. Instead, freeze the cooked steak and vegetable mixture and the sauce separately, then combine them upon reheating.

    Managing Pasta Texture During Storage

    Undercook the pasta by one minute when planning for leftovers. This prevents the noodles from becoming overly soft when they are reheated in the cheese sauce.

    Effective Reheating Methods

    Stovetop Reheating for Maximum Creaminess

    Place the leftovers in a skillet over low-medium heat. Add a tablespoon of milk and stir gently to loosen the sauce and return it to its original glossy consistency.

    Microwave Heating Instructions

    Heat the pasta in a microwave-safe bowl in 45-second intervals. Stir between each interval to ensure the cheese melts evenly and avoid hot spots in the center.

    Oven Finishing for a Cheesy Crust

    Transfer the pasta to an oven-safe dish and top with a thin layer of extra mozzarella. Broil for 2 to 3 minutes until the top is bubbly and golden brown.

    Avoiding Overcooking During Reheat

    Heat only until the center is warm. Overheating the dish can cause the cheese sauce to break, resulting in a greasy texture and tough pieces of steak.

    Make-Ahead Preparation Tips

    Advance Vegetable and Meat Prep

    Slice the steak, onions, and peppers the night before and store them in separate containers. This reduces the actual cooking time to just the searing and assembling phases.

    Pre-Cooking the Protein Pasta

    Cook the pasta in advance and toss it with a drizzle of olive oil to prevent sticking. Store it in the fridge and add it to the skillet at the very end of the cooking process.

    Creating a Pre-Mixed Cheese Blend

    Combine the shredded provolone and mozzarella in a single bag. This allows you to dump the cheese into the sauce in one go, speeding up the melting process.

    Preparing Minced Garlic in Bulk

    Mince a whole head of garlic and store it in a small jar covered with olive oil. This ensures you have fresh, ready-to-use garlic for this recipe and other weeknight meals.

    Troubleshooting Common Issues

    Fixing a Sauce that is Too Thick

    If the sauce becomes too heavy, stir in a tablespoon of reserved pasta water or low-fat milk. The starch in the pasta water helps emulsify the sauce while loosening the consistency.

    Preventing Grainy Cheese Sauce

    Keep the heat on medium or low when adding the shredded cheeses. High heat can cause the proteins in the cheese to tighten and separate from the fats, leading to a grainy texture.

    Avoiding Tough Steak

    Ensure the pan is very hot before adding the steak and cook it quickly. Leaving the steak in the pan too long after it has browned will overcook the center and make it chewy.

    Managing Pasta Clumping

    If the high-protein pasta sticks together after draining, rinse it briefly with warm water or toss it with a small amount of olive oil before adding it to the sauce.

    Frequently Asked Questions

    Can I use regular pasta and still keep it high-protein?

    Yes, you can use regular pasta, though the total protein per serving will decrease. To compensate, you can slightly increase the amount of lean steak or add a side of steamed broccoli.

    How long do leftovers keep in the fridge?

    This dish stays fresh in an airtight container for up to 3 days. Always ensure the food is cooled slightly before sealing the lid to prevent excess moisture buildup.

    Can this meal be frozen?

    It is best enjoyed fresh, as the dairy-based sauce and high-protein pasta may change texture when frozen. If you must freeze it, reheat slowly on the stovetop with extra milk.

    Which steak cuts work best for this recipe?

    Lean sirloin is recommended for the best balance of flavor and health. Flank steak or skirt steak are also excellent alternatives if sliced very thin against the grain.

    Print
    clock clock iconcutlery cutlery iconflag flag iconfolder folder iconinstagram instagram iconpinterest pinterest iconfacebook facebook iconprint print iconsquares squares iconheart heart iconheart solid heart solid icon
    High-Protein Philly Cheesesteak Mac and Cheese

    High-Protein Philly Cheesesteak Mac and Cheese


    5 Stars 4 Stars 3 Stars 2 Stars 1 Star

    No reviews

    • Author: imageuploader
    • Total Time: 30 minutes
    • Yield: 4 servings 1x
    • Diet: Low Fat

    Description

    High-Protein Philly Cheesesteak Mac: Creamy, protein-packed comfort food with classic Philly flavors in a mac and cheese twist.


    Ingredients

    Scale
    • 8 oz high-protein pasta
    • 1 lb lean sirloin steak, thinly sliced
    • 1 tbsp olive oil
    • 1 small green bell pepper, thinly sliced
    • 1 small onion, thinly sliced
    • 2 cloves garlic, minced
    • 1 tsp Worcestershire sauce
    • ½ tsp salt
    • ½ tsp black pepper
    • 1 cup low-fat milk
    • 1 cup shredded provolone cheese
    • ½ cup shredded mozzarella cheese
    • 2 oz light cream cheese

    Instructions

    1. Step: Cook high-protein pasta according to package directions. Drain and set aside.
    2. Step: Heat olive oil in a large skillet over medium-high heat. Add sliced steak and cook 2 to 3 minutes until browned. Remove and set aside.
    3. Step: In the same skillet, sauté bell pepper and onion for 4 to 5 minutes until softened. Add garlic and cook 30 seconds.
    4. Step: Return steak to the skillet. Stir in Worcestershire sauce, salt, and black pepper.
    5. Step: Reduce heat to medium. Add milk and cream cheese, stirring until smooth and slightly thickened.
    6. Step: Stir in provolone and mozzarella until melted and creamy.
    7. Step: Add cooked pasta and toss until evenly coated. Cook 1 to 2 minutes until everything is heated through.
    8. Step: Serve warm with extra cracked pepper if desired.

    Notes

    Use extra-lean sirloin for the leanest dish. To reduce fat further, substitute part-skim cheese options or 1% milk. Want more veggies? Add mushrooms or extra peppers for color and texture. Leftovers can be stored in an airtight container for up to 3 days.

    • Prep Time: 10 minutes
    • Cook Time: 20 minutes
    • Category: Main Dish
    • Method: Skillet, Stovetop
    • Cuisine: American

    Nutrition

    • Serving Size: 1 serving
    • Calories: 630 kcal
    • Sugar: 8 g
    • Sodium: 1150 mg
    • Fat: 27 g
    • Saturated Fat: 14 g
    • Unsaturated Fat: 11 g
    • Trans Fat: 0 g
    • Carbohydrates: 34 g
    • Fiber: 3 g
    • Protein: 47 g
    • Cholesterol: 110 mg
  • Easy Vegan Breakfast Burritos (Freezer-Friendly!)

    Easy Vegan Breakfast Burritos (Freezer-Friendly!)

    These plant-based breakfast burritos are designed for efficient meal prep and busy mornings. They combine high-protein tofu and fiber-rich black beans for a filling, handheld meal.

    Recipe image

    List of ingredients

    • 1 lb small yellow potatoes, diced into ½-inch cubes – provides a hearty base.
    • 1 tablespoon light oil (canola, vegetable, or broth for oil-free) – used for roasting.
    • ½ teaspoon smoked paprika – adds a woody, smoky flavor.
    • ½ teaspoon garlic powder – provides a savory aromatic base.
    • Salt & pepper to taste – for basic seasoning.
    • 1 tablespoon light oil (canola, vegetable, or broth for oil-free) – used for the scramble.
    • 1 block (14 oz / 400 g) firm tofu, drained and crumbled – the primary protein source.
    • 1 cup black beans, rinsed and drained – adds texture and fiber.
    • 2 tablespoons nutritional yeast – provides a cheesy, savory depth.
    • ½ teaspoon chili powder – adds a mild warmth.
    • ½ teaspoon onion powder – enhances the savory profile.
    • ½ teaspoon garlic powder – adds depth to the tofu.
    • ¼ teaspoon turmeric – used primarily for a yellow egg-like color.
    • 1 teaspoon black salt (kala namak), optional – creates a sulfurous, eggy taste.
    • Salt & pepper to taste – to balance the spices.
    • 6 large flour tortillas (gluten-free if preferred) – the wrapper.
    • 1 cup vegan shredded cheese – for meltability and flavor.
    • 1 avocado, diced (omit if freezing) – adds creaminess.
    • 1 cup chopped spinach or lettuce (use spinach if freezing), optional – adds nutrients.
    • ½ cup salsa or pico de gallo – provides acidity and moisture.
    • Optional additions: vegan bacon, breakfast sausage, guacamole, jalapeños, chopped bell peppers, corn kernels, hot sauce, cilantro, or lime juice.

    step-by-step instructions

    1. Roast the potatoes: Preheat the oven to 425°F (220°C). Toss the diced potatoes with oil, smoked paprika, garlic powder, salt, and pepper. Spread evenly on a parchment-lined or lightly greased baking sheet and roast for 20–25 minutes, flipping halfway through, until golden and crisp.
    2. Make the tofu scramble: Heat the oil in a large nonstick skillet over medium heat. Add the tofu and use a spatula to break it into crumbles. Add the black beans, nutritional yeast, chili powder, onion powder, garlic powder, turmeric, and black salt. Cook for 5–7 minutes, stirring often, until heated through, and season with salt and pepper. Tip: For a stronger eggy flavor, add more black salt, or cook longer to mellow the flavor.
    3. Assemble the burritos: Lay out the tortillas. Layer on tofu scramble, roasted potatoes, vegan cheese, avocado, spinach, and salsa, including any optional additions. Fold in the sides, then roll tightly from the bottom to form burritos.
    4. Crisp the burritos: Place burritos seam-side down in a dry skillet over medium heat. Cook 2–3 minutes per side until golden and lightly crisp. This process seals the wrapper and prevents the burrito from unwrapping.

    Freezer Optimization Strategies

    Cooling Fillings to Prevent Sogginess

    Allow the roasted potatoes and tofu scramble to cool to room temperature before assembling the burritos. If hot fillings are wrapped immediately, they release steam that gets trapped inside the tortilla. This moisture creates soggy patches that compromise the texture during reheating.

    Selecting Hardy Greens for Freezing

    Use chopped spinach instead of shredded lettuce when preparing burritos for the freezer. Spinach maintains its structure better after the freezing and thawing process. Lettuce has a higher water content and becomes limp and translucent when frozen.

    Managing Fresh Toppings

    Omit diced avocado or fresh guacamole from burritos that will be frozen. Avocado oxidizes and changes texture when frozen, often becoming brown or mushy. Instead, add fresh avocado slices or serve with a side of guacamole after the burrito has been reheated.

    Double Wrapping for Freezer Burn Protection

    Wrap each individual burrito tightly in parchment paper or aluminum foil. Once wrapped, place all burritos inside a heavy-duty freezer bag, squeezing out as much air as possible. This double-layer approach prevents freezer burn and protects the tortillas from drying out.

    Flavor Enhancements and Variations

    Adding Plant-Based Meats

    Incorporate vegan bacon strips or soy-based breakfast sausage for extra protein and saltiness. Sauté these separately until crisp before adding them to the burrito assembly. This ensures the meats provide a textural contrast to the soft tofu scramble.

    Integrating Sautéed Aromatics

    Add diced red bell peppers, onions, or corn kernels to the tofu scramble. Sauté these vegetables in the skillet for 3-4 minutes before adding the tofu. This adds natural sweetness and a variety of colors to the filling.

    Adjusting Heat Levels

    Increase the spice by adding sliced jalapeños or a tablespoon of chipotle peppers in adobo sauce. For a brighter heat, drizzle hot sauce directly onto the tortilla before adding the fillings. Squeezing fresh lime juice over the tofu scramble also balances the heavy spices.

    Using Different Legume Options

    Substitute black beans with pinto beans or chickpeas for a different flavor profile. Pinto beans offer a creamier texture, while chickpeas provide a firmer bite. Ensure all beans are well-rinsed and drained to avoid adding excess liquid to the wrap.

    Comprehensive Reheating Guide

    Fast Microwave Recovery

    For refrigerated burritos, microwave for 1 to 2 minutes until heated through. For frozen burritos, use the defrost setting for 4 to 5 minutes first. Then, heat on high for another 1 to 2 minutes to ensure the center is hot.

    Oven Baking for Consistent Heat

    Preheat the oven to 350°F (175°C). Wrap frozen burritos in foil and bake for 15 to 20 minutes. This method provides a more consistent internal temperature and avoids the cold spots often found with microwaving.

    Skillet Searing for Texture

    After microwaving or defrosting, place the burrito in a dry skillet over medium heat. Sear for 2 to 3 minutes per side until the tortilla is golden brown. This restores the crispiness of the wrapper and seals the seam.

    Air Fryer Method

    Place frozen or refrigerated burritos in the air fryer basket at 350°F. Heat for 8 to 12 minutes, turning halfway through. This results in a very crisp exterior while keeping the inside moist.

    Tofu Scramble Mastery

    Achieving the Right Texture

    Use a potato masher or a sturdy fork to crumble the firm tofu for a more consistent, egg-like appearance. Avoid blending the tofu, as this creates a paste rather than a scramble. The goal is to have varied piece sizes to mimic scrambled eggs.

    Understanding Black Salt (Kala Namak)

    Black salt contains sulfur compounds that mimic the smell and taste of real eggs. Because the flavor is quite pungent, add it toward the end of the cooking process. If the taste is too strong, continuing to cook the scramble for a few minutes will mellow the aroma.

    Using Nutritional Yeast for Umami

    Nutritional yeast provides a savory, nutty, and slightly cheesy flavor that complements the tofu. It also helps thicken the scramble, preventing the filling from being too wet. Ensure it is stirred in well to avoid clumps of powder.

    The Role of Turmeric

    Turmeric is used primarily for visual appeal, giving the tofu a vibrant yellow color. Use it sparingly, as too much turmeric can introduce a slightly bitter, earthy taste. A quarter teaspoon is usually sufficient for one block of tofu.

    Tortilla Selection and Preparation

    Flour vs. Corn Tortillas

    Large flour tortillas are recommended because they are more pliable and can hold a larger volume of filling without tearing. Corn tortillas are smaller and more prone to cracking when folded. If using corn, you will likely need to make smaller, taco-style wraps.

    Warming Tortillas for Easier Folding

    Warm the tortillas in a microwave for 10 seconds or on a dry pan before filling. This softens the gluten structure, making the tortilla more elastic. This prevents the wrapper from splitting when you fold in the sides and roll the burrito.

    Selecting Gluten-Free Alternatives

    Cassava or almond flour tortillas are excellent gluten-free substitutes that hold up well to heat. Check the labels for flexibility; some gluten-free brands are more brittle than others. Warming these tortillas is essential to prevent them from breaking during assembly.

    Common Troubleshooting

    Solving Tortilla Tearing

    If your tortillas frequently tear, they may be too cold or too dry. Use a damp paper towel to cover them while microwaving for 15 seconds. This adds a small amount of moisture that increases pliability.

    Balancing Overpowering Black Salt

    If the sulfur flavor of the kala namak is too intense, add a pinch of sugar or more nutritional yeast. These ingredients help neutralize the pungency. Alternatively, cooking the mixture longer on medium heat reduces the volatile sulfur compounds.

    Preventing Potato Mushiness

    Avoid overcrowding the baking sheet when roasting the potatoes. If the cubes are too close together, they steam instead of roast, resulting in a soft texture. Use two baking sheets if necessary to ensure airflow around each potato cube.

    Frequently Asked Questions

    Can I use extra-firm tofu instead of firm?

    Yes, extra-firm tofu is actually preferred as it holds its shape better and provides a heartier bite. Ensure you drain it well to remove excess water before crumbling.

    What is the best gluten-free tortilla for freezing?

    Cassava-based tortillas generally freeze and reheat better than corn-based ones. They maintain a better texture and are less likely to crack after being frozen.

    How do I keep the burrito from opening during reheating?

    Always place the burrito seam-side down in a skillet for a few minutes before serving. The heat seals the tortilla together, ensuring the filling does not leak out.

    Can I make this recipe completely oil-free?

    Yes, replace the oil in the roasting and sautéing steps with vegetable broth or water. Use a high-quality nonstick pan to prevent the tofu and potatoes from sticking.

    Print
    clock clock iconcutlery cutlery iconflag flag iconfolder folder iconinstagram instagram iconpinterest pinterest iconfacebook facebook iconprint print iconsquares squares iconheart heart iconheart solid heart solid icon
    Easy Vegan Breakfast Burritos (Freezer-Friendly!)

    Easy Vegan Breakfast Burritos (Freezer-Friendly!)


    5 Stars 4 Stars 3 Stars 2 Stars 1 Star

    No reviews

    • Author: imageuploader
    • Total Time: 45 minutes
    • Yield: 6 burritos 1x
    • Diet: Vegan

    Description

    These Vegan Breakfast Burritos are hearty, satisfying, and totally customizable! Packed with crispy potatoes, tofu scramble, black beans, and melty vegan cheese, they’re the ultimate make-ahead breakfast. Perfect for busy mornings, just grab one from the freezer, heat, and go!


    Ingredients

    Scale
    • 1 lb small yellow potatoes, diced into ½-inch cubes
    • 1 tablespoon light oil
    • ½ teaspoon smoked paprika
    • 1/2 teaspoon garlic powder
    • salt & pepper, to taste
    • 1 tablespoon light oil
    • 1 block (14 oz / 400 g) firm tofu, drained and crumbled
    • 1 cup black beans, rinsed and drained
    • 2 tablespoons nutritional yeast
    • 1/2 teaspoon chili powder
    • ½ teaspoon onion powder
    • ½ teaspoon garlic powder
    • ¼ teaspoon turmeric
    • 1 teaspoon black salt (kala namak)
    • salt & pepper, to taste
    • 6 large flour tortillas
    • 1 cup vegan shredded cheese
    • 1 avocado, diced
    • 1 cup chopped spinach or lettuce
    • ½ cup salsa or pico de gallo

    Instructions

    1. Roast the potatoes: Preheat the oven to 425°F (220°C). Toss the diced potatoes with oil, smoked paprika, garlic powder, salt, and pepper. Spread evenly on a parchment-lined or lightly greased baking sheet. Roast for 20–25 minutes, flipping halfway through, until golden and crisp.
    2. Make the tofu scramble: Heat the oil in a large nonstick skillet over medium heat. Add the tofu and use a spatula to break up the tofu into crumbles. Add the black beans, nutritional yeast, chili powder, onion powder, garlic powder, turmeric, and black salt. Cook for 5–7 minutes, stirring often, until heated through. Season with salt and pepper to taste.
    3. Assemble the burritos: Lay out the tortillas. Layer on tofu scramble, roasted potatoes, vegan cheese, avocado, spinach, and salsa. Fold in the sides, then roll tightly from the bottom to form burritos.
    4. Crisp the burritos: Place burritos seam-side down in a dry skillet over medium heat. Cook 2–3 minutes per side until golden and lightly crisp.

    Notes

    Fridge: Wrap tightly and refrigerate up to 3 days. Freezer: Let fillings cool completely before assembling. Wrap each burrito in parchment or foil and store in a freezer bag for up to 2 months. Reheating: Microwave refrigerated burritos for 1-2 minutes; for frozen, defrost for 4-5 minutes in the microwave, then heat 1-2 minutes more, or bake at 350°F for 15-20 minutes.

    • Prep Time: 15 minutes
    • Cook Time: 30 minutes
    • Category: Breakfast
    • Method: Baking, Sautéing
    • Cuisine: American, Mexican

    Nutrition

    • Serving Size: 1 burrito
    • Calories: 362 kcal
    • Sugar: 3 g
    • Sodium: 1145 mg
    • Fat: 16 g
    • Saturated Fat: 4 g
    • Unsaturated Fat: 12 g
    • Trans Fat: 0.03 g
    • Carbohydrates: 46 g
    • Fiber: 9 g
    • Protein: 10 g
    • Cholesterol: 0 mg
  • Tender and Juicy Creamy Chicken Breast

    Tender and Juicy Creamy Chicken Breast

    Achieving juicy chicken breast requires a combination of proper preparation and a controlled simmering process. This recipe uses a creamy sauce and a pounding technique to ensure every bite is tender and flavorful.

    Recipe image

    List of ingredients

    • 2 large boneless, skinless chicken breasts – pounded to even thickness.
    • Cream cheese – softened to room temperature for a smooth sauce.
    • Low-sodium chicken broth – used as the savory liquid base.
    • 3-4 cloves of freshly minced garlic – provides aromatic depth.
    • Fresh lemon juice – added at the end to brighten the flavor.
    • Dried Italian seasoning – a blend for savory herbal notes.
    • Olive oil – used for searing the meat.
    • Salt – for seasoning and flavor enhancement.
    • Black pepper – for a touch of spice and warmth.

    step-by-step instructions

    1. Prepare the Chicken: Place boneless, skinless chicken breasts one at a time between two pieces of plastic wrap or in a large resealable bag. Use a meat mallet or rolling pin to pound them evenly to about 1/2-inch thickness. Pat the meat dry with paper towels and season both sides generously with salt and black pepper.
    2. Sear the Chicken: Heat a large skillet over medium-high heat and add 1 tablespoon of olive oil. Once the oil shimmers, place the seasoned chicken in the pan and sear for 3-4 minutes per side until golden brown and caramelized. Remove the chicken and set it aside on a plate.
    3. Sauté the Aromatics: Reduce the heat to medium and add another teaspoon of olive oil if the pan is dry. Add the minced garlic and cook for 30-60 seconds, stirring constantly to prevent burning.
    4. Build the Creamy Sauce: Pour the chicken broth into the skillet and scrape the browned bits from the bottom of the pan. Bring to a gentle simmer, then reduce heat to low and add the softened cream cheese. Whisk constantly until the cheese is fully melted and the sauce is smooth.
    5. Season the Sauce: Stir in the dried Italian seasoning and a pinch more salt and pepper. Taste the sauce and adjust the seasoning as needed.
    6. Simmer the Chicken: Return the seared chicken breasts to the skillet, nestling them into the sauce. Cover the pan and simmer for 8-12 minutes, or until the internal temperature reaches 165°F (74°C).
    7. Finish and Serve: Remove the pan from the heat and stir in the fresh lemon juice. Sprinkle in fresh herbs if desired and let the chicken rest in the sauce for a few minutes before serving.

    Expert Techniques for Maximum Tenderness

    Pounding Chicken for Uniform Thickness

    Pounding the chicken breasts is the most critical step for ensuring a juicy result. When breasts are uneven, the thinner end overcooks and dries out before the thicker center reaches a safe temperature. Using a mallet to create a consistent 1/2-inch thickness allows the meat to cook rapidly and evenly.

    Using an Instant-Read Thermometer for Precision

    Chicken breast has a very narrow window between being perfectly cooked and becoming dry. An instant-read thermometer allows you to pull the meat from the heat the moment it hits 165°F (74°C). This prevents the common mistake of overcooking based on visual cues alone.

    Allowing the Meat to Rest Before Serving

    Resting the chicken for several minutes after cooking allows the muscle fibers to relax. This process redistributes the internal juices throughout the meat rather than letting them run out upon the first cut. Resting the chicken inside the sauce also allows it to absorb more of the creamy flavors.

    Ingredient Substitutions and Customizations

    Substituting Chicken Broth with Vegetable Options

    If you do not have chicken broth on hand, low-sodium vegetable broth is an excellent alternative. It provides a similar savory base without significantly altering the flavor profile of the cream sauce. This is a great way to keep the recipe flexible based on your pantry staples.

    Using Low-Fat or Alternative Cream Cheeses

    While full-fat cream cheese provides the richest texture, reduced-fat versions can be used for a lighter sauce. If using a lower-fat version, be mindful that the sauce may be slightly thinner. You can compensate for this by simmering the sauce for an extra minute before adding the chicken back in.

    Introducing Red Pepper Flakes for Spicy Flavor

    For those who prefer a bit of heat, adding a pinch of crushed red pepper flakes during the garlic sauté phase is highly effective. The oil helps release the capsaicin in the flakes, distributing the spice evenly through the cream sauce. This adds a subtle kick that complements the lemon juice.

    Adding Mushrooms or Spinach for Extra Nutrition

    You can easily turn this into a one-pan meal by adding vegetables. Sauté sliced mushrooms with the garlic or stir in fresh baby spinach at the very end until wilted. These additions add texture and nutrients without requiring a separate cooking pot.

    Incorporating Parmesan for a Saltier Profile

    Stirring in a handful of freshly grated Parmesan cheese along with the cream cheese adds a sharp, nutty dimension to the sauce. If you add Parmesan, reduce the additional salt used in the seasoning step to keep the sodium levels balanced. The extra cheese also helps thicken the sauce naturally.

    Experimenting with Different Herb Blends

    While Italian seasoning is a standard choice, you can swap it for dried thyme and rosemary for a more earthy flavor. For a brighter, more summer-like profile, try using dried dill or parsley. Fresh herbs added at the final step provide the most vibrant color and aroma.

    Serving Suggestions

    Serving Over Rice or Mashed Potatoes

    The creamy sauce is the highlight of this dish, and serving it over a starch allows you to enjoy every drop. Fluffy white rice, brown rice, or creamy mashed potatoes provide a neutral base that balances the richness of the cream cheese. This makes the meal feel more substantial and filling.

    Pairing with Steamed Green Beans or Salad

    To balance the richness of the dairy sauce, pair the chicken with a crisp, fresh side. Steamed green beans with a squeeze of lemon or a garden salad with a light vinaigrette provide a necessary acidic contrast. This prevents the palate from feeling overwhelmed by the creaminess.

    Serving with Crusty Bread for Sauce Dipping

    A side of warm, toasted baguette or crusty sourdough bread is ideal for this recipe. The bread can be used to soak up the remaining sauce from the plate. This is a practical way to ensure none of the flavorful cream sauce goes to waste.

    Storage and Reheating Guidelines

    Cooling and Refrigerating Leftovers Properly

    Allow the chicken and sauce to cool to room temperature before transferring them to an airtight container. This prevents excess condensation from forming inside the container, which can make the sauce watery. Store the dish in the refrigerator for up to 3-4 days.

    Warming Creamy Sauces Without Separation

    Dairy-based sauces can separate or break if heated too quickly. Reheat the chicken in a skillet over low heat, adding a splash of chicken broth or water to loosen the sauce. Stir gently and frequently until the sauce becomes smooth and the chicken is heated through.

    Guidelines for Freezing Dairy-Based Chicken

    Freezing is possible, but cream cheese sauces can sometimes become grainy upon thawing. To minimize this, freeze the chicken and sauce in a freezer-safe container for up to 2 months. Thaw the meal slowly in the refrigerator overnight before reheating gently on the stove.

    Common Questions

    How can I prevent the cream sauce from breaking?

    To keep the sauce smooth, always ensure the cream cheese is softened to room temperature before adding it to the broth. Additionally, keep the heat on low when whisking in the cheese; boiling the sauce too vigorously can cause the fats to separate from the liquids.

    Can I use chicken thighs instead of breasts?

    Yes, you can use boneless, skinless chicken thighs, though they contain more fat and have a different texture. Thighs do not need to be pounded as they are naturally more tender, but they may require a slightly longer simmering time to ensure they are fully cooked.

    What is the best way to pound chicken without tearing it?

    Always place the chicken between two sheets of plastic wrap or inside a sealed plastic bag. This protects the meat from tearing and prevents raw chicken juices from splashing onto your counter. Use a flat-faced meat mallet or a heavy rolling pin for an even surface.

    How do I make the sauce thicker if it is too runny?

    If the sauce is too thin, you can simmer it uncovered for a few minutes to allow the liquid to reduce. Alternatively, whisk one teaspoon of cornstarch into one tablespoon of cold water to create a slurry, then stir this into the simmering sauce for a few minutes until thickened.

    Can I use dried garlic instead of fresh?

    Dried garlic powder can be used, but it lacks the pungent, aromatic quality of fresh minced garlic. If using powder, use about 1/4 teaspoon for every clove called for in the recipe and add it during the broth stage rather than sautéing it in oil to avoid burning.

    Print
    clock clock iconcutlery cutlery iconflag flag iconfolder folder iconinstagram instagram iconpinterest pinterest iconfacebook facebook iconprint print iconsquares squares iconheart heart iconheart solid heart solid icon
    Juicy and Tender Creamy Chicken Breast

    Tender and Juicy Creamy Chicken Breast


    5 Stars 4 Stars 3 Stars 2 Stars 1 Star

    No reviews

    • Author: imageuploader
    • Total Time: 35 minutes
    • Yield: 2 servings 1x
    • Diet: General

    Description

    This Melt In Your Mouth Chicken Breast recipe transforms bland poultry into an incredibly tender and juicy dish. It’s simple to prepare and perfect for both weeknight dinners and special occasions.


    Ingredients

    Scale
    • 2 large boneless, skinless chicken breasts
    • Cream cheese (softened to room temperature)
    • Low-sodium chicken broth
    • 34 cloves of freshly minced garlic
    • Fresh lemon juice
    • Dried Italian seasoning
    • Olive oil
    • Salt
    • Black pepper

    Instructions

    1. Prepare the Chicken: Take your boneless, skinless chicken breasts and place them one at a time between two pieces of plastic wrap or in a large resealable bag. Using a meat mallet or a rolling pin, pound them evenly to about 1/2-inch thickness. Pat them dry with paper towels and season generously on both sides with salt and black pepper.
    2. Sear the Chicken: Heat a large skillet over medium-high heat and add about 1 tablespoon of olive oil. Once the oil shimmers, carefully place the seasoned chicken breasts in the hot pan. Sear them for 3-4 minutes per side until they’re golden brown and lightly caramelized. Remove the chicken from the skillet and set aside on a plate.
    3. Sauté the Aromatics: Reduce the heat to medium. If the pan looks dry, add another teaspoon of olive oil. Add the minced garlic to the skillet and cook for about 30-60 seconds, stirring constantly, until fragrant.
    4. Build the Creamy Sauce: Pour the chicken broth into the skillet, scraping up any browned bits from the bottom of the pan. Bring the broth to a gentle simmer. Reduce the heat to low, then add the softened cream cheese to the simmering broth. Whisk constantly until the cream cheese is fully melted and the sauce is smooth.
    5. Season the Sauce: Stir in your dried Italian seasoning and a good pinch more of salt and pepper. Taste the sauce and adjust seasonings as needed.
    6. Simmer the Chicken: Return the seared chicken breasts to the skillet, nestling them into the creamy sauce. Cover the skillet and let the chicken gently simmer in the sauce for 8-12 minutes, or until the chicken is cooked through and registers an internal temperature of 165°F (74°C).
    7. Finish and Serve: Remove the skillet from the heat. Stir in the fresh lemon juice. If using fresh herbs, sprinkle them in. Let the chicken rest in the sauce for a few minutes before serving.

    Notes

    Pounding the chicken breasts to an even thickness ensures they cook quickly and uniformly. Use an instant-read thermometer to avoid overcooking, and let the chicken rest after cooking to keep it moist.

    • Prep Time: 15 minutes
    • Cook Time: 20 minutes
    • Category: Dinner
    • Method: Searing
    • Cuisine: American

    Nutrition

    • Serving Size: 1 chicken breast with sauce
    • Calories: 400 kcal
    • Sugar: 2 g
    • Sodium: 600 mg
    • Fat: 25 g
    • Saturated Fat: 10 g
    • Unsaturated Fat: 15 g
    • Trans Fat: 0 g
    • Carbohydrates: 5 g
    • Fiber: 0 g
    • Protein: 40 g
    • Cholesterol: 120 mg
  • High-Protein Viral Ground Beef Bowls for Easy Meal Prep

    High-Protein Viral Ground Beef Bowls for Easy Meal Prep

    These high-protein ground beef bowls provide a balanced mix of lean protein, complex carbohydrates, and fresh vegetables. They are designed for efficient weekly meal prep, ensuring you have a nutritious and flavorful meal ready in minutes.

    Recipe image

    List of ingredients

    • 1 lb lean ground beef (93% lean) – provides a high-protein, low-fat base.
    • 1 cup cooked jasmine or brown rice – serves as the fluffy carbohydrate foundation.
    • 1 1/2 cups shredded cabbage or slaw mix – adds crunch and essential fiber.
    • 1/2 cup shredded carrots – contributes natural sweetness and color.
    • 2 eggs (fried or soft-boiled) – adds richness and extra protein.
    • 1 tbsp olive oil – used for sautéing and preventing sticking.
    • 3 tbsp soy sauce or tamari – provides a salty, umami depth to the beef.
    • 1 tbsp brown sugar – balances the saltiness with a hint of sweetness.
    • 2 cloves garlic, minced – adds aromatic pungency to the meat.
    • 1 tsp sesame oil – gives a distinct nutty aroma.
    • 1/2 tsp chili flakes (optional) – adds a mild heat to the protein.
    • 1/4 cup Greek yogurt or mayo – the creamy base for the spicy drizzle.
    • 1 tbsp sriracha – provides a spicy kick to the sauce.
    • 1 tsp honey – adds a touch of floral sweetness to the glaze.
    • Juice of 1/2 lime – cuts through the richness with bright acidity.

    step-by-step instructions

    1. Prepare the grains: Cook your jasmine or brown rice according to the package directions until fluffy and tender.
    2. Sauté the beef: Heat sesame oil in a large skillet over medium-high heat. Add the ground beef, minced garlic, soy sauce, brown sugar, and chili flakes, cooking until the beef is fully browned and the sauce has thickened.
    3. Prepare the vegetables: While the beef is simmering, shred the cabbage and carrots to keep them fresh and crisp for the assembly.
    4. Whisk the sauce: In a small mixing bowl, combine the Greek yogurt or mayo, sriracha, honey, and lime juice, stirring until the mixture is smooth.
    5. Cook the eggs: Prepare your eggs by frying them or soft-boiling them to your preferred level of doneness.
    6. Assemble the bowls: Start with a base of cooked rice, then layer on the seasoned beef, shredded cabbage, and carrots. Top with an egg and a generous drizzle of the spicy mayo sauce.

    Professional Techniques for Maximum Flavor

    Brown the Beef Thoroughly for Depth

    Allow the ground beef to sear without stirring constantly at the beginning. This creates a caramelized crust through the Maillard reaction, which adds a deep, savory complexity that boiling the meat in its own juices cannot achieve.

    Layer Seasonings for a Balanced Profile

    Add your aromatics like garlic toward the end of the browning process to prevent them from burning. Stirring in the soy sauce and brown sugar at the final stage allows the sugars to glaze the meat, creating a sticky, savory coating that clings to the beef.

    Control Rice Texture for Reheating

    If you are prepping these bowls for the week, cook your rice slightly under the package instructions. This prevents the grains from becoming mushy when you microwave the bowl later, maintaining a firm and pleasant bite.

    Emulsify the Spicy Mayo Properly

    Whisk the Greek yogurt and sriracha first before adding the honey and lime juice. This ensures the sauce stays thick and creamy rather than separating, which allows it to sit perfectly on top of the ingredients without soaking in too quickly.

    Smart Ingredient Substitutions

    Low-Carb Grain Alternatives

    Replace jasmine rice with cauliflower rice or quinoa for a lower-calorie or higher-fiber option. Cauliflower rice works best when sautéed briefly to remove excess moisture, ensuring the bowl doesn’t become watery.

    Plant-Based Protein Swaps

    Substitute the ground beef with cooked brown lentils, crumbled tempeh, or plant-based meat alternatives. These options absorb the soy and sesame flavors effectively, maintaining the integrity of the original flavor profile.

    Dairy-Free Sauce Options

    Swap the Greek yogurt for a vegan mayonnaise or a cashew-based cream. These alternatives provide the same creamy texture and richness while remaining entirely plant-based and dairy-free.

    Low-Sodium Flavor Enhancers

    Use coconut aminos instead of soy sauce to reduce the overall sodium content. Coconut aminos provide a similar salty-sweet taste but are generally lower in salt, making the dish more heart-healthy.

    Creative Recipe Variations

    Asian-Style Umami Twist

    Incorporate a tablespoon of hoisin sauce and freshly grated ginger into the beef mixture. This increases the sweetness and adds a pungent, zesty note that mimics restaurant-style beef bowls.

    Tex-Mex Fusion Version

    Change the beef seasoning to cumin, chili powder, and smoked paprika. Replace the cabbage with corn and diced avocado, and use a lime-cilantro Greek yogurt sauce for a vibrant, zesty profile.

    Extra Spicy Heat Level

    Add sliced fresh jalapeños or a drizzle of chili oil over the final assembly. For an even deeper heat, substitute the sriracha in the sauce with gochujang or a habanero-based hot sauce.

    Mediterranean-Inspired Bowl

    Use brown rice and swap the soy sauce for lemon juice and dried oregano. Pair the beef with diced cucumbers, cherry tomatoes, and a dollop of tzatziki instead of the spicy mayo.

    Comprehensive Meal Prep and Storage

    Separating Components for Optimal Freshness

    Store the cooked beef, rice, and fresh vegetables in separate compartments or containers. This prevents the moisture from the vegetables and sauce from softening the rice, keeping each element at its peak texture until consumption.

    Proper Refrigeration Guidelines

    Place the assembled or separated components in airtight glass containers to prevent odors from the fridge from penetrating the food. These bowls will maintain their quality and safety for up to four days when kept at or below 40°F.

    Freezing the Beef Base

    Cook a double batch of the seasoned beef and freeze it in portions using freezer-safe bags. The beef freezes exceptionally well for up to two months; simply thaw it overnight in the fridge before adding it to fresh rice and veggies.

    Reheating for Best Results

    Microwave the beef and rice together for 90-120 seconds until steaming. Add the cold shredded vegetables and the fresh sauce after heating to maintain the contrast between the warm protein and the crisp, cool toppings.

    Common Cooking Mistakes to Avoid

    Preventing Dry and Crumbly Meat

    Avoid overcooking the lean beef, as 93% lean meat can dry out quickly. Remove the skillet from the heat as soon as the meat is browned and the sauce has thickened to keep the beef juicy.

    Avoiding Soggy Meal Prep Containers

    Never add the spicy mayo drizzle to the bowls before storing them in the fridge. The acids in the lime and the moisture in the yogurt can break down the vegetables and make the rice gummy if left to sit for days.

    Managing Excessive Oil Levels

    Do not add too much olive oil to the pan, as lean beef already releases some fat. Excess oil can pool at the bottom of your prep containers, making the dish feel greasy and altering the flavor of the rice.

    Over-Salting the Dish

    Be cautious when adding extra salt if you are using soy sauce or tamari, as these are already very high in sodium. Taste the beef after the soy sauce has reduced before deciding if additional salt is necessary.

    Serving and Pairing Suggestions

    Quick Weekday Lunch Strategy

    Pack these bowls with a side of sliced cucumbers or a handful of edamame for extra volume. This makes the meal incredibly filling and ensures you avoid the mid-afternoon energy crash by providing sustained protein and fiber.

    Family-Style Build-Your-Own Bar

    Place the beef, rice, and assorted vegetables in large serving bowls in the center of the table. Provide the spicy mayo and eggs in separate containers, allowing each family member to customize their portions and toppings.

    Post-Workout Recovery Meal

    Focus on a higher ratio of rice and beef to replenish glycogen stores and repair muscle tissue after intense exercise. Adding an extra soft-boiled egg increases the leucine content, which is critical for muscle protein synthesis.

    Frequently Asked Questions

    Are these beef bowls considered healthy?

    Yes, they are balanced meals containing lean protein, fiber-rich vegetables, and complex carbohydrates. Using lean beef and Greek yogurt keeps the saturated fat lower while maximizing the nutrient density.

    How much protein is in one serving?

    Depending on the specific brand of beef and the size of the egg, one bowl typically contains between 30 and 35 grams of protein. This is an ideal amount for supporting satiety and muscle maintenance.

    Can I use a different type of rice?

    Absolutely. Brown rice adds more fiber and a nuttier taste, while quinoa provides a complete protein source. Basmati rice is also an excellent alternative for those who prefer a more fragrant, long-grain texture.

    Which vegetables are best for this recipe?

    Cruciferous vegetables like cabbage, broccoli, and kale work best because they maintain their crunch during reheating. Shredded carrots and bell peppers add necessary sweetness and vitamins to balance the savory beef.

    How do I keep the vegetables from wilting?

    Keep the raw vegetables separate from the warm beef and rice during storage. Only combine them at the time of serving or after reheating the protein to ensure the vegetables remain crisp and vibrant.

    Can this recipe be made in a slow cooker?

    While the beef is best seared in a skillet, you can slow-cook a larger batch of beef with the seasonings on low for 6-8 hours. However, you will lose the caramelized edges that come from skillet browning.

    Print
    clock clock iconcutlery cutlery iconflag flag iconfolder folder iconinstagram instagram iconpinterest pinterest iconfacebook facebook iconprint print iconsquares squares iconheart heart iconheart solid heart solid icon
    High-Protein Viral Ground Beef Bowls for Easy Meal Prep

    High-Protein Viral Ground Beef Bowls for Easy Meal Prep


    5 Stars 4 Stars 3 Stars 2 Stars 1 Star

    No reviews

    • Author: imageuploader
    • Total Time: 25 minutes
    • Yield: 4 servings 1x
    • Diet: High-Protein

    Description

    These viral ground beef bowls are everything you want in a quick, clean, and protein-packed meal. Featuring seasoned ground beef, fluffy rice, crunchy veggies, and a creamy-spicy drizzle, this bowl is bursting with flavor and perfect for weekly meal prep, healthy family dinners, or post-workout recovery.


    Ingredients

    Scale
    • 1 lb lean ground beef (93% lean)
    • 1 cup cooked jasmine or brown rice
    • 1 1/2 cups shredded cabbage (or slaw mix)
    • 1/2 cup shredded carrots
    • 2 eggs (fried or soft-boiled)
    • 1 tbsp olive oil
    • 3 tbsp soy sauce or tamari
    • 1 tbsp brown sugar
    • 2 cloves garlic (minced)
    • 1 tsp sesame oil
    • 1/2 tsp chili flakes (optional)
    • 1/4 cup Greek yogurt or mayo
    • 1 tbsp sriracha
    • 1 tsp honey
    • Juice of 1/2 lime

    Instructions

    1. Step: Cook the rice according to package instructions.
    2. Step: In a skillet, heat sesame oil. Add ground beef, garlic, soy sauce, brown sugar, and chili flakes. Cook until browned and saucy.
    3. Step: While the beef cooks, shred your cabbage and carrots.
    4. Step: In a small bowl, whisk together Greek yogurt, sriracha, honey, and lime juice.
    5. Step: Fry or soft-boil the eggs to your liking.
    6. Step: Layer rice, beef, veggies, egg, and a big drizzle of spicy mayo. Garnish with green onions or sesame seeds if you like.

    Notes

    Store components separately (beef, rice, veggies, and sauce) when meal prepping to maintain freshness and prevent sogginess. Use jasmine or basmati rice for better texture.

    • Prep Time: 10 minutes
    • Cook Time: 15 minutes
    • Category: Dinner, Lunch, Meal Prep
    • Method: Sautéing
    • Cuisine: Asian-Inspired, Fusion

    Nutrition

    • Serving Size: 1 bowl
    • Calories: 520 kcal
    • Sugar: 9 g
    • Sodium: 620 mg
    • Fat: 25 g
    • Saturated Fat: 9 g
    • Unsaturated Fat: 16 g
    • Trans Fat: 0 g
    • Carbohydrates: 40 g
    • Fiber: 5 g
    • Protein: 32 g
    • Cholesterol: 185 mg
  • Easy Baked Feta Eggs

    Easy Baked Feta Eggs

    This baked feta egg dish combines savory cheese and fresh vegetables for a nutrient-dense breakfast. It is prepared in a single skillet, making it an efficient choice for brunch or a quick dinner.

    Recipe image

    List of ingredients

    • 2 cups cherry or grape tomatoes – provides a juicy base for the sauce.
    • 1 red bell pepper, diced – adds sweetness and color.
    • ½ small red onion, diced – contributes a sharp aromatic flavor.
    • 3 cloves minced garlic – used for depth of flavor.
    • 8 ounces feta cheese – provides a salty, creamy element.
    • 4 tablespoons olive oil – used for sautéing the vegetables.
    • 1 teaspoon dried oregano – adds an earthy, herbal note.
    • 1 teaspoon sea salt – enhances all the flavors in the dish.
    • ½ teaspoon dried thyme – adds a subtle minty aroma.
    • ½ teaspoon ground black pepper – provides a mild spicy warmth.
    • ½ teaspoon red pepper flakes – gives a gentle kick of heat.
    • 1 cup chopped baby spinach – adds nutrients and a fresh green contrast.
    • 4 large eggs – the main protein of the dish.
    • Optional chopped fresh basil or fresh chives – used for a final fresh garnish.

    step-by-step instructions

    1. Sauté the base: Preheat oven to 400°F (200°C). Add olive oil to an oven-safe skillet over medium heat, then sauté diced red bell pepper and red onion for 5-7 minutes until they have softened.
    2. Aromatics and tomatoes: Add minced garlic and cook for 1 minute until fragrant. Stir in the cherry tomatoes and cook for 3-5 minutes until they begin to soften and release their juices.
    3. Season the mixture: Stir in dried oregano, dried thyme, ground black pepper, sea salt, and red pepper flakes. Simmer the mixture for 2-3 minutes to allow the herbs to infuse into the oil.
    4. Layer cheese and greens: Crumble the feta cheese over the vegetable mixture. Scatter the chopped baby spinach on top and gently tuck the leaves around the feta crumbles.
    5. Prepare egg wells: Using a spoon or spatula, create 4 distinct wells in the mixture. Carefully crack one large egg into each well, ensuring the yolk remains intact.
    6. Bake the dish: Place the skillet in the oven and bake for 10-15 minutes. Remove once the egg whites are set and opaque, the yolks are still runny, and the feta is bubbly.
    7. Finish and serve: Remove from the oven and garnish with fresh basil or chives if desired. Serve immediately from the skillet with warm crusty bread.

    Vegetable Selection and Preparation

    Choosing the Right Tomatoes

    Cherry tomatoes are preferred for their higher juice content, which creates a natural sauce as they bake. If using grape tomatoes, which are firmer, you may halve them to speed up the softening process. This ensures the sauce has a consistent texture.

    Dicing Peppers and Onions

    Uniform dicing of the red bell pepper and red onion is essential for even cooking. Aim for pieces about a quarter-inch in size so they soften at the same rate. This prevents some pieces from remaining raw while others overcook.

    Preparing the Garlic

    Fresh garlic should be minced finely to ensure it distributes evenly throughout the skillet. Avoid using pre-minced jarred garlic, as it often contains preservatives that alter the flavor. Freshly minced garlic provides a sharper, more authentic taste.

    Managing Baby Spinach

    Chopped baby spinach is used because it wilts quickly and integrates well into the feta. If using larger spinach leaves, chop them into smaller ribbons to make the dish easier to scoop. Tucking the spinach under the cheese protects it from burning in the oven.

    Oven and Pan Optimization

    Selecting an Oven-Safe Skillet

    A cast-iron skillet is ideal because it retains heat exceptionally well and transitions seamlessly from stovetop to oven. If using a stainless steel pan, ensure it has an oven-safe handle. Avoid non-stick pans that are not rated for 400°F to prevent coating damage.

    The Role of Oven Temperature

    The 400°F (200°C) temperature is necessary to ensure the feta bubbles and the egg whites set quickly. If the oven is too cool, the eggs may overcook before the feta softens. Always use a preheated oven for the best results.

    Controlling Egg Doneness

    Egg consistency varies by oven; start checking the eggs at the 10-minute mark. The whites should be completely opaque, but the center of the yolk should still jiggle slightly. Remember that carry-over cooking will continue for a few minutes after removal from the oven.

    Flavor Enhancements and Substitutions

    Alternative Cheese Options

    If feta is too salty, you can substitute it with goat cheese for a creamier, tangier profile. Halloumi can also be used, though it will not melt as completely as feta. Use a microbial-rennet cheese to ensure the dish remains plant-based in its additives.

    Substituting Fresh Greens

    Kale can replace baby spinach, but it should be sautéed with the onions to ensure it is tender. Arugula is another option, though it should be added after baking to preserve its peppery bite. Swiss chard is also a viable nutrient-dense alternative.

    Adjusting the Spice Level

    For a milder dish, omit the red pepper flakes entirely. If you prefer more heat, increase the flakes to a full teaspoon or add a pinch of cayenne pepper. Smoked paprika can also be added during the seasoning step for a woody, deep flavor.

    Herbal Variations

    While oregano and thyme are classic, fresh dill or parsley can be added at the end. Fresh basil provides a sweet contrast to the salty feta. For a more Mediterranean feel, add a teaspoon of dried rosemary during the simmering stage.

    Serving and Pairing Suggestions

    Selecting the Best Breads

    Sourdough bread is an excellent pairing due to its acidity, which cuts through the richness of the feta. Warm pita bread or toasted ciabatta also work well for scooping up the eggs and sauce. Ensure the bread is toasted or warmed to maintain a contrast in textures.

    Complementary Side Dishes

    A simple green salad with a lemon vinaigrette balances the saltiness of the baked eggs. Sliced avocado provides a creamy texture that complements the runny egg yolks. Roasted potatoes can be served on the side for a heartier meal.

    Beverage Pairings

    Freshly squeezed orange juice or a light herbal tea pairs well with this brunch dish. For a savory option, a chilled tomato juice or a sparkling water with lemon cleanses the palate between bites. Avoid heavy drinks that might overwhelm the delicate herbs.

    Storage and Reheating Advice

    Storing Leftovers

    Store any remaining baked eggs in an airtight glass container in the refrigerator for up to two days. Let the skillet cool slightly before transferring the food to avoid condensation. Keep the garnish separate and add it fresh when serving.

    Safe Reheating Methods

    Reheat leftovers in a low oven at 300°F (150°C) for 5-10 minutes to avoid rubberizing the eggs. A microwave can be used, but heat on medium power in short bursts. Avoid high heat, as it will overcook the egg yolks and dry out the feta.

    Freezing Guidelines

    This dish is not recommended for freezing due to the high moisture content of the tomatoes and spinach. Freezing will alter the texture of the eggs and cause the feta to become grainy. It is best enjoyed fresh or refrigerated.

    Troubleshooting Common Issues

    Preventing Burnt Garlic

    Garlic burns quickly and can become bitter if cooked too long. Always add it after the onions and peppers have already softened. Stir constantly for exactly one minute before adding the tomatoes to lower the pan temperature.

    Avoiding Watery Vegetables

    If the mixture seems too liquid, increase the heat slightly during the simmering stage to evaporate excess moisture. Avoid overcrowding the pan, which can lead to steaming instead of sautéing. Ensure the tomatoes are not overly wet after washing.

    Fixing Broken Egg Yolks

    If a yolk breaks during the cracking process, simply continue baking as usual. The broken yolk will merge with the feta and vegetable sauce, creating a richer flavor. To prevent this, crack eggs into a small bowl first before pouring them into the wells.

    Managing Feta Saltiness

    If the feta is exceptionally salty, rinse the block under cold water before crumbling it. You can also reduce the amount of sea salt added to the vegetable mixture. Balancing the salt with the sweetness of the red peppers helps maintain equilibrium.

    Frequently Asked Questions

    Can I make this dish ahead of time?

    You can chop the vegetables and crumble the feta in advance, but the eggs must be added just before baking. Preparing the vegetable base and storing it in the fridge allows you to simply heat the skillet and crack the eggs when ready.

    What kind of feta cheese should I use?

    A block of feta stored in brine is recommended over pre-crumbled varieties. Brined feta is generally creamier and has a more consistent texture when melted. It also allows you to control the size of the crumbles.

    Can I use egg whites only?

    Yes, you can use egg whites, although you will lose the creamy richness of the yolks. You may need to use more egg whites to fill the wells. The cooking time remains similar, but the overall flavor profile will be lighter.

    Can this be made in a baking dish instead of a skillet?

    Yes, you can sauté the vegetables in a pan and then transfer them to a ceramic baking dish. Ensure the dish is oven-safe and wide enough to accommodate four eggs. The cooking time may increase by a few minutes depending on the material.

    How do I prevent the spinach from burning?

    Tucking the spinach under the feta cheese protects the leaves from direct heat. If you notice the edges browning too quickly, you can cover the skillet with foil for the first five minutes of baking. This traps moisture and steams the spinach.

    Print
    clock clock iconcutlery cutlery iconflag flag iconfolder folder iconinstagram instagram iconpinterest pinterest iconfacebook facebook iconprint print iconsquares squares iconheart heart iconheart solid heart solid icon
    Easy Baked Feta Eggs

    Easy Baked Feta Eggs


    5 Stars 4 Stars 3 Stars 2 Stars 1 Star

    No reviews

    • Author: imageuploader
    • Total Time: 40 minutes
    • Yield: 4 servings 1x
    • Diet: Vegetarian

    Description

    A delicious and simple recipe for baked feta eggs with cherry tomatoes, bell pepper, and spinach, baked to perfection in a flavorful feta and vegetable sauce.


    Ingredients

    Scale
    • 2 cups cherry or grape tomatoes
    • 1 red bell pepper, diced
    • ½ small red onion, diced
    • 3 cloves minced garlic
    • 8 ounces feta cheese
    • 4 tablespoons olive oil
    • 1 teaspoon dried oregano
    • 1 teaspoon sea salt
    • ½ teaspoon dried thyme
    • ½ teaspoon ground black pepper
    • ½ teaspoon red pepper flakes
    • 1 cup chopped baby spinach
    • 4 large eggs
    • Optional for topping – chopped fresh basil or fresh chives

    Instructions

    1. Step: Preheat oven to 400°F (200°C). Add olive oil to an oven-safe skillet over medium heat. Sauté diced red bell pepper and red onion for 5-7 minutes until softened.
    2. Step: Add minced garlic and cook for 1 minute until fragrant. Add cherry tomatoes and cook for 3-5 minutes until they start to soften.
    3. Step: Stir in dried oregano, dried thyme, ground black pepper, sea salt, and red pepper flakes. Simmer for 2-3 minutes.
    4. Step: Crumble feta cheese over the vegetable mixture and scatter chopped baby spinach on top. Gently tuck spinach around the feta.
    5. Step: Create 4 wells in the mixture and carefully crack one egg into each well.
    6. Step: Bake for 10-15 minutes, or until egg whites are set and yolks are runny. The feta should be bubbly.
    7. Step: Remove from oven, garnish with fresh basil or chives if desired, and serve directly from the skillet with crusty bread.

    Notes

    Serve with warm crusty bread, pita, or a simple green salad. Use a high-quality block of feta packed in brine for the creamiest texture.

    • Prep Time: 15 minutes
    • Cook Time: 25 minutes
    • Category: Breakfast
    • Method: Baking
    • Cuisine: Mediterranean

    Nutrition

    • Serving Size: 1 serving
    • Calories: 410 kcal
    • Sugar: 6 g
    • Sodium: 850 mg
    • Fat: 32 g
    • Saturated Fat: 12 g
    • Unsaturated Fat: 20 g
    • Trans Fat: 0 g
    • Carbohydrates: 11 g
    • Fiber: 3 g
    • Protein: 17 g
    • Cholesterol: 240 mg
  • How to Make Perfect Hard Boiled Eggs

    How to Make Perfect Hard Boiled Eggs

    Mastering the art of boiling eggs ensures you have a versatile protein for salads, snacks, and breakfasts. This method prevents rubbery whites and green yolks for consistent results every time.

    Recipe image

    List of ingredients

    • 8 large eggs (you can use between 6-12 eggs), cold from the refrigerator.
    • 8 cups cold water (enough to cover the eggs by 1 inch in a 3-quart saucepan).

    step-by-step instructions

    1. Initial Boil: Place the cold eggs into a large 3-quart stainless steel saucepan. Cover them with cold water so that the water level is 1 inch above the surface of the eggs. Bring the water to a rolling boil over high heat with the lid off.
    2. Timed Simmer: As soon as the water reaches a boil, reduce the heat to maintain a medium boil. Immediately set a timer based on your preferred doneness: 2 minutes for a liquid center, 3 minutes for a creamy center, 4-5 minutes for a moist soft center, 6-7 minutes for a hard-boiled egg with a soft center, or 8-9 minutes for a fully hard-boiled egg with a firm, dry center.
    3. Ice Bath Cooling: While the eggs are cooking, prepare a bowl of ice water. Once the timer expires, transfer the eggs immediately into the ice water so they are fully submerged. Let them cool completely before refrigerating or peeling.

    Optimizing Egg Selection

    Use Older Store-Bought Eggs for Easier Peeling

    Eggs that have been in the refrigerator for a week or two are significantly easier to peel than farm-fresh eggs. As eggs age, the pH level of the white increases, which weakens the bond between the membrane and the shell. This makes the shell slip off more easily after boiling.

    Select Large Grade AA Eggs for Consistency

    Standardizing the size of your eggs ensures the timing chart remains accurate. Large Grade AA eggs are the baseline for most professional recipes and provide a consistent volume. Using medium eggs will result in overcooking if you follow the standard timer, while jumbo eggs may remain underdone.

    Avoid Using Extremely Fresh Farm Eggs

    Fresh eggs from a backyard chicken often have a very strong bond between the shell and the inner membrane. If you must use very fresh eggs, consider using a pressure cooker to help loosen the shell. In a standard pot, these eggs are often the most difficult to peel without tearing the whites.

    Essential Equipment Recommendations

    Choose a Stainless Steel Saucepan

    A 3-quart stainless steel pot provides consistent heat distribution and allows you to see the water level clearly. Avoid using cast iron or heavy clay pots for this specific method, as they take much longer to reach a boil. The delayed heating time in heavier pots can lead to inconsistent results if you are not adjusting your timer carefully.

    Prepare the Ice Bath in Advance

    Having a bowl of ice and water ready before the timer goes off is critical to stopping the carry-over cooking. If you wait to prepare the bath after the eggs are done, the residual heat will continue to cook the yolk. This often leads to the dreaded green ring around the yolk of hard-boiled eggs.

    Keep the Pot Lid Off During Heating

    Cooking without a lid allows you to monitor the water precisely so you can start your timer the exact second the water reaches a rolling boil. Lids can trap heat and cause the water to boil over quickly, which might distract you from the timing. Visual confirmation of the boil is the only way to ensure accuracy.

    Mastering the Peeling Process

    Start Peeling at the Thick End

    Every egg has a small air pocket located at the wider end of the shell. By starting your peel here, you can easily get your finger under the membrane and create a starting point for the rest of the shell. This prevents you from having to crack the egg too aggressively, which preserves the shape of the white.

    Peel Under Running Cold Water

    Holding the egg under a stream of cold running water while peeling helps force water between the membrane and the egg white. This lubrication allows the shell to glide off in larger pieces. It also cleans away any small fragments of shell that might stick to the egg.

    Use the Roll-and-Press Technique

    Gently roll the cooled egg on a flat surface with light pressure until the shell is covered in fine cracks. Once the shell is shattered, peel from the large end. This method is more efficient than tapping the egg on a counter, as it distributes the cracks evenly across the entire surface.

    Proper Storage and Shelf Life

    Refrigerate Boiled Eggs Within Two Hours

    According to food safety guidelines, boiled eggs should be moved to the refrigerator within two hours of cooking. Leaving them at room temperature for too long increases the risk of bacterial growth. Always ensure they are cooled in an ice bath first to bring them to a safe temperature quickly.

    Store Unpeeled Eggs to Prevent Odor Absorption

    Keeping the shells on during refrigeration protects the egg from absorbing smells from other foods in the fridge. Shells also act as a barrier that prevents the egg whites from drying out. Hard-boiled eggs kept in their shells will remain fresh for up to 7 days.

    Observe Shorter Storage for Soft-Boiled Eggs

    Soft-boiled eggs have a more liquid center, making them more susceptible to spoilage than fully hard-boiled eggs. Store soft-boiled eggs in an airtight container in the refrigerator and consume them within 3 days. Always peel them immediately before eating for the best texture.

    Practical Serving and Meal Ideas

    Prepare a Classic Egg Salad

    Dice hard-boiled eggs into small cubes and mix them with mayonnaise, Dijon mustard, and finely chopped celery. This creates a creamy spread that works perfectly on toasted sourdough or in a wrap. Add a pinch of paprika and black pepper to enhance the flavor profile.

    Create Guacamole Stuffed Eggs

    Slice hard-boiled eggs in half lengthwise and remove the yolks. Mash the yolks with ripe avocado, lime juice, and salt, then pipe the mixture back into the whites. This is a high-protein alternative to traditional deviled eggs that adds a rich, buttery texture.

    Add Protein to a Cobb Salad

    Quarter your hard-boiled eggs and place them atop a bed of mixed greens, diced chicken, avocado, and tomatoes. The firm yolk of an 8-minute egg provides a great contrast to the crisp vegetables. Use a light vinaigrette to balance the richness of the egg.

    Incorporate Eggs into Potato Salad

    Roughly chop hard-boiled eggs and fold them into a mixture of boiled potatoes, red onions, and a creamy dressing. The eggs add a velvety consistency to the salad that binds the potatoes together. Ensure the eggs are fully chilled before adding them to the potato mixture.

    Use Soft-Boiled Eggs for Avocado Toast

    Boil your eggs for 6-7 minutes to achieve a jammy, soft center. Slice the egg in half and place it over smashed avocado on a piece of whole-grain toast. The liquid yolk acts as a natural sauce for the toast and avocado.

    Troubleshooting Common Issues

    How to Avoid the Green Ring Around the Yolk

    The green or grey ring is a sign of overcooking, caused by a reaction between sulfur in the white and iron in the yolk. To prevent this, strictly follow the timing chart and move the eggs to an ice bath immediately. The rapid cooling stops the chemical reaction and keeps the yolk bright yellow.

    Preventing Eggs from Cracking During Boiling

    Adding a pinch of salt to the water can help seal small cracks that may occur as the eggs bump into each other during the boil. While it won’t stop every crack, it reduces the amount of egg white that leaks into the water. To further prevent cracking, ensure the eggs are not crowded in the pan.

    Fixing Rubbery Egg Whites

    Rubbery whites are the result of boiling eggs for too long or using too high a heat during the simmering phase. Once the water boils, reducing the heat to a medium boil is essential. If your whites are consistently rubbery, try reducing your timer by one minute.

    Common Questions About Boiling Eggs

    Is adding vinegar necessary for peeling?

    Adding vinegar to the boiling water is a common suggestion, but the difference in peeling ease is minimal. While some believe it helps soften the shell, the age of the egg and the ice bath are much more influential factors. It remains an optional step based on personal preference.

    Can I boil eggs in a cast iron pot?

    You can, but it is not recommended for this specific timing method. Cast iron holds heat differently and takes much longer to reach a boil than stainless steel. This can alter the total time the egg is exposed to heat, potentially leading to overcooked eggs.

    How do I know if an egg is still raw or boiled?

    If you have a mix of raw and boiled eggs in your fridge, use the spin test. Place the egg on a flat surface and spin it like a top. A hard-boiled egg will spin quickly and smoothly, while a raw egg will wobble and spin slowly because the liquid center shifts inside.

    Can I freeze hard-boiled eggs?

    No, you should not freeze hard-boiled eggs. Freezing changes the molecular structure of the egg white, turning it rubbery and watery upon thawing. Always store them in the refrigerator and consume them within the recommended timeframes.

    Print
    clock clock iconcutlery cutlery iconflag flag iconfolder folder iconinstagram instagram iconpinterest pinterest iconfacebook facebook iconprint print iconsquares squares iconheart heart iconheart solid heart solid icon
    The Definitive Guide to Perfect Hard Boiled Eggs

    How to Make Perfect Hard Boiled Eggs


    5 Stars 4 Stars 3 Stars 2 Stars 1 Star

    No reviews

    • Author: imageuploader
    • Total Time: 10 minutes
    • Yield: 8 eggs 1x
    • Diet: General

    Description

    This method for making hard-boiled eggs (or soft boiled eggs) will get you perfect results every time and it’s really easy!


    Ingredients

    Scale
    • 8 large eggs, cold from the fridge
    • 8 cups cold water

    Instructions

    1. Step: Place cold eggs in a large 3-quart stainless steel saucepan and cover with cold water so water is 1″ above the surface of the eggs. With the lid off, bring to a rolling boil over high heat.
    2. Step: Once at a boil, reduce heat to keep at a medium boil and set a timer for your desired doneness (see chart below).
    3. Step: Prepare your ice water bath, and as soon as the timer is done, transfer the eggs into ice water so they are fully submerged.
    4. Step: Once the eggs have cooled, you can refrigerate hard-boiled eggs for up to 7 days or soft-boiled eggs for up to 3 days. Peel when ready to use.

    Notes

    Hard Boiled Eggs Timing Chart: Boil 2 min: soft boiled with a liquid center; Boil 3 min: soft-boiled with a creamy center; Boil 4-5 min: medium-boiled with a moist, soft center; Boil 6-7 min: hard-boiled eggs with a soft center; Boil 8-9 min: hard-boiled eggs with firm dry center.

    • Prep Time: 0 minutes
    • Cook Time: 10 minutes
    • Category: Appetizer, Breakfast, Side Dish
    • Method: Boiling
    • Cuisine: American

    Nutrition

    • Serving Size: 1 egg
    • Calories: 63 kcal
    • Sugar: 1 g
    • Sodium: 75 mg
    • Fat: 4 g
    • Saturated Fat: 1 g
    • Unsaturated Fat: 3 g
    • Trans Fat: 0 g
    • Carbohydrates: 1 g
    • Fiber: 0 g
    • Protein: 6 g
    • Cholesterol: 164 mg
  • Savory Breakfast Egg Muffins with Cheese and Veggies

    Savory Breakfast Egg Muffins with Cheese and Veggies

    Prepare high-protein breakfast cups that are easy to grab and go for busy mornings. These savory egg muffins combine fresh vegetables and melted cheese for a nutritious and satisfying meal.

    Recipe image

    List of ingredients

    • 12 large eggs – provides the protein base and structure.
    • 1 cup shredded cheddar cheese – adds richness and a savory flavor.
    • ½ cup red bell pepper, diced – contributes a sweet crunch and color.
    • ½ cup fresh spinach, chopped – adds essential nutrients and a fresh taste.
    • ½ cup cooked and crumbled beef bacon – brings a salty, smoky element.
    • ½ teaspoon salt – enhances the natural flavors of the eggs and vegetables.
    • ¼ teaspoon pepper – adds a subtle warmth to the mixture.

    step-by-step instructions

    1. Prepare the oven and pan: Preheat your oven to 350°F. Lightly coat a 12-cup muffin pan with non-stick spray to ensure the muffins release easily after baking.
    2. Beat the eggs: Crack the 12 eggs into a large mixing bowl. Beat them vigorously until the mixture is light and frothy, which helps create a fluffier texture.
    3. Combine ingredients: Stir in the shredded cheddar cheese, diced red bell pepper, chopped spinach, crumbled beef bacon, salt, and pepper. Mix until all components are evenly distributed throughout the eggs.
    4. Fill the pan: Pour the egg mixture into each muffin cup. Leave a small amount of space at the top to allow the muffins to rise during the baking process.
    5. Bake and cool: Bake for 15-20 minutes until the tops are firm and no longer jiggle when touched. Remove from the oven and let them cool slightly before removing them from the pan.

    Professional Baking Tips

    Prioritize Fresh Produce

    Using fresh, crisp vegetables prevents the muffins from becoming watery. Avoid using frozen spinach unless it is fully thawed and squeezed dry of all excess moisture.

    Crisping the Beef Bacon

    Ensure the beef bacon is cooked until crispy before crumbling it into the mix. This prevents the muffins from becoming greasy and adds a better textural contrast.

    Controlled Mixing Technique

    Stir the ingredients just until they are combined to avoid overbeating the eggs. Overmixing can lead to a denser, less airy muffin texture.

    Adding Flavor Accents

    Consider adding a pinch of garlic powder or smoked paprika to the egg base. These spices complement the beef bacon and cheddar cheese without overpowering the dish.

    Ingredient Substitutions and Variations

    Alternative Protein Sources

    If you prefer different proteins, you can replace the beef bacon with diced turkey breast or crumbled plant-based sausage. Ensure any substitute is pre-cooked and drained of excess oil.

    Vegetable Swaps for Variety

    Swap the red bell pepper for diced zucchini or mushrooms for a different flavor profile. Kale is a great substitute for spinach, though it should be chopped very finely.

    Exploring Different Cheeses

    Replace cheddar with crumbled feta for a tangier taste or Swiss cheese for a nuttier flavor. Pepper Jack cheese is an excellent choice if you prefer a spicier breakfast.

    Low-Carb Vegetable Additions

    Include diced cauliflower or chopped broccoli to increase the volume and nutrient density. Briefly steam these harder vegetables before adding them to the egg mixture.

    Serving Recommendations

    Pairing with Fresh Fruit

    Serve these egg muffins with a side of sliced strawberries, blueberries, or melon. The natural sweetness of the fruit balances the savory saltiness of the cheese and beef bacon.

    Adding Fresh Toppings

    Top each muffin with a slice of fresh avocado or a spoonful of mild salsa. These additions provide a creamy or zesty contrast that enhances the overall meal.

    Nutrient-Dense Beverage Pairings

    Pair your breakfast muffins with a green smoothie made from kale and apple. This combination provides a comprehensive blend of proteins, fats, and vitamins to start the day.

    Heartier Side Options

    For a more filling meal, serve the muffins alongside a slice of toasted whole-grain bread. A small side of mixed baby greens with a light lemon vinaigrette also works well.

    Storage and Reheating Guide

    Refrigeration for Meal Prep

    Store leftover muffins in an airtight container in the refrigerator for up to 5 days. This makes them an ideal option for weekly meal planning and quick morning exits.

    Long-Term Freezer Storage

    Place cooled muffins on a baking sheet to freeze individually before transferring them to a freezer bag. This prevents them from sticking together and allows you to take only what you need.

    Microwave Reheating Method

    Heat individual muffins in the microwave for 30-60 seconds. Placing a damp paper towel over the muffins helps retain moisture and prevents them from drying out.

    Oven Reheating for Texture

    To maintain a firmer exterior, reheat the muffins in an oven at 325°F for about 5-10 minutes. This method is preferable for those who dislike the softness of microwaved eggs.

    Troubleshooting Common Issues

    Preventing Muffin Sticking

    If muffins stick to the pan, increase the amount of non-stick spray or use silicone muffin liners. Let the muffins cool for 5 minutes before attempting to remove them.

    Avoiding Soggy Textures

    Soggy muffins usually result from too much moisture in the vegetables. Sauté the peppers and spinach briefly to cook off excess water before mixing them in.

    Handling Underbaked Centers

    If the centers are still jiggly, bake for an additional 3-5 minutes. Use a toothpick to check the center; it should come out clean for perfectly cooked eggs.

    Managing Excess Moisture

    Ensure the shredded cheese is not too wet, especially if using fresh mozzarella. Pat any wet ingredients with a paper towel before adding them to the bowl.

    Essential Kitchen Equipment

    Choosing the Right Muffin Pan

    A standard 12-cup non-stick metal pan works best for heat distribution. Ensure the pan is evenly coated to prevent the eggs from clinging to the sides.

    Using Silicone Liners

    Silicone liners offer a foolproof way to ensure the muffins pop out effortlessly. They also make cleanup much faster as the pan remains clean.

    Mixing Bowl Selection

    Use a large stainless steel or glass bowl to allow plenty of room for whisking. A bowl with a rounded bottom makes it easier to incorporate all the mix-ins evenly.

    Precision Measuring Tools

    Use standard measuring cups and spoons for the cheese and seasonings. Precise measurements ensure the ratio of eggs to fillings remains consistent for the best bake.

    Nutrition and Dietary Adjustments

    Increasing Protein Content

    To boost the protein further, stir in a tablespoon of Greek yogurt or cottage cheese into the beaten eggs. This adds creaminess while increasing the amino acid profile.

    Reducing Sodium Levels

    Lower the salt content by using an unsalted beef bacon and a low-sodium cheese. You can replace the salt with a pinch of onion powder to maintain a savory depth.

    Adding Fiber with Extra Greens

    Increase the amount of chopped spinach or add finely grated carrots to the mix. This adds essential dietary fiber and increases the satiety of the meal.

    Managing Fat Content

    Substitute some of the whole eggs with egg whites to reduce the overall fat and calorie count. This maintains the volume of the muffins while lightening the nutritional profile.

    Frequently Asked Questions

    How do I know when the egg muffins are fully cooked?

    The muffins are done when the tops feel firm to the touch and do not jiggle in the center. A toothpick inserted into the middle should come out clean without any liquid egg.

    Can I make these without a muffin pan?

    You can use a silicone mold or a small baking dish for a frittata-style result. If using a dish, increase the baking time and slice the eggs into squares after cooling.

    Which eggs are best for this recipe?

    Large, room-temperature eggs are ideal as they whisk more easily and create a more uniform rise. Using organic or pasture-raised eggs can provide a richer color and flavor.

    How long do these stay fresh in the fridge?

    These muffins maintain their quality and taste for up to 5 days when stored in an airtight container. Ensure they are completely cooled before sealing them to prevent condensation.

    Print
    clock clock iconcutlery cutlery iconflag flag iconfolder folder iconinstagram instagram iconpinterest pinterest iconfacebook facebook iconprint print iconsquares squares iconheart heart iconheart solid heart solid icon
    Savory Baked Egg Muffins with Cheese and Veggies

    Savory Breakfast Egg Muffins with Cheese and Veggies


    5 Stars 4 Stars 3 Stars 2 Stars 1 Star

    No reviews

    • Author: imageuploader
    • Total Time: 30 minutes
    • Yield: 12 muffins 1x
    • Diet: General

    Description

    These quick and versatile breakfast egg muffins are easy to make and packed with flavor and nutrition, perfect for busy mornings.


    Ingredients

    Scale
    • 12 large eggs
    • 1 cup Shredded cheddar cheese
    • ½ cup Red bell pepper, diced
    • ½ cup Fresh spinach, chopped
    • ½ cup Cooked and crumbled beef bacon
    • ½ teaspoon Salt
    • ¼ teaspoon Pepper

    Instructions

    1. Step 1: Preheat the oven to 350°F and prepare a 12-cup muffin pan by spraying it with non-stick spray.
    2. Step 2: In a large mixing bowl, crack in the eggs and beat them until they are light and frothy.
    3. Step 3: Add the shredded cheddar cheese, diced red bell pepper, chopped spinach, crumbled bacon, salt, and pepper into the beaten eggs. Stir everything together until well combined.
    4. Step 4: Carefully fill each muffin cup with the egg mixture, leaving a little room for the muffins to rise.
    5. Step 5: Place the muffin pan in the preheated oven and bake for 15-20 minutes until the tops feel firm and no longer jiggle. Allow them to cool slightly before serving.

    Notes

    For best results, use fresh ingredients, avoid overmixing, and store leftovers in an airtight container in the refrigerator for up to 5 days.

    • Prep Time: 10 minutes
    • Cook Time: 20 minutes
    • Category: Breakfast
    • Method: Baking
    • Cuisine: American

    Nutrition

    • Serving Size: 1 muffin
    • Calories: 150 kcal
    • Sugar: 1 g
    • Sodium: 220 mg
    • Fat: 11 g
    • Saturated Fat: 5 g
    • Unsaturated Fat: 6 g
    • Trans Fat: 0 g
    • Carbohydrates: 2 g
    • Fiber: 1 g
    • Protein: 10 g
    • Cholesterol: 185 mg
  • Creamy Lemon Garlic Butter Shrimp Pasta

    Creamy Lemon Garlic Butter Shrimp Pasta

    This restaurant-quality shrimp pasta combines zesty lemon and rich butter for a sophisticated meal. It is designed for busy weeknights, coming together in just 30 minutes without sacrificing depth of flavor.

    Recipe image

    List of ingredients

    • 12 oz Fettuccine (approx 340g) – use a high-quality bronze-cut pasta for better sauce adhesion.
    • 1 lb Large Shrimp (peeled and deveined, approx 450g) – pat these completely dry before cooking.
    • 2 tbsp Extra Virgin Olive Oil (30ml) – used for the high-heat sear.
    • 6 tbsp Unsalted Butter, divided (85g) – essential for building the emulsion and richness.
    • 4 cloves Garlic, finely minced – provides the aromatic base of the sauce.
    • 1/4 cup Vegetable Broth (60ml) – used for deglazing the pan and adding savory depth.
    • 1/2 cup Heavy Cream (120ml) – creates the signature velvety texture.
    • 1 Large Lemon, juiced and zested – brings essential brightness and acidity.
    • 1/4 cup Fresh Parsley, finely chopped (15g) – adds color and a clean, peppery finish.
    • 1/2 cup Parmesan Cheese, freshly grated (50g), plus more for garnish – adds saltiness and helps thicken the sauce.
    • Kosher Salt and Freshly Cracked Black Pepper – to taste.

    step-by-step instructions

    1. Boil the Pasta: Cook fettuccine in heavily salted water until al dente. Reserve 1 cup of the starchy pasta water before draining the noodles.
    2. Sear the Shrimp: Pat shrimp dry and season with salt and pepper. Heat olive oil in a large skillet over medium-high heat, sear shrimp for 1-2 minutes per side until pink with golden-brown edges, then remove and set aside.
    3. Sauté Aromatics: Reduce heat to medium and melt 2 tbsp of butter. Add minced garlic and cook for 30 seconds until fragrant, then deglaze with vegetable broth, scraping the pan and reducing the liquid by half.
    4. Emulsify the Sauce: Stir in heavy cream, lemon juice, and zest, then bring to a gentle simmer. Whisk in the remaining 4 tbsp of butter one piece at a time, then stir in parmesan cheese until melted; season with salt and pepper.
    5. Combine and Serve: Add the drained pasta to the sauce and toss to coat. Use reserved pasta water to adjust the consistency if the sauce is too thick. Return shrimp and parsley to the pan, toss gently, and serve with extra parmesan and a lemon wedge.

    Pro Techniques for Perfect Shrimp Pasta

    Achieving a Golden Sear on Shrimp

    To get those professional brown edges, the shrimp must be completely dry. Use paper towels to remove all surface moisture before seasoning and hitting the hot oil. If the pan is too crowded, the shrimp will steam instead of sear, so work in batches if necessary.

    Utilizing Starchy Pasta Water

    The reserved pasta water is a powerful tool for emulsification. Because it contains starch from the noodles, it helps bind the fats from the butter and cream with the acidic lemon juice. Adding a splash at the end ensures the sauce clings to the pasta rather than pooling at the bottom of the plate.

    Preventing Garlic from Burning

    Garlic burns quickly at high temperatures, which creates a bitter taste in the sauce. Always reduce the heat from the searing temperature to medium before adding the butter and garlic. Sauté just until the aroma is released, usually around 30 seconds, before deglazing with liquid.

    Whisking in Cold Butter for Glossiness

    Adding butter piece by piece at the end of the sauce process is a technique called mounting. This creates a stable emulsion that gives the sauce its signature mirror-like gloss. Whisking continuously while the butter melts prevents the sauce from breaking or becoming greasy.

    Ingredient Substitutions and Adaptations

    Choosing Different Pasta Shapes

    Fettuccine is ideal because its wide surface area holds heavy sauces well. However, linguine or spaghetti work equally well for a classic look. For a more rustic feel, try penne or fusilli, which trap the sauce inside their ridges and holes.

    Swapping Heavy Cream for Lighter Options

    If you prefer a lighter sauce, you can use half-and-half or whole milk mixed with a teaspoon of cornstarch. For a dairy-free version, full-fat coconut milk or cashew cream can provide a similar thickness. Note that these alternatives may slightly alter the final flavor profile.

    Using Alternative Seafood

    While shrimp is traditional, sea scallops are a luxurious alternative that sears beautifully. You can also use cubed salmon or firm white fish like halibut. Adjust the cooking time based on the thickness of the protein to avoid overcooking.

    Replacing Parmesan Cheese

    If you cannot use Parmesan, Pecorino Romano offers a similar salty, hard-cheese profile but with a sharper tang. For a vegan option, use nutritional yeast or a plant-based parmesan alternative to maintain the savory depth of the dish.

    Flavor Variations to Try

    Adding Spicy Heat with Red Pepper Flakes

    To add a subtle kick, stir in 1/2 teaspoon of crushed red pepper flakes when sautéing the garlic. The oil will infuse the heat throughout the sauce. This pairs exceptionally well with the acidity of the lemon.

    Incorporating Fresh Leafy Greens

    Stirring in two cups of fresh baby spinach or chopped kale during the final tossing stage adds color and nutrition. The residual heat of the pasta and sauce will wilt the greens perfectly in about one minute. This provides a fresh contrast to the rich butter sauce.

    Using Sun-Dried Tomatoes for Depth

    Chopped sun-dried tomatoes add a concentrated, sweet-tart flavor that complements the shrimp. Add them to the pan during the deglazing step. They provide a pop of color and a chewy texture that enhances the overall meal.

    Exploring Different Citrus Options

    While lemon is the standard, lime can be used for a more tropical, zesty twist. Orange zest can also be added in small amounts to provide a floral sweetness. Always balance the citrus juice with a bit more butter if the sauce becomes too tart.

    Serving Suggestions and Pairings

    Best Vegetable Side Dishes

    Steamed asparagus or sautéed broccolini are the best pairings for this dish. Their slightly bitter notes cut through the richness of the cream and butter. Roast them with a bit of olive oil and salt to mirror the flavors of the pasta.

    Selecting the Right Salad Pairing

    A crisp arugula salad with a light balsamic vinaigrette provides a refreshing contrast. The peppery nature of arugula balances the creamy sauce. Alternatively, a simple Caesar salad offers a classic Italian-American dining experience.

    Complementary Bread Options

    Warm garlic bread or a slice of toasted sourdough is perfect for mopping up the extra lemon butter sauce. Bruschetta topped with tomato and basil also adds a fresh, acidic element that cleanses the palate between bites.

    Storage and Reheating Guidelines

    Proper Refrigeration Methods

    Store leftovers in an airtight container in the refrigerator for up to two days. Keep the pasta and shrimp together, but be aware that the pasta will absorb more sauce over time. This may make the dish seem drier upon reheating.

    Reheating Without Overcooking Shrimp

    Avoid the microwave, as it often turns shrimp rubbery and separates the cream sauce. Instead, gently warm the pasta in a skillet over low heat. Add a splash of water, broth, or a knob of butter to loosen the sauce and restore the glossy texture.

    Why Freezing is Not Recommended

    Cream-based sauces typically break or separate during the freezing and thawing process. Additionally, the texture of the shrimp and pasta degrades significantly in the freezer. For the best quality, this dish should be eaten fresh or refrigerated shortly after cooking.

    Troubleshooting Common Issues

    Fixing a Sauce That Is Too Thick

    If the sauce becomes too thick or clings too tightly to the noodles, add more reserved pasta water one tablespoon at a time. Stir constantly over low heat until the sauce reaches a smooth, pourable consistency. This restores the emulsion without diluting the flavor.

    Preventing the Sauce from Curdling

    Curdling usually happens if the heat is too high when adding the cream or lemon juice. Keep the sauce at a gentle simmer rather than a rolling boil. If the sauce looks like it is separating, whisk in a small amount of cold butter immediately to bind it back together.

    Correcting an Overly Tart Sauce

    If the lemon juice makes the dish too acidic, add another tablespoon of butter or a pinch of sugar. The fat in the butter neutralizes the sharpness of the citric acid. Taste the sauce frequently before adding the pasta to ensure the balance is correct.

    Frequently Asked Questions

    Can I use frozen shrimp for this recipe?

    Yes, frozen shrimp work perfectly as long as they are completely thawed. Thaw them in the refrigerator overnight or under cold running water. Ensure you pat them dry with paper towels before seasoning to ensure a proper sear.

    How do I keep the shrimp from becoming rubbery?

    The key is to avoid overcooking. Sear them quickly on high heat and remove them the moment they turn opaque. Since they are added back to the pan at the end, they will finish heating through without becoming tough.

    What is the best lemon for this recipe?

    Standard Eureka lemons provide the best acidic punch for this dish. Meyer lemons are a sweeter, more floral alternative and can be used if you prefer a milder citrus flavor. Always use fresh lemons rather than bottled juice for the best aroma.

    Can I make this dish gluten-free?

    Absolutely. Simply replace the wheat-based fettuccine with your favorite gluten-free pasta alternative, such as brown rice or chickpea pasta. Be mindful that gluten-free pasta often releases different levels of starch, so you may need to adjust the amount of pasta water used.

    Print
    clock clock iconcutlery cutlery iconflag flag iconfolder folder iconinstagram instagram iconpinterest pinterest iconfacebook facebook iconprint print iconsquares squares iconheart heart iconheart solid heart solid icon
    Creamy Lemon Garlic Butter Shrimp Pasta

    Creamy Lemon Garlic Butter Shrimp Pasta


    5 Stars 4 Stars 3 Stars 2 Stars 1 Star

    No reviews

    • Author: imageuploader
    • Total Time: 30 minutes
    • Yield: 4 servings 1x
    • Diet: General

    Description

    Create a restaurant-worthy Lemon Garlic Shrimp Pasta in just 30 minutes. This recipe features al dente fettuccine in a glossy, creamy lemon butter sauce with perfectly seared shrimp, fresh parsley, and parmesan.


    Ingredients

    Scale
    • 12 oz Fettuccine
    • 1 lb Large Shrimp, peeled and deveined
    • 2 tbsp Extra Virgin Olive Oil
    • 6 tbsp Unsalted Butter, divided
    • 4 cloves Garlic, finely minced
    • 1/4 cup Vegetable Broth
    • 1/2 cup Heavy Cream
    • 1 Large Lemon, juiced and zested
    • 1/4 cup Fresh Parsley, finely chopped
    • 1/2 cup Parmesan Cheese, freshly grated
    • Kosher Salt to taste
    • Freshly Cracked Black Pepper to taste

    Instructions

    1. Step 1: Cook fettuccine in heavily salted water until al dente. Reserve 1 cup of pasta water before draining.
    2. Step 2: Pat shrimp dry and season with salt and pepper. Heat olive oil in a large skillet over medium-high heat. Sear shrimp for 1-2 minutes per side until pink with golden-brown edges. Remove and set aside.
    3. Step 3: Reduce heat to medium, add 2 tbsp butter. Add minced garlic and cook until fragrant (30 seconds). Deglaze with vegetable broth, scraping the pan, and let it reduce by half.
    4. Step 4: Stir in heavy cream, lemon juice, and zest. Bring to a simmer. Whisk in the remaining 4 tbsp of butter one piece at a time. Stir in the parmesan cheese until melted. Season with salt and pepper.
    5. Step 5: Add the drained pasta to the sauce and toss. Use reserved pasta water to adjust consistency if needed. Return shrimp to the pan with the fresh parsley. Toss to combine. Serve immediately, garnished with more parmesan and a lemon wedge.

    Notes

    Don’t Overcook the Shrimp: They cook very quickly and will heat up again in the final step. The Power of Pasta Water: This starchy water is the secret to a smooth, emulsified sauce that coats the noodles perfectly. Fresh is Best: Use fresh lemon juice, garlic, and parsley for the most vibrant flavor.

    • Prep Time: 10 minutes
    • Cook Time: 20 minutes
    • Category: Dinner
    • Method: Sautéing
    • Cuisine: Italian-American

    Nutrition

    • Serving Size: 1 serving
    • Calories: 750 kcal
    • Sugar: 6 g
    • Sodium: 1150 mg
    • Fat: 48 g
    • Saturated Fat: 26 g
    • Unsaturated Fat: 22 g
    • Trans Fat: 0 g
    • Carbohydrates: 62 g
    • Fiber: 4 g
    • Protein: 36 g
    • Cholesterol: 210 mg
  • Protein-Packed Garlic Steak and Creamy Mac & Cheese

    Protein-Packed Garlic Steak and Creamy Mac & Cheese

    This high-protein meal prep combines tender, savory garlic steak bites with a lightened-up version of classic macaroni and cheese. It is an ideal solution for those seeking comfort food flavors while maintaining a strict calorie and macro budget.

    Recipe image

    List of ingredients

    • 1.5 lb lean sirloin or top round steak – trimmed and cut into 1-inch cubes.
    • 1 tbsp Worcestershire sauce – adds depth and umami.
    • 1 tbsp low-sodium soy sauce – for a savory, salty base.
    • 1 tbsp minced garlic – approximately 3 fresh cloves.
    • ½ tbsp garlic powder – enhances the aromatic garlic profile.
    • 1 tsp onion powder – adds a subtle sweetness.
    • 1 tsp smoked paprika – provides a subtle woody smoke flavor.
    • ½ tsp salt – to taste.
    • ½ tsp black pepper – for a touch of spice.
    • Olive oil spray – used for searing the meat.
    • 8 oz dry elbow or penne pasta – provides the hearty base.
    • 4 oz low-fat cream cheese – creates a rich, creamy texture.
    • ½ cup skim milk – thins the sauce without adding heavy fats.
    • ¾ cup nonfat shredded cheddar cheese – for a sharp cheese taste.
    • ½ cup plain nonfat Greek yogurt – increases protein and creaminess.
    • ½ tbsp garlic powder – seasons the cheese sauce.
    • 1 tsp onion powder – balances the cheese flavor.
    • ½ tsp black pepper – seasons the sauce.
    • ¼ tsp salt – to taste.
    • Chives – used for a fresh final garnish.

    step-by-step instructions

    1. Cook the Pasta: Bring a pot of salted water to a boil. Add the dry elbow or penne pasta and cook according to the package directions until al dente. Drain the pasta thoroughly and set it aside.
    2. Prep the Steak Bites: In a large mixing bowl, combine the cubed steak with soy sauce, Worcestershire sauce, minced garlic, garlic powder, onion powder, smoked paprika, salt, and pepper. Toss the meat until every piece is evenly coated in the seasoning.
    3. Cook the Steak: Heat a large skillet over medium-high heat and lightly coat with olive oil spray. Add the steak bites in a single layer and sear for 2–3 minutes per side until browned and cooked to your desired doneness. Remove the steak from the pan and set aside.
    4. Make the Low-Cal Mac Sauce: Using the same pot from the pasta or a separate saucepan, combine skim milk and low-fat cream cheese over medium heat. Whisk continuously until the mixture is completely smooth. Stir in the nonfat cheddar, Greek yogurt, garlic powder, and onion powder until the sauce is creamy. Season with salt and pepper.
    5. Combine & Serve: Fold the drained pasta into the cheese sauce and toss until every piece is well coated. Divide the macaroni and cheese into meal prep containers and top each portion with the seared steak bites. Garnish with fresh chives.

    Mastering the Steak Searing Process

    Achieving a Deep Brown Crust

    To get a professional sear, ensure your skillet is very hot before the meat hits the pan. This triggers the Maillard reaction, which creates a savory brown crust that locks in juices. If the pan is too cool, the steak will release water and steam rather than sear.

    Managing Pan Crowding

    Avoid adding all the steak bites to the pan at once, as this lowers the surface temperature rapidly. Work in smaller batches if necessary to ensure each piece has enough space. This prevents the meat from boiling in its own juices and ensures a consistent char.

    Controlling Meat Doneness

    Use a meat thermometer to track the internal temperature of the steak bites. For medium-rare, aim for about 130-135°F, while medium is typically 140-145°F. Because the pieces are small, they cook quickly, so keep a close eye on the timer.

    Effective Use of Oil Spray

    Olive oil spray is a great way to reduce added fats while preventing sticking. Apply a fresh layer of spray between each batch of steak to maintain a non-stick surface. Be sure to spray the pan evenly across the entire cooking area.

    Customizing Protein and Pasta

    Alternative Lean Meat Options

    While sirloin is excellent, you can substitute chicken breast or shrimp for a different flavor profile. For chicken, dice the meat into similar 1-inch cubes and sear for slightly longer. Shrimp should be added at the very end and cooked for only 2 minutes per side.

    Integrating High-Protein Pasta

    Swap traditional white pasta for chickpea, lentil, or edamame pasta to significantly increase the fiber and protein content. These alternatives often have a denser texture, so be careful not to overcook them. Always rinse protein pasta under cold water if you find the starchiness too intense.

    Adjusting Cheese for Texture

    If you prefer a stretchier cheese pull, you can replace a small portion of the nonfat cheddar with reduced-fat mozzarella. While nonfat cheese keeps calories low, a small amount of low-fat variety can improve the meltability. Ensure the cheese is finely shredded for faster melting.

    Adding Volume with Vegetables

    To increase the volume of the meal without adding many calories, stir in steamed broccoli or sautéed spinach. Roasted red peppers also pair well with the garlic steak flavor. Add these vegetables to the pasta during the combining step for a nutrient-dense meal.

    Secrets to a Perfect Low-Cal Sauce

    Preventing Greek Yogurt Curdling

    Greek yogurt can curdle if exposed to high heat for too long. To avoid this, remove the sauce from the heat or turn it to the lowest setting before stirring in the yogurt. Whisk it in quickly to maintain a smooth, velvety consistency.

    Creating a Smooth Cream Cheese Base

    Start by melting the low-fat cream cheese over medium-low heat with the milk. Use a whisk or a handheld frother to break up any lumps before adding the other ingredients. This ensures the sauce is uniform and doesn’t have small clumps of cheese.

    Balancing the Garlic Profiles

    This recipe uses both minced fresh garlic and garlic powder for a layered taste. The fresh garlic provides a sharp, pungent bite, while the powder offers a consistent, mellow background flavor. Adjust the ratio based on your preference for garlic intensity.

    Fixing Sauce Consistency

    If the sauce becomes too thick after adding the cheese and yogurt, stir in a tablespoon of skim milk at a time. Conversely, if the sauce is too thin, let it simmer on low for a few extra minutes. Remember that the sauce will thicken slightly as it cools in the fridge.

    Meal Prep and Storage Guidelines

    Choosing the Right Containers

    Glass airtight containers are the best choice for this meal because they reheat evenly in the microwave. They also prevent the pasta from absorbing odors from other foods in the fridge. Ensure the lids seal tightly to keep the steak from drying out.

    Optimal Reheating Methods

    Reheat the portions in 60 to 90 second bursts in the microwave. Stir the macaroni halfway through the heating process to redistribute the cheese sauce. Adding a tiny splash of milk before reheating helps restore the original creamy texture.

    Freezing and Thawing Instructions

    For long-term storage, freeze the macaroni and cheese separately from the steak. Thaw the containers in the refrigerator overnight before reheating. This prevents the steak from becoming rubbery during the freezing and thawing cycle.

    Separation for Texture Preservation

    If you are prepping for more than three days, consider storing the steak in a separate small container. Place the steak on top of the pasta only when you are ready to eat. This keeps the pasta from absorbing too much of the steak’s marinade.

    Nutrition and Macro Optimization

    Boosting Fiber Content

    To make this meal more filling, consider adding a side of roasted cauliflower or asparagus. You can also stir in a handful of grated carrots or finely chopped kale into the pasta. These additions provide essential micronutrients and slow down digestion.

    Managing Sodium Levels

    To reduce the sodium content, use a salt-free seasoning blend for the steak and omit the added salt in the pasta water. Low-sodium soy sauce is critical here to avoid an overly salty result. You can also use a splash of lemon juice to enhance flavors without adding salt.

    Understanding the Protein-to-Carb Ratio

    This dish is designed for muscle recovery, offering a high ratio of protein to carbohydrates. The lean steak and Greek yogurt provide a steady stream of amino acids. The complex carbohydrates from the pasta (especially if using lentil pasta) provide lasting energy.

    Controlling Caloric Density

    Using skim milk and nonfat dairy keeps the caloric density low while maintaining a high volume of food. If you need to lower calories further, replace half of the pasta with steamed cauliflower florets. This creates a “half-and-half” mac and cheese that is even lighter.

    Troubleshooting Common Cooking Issues

    Resolving a Broken Sauce

    If the cheese sauce separates or looks grainy, it is usually due to overheating. To fix this, whisk in a teaspoon of warm milk or a small amount of cornstarch slurry over very low heat. Stir vigorously until the emulsion reforms into a smooth sauce.

    Reducing Overly Salty Steak

    If the steak tastes too salty due to the soy and Worcestershire sauces, serve it with an unseasoned vegetable side. A squeeze of fresh lime or lemon juice can also neutralize the saltiness. Avoid adding any additional salt to the macaroni and cheese in this case.

    Cleaning Searing Residue

    To clean a cast iron or stainless steel skillet after searing steak, deglaze the pan while it is still warm. Pour in a small amount of water and scrape the browned bits with a spatula. This makes the final cleaning process much easier and prevents burnt-on residue.

    Preventing Mushy Pasta

    Overcooked pasta can turn the meal into a mushy consistency, especially after reheating. Cook your pasta for 1 to 2 minutes less than the package instructions suggest. This ensures the pasta retains a bite and doesn’t fall apart when mixed with the sauce.

    Frequently Asked Questions

    Can I make this gluten-free?

    Yes, you can easily make this dish gluten-free by using your favorite gluten-free pasta. Chickpea or brown rice pastas are excellent choices. Ensure your soy sauce is replaced with tamari or coconut aminos to avoid gluten.

    How many calories are in this version?

    Each serving contains approximately 594 calories. The macronutrient breakdown includes about 61g of protein, 57g of carbohydrates, and 14g of fat. These numbers may vary slightly based on the specific brands of dairy and meat used.

    Can I use full-fat cheese instead of nonfat?

    You can use full-fat or reduced-fat cheeses if your macros allow for it. This will result in a richer, creamier taste and a better melt. However, be aware that this will increase the total fat and calorie count per serving.

    Which steak cut is the best for this recipe?

    Lean sirloin or top round are the best options because they are low in fat and high in protein. If you prefer a more tender bite, you can use filet mignon, though it is more expensive. Avoid heavily marbled cuts like ribeye, as they may release too much oil during searing.

    Print
    clock clock iconcutlery cutlery iconflag flag iconfolder folder iconinstagram instagram iconpinterest pinterest iconfacebook facebook iconprint print iconsquares squares iconheart heart iconheart solid heart solid icon
    Protein-Packed Garlic Steak and Creamy Mac & Cheese

    Protein-Packed Garlic Steak and Creamy Mac & Cheese


    5 Stars 4 Stars 3 Stars 2 Stars 1 Star

    No reviews

    • Author: imageuploader
    • Total Time: 35 minutes
    • Yield: 4 servings 1x
    • Diet: Low-Calorie

    Description

    A high-protein, low-calorie remix of garlic steak and creamy mac & cheese, perfect for meal prep and fitness goals.


    Ingredients

    Scale
    • 1.5 lb lean sirloin or top round steak, trimmed and cut into 1-inch cubes
    • 1 tbsp Worcestershire sauce
    • 1 tbsp low-sodium soy sauce
    • 1 tbsp minced garlic
    • 1/2 tbsp garlic powder
    • 1 tsp onion powder
    • 1 tsp smoked paprika
    • 1/2 tsp salt
    • 1/2 tsp black pepper
    • Olive oil spray
    • 8 oz dry elbow or penne pasta
    • 4 oz low-fat cream cheese
    • 1/2 cup skim milk
    • 3/4 cup nonfat shredded cheddar cheese
    • 1/3 cup plain nonfat Greek yogurt
    • 1/2 tbsp garlic powder
    • 1 tsp onion powder
    • 1/2 tsp black pepper
    • 1/4 tsp salt
    • Chives for garnish

    Instructions

    1. Cook the Pasta: Cook pasta in salted boiling water according to package directions. Drain and set aside.
    2. Prep the Steak Bites: In a bowl, toss steak cubes with soy sauce, Worcestershire, minced garlic, garlic powder, onion powder, smoked paprika, salt, and pepper.
    3. Cook the Steak: Heat a large skillet over medium-high heat. Lightly coat with olive oil spray. Sear steak bites for 2–3 minutes per side until browned and cooked to your preferred doneness. Remove from pan and set aside.
    4. Make the Low-Cal Mac Sauce: In the same pot you used for pasta (or a clean saucepan), whisk together skim milk and low-fat cream cheese over medium heat until smooth. Stir in nonfat cheddar, Greek yogurt, garlic powder, and onion powder until creamy. Season with salt and pepper.
    5. Combine & Serve: Add drained pasta to the cheese sauce and toss to coat. Portion mac & cheese into meal prep containers, then top each with steak bites. Garnish with parsley or chives if desired.

    Notes

    To maintain the best texture during meal prep, store the steak and mac & cheese separately. When reheating, add a splash of skim milk to the mac & cheese to restore creaminess.

    • Prep Time: 15 minutes
    • Cook Time: 20 minutes
    • Category: Main Course
    • Method: Searing
    • Cuisine: American

    Nutrition

    • Serving Size: 1 serving
    • Calories: 594 kcal
    • Sugar: 10 g
    • Sodium: 1536 mg
    • Fat: 14 g
    • Saturated Fat: 6 g
    • Unsaturated Fat: 8 g
    • Trans Fat: 0 g
    • Carbohydrates: 57 g
    • Fiber: 3 g
    • Protein: 61 g
    • Cholesterol: 126 mg
  • Hearty Chicken Caesar Pasta Salad

    Hearty Chicken Caesar Pasta Salad

    This creamy chicken caesar pasta salad is a filling and refreshing meal that combines protein, carbohydrates, and fresh greens. It is an ideal choice for quick family dinners or a substantial side dish for social gatherings.

    Recipe image

    List of ingredients

    • 2 lbs boneless, skinless chicken breasts (sliced horizontally into 1/2-inch thick cutlets) – provide lean protein.
    • 2 tbsp olive oil (for grilling) – prevents sticking to the pan.
    • 1/2 tsp salt – basic seasoning.
    • 1/4 tsp black pepper (freshly ground) – adds a subtle heat.
    • 1 tsp garlic powder – enhances the savory flavor of the meat.
    • 12 oz rotini or penne pasta – holds the dressing well in their shapes.
    • 1 tbsp olive oil (optional) – prevents cooked pasta from clumping.
    • 1 tsp salt (for pasta water) – seasons the pasta from the inside.
    • 1/2 cup mayonnaise (full-fat recommended) – provides the creamy base for the dressing.
    • 1/4 cup grated Parmesan cheese (plus extra for garnish) – adds a salty, nutty depth.
    • 2 tbsp fresh lemon juice – provides necessary acidity to cut through the richness.
    • 1 tbsp Dijon mustard – acts as an emulsifier and adds tang.
    • 1 clove garlic (minced) – provides a sharp, fresh aromatic quality.
    • 1 tsp Worcestershire sauce – adds a complex, savory umami layer.
    • 1/2 tsp salt – adjusts the dressing salinity.
    • 1/4 tsp black pepper (freshly ground) – adds a spicy note to the sauce.
    • 2 tbsp water or milk (optional) – used to thin the dressing if it is too thick.
    • 1 head romaine lettuce (chopped) – provides a crisp, fresh contrast.
    • 1 cup cherry tomatoes (halved) – adds sweetness and color.
    • 1/2 cup croutons (store-bought or homemade) – adds essential crunch.
    • 1/4 cup red onion (thinly sliced, optional) – provides a sharp, pungent bite.
    • 1/4 cup fresh parsley (chopped, optional) – used as a fresh garnish.

    step-by-step instructions

    1. Prepare the Chicken: Pat the chicken cutlets dry with paper towels to ensure a good sear. Season both sides evenly with salt, black pepper, and garlic powder. Heat a grill pan or outdoor grill to medium-high and lightly brush with 2 tablespoons of olive oil. Grill the chicken for 4-6 minutes per side until the internal temperature reaches 165°F (74°C). Let the meat rest for 5 minutes before slicing into bite-sized pieces and allowing them to cool.
    2. Cook the Pasta: Bring a large pot of salted water to a rolling boil. Add the rotini or penne and cook according to the package directions until it reaches an al dente texture. Drain the pasta thoroughly and rinse it immediately with cold water to stop the cooking process. Toss the cooled pasta with 1 tablespoon of olive oil if necessary to prevent the pieces from sticking together.
    3. Make the Caesar Dressing: In a medium mixing bowl, combine the mayonnaise, grated Parmesan cheese, fresh lemon juice, Dijon mustard, minced garlic, Worcestershire sauce, salt, and black pepper. Whisk the mixture vigorously until the texture is smooth and fully emulsified. If the consistency is too thick for your preference, stir in water or milk one tablespoon at a time until it reaches the desired thickness.
    4. Assemble the Salad: Use a large mixing bowl to combine the cooled pasta, grilled chicken pieces, chopped romaine lettuce, halved cherry tomatoes, and sliced red onion. Pour the prepared Caesar dressing over the ingredients and toss gently to ensure everything is evenly coated. Fold in the croutons and additional Parmesan cheese just before serving to maintain crispness. Garnish with chopped parsley if desired.

    Expert Cooking Tips

    Prevent Chicken from Drying Out

    Avoid overcooking the chicken breasts by using a digital meat thermometer. Remove the chicken from the heat exactly when it hits 165°F (74°C). Letting the meat rest for five minutes allows the juices to redistribute, ensuring the cutlets remain moist when sliced.

    Optimize Pasta Texture

    Cook the pasta for one minute less than the package instructions for al dente. This prevents the pasta from becoming mushy when it absorbs the Caesar dressing. Rinsing with cold water is essential for pasta salads to stop the starch from continuing to cook the noodles.

    Balance the Dressing Consistency

    The thickness of your dressing depends on the brand of mayonnaise and the amount of cheese used. If the dressing feels too heavy, use a tablespoon of the reserved pasta water instead of plain water. The starch in the pasta water helps the dressing cling better to the noodles.

    Enhance the Garlic Flavor

    For a more potent garlic taste, let the minced garlic sit in the lemon juice for a few minutes before adding the other ingredients. This process, known as macerating, mellows the harsh raw bite while distributing the flavor more evenly throughout the sauce.

    Customization and Substitutions

    Vegetarian Protein Alternatives

    Replace the grilled chicken with roasted chickpeas or grilled tofu cubes for a plant-based version. Season the chickpeas with garlic powder, salt, and pepper before roasting them at 400°F until crispy. This maintains the protein content and adds a different type of crunch to the salad.

    Low-Calorie Dressing Options

    Substitute half of the mayonnaise with plain Greek yogurt to reduce the total fat and increase the protein content. Greek yogurt provides a similar tanginess and creaminess to mayo. You may need an extra teaspoon of lemon juice to balance the flavor of the yogurt.

    Different Pasta Shape Selections

    While rotini and penne are recommended, farfalle (bowtie) or fusilli also work well. Choose shapes with ridges or hollow centers, as these capture the creamy dressing more effectively than smooth pasta. Avoid long noodles like spaghetti, which can be difficult to toss with large chunks of chicken and lettuce.

    Adding Seasonal Vegetables

    Incorporate diced cucumbers, sliced bell peppers, or blanched asparagus to add more nutrients and variety. These additions provide extra crunch and a fresh flavor profile. Always ensure the vegetables are well-dried before adding them to prevent the dressing from thinning out.

    Serving and Presentation Suggestions

    Plating for Large Gatherings

    When serving at a potluck, present the salad in a wide, shallow bowl rather than a deep one. This prevents the heavier ingredients like chicken and pasta from settling at the bottom. Gently fold in the croutons and a final sprinkle of Parmesan right before the guests arrive.

    Pairing with Side Dishes

    Serve this salad alongside a light fruit platter or toasted garlic bread for a complete meal. A side of chilled grapes or sliced melon complements the salty notes of the Parmesan and Worcestershire sauce. For a heartier meal, a simple side of roasted vegetables works well.

    Adding Extra Texture

    To increase the textural contrast, add toasted pine nuts or slivered almonds to the top. These nuts provide a buttery crunch that complements the creaminess of the Caesar dressing. Ensure the nuts are toasted lightly so they do not overpower the other flavors.

    Storage and Preservation

    Refrigeration Guidelines

    Store any leftovers in an airtight container in the refrigerator for up to three days. Keep the chicken and pasta components together, but consider storing the romaine lettuce in a separate container. This prevents the greens from becoming soggy due to the salt in the dressing.

    Maintaining Lettuce Crispness

    If you are preparing the salad for meal prep, keep the dressing in a separate jar. Mix the dressing into the salad only at the moment of consumption. Romaine lettuce loses its structure quickly once exposed to acidic dressings and salt.

    Freezing Considerations

    This dish is not suitable for freezing because of the mayonnaise and fresh lettuce. Freezing causes the emulsion in the dressing to break, resulting in a grainy texture. Additionally, the lettuce and tomatoes will become limp and watery upon thawing.

    Reheating and Refreshing

    How to Revive the Dressing

    If the dressing thickens too much in the fridge, whisk in a teaspoon of warm water or milk. This restores the creamy consistency without altering the taste. Always whisk the dressing thoroughly before adding it back to the chilled pasta and chicken.

    Reheating the Chicken Component

    If you prefer the chicken warm, sauté the sliced pieces in a pan for two minutes before adding them to the cold pasta and lettuce. This creates a temperature contrast that some find appealing. Ensure the chicken is not steaming hot when it touches the romaine to avoid wilting the leaves.

    Common Troubleshooting

    Addressing Watery Salad

    If the salad becomes watery, it is often due to excess moisture from the cherry tomatoes or lettuce. Use a paper towel to pat the halved tomatoes dry before adding them. Ensure the pasta is drained and cooled completely before mixing to prevent condensation.

    Fixing Over-Salted Dressing

    If the dressing tastes too salty, add a small squeeze of extra lemon juice or a teaspoon of honey. The acidity of the lemon or the sweetness of the honey helps neutralize the perceived saltiness. Avoid adding more mayo, as this can make the dressing too bland.

    Preventing Pasta Sticking

    If the pasta clumps together after cooling, toss it with a small amount of olive oil immediately after rinsing. This creates a thin barrier that keeps the noodles separate. If they have already clumped, gently break them apart with a fork before adding the dressing.

    Frequently Asked Questions

    Can I use rotisserie chicken?

    Yes, using a store-bought rotisserie chicken is a great time-saver. Simply shred or cube the breast meat and use it in place of the grilled chicken. Ensure the chicken is cooled to room temperature before mixing it into the salad.

    How long does the dressing last?

    The homemade Caesar dressing can be stored in an airtight glass jar in the refrigerator for up to five days. Because it contains fresh garlic and lemon juice, it stays vibrant for several days. Shake the jar well before using to re-emulsify the ingredients.

    Can I use a different lettuce?

    While romaine is traditional for its crunch, you can use iceberg lettuce for a similar texture or baby spinach for more nutrients. If using spinach, be aware that it wilts faster than romaine, so add it only right before serving.

    Print
    clock clock iconcutlery cutlery iconflag flag iconfolder folder iconinstagram instagram iconpinterest pinterest iconfacebook facebook iconprint print iconsquares squares iconheart heart iconheart solid heart solid icon
    Hearty Chicken Caesar Pasta Salad

    Hearty Chicken Caesar Pasta Salad


    5 Stars 4 Stars 3 Stars 2 Stars 1 Star

    No reviews

    • Author: imageuploader
    • Total Time: 45 minutes
    • Yield: 6 servings 1x
    • Diet: General

    Description

    A delightful twist on the traditional Caesar salad, this recipe combines tender grilled chicken, al dente pasta, crisp romaine, and a creamy Caesar dressing for a satisfying and flavorful meal perfect for any occasion.


    Ingredients

    Scale
    • 2 lbs boneless, skinless chicken breasts, sliced horizontally into 1/2-inch thick cutlets
    • 2 tbsp olive oil
    • 1/2 tsp salt
    • 1/4 tsp black pepper
    • 1 tsp garlic powder
    • 12 oz rotini or penne pasta
    • 1 tbsp olive oil
    • 1 tsp salt
    • 1/2 cup mayonnaise
    • 1/4 cup grated microbial-rennet Parmesan cheese
    • 2 tbsp fresh lemon juice
    • 1 tbsp Dijon mustard
    • 1 clove garlic, minced
    • 1 tsp Worcestershire sauce
    • 1/2 tsp salt
    • 1/4 tsp black pepper
    • 2 tbsp water or milk
    • 1 head romaine lettuce, chopped
    • 1 cup cherry tomatoes, halved
    • 1/2 cup croutons
    • 1/4 cup red onion, thinly sliced
    • 1/4 cup fresh parsley, chopped

    Instructions

    1. Prepare the Chicken: Pat chicken cutlets dry with paper towels. Season both sides with salt, black pepper, and garlic powder. Heat a grill pan or outdoor grill to medium-high heat. Lightly brush with 2 tablespoons olive oil. Grill chicken for 4-6 minutes per side, or until cooked through and internal temperature reaches 165°F (74°C). Remove from heat, let rest for 5 minutes, then slice into bite-sized pieces. Set aside to cool.
    2. Cook the Pasta: Bring a large pot of salted water to a rolling boil. Add rotini or penne pasta and cook according to package directions until al dente. Drain the pasta thoroughly and rinse with cold water to stop cooking and cool it down. Optionally, toss with 1 tablespoon olive oil to prevent sticking. Set aside.
    3. Make the Caesar Dressing: In a medium bowl, whisk together mayonnaise, grated Parmesan cheese, fresh lemon juice, Dijon mustard, minced garlic, Worcestershire sauce, salt, and black pepper until smooth. If the dressing is too thick, add water or milk, one tablespoon at a time, until desired consistency is reached.
    4. Assemble the Salad: In a large mixing bowl, combine the cooled cooked pasta, grilled chicken pieces, chopped romaine lettuce, halved cherry tomatoes, and thinly sliced red onion (if using). Pour the prepared Caesar dressing over the salad ingredients. Toss gently until all ingredients are well coated with the dressing. Add croutons and extra grated Parmesan cheese just before serving. Garnish with fresh chopped parsley, if desired.

    Notes

    For a quicker chicken option, use shredded rotisserie chicken. The Caesar dressing can be made a day ahead and stored in an airtight container in the refrigerator; whisk again before using. To keep croutons crisp, add them just before serving.

    • Prep Time: 20 minutes
    • Cook Time: 25 minutes
    • Category: Main Course
    • Method: Grilling
    • Cuisine: American

    Nutrition

    • Serving Size: 1 serving
    • Calories: 550 kcal
    • Sugar: 7 g
    • Sodium: 980 mg
    • Fat: 28 g
    • Saturated Fat: 9 g
    • Unsaturated Fat: 19 g
    • Trans Fat: 0 g
    • Carbohydrates: 38 g
    • Fiber: 5 g
    • Protein: 36 g
    • Cholesterol: 95 mg