Blog

  • Succulent Slow Cooker Lemon Herb Chicken Rice for Busy Nights

    Succulent Slow Cooker Lemon Herb Chicken Rice for Busy Nights

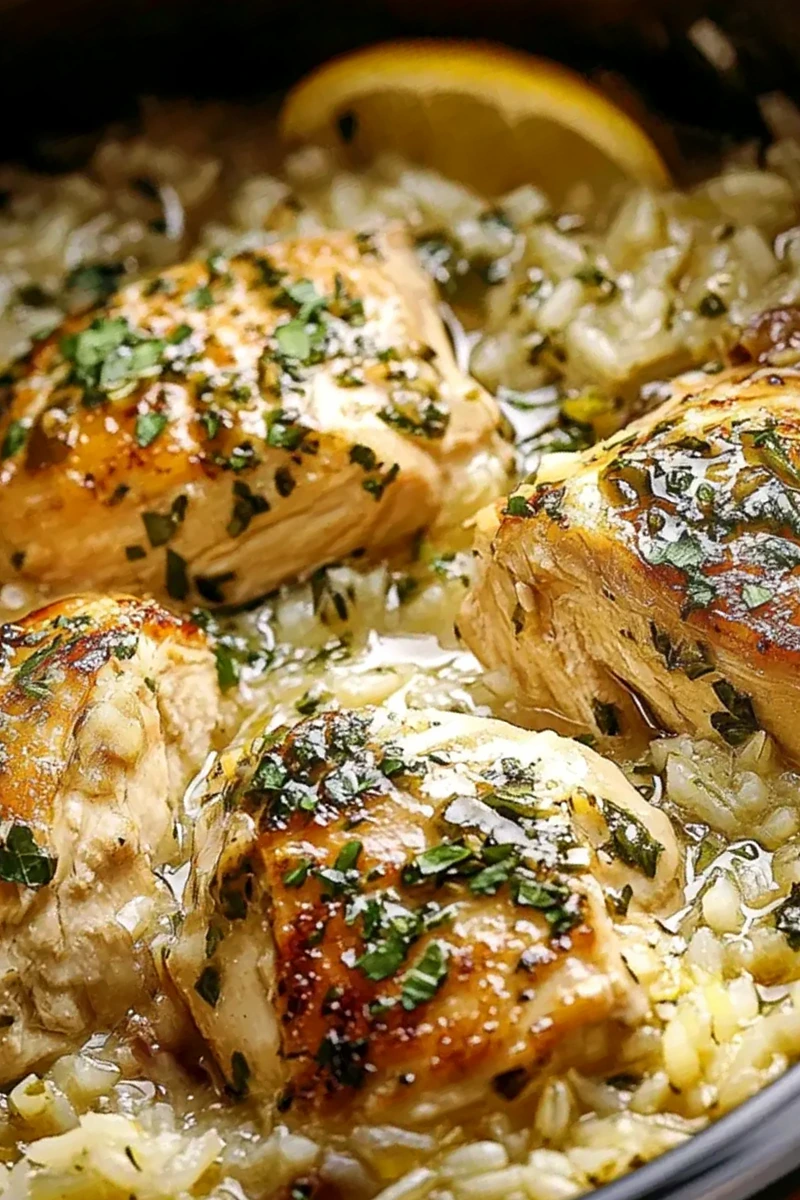
    This slow cooker meal provides a convenient way to prepare zesty chicken and rice with minimal active effort. It is designed for efficient weeknight cooking using fresh citrus and dried herbs.

    Recipe image

    List of ingredients

    • 4 pieces chicken breasts (boneless and skinless) – provides the main protein.
    • 1 lemon (juiced and zested) – adds brightness and acidity.
    • 2 tbsp olive oil – ensures moisture and carries flavors.
    • 1 tsp garlic powder – adds a savory, earthy depth.
    • 1 tsp dried oregano – provides a warm herbaceous note.
    • 1 tsp dried thyme – adds a subtle woody aroma.
    • salt and pepper (to taste) – essential for basic seasoning.
    • 2 cups chicken broth – serves as the cooking liquid for the rice.
    • 1 cup long-grain rice – absorbs the broth and flavors.
    • fresh herbs (for garnish, optional) – adds a fresh finish of parsley or dill.

    step-by-step instructions

    1. Prepare marinade: In a small bowl, combine the lemon juice, zest, olive oil, garlic powder, oregano, thyme, salt, and pepper.
    2. Coat chicken: Place your chicken breasts in the slow cooker, then pour the lemon herb mixture over them.
    3. Add base: Pour in the chicken broth and add the long-grain rice to the slow cooker.
    4. Distribute: Gently mix the ingredients to ensure that the rice is evenly distributed.
    5. Cook: Secure the lid on your slow cooker. Cook on low for 360 minutes or high for 180 minutes.
    6. Finish: Once cooked, remove the lid and fluff the rice gently with a fork.

    Practical Cooking Tips

    Ensure Thorough Chicken Coating

    Coat each piece of chicken thoroughly with the lemon herb marinade before adding the liquid. This ensures that the flavor penetrates the meat rather than just staying in the cooking broth.

    Rinse the Rice Before Adding

    Rinse the long-grain rice under cold water until the water runs clear. This removes excess surface starch, which prevents the rice from becoming gummy or sticking together in the slow cooker.

    Use High-Quality Chicken Broth

    Opt for a low-sodium or homemade chicken broth to better control the salt content. Homemade broth often contains more gelatin, which can result in a richer texture for the finished rice.

    Avoid Opening the Lid

    Keep the slow cooker lid closed throughout the cooking process. Opening the lid releases heat and steam, which can increase the cooking time and potentially lead to undercooked rice.

    Adjust Seasoning at the End

    Taste the rice after fluffing it and add extra salt or a squeeze of fresh lemon if needed. Slow cooking can sometimes mute flavors, so a final adjustment ensures the taste is balanced.

    Ingredient Substitutions

    Using Chicken Thighs for Moisture

    Replace the chicken breasts with boneless, skinless chicken thighs. Thighs have a higher fat content, making them more resistant to drying out during long cook times.

    Substituting Quinoa for Rice

    Use quinoa instead of long-grain rice for a higher protein content. Note that quinoa typically cooks faster than rice, so check for doneness earlier in the process.

    Replacing Olive Oil with Avocado Oil

    If you prefer a neutral taste, substitute olive oil with avocado oil. Avocado oil has a high smoke point and a milder flavor that allows the lemon and herbs to stand out.

    Fresh Garlic Instead of Powder

    Substitute the garlic powder with three to four cloves of minced fresh garlic. Fresh garlic provides a sharper, more pungent flavor profile compared to the mellow taste of powder.

    Vegetable Broth for a Lighter Base

    Use a high-quality vegetable broth instead of chicken broth. This is a practical option for those who prefer a different savory base while maintaining the same liquid ratio.

    Meal Variations

    Adding Root Vegetables

    Add diced carrots or parsnips at the beginning of the cooking cycle. These vegetables hold up well to slow cooking and add natural sweetness to the dish.

    Incorporating Green Peas

    Stir in one cup of frozen peas during the final 30 minutes of cooking. This adds a pop of color and nutritional value without overcooking the delicate peas.

    Adding a Spicy Element

    Mix in a half teaspoon of red pepper flakes or a diced jalapeño into the marinade. This introduces a mild heat that complements the citrusy lemon notes.

    Creating a Creamy Texture

    Substitute half of the chicken broth with coconut milk for a creamier, tropical twist. This change alters the flavor profile but maintains the moisture needed for the rice.

    Using Fresh Rosemary and Basil

    Replace the dried oregano and thyme with finely chopped fresh rosemary and basil. Fresh herbs provide a more vibrant and aromatic taste to the chicken.

    Brown Rice Adjustment

    You can use brown rice, but you must increase the chicken broth by half a cup. Brown rice requires more liquid and a longer cooking time to become tender.

    Serving Suggestions

    Pairing with Steamed Broccoli

    Serve the chicken and rice with steamed broccoli or cauliflower. The crunch of the vegetables provides a textural contrast to the tender chicken and fluffy rice.

    Adding a Crisp Side Salad

    Pair the meal with a mixed green salad tossed in a light vinaigrette. The acidity of the salad dressing cleanses the palate between bites of the savory rice.

    Serving with Garlic Toast

    Accompany the dish with toasted slices of garlic bread. This is useful for soaking up any remaining lemon-herb broth left on the plate.

    Non-Alcoholic Beverage Pairings

    Pair this zesty meal with a glass of iced green tea or sparkling apple cider. These beverages complement the citrus notes without overpowering the herbs.

    Storage and Preservation

    Refrigeration Guidelines

    Store leftovers in an airtight container in the refrigerator for up to 3 days. Ensure the food is cooled to room temperature within two hours to prevent bacterial growth.

    Freezing for Later Use

    Place the chicken and rice in a freezer-safe sealed bag or container for up to 3 months. Be aware that the rice texture may change slightly after the freezing and thawing process.

    Preventing Rice Dryness

    When storing, leave a small amount of the cooking liquid in the container. This helps the rice retain moisture during refrigeration and makes reheating more effective.

    Safe Thawing Procedures

    Thaw frozen portions in the refrigerator overnight before reheating. Avoid thawing on the counter to maintain food safety and prevent the meat from reaching the danger zone.

    Reheating Guidelines

    Microwave Reheating Method

    Place a portion in a microwave-safe dish and add a tablespoon of water or broth. Cover with a damp paper towel and heat in short intervals, stirring in between.

    Stovetop Reheating Technique

    Place the leftovers in a skillet over medium-low heat with a splash of chicken broth. Cover with a lid and heat gently until the chicken is warmed through.

    Oven Reheating Process

    Transfer the meal to an oven-safe dish and cover tightly with foil to trap steam. Heat at 325 degrees Fahrenheit until the internal temperature of the chicken reaches 165 degrees.

    Maintaining Rice Texture

    Avoid overcooking during the reheating process, as this can make the rice mushy. Heat only until warm and avoid high-power settings in the microwave.

    Common Cooking Issues

    Dealing with Mushy Rice

    Mushy rice usually occurs if too much liquid is added or if the rice is overcooked. To prevent this, strictly follow the liquid-to-rice ratio and avoid using short-grain rice.

    Fixing Dry Chicken Breasts

    Dry chicken often results from cooking on the high setting for too long. Using the low setting for a longer duration generally produces more tender and juicy results.

    Handling Undercooked Rice

    If the rice is still hard, add a quarter cup of broth and cook on high for an additional 30 minutes. Ensure the lid remains closed to maintain the necessary steam.

    Correcting Bland Flavor

    If the dish lacks punch, stir in a teaspoon of lemon zest or a pinch of salt after cooking. A small amount of fresh parsley can also brighten the overall flavor.

    Preventing Burnt Bottoms

    Some slow cookers run hotter than others, which can scorch the rice at the bottom. Using a slow cooker with a ceramic liner helps distribute heat more evenly.

    Frequently Asked Questions

    How long does Slow Cooker Lemon Herb Chicken Rice last in the fridge?

    It stays fresh for up to 3 days when stored in an airtight container. Refrigerate the meal within two hours of cooking to ensure safety.

    Can I freeze Slow Cooker Lemon Herb Chicken Rice?

    Yes, it can be frozen in a sealed container for up to 3 months. Add a splash of broth when reheating to restore the moisture to the rice.

    What can I use instead of chicken breasts?

    Boneless, skinless chicken thighs are a great substitute for a juicier result. Turkey breasts can also be used as a lean alternative.

    Is there a gluten-free option for this recipe?

    Yes, this recipe is naturally gluten-free provided that you use a certified gluten-free chicken broth and rice.

    What pairs well with Slow Cooker Lemon Herb Chicken Rice?

    Steamed vegetables, a crisp side salad, or garlic bread are excellent pairings. For drinks, iced tea or sparkling water work well.

    Can I use a different type of rice?

    Long-grain white rice or Basmati rice work best. If using brown rice, increase the liquid and the cooking time.

    Print
    clock clock iconcutlery cutlery iconflag flag iconfolder folder iconinstagram instagram iconpinterest pinterest iconfacebook facebook iconprint print iconsquares squares iconheart heart iconheart solid heart solid icon
    Succulent Slow Cooker Lemon Herb Chicken Rice for Busy Nights

    Succulent Slow Cooker Lemon Herb Chicken Rice for Busy Nights


    5 Stars 4 Stars 3 Stars 2 Stars 1 Star

    No reviews

    • Author: imageuploader
    • Total Time: 6 hours 15 minutes
    • Yield: 4 servings 1x
    • Diet: General

    Description

    Enjoy Slow Cooker Lemon Herb Chicken Rice: Easy Healthy Crock Pot Meal, a vibrant dish for busy weeknights.


    Ingredients

    Scale
    • 4 pieces chicken breasts (boneless and skinless)
    • 1 lemon (juiced and zested)
    • 2 tbsp olive oil
    • 1 tsp garlic powder
    • 1 tsp dried oregano
    • 1 tsp dried thyme
    • salt and pepper (to taste)
    • 2 cups chicken broth
    • 1 cup long-grain rice
    • fresh herbs (for garnish, optional)

    Instructions

    1. Combine: In a small bowl, combine the lemon juice, zest, olive oil, garlic powder, oregano, thyme, salt, and pepper.
    2. Coat: Place your chicken breasts in the slow cooker, then pour the lemon herb mixture over them.
    3. Add: Pour in the chicken broth and add the long-grain rice to the slow cooker.
    4. Mix: Gently mix the ingredients to ensure that the rice is evenly distributed.
    5. Cook: Secure the lid on your slow cooker. Cook on low for 360 minutes or high for 180 minutes.
    6. Fluff: Once cooked, remove the lid and fluff the rice gently with a fork.

    Notes

    Ensure each chicken breast is well-coated for maximum flavor. Adjust seasonings based on personal preference.

    • Prep Time: 15 minutes
    • Cook Time: 6 hours
    • Category: Healthy Recipes
    • Method: Slow Cooking
    • Cuisine: American

    Nutrition

    • Serving Size: 1 serving
    • Calories: 450 kcal
    • Sugar: 1 g
    • Sodium: 600 mg
    • Fat: 12 g
    • Saturated Fat: 2 g
    • Unsaturated Fat: 10 g
    • Trans Fat: 0 g
    • Carbohydrates: 50 g
    • Fiber: 2 g
    • Protein: 40 g
    • Cholesterol: 100 mg
  • Juicy and Tender Creamy Chicken Breast

    Juicy and Tender Creamy Chicken Breast

    This method transforms standard chicken breasts into a succulent, tender meal with a rich pan sauce. It is an ideal solution for anyone who struggles with dry poultry during weeknight dinners.

    Recipe image

    List of ingredients

    • 2 large boneless, skinless chicken breasts – pounded to 1/2-inch thickness for even cooking.
    • Cream cheese – softened to room temperature for a smooth sauce.
    • Low-sodium chicken broth – used as the savory base for the cream sauce.
    • 3-4 cloves of freshly minced garlic – provides essential aromatic depth.
    • Fresh lemon juice – added at the end to brighten the rich flavors.
    • Dried Italian seasoning – a blend of herbs like oregano and basil.
    • Olive oil – for searing the chicken to a golden brown.
    • Salt – to enhance all natural flavors.
    • Black pepper – for a touch of warmth and spice.

    step-by-step instructions

    1. Prepare the Chicken: Place chicken breasts between two pieces of plastic wrap or in a resealable bag. Pound them to a uniform 1/2-inch thickness using a meat mallet or rolling pin. Pat them dry with paper towels and season both sides generously with salt and black pepper.
    2. Sear the Chicken: Heat 1 tablespoon of olive oil in a large skillet over medium-high heat. Once shimmering, sear chicken for 3-4 minutes per side until golden brown. Remove the chicken from the pan and set aside on a plate.
    3. Sauté the Aromatics: Lower the heat to medium and add another teaspoon of olive oil if needed. Sauté the minced garlic for 30-60 seconds, stirring constantly to prevent burning.
    4. Build the Creamy Sauce: Pour chicken broth into the skillet, scraping the bottom to release browned bits. Bring to a gentle simmer, then reduce heat to low and whisk in the softened cream cheese until smooth.
    5. Season the Sauce: Stir in the dried Italian seasoning and a pinch of salt and pepper. Taste the sauce and adjust seasonings to your preference.
    6. Simmer the Chicken: Return the seared chicken to the skillet, nestling it into the sauce. Cover and simmer for 8-12 minutes until the internal temperature reaches 165°F (74°C).
    7. Finish and Serve: Remove the skillet from heat and stir in fresh lemon juice. Optional fresh herbs can be sprinkled on top. Let the chicken rest in the sauce for a few minutes before serving.

    Essential Cooking Techniques for Tenderness

    Pounding Meat for Uniform Thickness

    Chicken breasts are naturally tapered, meaning one end is much thicker than the other. Pounding the meat to a consistent 1/2-inch thickness ensures that the entire piece cooks at the same rate. This prevents the thin end from drying out while you wait for the center to reach a safe temperature.

    Mastering the High-Heat Sear

    Searing the chicken first creates a golden-brown crust through the Maillard reaction, which adds deep savory flavor. Ensure the oil is shimmering before adding the meat to prevent sticking. Avoid crowding the pan, as too much meat can lower the temperature and cause the chicken to steam rather than sear.

    Preventing Garlic from Burning

    Garlic has a low burn point and can become bitter if overheated. Always reduce the pan heat to medium and sauté the garlic for no more than 60 seconds. Constant stirring ensures the garlic releases its aroma without turning dark brown or black.

    Deglazing the Pan for Flavor

    The browned bits stuck to the bottom of the pan, known as the fond, contain concentrated flavor. When you pour in the chicken broth, use a wooden spoon to scrape these bits into the liquid. This process integrates those savory notes directly into the creamy sauce.

    Using a Meat Thermometer

    The only foolproof way to avoid dry chicken is to use an instant-read thermometer. Remove the chicken from the heat exactly when it hits 165°F (74°C) in the thickest part. Relying on time alone is risky because skillet temperatures and meat thickness vary.

    Ingredient Substitutions and Alternatives

    Replacing Chicken Broth with Vegetable Broth

    If you do not have chicken broth on hand, low-sodium vegetable broth is an excellent substitute. It provides a similar salty, savory base without significantly changing the flavor profile of the dish. This is a great way to keep the recipe flexible based on your pantry stock.

    Using Low-Fat Cream Cheese

    For a lighter version of the sauce, you can use reduced-fat cream cheese. While the full-fat version provides a silkier texture, the low-fat option still delivers the necessary creaminess. Be aware that low-fat versions may require a slightly lower heat to prevent the sauce from breaking.

    Alternative Cooking Oils

    While olive oil is recommended, any neutral oil with a high smoke point will work. Avocado oil or canola oil are great choices for the searing phase. Avoid using butter for the initial sear as it can burn quickly at medium-high temperatures.

    Swapping Italian Seasoning

    If you lack a pre-mixed Italian seasoning, you can create your own with a mix of dried oregano, basil, and thyme. Alternatively, a pinch of Herbes de Provence offers a similar aromatic quality. Adjust the proportions based on which herb you prefer most.

    Fresh Lemon Juice Substitutes

    Fresh lemon juice is best for its bright acidity, but bottled lemon juice can be used in a pinch. If you have no lemon, a small splash of white wine vinegar or apple cider vinegar can provide the necessary acid. Use a small amount to avoid overpowering the sauce.

    Softening Hard Cream Cheese

    If you forget to take your cream cheese out of the fridge, you can soften it quickly. Cut the cheese into small cubes and microwave them for 10-15 seconds on low power. Be careful not to melt it completely, as it should remain soft but hold its shape before whisking.

    Creative Flavor Variations

    Incorporating Fresh Spinach

    Adding fresh baby spinach transforms this into a complete meal with added nutrition. Stir in two handfuls of spinach at the very end of the simmering process. The residual heat from the sauce will wilt the leaves in about 60 seconds.

    Adding Sliced Mushrooms

    For a deeper, earthier flavor, sauté sliced cremini or button mushrooms before adding the garlic. Brown them in the olive oil until they release their moisture and turn golden. This adds a meaty texture and a rich umami quality to the final dish.

    Integrating Sun-Dried Tomatoes

    Sun-dried tomatoes add a tangy, concentrated sweetness that pairs perfectly with cream cheese. Chop them finely and add them to the pan along with the garlic. This variation gives the dish a Mediterranean feel and vibrant color.

    Adding Parmesan Cheese for Richness

    Stirring in a handful of freshly grated Parmesan cheese along with the cream cheese adds a salty, nutty dimension. This thickens the sauce further and creates a more indulgent experience. Ensure you reduce the additional salt in the recipe to account for the salty cheese.

    Using Red Pepper Flakes for Heat

    If you prefer a spicy kick, add a pinch of red pepper flakes when sautéing the garlic. The heat infuses into the oil and then into the creamy sauce. This provides a subtle warmth that cuts through the richness of the dairy.

    Fresh Herb Garnishes

    While dried herbs are used for the sauce, fresh herbs added at the end make a huge difference. Chopped parsley, chives, or fresh basil provide a pop of color and a fresh aroma. Always stir these in after the pan is removed from the heat to preserve their bright flavor.

    The Best Side Dish Pairings

    Fluffy White or Brown Rice

    Rice is an ideal companion because it absorbs the creamy sauce efficiently. Basmati or Jasmine rice provides a fragrant, light base that doesn’t compete with the chicken’s flavor. For a nuttier taste and more fiber, use long-grain brown rice.

    Creamy Mashed Potatoes

    Mashed potatoes create a comforting, hearty dinner when paired with this recipe. The creamy sauce acts as a rich gravy that complements the buttery texture of the potatoes. For extra flavor, fold some roasted garlic into your mash.

    Butter-Tossed Egg Noodles

    Wide egg noodles are a classic choice for creamy chicken dishes. Toss the cooked noodles in a small amount of butter and parsley before plating. Nestling the chicken and sauce over the noodles ensures every bite is flavorful.

    Steamed Green Beans

    To balance the richness of the cream sauce, serve the chicken with steamed green beans. The snap and freshness of the vegetables provide a necessary textural contrast. A squeeze of lemon and a pinch of salt on the beans tie the meal together.

    Fresh Garden Salad

    A crisp salad with a light vinaigrette is the perfect palate cleanser for this rich meal. Use mixed greens, cucumbers, and cherry tomatoes with a simple lemon-olive oil dressing. This acidity helps cut through the density of the cream cheese sauce.

    Crusty Artisan Bread

    A slice of toasted sourdough or a warm baguette is essential for mopping up the extra sauce. Brush the bread with garlic butter and toast it until golden. This ensures none of the flavorful pan sauce goes to waste.

    Storage and Meal Prep Advice

    Refrigeration Guidelines

    Store leftover chicken and sauce in an airtight glass or plastic container. Ensure the food has cooled slightly before sealing to prevent excessive condensation. The chicken will remain safe and delicious in the refrigerator for up to 3-4 days.

    Stovetop Reheating Method

    The best way to reheat this dish is in a skillet over low heat. Add a small splash of chicken broth or water to the pan to loosen the sauce, which may have thickened in the fridge. Stir gently until the chicken is warmed through to avoid overcooking.

    Microwave Reheating Tips

    If using a microwave, heat the chicken in short 45-60 second bursts. Stir the sauce between each interval to ensure even heating and prevent the cream cheese from separating. Avoid overheating, as this can make the chicken rubbery.

    Freezing Creamy Chicken

    Freezing is generally not recommended for dairy-based sauces as they can become grainy upon thawing. However, if necessary, store in a freezer-safe container for up to 2 months. Thaw slowly in the refrigerator overnight before reheating gently on the stove.

    Make-Ahead Preparation

    You can pound and season the chicken breasts a few hours in advance and store them in the fridge. This saves time during the actual cooking process. However, do not sear the chicken ahead of time, as it is best cooked and served fresh for maximum tenderness.

    Troubleshooting and FAQs

    Why is my sauce lumpy?

    Lumps usually occur if the cream cheese is too cold when added to the broth. Always ensure the cream cheese is softened to room temperature before whisking. If lumps appear, you can use a whisk more vigorously or briefly strain the sauce through a fine-mesh sieve.

    How do I thicken the sauce further?

    If the sauce is too thin, simmer it uncovered for a few extra minutes to reduce the liquid. Alternatively, mix one teaspoon of cornstarch with a tablespoon of cold water to create a slurry. Whisk the slurry into the simmering sauce and cook for one minute until thickened.

    How do I thin out the sauce?

    If the sauce becomes too thick or heavy, whisk in an additional tablespoon of chicken broth. Add the liquid one tablespoon at a time until you reach your desired consistency. A small squeeze of extra lemon juice can also help break up the heaviness.

    What if I do not have a meat mallet?

    You can use a sturdy rolling pin or even the bottom of a heavy skillet to flatten the chicken. Place the meat inside a resealable plastic bag to avoid mess and prevent the meat from tearing. Apply firm, even pressure across the entire breast.

    Can I use frozen chicken breasts?

    Yes, but they must be completely thawed before you start the recipe. Thaw them slowly in the refrigerator for 24 hours or use a cold-water bath. Cooking frozen chicken will result in uneven searing and a higher risk of the exterior overcooking while the interior remains raw.

    Why did the sauce separate?

    Separation often happens if the heat is too high when the cream cheese is added. Keep the heat on low and whisk constantly to maintain a stable emulsion. If it separates, stir in a tiny bit of cold broth and whisk rapidly to bring it back together.

    How do I know when the chicken is done?

    The most accurate method is using a meat thermometer to check for an internal temperature of 165°F (74°C). If you do not have one, the chicken should be opaque throughout and the juices should run clear. Be careful not to overcook, as chicken breast dries out very quickly.

    Print
    clock clock iconcutlery cutlery iconflag flag iconfolder folder iconinstagram instagram iconpinterest pinterest iconfacebook facebook iconprint print iconsquares squares iconheart heart iconheart solid heart solid icon
    Juicy and Tender Creamy Chicken Breast

    Juicy and Tender Creamy Chicken Breast


    5 Stars 4 Stars 3 Stars 2 Stars 1 Star

    No reviews

    • Author: imageuploader
    • Total Time: 35 minutes
    • Yield: 2 servings 1x
    • Diet: General

    Description

    This Melt In Your Mouth Chicken Breast recipe transforms bland poultry into an incredibly tender and juicy dish. It’s simple to prepare and perfect for both weeknight dinners and special occasions.


    Ingredients

    Scale
    • 2 large boneless, skinless chicken breasts
    • Cream cheese (softened to room temperature)
    • Low-sodium chicken broth
    • 34 cloves of freshly minced garlic
    • Fresh lemon juice
    • Dried Italian seasoning
    • Olive oil
    • Salt
    • Black pepper

    Instructions

    1. Prepare the Chicken: Take your boneless, skinless chicken breasts and place them one at a time between two pieces of plastic wrap or in a large resealable bag. Using a meat mallet or a rolling pin, pound them evenly to about 1/2-inch thickness. Pat them dry with paper towels and season generously on both sides with salt and black pepper.
    2. Sear the Chicken: Heat a large skillet over medium-high heat and add about 1 tablespoon of olive oil. Once the oil shimmers, carefully place the seasoned chicken breasts in the hot pan. Sear them for 3-4 minutes per side until they’re golden brown and lightly caramelized. Remove the chicken from the skillet and set aside on a plate.
    3. Sauté the Aromatics: Reduce the heat to medium. If the pan looks dry, add another teaspoon of olive oil. Add the minced garlic to the skillet and cook for about 30-60 seconds, stirring constantly, until fragrant.
    4. Build the Creamy Sauce: Pour the chicken broth into the skillet, scraping up any browned bits from the bottom of the pan. Bring the broth to a gentle simmer. Reduce the heat to low, then add the softened cream cheese to the simmering broth. Whisk constantly until the cream cheese is fully melted and the sauce is smooth.
    5. Season the Sauce: Stir in your dried Italian seasoning and a good pinch more of salt and pepper. Taste the sauce and adjust seasonings as needed.
    6. Simmer the Chicken: Return the seared chicken breasts to the skillet, nestling them into the creamy sauce. Cover the skillet and let the chicken gently simmer in the sauce for 8-12 minutes, or until the chicken is cooked through and registers an internal temperature of 165°F (74°C).
    7. Finish and Serve: Remove the skillet from the heat. Stir in the fresh lemon juice. If using fresh herbs, sprinkle them in. Let the chicken rest in the sauce for a few minutes before serving.

    Notes

    Pounding the chicken breasts to an even thickness ensures they cook quickly and uniformly. Use an instant-read thermometer to avoid overcooking, and let the chicken rest after cooking to keep it moist.

    • Prep Time: 15 minutes
    • Cook Time: 20 minutes
    • Category: Dinner
    • Method: Searing
    • Cuisine: American

    Nutrition

    • Serving Size: 1 chicken breast with sauce
    • Calories: 400 kcal
    • Sugar: 2 g
    • Sodium: 600 mg
    • Fat: 25 g
    • Saturated Fat: 10 g
    • Unsaturated Fat: 15 g
    • Trans Fat: 0 g
    • Carbohydrates: 5 g
    • Fiber: 0 g
    • Protein: 40 g
    • Cholesterol: 120 mg
  • Chipotle Lime Shrimp Bowl: Quick, Zesty Weeknight Delight

    Chipotle Lime Shrimp Bowl: Quick, Zesty Weeknight Delight

    This zesty shrimp bowl is a fast dinner option that combines smoky chipotle flavors with fresh lime. It is highly customizable and perfect for healthy meal prep throughout the week.

    Recipe image

    List of ingredients

    • 2 tablespoons olive oil – can be replaced with avocado oil for higher heat.
    • 1 minced chipotle pepper – use smoked paprika for a milder spice level.
    • 1 tablespoon adobo sauce – substitute with extra lime juice if unavailable.
    • 3 cloves garlic – fresh is preferred, but garlic powder is a viable alternative.
    • 1 tablespoon lime juice – use fresh lime for the best acidity.
    • 1 teaspoon ground cumin – coriander serves as a good earthy substitute.
    • 1 teaspoon chili powder – swap with cayenne pepper for more heat.
    • Salt and black pepper – adjust to taste for flavor balance.
    • 1 pound shrimp – skinless chicken or firm tofu are suitable protein swaps.
    • 2 cups cooked rice – brown rice adds nutrition, or use cauliflower rice for low-carb.
    • 1 cup black beans – drain and rinse canned beans thoroughly.
    • 1 cup corn kernels – frozen corn is a convenient and effective substitute.
    • 1/4 cup chopped cilantro – parsley or green onions can be used instead.
    • 1/2 cup sour cream – plain Greek yogurt is a healthier, tangy alternative.
    • Lime wedges – used for garnish and adding extra acidity during serving.

    step-by-step instructions

    1. Prepare Marinade: In a medium bowl, whisk together olive oil, minced chipotle pepper, adobo sauce, minced garlic, lime juice, ground cumin, chili powder, salt, and black pepper until the mixture is smooth.
    2. Marinate Shrimp: Add the peeled and deveined shrimp to the marinade, coating them thoroughly. Cover the bowl and let the shrimp rest at room temperature for approximately 10 minutes.
    3. Cook Shrimp: Heat a large skillet over medium-high heat with a small amount of olive oil. Add the shrimp in a single layer and cook for 2-3 minutes per side until they are pink, opaque, and slightly charred.
    4. Warm Sides: Use the same skillet to add the cooked rice, drained black beans, and corn kernels. Stir occasionally for 3-5 minutes until all ingredients are heated through.
    5. Assemble Bowls: Divide the rice, bean, and corn mixture among serving bowls. Arrange the cooked shrimp on top, creating distinct sections of color and texture.
    6. Garnish: Top each bowl with sliced avocado, chopped cilantro, and a dollop of sour cream or Greek yogurt. Serve with lime wedges on the side for additional seasoning.

    Pro Cooking Tips for Optimal Texture

    Limit Marination Time to Prevent Mushiness

    Do not marinate the shrimp for longer than 30 minutes. The citric acid in the lime juice can begin to break down the proteins, which may lead to a mushy texture. Ten to twenty minutes is the ideal window for flavor absorption while maintaining firmness.

    Use High Heat for Proper Searing

    Ensure your skillet is very hot before adding the shrimp to achieve a charred exterior. Cooking in a single layer prevents the shrimp from steaming in their own juices. This technique ensures a golden-brown crust and a tender interior.

    Prioritize Fresh Aromatics

    Freshly squeezed lime juice and minced garlic provide a brightness that bottled versions cannot match. Fresh lime contains volatile oils that enhance the smoky notes of the chipotle. Use a microplane or fine grater for the garlic to ensure it distributes evenly in the marinade.

    Protein and Base Substitutions

    Using Chicken or Tofu as Protein

    If substituting shrimp with skinless chicken breast, dice the meat into small, equal-sized cubes for even cooking. Ensure the chicken reaches an internal temperature of 165°F for safety. For tofu, use extra-firm variety, press out excess water, and sauté until golden brown.

    Switching to Low-Carb Bases

    Replace white or brown rice with cauliflower rice to significantly reduce the carbohydrate count. Sauté the cauliflower rice in the same skillet used for the shrimp to pick up the residual marinade. This keeps the bowl nutrient-dense while remaining light.

    Replacing Sour Cream for Healthier Options

    Plain Greek yogurt is an excellent substitute for sour cream, offering a similar creaminess with added protein. It provides a slightly sharper tang that complements the smoky chipotle. You can also use a drizzle of tahini or a scoop of mashed avocado for a dairy-free alternative.

    Adjusting the Spice Level

    To reduce the heat, replace the chipotle pepper and adobo sauce with smoked paprika. If you prefer a spicier bowl, add diced fresh jalapeños or increase the amount of cayenne pepper in the marinade. Always taste the marinade before adding the shrimp to gauge the heat level.

    Recommended Side Pairings

    Adding Creamy Guacamole

    A side of homemade guacamole adds healthy fats and a buttery texture that balances the spice of the chipotle. Mash ripe avocados with lime juice, salt, and diced red onion. Scoop it directly into the bowl or serve it as a side dip.

    Serving with Crunchy Tortilla Chips

    Corn tortilla chips provide a satisfying crunch that contrasts with the softness of the rice and beans. Use lightly salted chips to avoid overpowering the flavors of the bowl. They are also useful for scooping up any leftover toppings or marinade.

    Incorporating a Zesty Cabbage Slaw

    A refreshing slaw made from shredded cabbage, lime juice, and cilantro adds a crisp element to the meal. The acidity of the slaw helps cut through the richness of the avocado and sour cream. Mix the slaw just before serving to maintain maximum crunch.

    Adding Sweet Mango Salsa

    Mango salsa offers a sweet and tropical contrast to the savory, smoky shrimp. Combine diced mango, red bell pepper, red onion, and lime juice for a vibrant topping. This pairing is particularly effective during summer months for a lighter feel.

    Storage and Preservation Guide

    Refrigerating Bowl Components

    Store the shrimp, rice, beans, and corn in separate airtight containers in the refrigerator. Keeping the components separate prevents the rice from absorbing too much moisture from the other ingredients. They will remain fresh and flavorful for up to three days.

    Freezing Shrimp and Rice

    The cooked shrimp and rice can be frozen separately for up to three months. Use freezer-safe bags and remove as much air as possible to prevent freezer burn. Thaw the components in the refrigerator overnight before reheating to maintain the best texture.

    Proper Reheating Techniques

    Warm the rice, beans, and corn in a microwave or skillet until heated through. Reheat the shrimp gently on medium heat for 1-2 minutes to avoid overcooking them. Overheating shrimp can make them rubbery, so heat them only until just warmed.

    Efficient Meal Prep Advice

    Pre-Marinating the Protein

    You can marinate the shrimp up to 24 hours in advance and keep them refrigerated. This allows the flavors to penetrate deeper into the protein without affecting the texture, as long as the shrimp are kept cold. When ready to cook, bring them to room temperature for a few minutes first.

    Batch Cooking Grains and Beans

    Cook a large batch of rice and prepare the black beans and corn at the start of the week. Store these bases together in a large container or in individual portion sizes. This reduces the active cooking time to just searing the shrimp when you are ready to eat.

    Organizing Components for Fast Assembly

    Use a meal prep container with compartments to keep the fresh garnishes separate from the cooked ingredients. Keep the chopped cilantro, lime wedges, and avocado in a small separate container. This ensures the fresh toppings do not wilt during the storage process.

    Common Cooking Troubleshooting

    Preventing Tough or Rubbery Shrimp

    Rubbery shrimp are usually the result of overcooking. Follow the 2-3 minute per side rule and remove them from the heat the moment they turn opaque. Use a meat thermometer to ensure they reach 145°F, which is the safe internal temperature for shrimp.

    Balancing Too Much Heat

    If the bowl is too spicy, increase the amount of sour cream or Greek yogurt to cool the palate. Adding extra lime wedges can also help neutralize the heat with acidity. A side of sliced avocado provides a creamy barrier that mellows the intensity of the chipotle.

    Fixing Dry Rice

    If your pre-cooked rice has dried out in the fridge, add a tablespoon of water or vegetable broth before reheating. Cover the container or skillet to create steam, which re-hydrates the grains. This ensures the rice is fluffy and moist when served.

    Frequently Asked Questions

    How do I select the best shrimp for this dish?

    Look for shrimp that are translucent, firm to the touch, and have a mild sea-salt scent. Avoid any shrimp with dark spots or a strong fishy odor, as these indicate spoilage. Both fresh and frozen options work, but ensure frozen shrimp are fully thawed before marinating.

    What is the best way to store leftover components?

    Store the shrimp, rice, beans, and corn in separate airtight containers in the refrigerator. This prevents the ingredients from mixing and becoming soggy. They will stay fresh for up to three days, and separating them makes reheating more efficient.

    Can I freeze any components of the bowl?

    Yes, you can freeze the cooked shrimp and the rice separately for up to three months. Cool them completely before placing them in freezer-safe containers. Thaw them in the refrigerator overnight before gently reheating them on the stove.

    What should I do if my shrimp become tough while cooking?

    If the shrimp are tough, they were likely cooked too long. For future batches, use a timer and remove them as soon as they turn pink and opaque. To fix current tough shrimp, avoid further heating and pair them with more creamy toppings like avocado to mask the texture.

    Is there a way to customize this for different dietary needs?

    This recipe is highly adaptable. For a vegetarian version, swap shrimp for firm tofu or roasted cauliflower. For a gluten-free diet, ensure your adobo sauce is certified gluten-free. Use cauliflower rice or quinoa to adjust the carbohydrate and nutrient profile according to your needs.

    Print
    clock clock iconcutlery cutlery iconflag flag iconfolder folder iconinstagram instagram iconpinterest pinterest iconfacebook facebook iconprint print iconsquares squares iconheart heart iconheart solid heart solid icon
    Chipotle Lime Shrimp Bowl: Quick, Zesty Weeknight Delight

    Chipotle Lime Shrimp Bowl: Quick, Zesty Weeknight Delight


    5 Stars 4 Stars 3 Stars 2 Stars 1 Star

    No reviews

    • Author: imageuploader
    • Total Time: 30 minutes
    • Yield: 4 bowls 1x
    • Diet: General

    Description

    This Chipotle Lime Shrimp Bowl is a quick, customizable dinner that bursts with flavor, making it perfect for busy weeknights.


    Ingredients

    Scale
    • 2 tablespoons olive oil
    • 1 minced chipotle pepper
    • 1 tablespoon adobo sauce
    • 3 cloves garlic, minced
    • 1 tablespoon lime juice
    • 1 teaspoon ground cumin
    • 1 teaspoon chili powder
    • Salt & black pepper to taste
    • 1 pound shrimp, peeled and deveined
    • 2 cups cooked rice
    • 1 cup black beans, drained and rinsed
    • 1 cup corn kernels
    • 1/4 cup chopped cilantro
    • 1/2 cup sour cream
    • sliced avocado
    • lime wedges

    Instructions

    1. Prepare Marinade: In a medium bowl, whisk together 2 tablespoons of olive oil, 1 minced chipotle pepper, 1 tablespoon of adobo sauce, 3 cloves of minced garlic, the juice of 1 lime, 1 teaspoon of ground cumin, 1 teaspoon of chili powder, and a pinch of salt and black pepper.
    2. Marinate Shrimp: Add 1 pound of peeled and deveined shrimp to the marinade, ensuring each piece is well coated. Cover the bowl with plastic wrap or a lid and let it rest at room temperature for about 10 minutes.
    3. Cook Shrimp: Heat a large skillet or frying pan over medium-high heat and drizzle in a touch of olive oil. Once hot, carefully add the marinated shrimp in a single layer. Cook for 2-3 minutes on each side until the shrimp are pink, opaque, and slightly charred.
    4. Warm Sides: In the same skillet, add 2 cups of cooked rice, 1 cup of drained and rinsed black beans, and 1 cup of corn kernels. Stir occasionally to warm everything through, about 3-5 minutes.
    5. Assemble Bowls: Divide the warmed rice, black beans, and corn mixture among serving bowls. In each bowl, artfully arrange the cooked shrimp.
    6. Garnish: Top each bowl with sliced avocado, a sprinkle of chopped cilantro for freshness, and a dollop of sour cream or Greek yogurt for creaminess. Serve with lime wedges on the side.

    Notes

    Ensure to marinate the shrimp for at least 10 minutes to absorb the chipotle lime flavors, but it should not exceed 30 minutes to maintain tenderness. Use fresh lime juice and garlic for best flavor.

    • Prep Time: 10 minutes
    • Cook Time: 20 minutes
    • Category: Dinner
    • Method: Sautéing
    • Cuisine: Mexican

    Nutrition

    • Serving Size: 1 bowl
    • Calories: 550 kcal
    • Sugar: 5 g
    • Sodium: 750 mg
    • Fat: 20 g
    • Saturated Fat: 4 g
    • Unsaturated Fat: 14 g
    • Trans Fat: 0 g
    • Carbohydrates: 65 g
    • Fiber: 10 g
    • Protein: 30 g
    • Cholesterol: 200 mg
  • Keto Smothered Chicken and Rice

    Keto Smothered Chicken and Rice

    This low-carb dish features juicy chicken thighs simmered in a rich, creamy sauce and served over tender cauliflower rice. It is a practical, one-pan solution for a filling weeknight dinner that fits a ketogenic lifestyle.

    Recipe image

    List of ingredients

    • 4 boneless, skinless chicken thighs – provides a juicy, protein-rich base.
    • 2 cups cauliflower rice – a low-carb alternative to traditional grains.
    • 1 cup chicken broth – adds savory depth to the sauce.
    • 1 cup heavy cream – creates a thick, velvety texture.
    • 1 tablespoon olive oil – used for searing the chicken to a golden brown.
    • 1 teaspoon garlic powder – adds a concentrated savory punch.
    • 1 teaspoon onion powder – provides a subtle, sweet aromatic layer.
    • 1 teaspoon paprika – adds mild smokiness and a rich color.
    • Salt and pepper to taste – essential for balancing all the flavors.

    step-by-step instructions

    1. Heat the Oil: Place olive oil in a large pan over medium-high heat until it shimmers.
    2. Season the Meat: Generously coat the chicken thighs with salt, pepper, garlic powder, onion powder, and paprika.
    3. Sear the Chicken: Brown the thighs in the hot pan for 5-7 minutes per side until a golden crust forms.
    4. Simmer the Sauce: Pour in the chicken broth and heavy cream, then bring the liquid to a gentle simmer.
    5. Cook the Rice: Stir in the cauliflower rice, cover the pan with a lid, and cook for 10-15 minutes.
    6. Rest and Serve: Remove the pan from the heat and let the dish rest for a few minutes to allow the sauce to thicken.

    Advanced Cooking Techniques for Better Results

    Achieving a Perfect Sear

    To get the best crust on your chicken, pat the meat dry with paper towels before seasoning. Moisture on the surface of the meat creates steam, which prevents the chicken from browning properly. Ensure the oil is hot enough that the meat sizzles immediately upon contact.

    Controlling the Sauce Consistency

    Keep the sauce at a gentle simmer rather than a rolling boil. High heat can cause the heavy cream to separate or break, leading to an oily texture. If the sauce seems too thin, simmer it uncovered for a few extra minutes before adding the cauliflower rice.

    Managing Cauliflower Rice Texture

    Avoid overcooking the cauliflower rice to prevent it from becoming mushy. The 10-15 minute window is a guideline; start checking the texture at the 10-minute mark. You want the grains to be tender but still hold their shape.

    Ingredient Substitutions and Customizations

    Alternative Protein Options

    You can replace chicken thighs with boneless, skinless chicken breasts for a leaner option. Note that breasts cook faster and can dry out more easily, so reduce the searing time. Turkey thighs are also an excellent substitute with a similar fat profile to chicken.

    Dairy-Free Cream Alternatives

    For a dairy-free version, substitute the heavy cream with full-fat coconut cream. Coconut cream provides the necessary thickness and richness while remaining keto-friendly. Be aware that this will add a subtle coconut flavor to the final dish.

    Low-Carb Grain Alternatives

    If you prefer a different base, try riced broccoli or sautéed zucchini noodles. Riced broccoli follows the same cooking process as cauliflower. Zucchini noodles should be added in the last 2-3 minutes of cooking to avoid oversoftening.

    Adding Nutritional Vegetable Boosts

    Incorporate sliced mushrooms or diced bell peppers during the browning phase. Sauté them after the chicken is removed from the pan but before adding the liquids. Spinach or kale can be stirred in at the very end until just wilted.

    Ways to Enhance the Flavor Profile

    Using Fresh Herbs

    Fresh thyme or rosemary pairs exceptionally well with the creamy sauce. Add these herbs during the simmering stage to infuse the sauce with earthy notes. Alternatively, stir in chopped fresh parsley right before serving for a bright, clean finish.

    Adding a Hint of Spice

    If you prefer a spicy kick, add a pinch of cayenne pepper or red pepper flakes to the seasoning mix. You can also stir in a teaspoon of sriracha or chipotle paste into the cream sauce. This adds a complex heat that cuts through the richness of the cream.

    Brightening with Acid

    A small squeeze of fresh lemon juice added at the end of cooking can elevate the dish. The acidity balances the heavy cream and enhances the savory notes of the chicken broth. This is especially useful if the dish feels too heavy on the palate.

    Serving and Pairing Ideas

    Refreshing Side Salad Pairings

    Serve this meal with a crisp garden salad featuring mixed greens, cucumber, and cherry tomatoes. A simple dressing of olive oil and apple cider vinegar provides a sharp contrast to the creamy sauce. This adds necessary crunch and freshness to the plate.

    Roasted Vegetable Accompaniments

    Roasted asparagus or steamed broccoli are excellent sides that complement the flavor profile. Toss them in olive oil, salt, and pepper, then roast at 400°F until charred. These vegetables add vibrant color and additional fiber to the meal.

    Garnishing for Presentation

    Top the finished dish with a sprinkle of crumbled feta or goat cheese for extra tanginess. A dusting of smoked paprika on top of the sauce adds a professional visual touch. Freshly chopped chives provide a mild onion flavor and a pop of green.

    Storage and Reheating Instructions

    Refrigeration Guidelines

    Store leftovers in an airtight container in the refrigerator for up to 3 to 4 days. Allow the food to cool slightly before sealing the lid to prevent excess condensation. This ensures the cauliflower rice does not become too watery during storage.

    Freezing for Future Meals

    This dish can be frozen for up to two months in freezer-safe containers. Be mindful that the texture of the cauliflower rice may change slightly upon thawing. Thaw the meal in the refrigerator overnight before reheating.

    Optimal Reheating Methods

    Reheat the dish on the stovetop over low heat, adding a tablespoon of water or broth to loosen the sauce. If using a microwave, heat in short intervals and stir in between. This prevents the cream from overheating in spots and separating.

    Meal Prep Strategies

    Portioning for the Week

    Divide the cooked meal into four equal containers immediately after the resting period. This allows for easy grab-and-go lunches or dinners. Including a side of steamed greens in each container makes it a complete, balanced meal.

    Prepping Ingredients in Advance

    You can season the chicken and store it in the refrigerator for up to 24 hours before cooking. Pre-measuring the broth and cream into a single jar also saves time during the cooking process. If using fresh cauliflower, rice it a day in advance and store it in a sealed bag.

    Troubleshooting Common Issues

    Fixing a Thin Sauce

    If the sauce is too thin after simmering, increase the heat slightly and cook without the lid for 3-5 minutes. The evaporation will naturally thicken the cream. Alternatively, you can whisk in a small amount of xanthan gum for an instant, keto-friendly thickening effect.

    Preventing Dry Chicken

    Avoid overcooking the chicken during the initial searing phase. The meat will continue to cook during the simmering and steaming process with the rice. Remove the chicken from the pan if it reaches an internal temperature of 160°F before the simmering step.

    Reducing Excess Liquid

    Some brands of frozen cauliflower rice release more water than others. If the dish looks soupy, stir in a tablespoon of cream cheese or a sprinkle of parmesan. This helps bind the liquid and adds more richness to the sauce.

    Frequently Asked Questions

    Can I use chicken breasts instead of thighs?

    Yes, chicken breasts work well, but they cook faster. Reduce the searing time and check for doneness earlier to ensure they remain moist.

    How do I store the leftovers without them getting mushy?

    Store the chicken and sauce separately from the cauliflower rice if possible. This prevents the rice from absorbing too much liquid while in the refrigerator.

    Is this dish suitable for a strict ketogenic diet?

    Yes, as it uses low-carb cauliflower rice and high-fat cream, it aligns with keto principles. Be sure to check your chicken broth label for added sugars or cornstarch.

    What is the best way to rice a cauliflower?

    Use a food processor and pulse the florets until they reach a grain-like consistency. Be careful not to over-process, or the cauliflower will turn into a puree.

    Can I make this in a slow cooker?

    You can, but the searing step must be done first in a pan for flavor. Add the chicken, broth, and cream to the slow cooker on low for 4-6 hours, then stir in the rice at the end.

    Print
    clock clock iconcutlery cutlery iconflag flag iconfolder folder iconinstagram instagram iconpinterest pinterest iconfacebook facebook iconprint print iconsquares squares iconheart heart iconheart solid heart solid icon
    Keto Smothered Chicken and Rice

    Keto Smothered Chicken and Rice


    5 Stars 4 Stars 3 Stars 2 Stars 1 Star

    No reviews

    • Author: imageuploader
    • Total Time: 40 minutes
    • Yield: 4 servings 1x
    • Diet: Keto

    Description

    A delicious and low-carb smothered chicken dish served over cauliflower rice for a KETO-friendly meal.


    Ingredients

    Scale
    • 4 boneless, skinless chicken thighs
    • 2 cups cauliflower rice
    • 1 cup chicken broth
    • 1 cup heavy cream
    • 1 tablespoon olive oil
    • 1 teaspoon garlic powder
    • 1 teaspoon onion powder
    • 1 teaspoon paprika
    • Salt and pepper to taste

    Instructions

    1. Step 1: Heat olive oil in a pan over medium-high heat.
    2. Step 2: Season chicken thighs with salt, pepper, garlic powder, onion powder, and paprika.
    3. Step 3: Brown chicken thighs in the pan until golden brown, about 5-7 minutes per side.
    4. Step 4: Add chicken broth and heavy cream, bring to a simmer.
    5. Step 5: Add cauliflower rice, cover, and cook for 10-15 minutes.
    6. Step 6: Remove from heat and let rest for a few minutes before serving.

    Notes

    This recipe is great for meal prep. Adjust seasoning according to your taste. Cauliflower rice can be substituted with any low-carb grain if desired.

    • Prep Time: 10 minutes
    • Cook Time: 30 minutes
    • Category: Dinner
    • Method: Stovetop
    • Cuisine: American

    Nutrition

    • Serving Size: 1 serving
    • Calories: 400 kcal
    • Sugar: 2 g
    • Sodium: 800 mg
    • Fat: 30 g
    • Saturated Fat: 15 g
    • Unsaturated Fat: 10 g
    • Trans Fat: 0 g
    • Carbohydrates: 8 g
    • Fiber: 3 g
    • Protein: 25 g
    • Cholesterol: 100 mg
  • Creamy Garlic Steak and Tortellini Skillet

    Creamy Garlic Steak and Tortellini Skillet

    This one-pan meal combines tender seared steak bites with cheesy pasta in a rich garlic cream sauce. It is a hearty, gourmet-style dinner that comes together in just 30 minutes.

    Recipe image

    List of ingredients

    • 20 oz cheese tortellini – fresh or refrigerated varieties provide the best texture.
    • 1 lb steak, sirloin or ribeye – sirloin is leaner, while ribeye is more tender.
    • Salt – for seasoning the steak.
    • Black pepper – for seasoning the steak.
    • Garlic powder – adds a concentrated garlic flavor to the meat.
    • Smoked paprika – provides a subtle woodsy depth.
    • 2 tbsp olive oil – essential for achieving a high-heat sear on the steak.
    • 4 tbsp butter – forms the base of the aromatic garlic sauce.
    • 5 cloves garlic, minced – adds a pungent, aromatic richness.
    • 1 cup heavy cream – creates a velvety and thick consistency.
    • 3/4 cup whole milk – balances the richness of the heavy cream.
    • 1 1/4 cups parmesan cheese, shredded – use a microbial-rennet variety for a savory finish.
    • Chopped parsley (optional) – used for a fresh, colorful garnish.
    • Red pepper flakes (optional) – adds a mild spicy kick.
    • Cracked black pepper (optional) – used as a final flavor enhancer.

    step-by-step instructions

    1. Cook the pasta: Bring a large pot of salted water to a boil over high heat. Add the cheese tortellini and cook for 3-5 minutes, or according to the package directions, until al dente. Drain the pasta and set it aside.
    2. Sear the steak: Heat olive oil in a large skillet over medium-high heat. Season the steak cubes with salt, black pepper, garlic powder, and smoked paprika. Sear the steak bites for 3-5 minutes until browned on all sides, then remove them from the pan and let them rest.
    3. Sauté the garlic: Reduce the skillet heat to medium and melt the butter. Add the minced garlic and sauté for about 1 minute until it is golden and fragrant.
    4. Simmer the cream: Pour in the heavy cream and whole milk, stirring the mixture to combine. Let the sauce simmer for 3-4 minutes until it reduces slightly and thickens.
    5. Melt the cheese: Gradually stir in the shredded parmesan cheese. Continue stirring until the cheese is completely melted and the sauce is smooth. Adjust the salt and pepper to your preference.
    6. Combine components: Return the seared steak and cooked tortellini to the skillet. Gently toss all ingredients together for about 2 minutes to ensure everything is evenly coated in the sauce.
    7. Garnish and serve: Sprinkle with chopped parsley, red pepper flakes, and cracked black pepper if desired. Serve the dish immediately while hot.

    Protein Selection and Preparation

    Choosing Sirloin for a Leaner Protein Option

    Sirloin is an excellent choice for those who prefer a leaner cut of meat with less fat. It provides a firm texture that holds up well when cubed and seared. This option reduces the overall calorie density of the meal without sacrificing protein.

    Utilizing Ribeye for Enhanced Tenderness

    Ribeye is highly marbled, which results in a more tender and juicy bite. The higher fat content melts during the searing process, adding additional flavor to the pan. Use this cut if you prefer a more decadent, steakhouse-style experience.

    Cutting Steak into Uniform Cubes for Even Cooking

    Cut the steak into consistent 1-inch cubes before seasoning. Uniform sizes ensure that every piece cooks at the same rate, preventing some bites from being overdone while others remain raw. This precision is key to maintaining juiciness.

    Perfecting the Garlic Cream Sauce

    Preventing Garlic from Burning During Sautéing

    Sauté garlic over medium heat and stir frequently. Garlic burns quickly, and burnt garlic introduces a bitter taste that can ruin the entire sauce. Remove the garlic from the heat as soon as it becomes fragrant and light golden.

    Controlling the Reduction of the Cream Sauce

    Allow the cream and milk to simmer gently rather than boiling rapidly. A slow simmer helps the sauce thicken naturally through evaporation without breaking the emulsion. This results in a more stable and velvety texture.

    Incorporating Parmesan for a Smooth Texture

    Add the shredded parmesan cheese gradually while whisking or stirring constantly. Adding all the cheese at once can lead to clumping. Slow incorporation ensures the cheese emulsifies perfectly into the cream base.

    Ingredient Substitutions and Variations

    Substituting Chicken for a Lighter Meal

    Replace the steak with cubed chicken breast for a leaner alternative. Season the chicken with the same blend of garlic powder and smoked paprika. Sear the chicken until fully cooked through before proceeding with the sauce.

    Adapting the Recipe for Shrimp

    Use peeled and deveined shrimp instead of steak for a seafood version. Sauté the shrimp quickly over high heat until pink, then remove them from the pan. Add the shrimp back into the skillet at the very end to avoid overcooking them.

    Selecting Gluten-Free Tortellini Alternatives

    Use gluten-free cheese tortellini, often made from rice or corn flour, to accommodate dietary restrictions. Since the sauce is naturally gluten-free, only the pasta needs to be swapped. Ensure the gluten-free pasta is not overcooked, as it can become mushy more quickly than wheat pasta.

    Adding Fresh Spinach for Nutrient Density

    Stir a few handfuls of fresh baby spinach into the sauce just before adding the steak and pasta. The residual heat from the cream will wilt the spinach in about one minute. This adds color and essential vitamins to the dish.

    Using Mascarpone to Increase Sauce Richness

    Substitute half of the heavy cream with mascarpone cheese for an ultra-thick sauce. Mascarpone adds a buttery, slightly sweet depth that enhances the savory parmesan. This variation is ideal for special occasions where a richer flavor is desired.

    Using Pecorino Romano for a Saltier Profile

    Swap the parmesan for Pecorino Romano if you prefer a sharper, saltier taste. Pecorino is made from sheep’s milk and has a more pungent aroma. If using this cheese, reduce the amount of added salt to avoid oversalting the dish.

    Ideal Side Dish Pairings

    Pairing with Toasted Garlic Bread

    Serve the tortellini with slices of toasted baguette spread with garlic butter. The crunch of the bread provides a texture contrast to the soft pasta. It also serves as a practical tool for cleaning the remaining cream sauce from the plate.

    Balancing the Meal with a Mixed Green Salad

    A fresh garden salad with a lemon-based vinaigrette helps balance the richness of the cream sauce. The acidity of the vinegar cuts through the heavy fats of the steak and cream. This creates a more balanced and refreshing dining experience.

    Incorporating Roasted Seasonal Vegetables

    Roasted broccoli, asparagus, or Brussels sprouts make excellent sides. Toss the vegetables in olive oil, salt, and pepper, then roast at 400°F until tender. These vegetables add a charred flavor that complements the seared steak.

    Adding Sautéed Spinach as a Side

    Quickly sauté spinach with a touch of garlic and a squeeze of fresh lemon juice. This side dish mirrors the garlic flavors in the main course. It provides a vibrant green contrast and a light, earthy flavor.

    Storage and Reheating Guidelines

    Storing Leftovers in the Refrigerator

    Place leftover tortellini in an airtight container and store it in the refrigerator. The dish will remain fresh and safe to eat for up to three days. Ensure the container is sealed tightly to prevent the pasta from drying out.

    Freezing for Long-Term Storage

    Transfer the cooked meal into freezer-safe containers or bags, removing as much air as possible. The dish can be frozen for up to three months. Thaw the container in the refrigerator overnight before reheating to maintain the best texture.

    Restoring Creaminess During the Reheating Process

    Reheat the pasta in a skillet over low heat rather than in the microwave. Add a tablespoon of milk or heavy cream to the pan to help emulsify the sauce. Stir gently to prevent the cheese from separating as it warms.

    Make-Ahead Strategies

    Pre-cooking Pasta for Faster Assembly

    Boil the tortellini a day in advance and toss them with a small amount of olive oil to prevent sticking. Store them in an airtight container in the fridge. Simply add them to the sauce during the final combining step.

    Searing Steak in Advance for Meal Prep

    Sear the steak bites to a medium-rare finish and store them separately in the refrigerator. When ready to serve, add them to the hot sauce for just a minute. This prevents the steak from becoming overcooked and tough during reheating.

    Preparing the Cream Base Ahead of Time

    You can prepare the garlic cream base without the cheese up to 24 hours in advance. Store the sauce in the fridge and reheat it gently on the stove. Stir in the parmesan cheese only when the sauce is hot to ensure a smooth melt.

    Common Cooking Challenges

    Thinning a Sauce That Has Become Too Thick

    If the sauce reduces too much and becomes overly thick, stir in a small amount of whole milk. Add the milk one tablespoon at a time over low heat. Stir until the desired consistency is achieved.

    Preventing the Cream Sauce from Separating

    Avoid boiling the sauce aggressively once the cheese has been added. Excessive heat can cause the fats to separate from the liquids, resulting in an oily appearance. Keep the heat on low or medium-low during the final stages.

    Correcting Overcooked Steak Texture

    If the steak becomes too firm, avoid reheating it for a long period. Add the steak to the sauce at the very last second. The heat from the sauce will warm the meat without further toughening the proteins.

    Frequently Asked Questions

    What type of steak is best for this recipe?

    Sirloin is recommended for a leaner result, while ribeye is best for those who prefer a more tender, marbled texture. Both work well as long as they are cut into uniform cubes.

    How long can I store the leftovers?

    Leftovers can be stored in an airtight container in the refrigerator for up to three days. For longer storage, they can be frozen for up to three months.

    Can I make this dish without heavy cream?

    You can substitute heavy cream with a mixture of whole milk and a small amount of cornstarch slurry to thicken the sauce. Alternatively, coconut cream can be used for a dairy-free version, though the flavor will change.

    How do I stop the pasta from getting mushy?

    Cook the tortellini strictly until al dente, which usually means removing them one minute before the package instructions suggest. They will finish cooking when tossed in the hot cream sauce.

    Can I add other vegetables to the skillet?

    Yes, mushrooms, peas, or kale can be added. Sauté mushrooms with the garlic or stir in peas and kale during the final simmering step.

    Is it possible to use a different cheese?

    Pecorino Romano or Gruyère are great alternatives to parmesan. Be mindful that some cheeses melt differently and may require a bit more stirring to stay smooth.

    Print
    clock clock iconcutlery cutlery iconflag flag iconfolder folder iconinstagram instagram iconpinterest pinterest iconfacebook facebook iconprint print iconsquares squares iconheart heart iconheart solid heart solid icon
    Creamy Garlic Steak and Tortellini Skillet

    Creamy Garlic Steak and Tortellini Skillet


    5 Stars 4 Stars 3 Stars 2 Stars 1 Star

    No reviews

    • Author: imageuploader
    • Total Time: 30 minutes
    • Yield: 4 servings 1x
    • Diet: General

    Description

    This Cracked Garlic Steak Tortellini in Creamhouse Sauce is a quick and comforting skillet dinner perfect for busy weeknights.


    Ingredients

    Scale
    • 20 oz cheese tortellini
    • 1 lb steak (sirloin or ribeye)
    • salt
    • black pepper
    • garlic powder
    • smoked paprika
    • 2 tbsp olive oil
    • 4 tbsp butter
    • 5 cloves garlic, minced
    • 1 cup heavy cream
    • 3/4 cup whole milk
    • 1 1/4 cups parmesan, shredded or freshly grated
    • parsley, chopped (optional)
    • red pepper flakes (optional)
    • cracked black pepper (optional garnish)

    Instructions

    1. Cook the Tortellini: Bring a large pot of salted water to a boil. Add cheese tortellini and cook according to package instructions, about 3-5 minutes, until al dente. Drain and set aside.
    2. Season and Sear the Steak: In a large skillet, heat olive oil. Season steak with salt, black pepper, garlic powder, and smoked paprika. Sear for about 3-5 minutes until browned. Remove and set aside.
    3. Prepare the Garlic Cream Sauce: In the same skillet, melt butter. Add minced garlic and sauté for 1 minute until fragrant.
    4. Create the Cream Sauce: Add heavy cream and whole milk, stirring to combine. Let simmer for 3-4 minutes until slightly thickened.
    5. Incorporate the Cheese: Gradually whisk in parmesan cheese, stirring until melted and smooth. Season if desired.
    6. Combine the Ingredients: Return seared steak and tortellini to the skillet and toss to combine for about 2 minutes.
    7. Garnish and Serve: Sprinkle with parsley, cracked black pepper, and red pepper flakes, if desired. Serve immediately.

    Notes

    Store leftovers in an airtight container in the refrigerator for up to 3 days. Reheat over low heat with a splash of milk to restore creaminess.

    • Prep Time: 10 minutes
    • Cook Time: 20 minutes
    • Category: Dinner
    • Method: Skillet
    • Cuisine: Italian

    Nutrition

    • Serving Size: 1 serving
    • Calories: 650 kcal
    • Sugar: 4 g
    • Sodium: 800 mg
    • Fat: 36 g
    • Saturated Fat: 20 g
    • Unsaturated Fat: 16 g
    • Trans Fat: 1 g
    • Carbohydrates: 45 g
    • Fiber: 2 g
    • Protein: 34 g
    • Cholesterol: 110 mg
  • Authentic Mexican Shrimp Sauté

    Authentic Mexican Shrimp Sauté

    This zesty Mexican shrimp dish is a fast, high-protein meal perfect for busy weeknights. It combines bright citrus notes with savory spices to create a versatile protein for tacos or bowls.

    Recipe image

    List of ingredients

    • 1 pound large shrimp, peeled and deveined – use wild-caught for a cleaner flavor.
    • 3 tablespoons olive oil – use extra virgin for better aromatic quality.
    • 4 cloves garlic, minced – fresh garlic provides the most pungent flavor.
    • 1 teaspoon chili powder – adds a mild, earthy heat.
    • 1 teaspoon cumin – gives the dish its signature smoky Mexican aroma.
    • 1 lime (juice and zest) – the zest contains essential oils for deeper citrus notes.
    • Salt and pepper to taste – adjust based on your preference for sodium.
    • 1/4 cup fresh cilantro, chopped – adds a bright, herbal finish.
    • 1 cup diced tomatoes – Roma tomatoes work best as they are less watery.
    • 1/2 cup diced red onion – provides a sharp, sweet contrast.
    • Warm tortillas for serving – corn or flour options both work well.

    step-by-step instructions

    1. Prepare the Shrimp: Rinse the shrimp under cold water and pat them dry with paper towels. Dry shrimp sear better in the pan and avoid steaming.
    2. Marinate the Shrimp: In a bowl, combine olive oil, garlic, chili powder, cumin, lime juice, lime zest, salt, and pepper. Add the shrimp and toss to coat evenly, then let marinate for 15 minutes to absorb the flavors.
    3. Cook the Shrimp: Heat a skillet over medium-high heat. Add the marinated shrimp, cooking for about 3-4 minutes on each side until they turn pink and opaque.
    4. Add the Vegetables: Incorporate diced tomatoes and red onion into the skillet, stirring to combine. Allow everything to cook for an additional 2-3 minutes until the vegetables are tender.
    5. Season and Finish: Stir in the chopped cilantro and adjust seasoning if necessary. Remove from heat once everything is heated through to prevent overcooking the shrimp.
    6. Prepare for Serving: Warm the tortillas in a separate skillet or microwave. Keep them covered with a clean cloth to retain heat and moisture.
    7. Serve: Spoon the shrimp mixture onto the warmed tortillas and garnish with additional cilantro for a fresh look.

    Optimal Serving Methods

    Customizing Taco Tortillas

    For the best experience, lightly toast corn tortillas on a dry skillet until slightly charred. This adds a nutty flavor and prevents the tortilla from breaking under the weight of the shrimp. If using flour tortillas, microwave them for 15 seconds wrapped in a damp paper towel.

    Creating Mexican Shrimp Bowls

    Instead of tortillas, serve the shrimp over a bed of cilantro-lime rice or quinoa. Adding a scoop of black beans and corn kernels transforms this recipe into a complete, filling meal. This option is ideal for those seeking a gluten-free or lower-carb alternative.

    Adding Fresh Toppings

    Enhance the dish with sliced avocado or a dollop of Greek yogurt for a creamy contrast. Thinly sliced radishes and pickled red onions add a crunch and acidity that balances the smoky cumin. Freshly diced jalapeños can be added for those who prefer a higher heat level.

    Choosing Complementary Side Dishes

    Pair the shrimp with a side of Mexican street corn, known as elote, for a festive feel. A crisp cabbage slaw dressed with lime juice and vinegar provides a refreshing textural contrast. For a heartier meal, serve with a side of refried beans seasoned with garlic.

    Selecting Refreshing Beverage Pairings

    Serve this meal with sparkling lime water or a fresh hibiscus tea (agua de jamaica). These drinks offer a tart profile that cuts through the richness of the olive oil and garlic. Freshly blended mango lassi or a pineapple smoothie also complements the tropical notes of the lime.

    Flavor Modifications and Substitutions

    Increasing the Spice Intensity

    If you want a spicier dish, add a half teaspoon of cayenne pepper or smoked paprika to the marinade. Finely diced habaneros can be stirred in with the onions for a significant kick. Chipotle peppers in adobo sauce can also be added for a smoky, spicy depth.

    Adding Umami Depth

    A small splash of low-sodium soy sauce or a few drops of Worcestershire sauce in the marinade enhances the savory profile. These ingredients add a fermented depth that complements the garlic and cumin. Keep the amount small to avoid overshadowing the citrus notes.

    Incorporating a Vegetable Medley

    Toss in diced bell peppers, sliced zucchini, or frozen corn kernels during the vegetable sauté step. These additions increase the nutritional value and add a variety of textures to the final dish. Ensure the vegetables are diced small so they cook in the same timeframe as the onions.

    Creating a Creamy Coconut Twist

    Replace one tablespoon of olive oil with a tablespoon of thick coconut milk for a tropical variation. This creates a subtle sweetness and a creamier sauce that coats the shrimp. This version pairs exceptionally well with steamed jasmine rice instead of tortillas.

    Alternative Cooking Techniques

    Grilling for a Smoky Profile

    Thread the marinated shrimp onto skewers and grill them over medium-high heat. Cook for about 2-3 minutes per side until charred and opaque. This method introduces a smoky flavor that cannot be achieved in a skillet.

    Using an Air Fryer

    Place the marinated shrimp in a single layer in the air fryer basket. Cook at 400 degrees Fahrenheit for 6-8 minutes, shaking the basket halfway through. This result is slightly firmer and uses less oil than the pan-fry method.

    Sheet Pan Roasting

    Spread the marinated shrimp and vegetables on a parchment-lined baking sheet. Roast in a preheated oven at 425 degrees Fahrenheit for 8-10 minutes. This is an efficient way to cook for larger groups without needing to stand over the stove.

    Preparation and Storage Guidelines

    Optimizing the Marination Process

    Stick to the 15-minute marination window to avoid the lime juice “cooking” the shrimp. The citric acid in the lime can break down the proteins, making the shrimp mushy if left too long. For deeper flavor without the acid risk, marinate without the lime and add the juice during the final cooking stage.

    Refrigeration Best Practices

    Store leftover shrimp in a glass airtight container to maintain freshness. Keep the container in the coldest part of the refrigerator and consume the shrimp within 48 hours. Avoid storing the shrimp in the tortillas to prevent them from becoming soggy.

    Guidelines for Freezing Cooked Shrimp

    Flash freeze cooked shrimp on a baking sheet before transferring them to a vacuum-sealed bag. This prevents the shrimp from clumping together in a single mass. Cooked shrimp can be stored in the freezer for up to three months without significant quality loss.

    Correct Thawing Procedures

    Thaw frozen shrimp slowly in the refrigerator overnight to preserve the texture. If you are in a hurry, place the sealed bag in a bowl of cold water, changing the water every 30 minutes. Never thaw shrimp at room temperature to avoid bacterial growth.

    Cooking Troubleshooting and Tips

    Identifying the Perfect Doneness

    Shrimp are perfectly cooked when they form a ‘C’ shape; if they curl into a tight ‘O’, they are overcooked. Overcooked shrimp become rubbery and lose their natural sweetness. Remove them from the heat the moment they turn opaque pink.

    Preventing Sogginess in Tortillas

    Avoid steaming tortillas in a microwave for too long, as this can make them gummy. Instead, use a dry cast-iron skillet over medium heat for 30 seconds per side. This creates a structural barrier that keeps the tortilla firm when the juicy shrimp are added.

    Managing Pan Temperature

    Ensure the olive oil is shimmering but not smoking before adding the shrimp. If the oil smokes, it has reached its smoke point and can impart a bitter taste to the food. If the pan is too cold, the shrimp will release water and boil rather than sear.

    Achieving Consistent Vegetable Texture

    Dice the onions and tomatoes into uniform pieces to ensure they cook evenly. If the onion pieces are too large, they may remain raw while the tomatoes break down too much. Consistent chopping ensures a balanced bite in every taco.

    Frequently Asked Questions

    How can I tell when the shrimp is cooked?

    Shrimp are done when they change from translucent grey to a pink, opaque color. They should feel firm to the touch and have a gentle curve without being tightly curled.

    Can I use frozen shrimp for this recipe?

    Yes, frozen shrimp are a great option. However, you must thaw them completely and pat them dry with paper towels to ensure they sear properly in the skillet.

    What can I serve with this dish besides tortillas?

    This shrimp mixture is versatile and can be served over brown rice, quinoa, or a fresh bed of mixed greens. It also works well as a topping for grilled polenta or inside a hollowed-out avocado.

    Can I use other seafood?

    You can substitute the shrimp with scallops or chunks of firm white fish like cod or halibut. Adjust the cooking time based on the thickness of the seafood to avoid overcooking.

    Is this recipe gluten-free?

    The ingredients are naturally gluten-free if you use corn tortillas or serve the shrimp without tortillas. Always check the labels on your store-bought chili powder and cumin to ensure no gluten-based fillers are added.

    Print
    clock clock iconcutlery cutlery iconflag flag iconfolder folder iconinstagram instagram iconpinterest pinterest iconfacebook facebook iconprint print iconsquares squares iconheart heart iconheart solid heart solid icon
    Authentic Mexican Shrimp Sauté

    Authentic Mexican Shrimp Sauté


    5 Stars 4 Stars 3 Stars 2 Stars 1 Star

    No reviews

    • Author: imageuploader
    • Total Time: 25 minutes
    • Yield: 4 servings 1x
    • Diet: Gluten-free

    Description

    A culinary masterpiece that marries fresh ingredients with vibrant flavors, featuring succulent shrimp seasoned with garlic, lime, and cilantro.


    Ingredients

    Scale
    • 1 pound large shrimp, peeled and deveined
    • 3 tablespoons olive oil
    • 4 cloves garlic, minced
    • 1 teaspoon chili powder
    • 1 teaspoon cumin
    • 1 lime (juice and zest)
    • Salt and pepper to taste
    • 1/4 cup fresh cilantro, chopped
    • 1 cup diced tomatoes
    • 1/2 cup diced red onion
    • Warm tortillas for serving

    Instructions

    1. Prepare the Shrimp: Rinse the shrimp under cold water and pat them dry with paper towels.
    2. Marinate the Shrimp: In a bowl, combine olive oil, garlic, chili powder, cumin, lime juice, lime zest, salt, and pepper. Add the shrimp and toss to coat evenly. Let it marinate for 15 minutes.
    3. Cook the Shrimp: Heat a skillet over medium-high heat. Add the marinated shrimp to the skillet, cooking for about 3-4 minutes on each side until they turn pink and opaque.
    4. Add the Vegetables: Incorporate diced tomatoes and red onion into the skillet, stirring to combine. Allow everything to cook for an additional 2-3 minutes until the vegetables are tender.
    5. Season and Finish: Stir in the chopped cilantro and adjust seasoning if necessary. Remove from heat once everything is heated through.
    6. Prepare for Serving: Warm the tortillas in a separate skillet or microwave, keeping them covered to retain heat.
    7. Serve: Spoon the shrimp mixture onto the warmed tortillas and garnish with additional cilantro.

    Notes

    For extra heat, add diced jalapeños or cayenne pepper. This dish can also be served over rice or beans.

    • Prep Time: 10 minutes
    • Cook Time: 15 minutes
    • Category: Main Course
    • Method: Sautéing
    • Cuisine: Mexican

    Nutrition

    • Serving Size: 1 serving
    • Calories: 320 kcal
    • Sugar: 6 g
    • Sodium: 650 mg
    • Fat: 16 g
    • Saturated Fat: 3 g
    • Unsaturated Fat: 13 g
    • Trans Fat: 0 g
    • Carbohydrates: 15 g
    • Fiber: 3 g
    • Protein: 28 g
    • Cholesterol: 185 mg
  • High Protein Crustless Chicken Pot Pie Skillet

    High Protein Crustless Chicken Pot Pie Skillet

    Enjoy a comforting, creamy dinner that delivers high protein and low calories without the heavy pastry crust. This one-pan meal is designed for easy preparation and quick cleanup.

    Recipe image

    List of ingredients

    • 1 lb chicken breast, diced – provides lean protein to keep the meal filling.
    • 2 medium carrots, diced – adds natural sweetness and color.
    • 2 stalks celery, diced – contributes a fresh crunch and aromatic base.
    • 1 cup frozen peas – maintains sweetness and adds vibrant green color.
    • 2 cups low-sodium chicken broth – creates a savory base for the creamy sauce.
    • 1/2 cup milk – provides creaminess; substitute with almond milk for a dairy-free version.
    • 2 tbsp olive oil – used for sautéing and preventing sticking.
    • 1/4 cup all-purpose flour – acts as the thickening agent for the sauce.
    • 1 tsp garlic powder – adds a subtle, savory depth.
    • 1 tsp onion powder – enhances the overall savory profile.
    • 1/2 tsp black pepper – seasons the dish and adds a mild heat.
    • 1 tsp Italian seasoning – a blend of herbs for a fragrant finish.

    step-by-step instructions

    1. Sauté the Protein: Heat olive oil in a large skillet over medium heat. Add diced chicken and cook for 6-8 minutes until browned and no longer pink.
    2. Soften Vegetables: Add diced carrots and celery to the skillet. Stir and cook for 3-4 minutes until they begin to soften and brighten.
    3. Add Aromatics: Mix in the frozen peas, garlic powder, onion powder, and black pepper. Stir well for 2 minutes to allow flavors to meld.
    4. Create the Sauce Base: In a separate bowl, whisk together chicken broth, milk, and flour until completely smooth. Gradually pour this mixture into the skillet, stirring constantly to prevent lumps.
    5. Thicken the Mixture: Bring the liquid to a gentle boil, then reduce heat to a simmer. Stir frequently for 5-7 minutes until the sauce thickens and coats the back of a spoon.
    6. Final Seasoning: Sprinkle in the Italian seasoning and stir well. Taste the sauce and add more black pepper if a stronger kick is desired.
    7. Rest and Serve: Remove the skillet from heat and let it sit for a few minutes before serving to allow the sauce to set.

    Practical Cooking Tips

    Achieving the Perfect Chicken Sear

    To get a golden-brown exterior on the chicken, ensure the olive oil is shimmering before adding the meat. Avoid overcrowding the skillet, as too much meat can release excess moisture and cause the chicken to steam instead of brown. Cook the pieces undisturbed for a few minutes to develop a deep flavor profile.

    Preventing Lumps in the Sauce

    Whisking the flour into the cold broth and milk before adding it to the pan is essential for a silky texture. This creates a slurry that integrates easily into the hot skillet. Continue stirring frequently during the simmering process to ensure the flour is evenly distributed and fully cooked.

    Managing Vegetable Textures

    Add the carrots and celery first because they are denser and require more time to soften. Frozen peas should be added later in the process to prevent them from becoming mushy or losing their bright color. This staggered approach ensures every vegetable maintains the ideal bite.

    Using Rotisserie Chicken for Speed

    If you are short on time, you can replace raw chicken breast with pre-cooked rotisserie chicken. Simply omit the initial searing step and add the shredded chicken during the final simmering phase. This reduces the total cook time by approximately 10 minutes.

    Ingredient Substitutions

    Dairy-Free Milk Alternatives

    You can easily replace cow’s milk with unsweetened almond milk, soy milk, or cashew milk. Cashew milk is particularly recommended for its naturally creamy consistency, which closely mimics dairy. Ensure the substitute is unsweetened to avoid altering the savory flavor of the pot pie.

    Low-Carb Flour Replacements

    For a lower-carbohydrate version, substitute all-purpose flour with almond flour or a small amount of xanthan gum. If using almond flour, you may need a slightly longer simmering time to achieve the desired thickness. Cornstarch is another option, though it creates a glossier sauce than flour does.

    Plant-Based Protein Options

    To make this recipe vegetarian, replace the chicken with canned chickpeas or firm diced tofu. Use vegetable broth instead of chicken broth to maintain a consistent flavor profile. Chickpeas add a hearty texture that complements the carrots and peas perfectly.

    Using Different Lean Meats

    Turkey breast is an excellent alternative to chicken, offering a similar protein profile and taste. You can also use diced shrimp or white fish for a seafood twist. When using seafood, add the protein at the very end of the cooking process to avoid overcooking.

    Flavor Enhancements and Variations

    Adding a Spicy Element

    If you prefer a bit of heat, stir in diced jalapeños during the vegetable sautéing phase. Alternatively, add a pinch of cayenne pepper or red pepper flakes along with the garlic and onion powder. This adds a bold contrast to the creamy sauce.

    Utilizing Fresh Herbs

    While dried Italian seasoning is convenient, fresh herbs can elevate the dish. Stir in chopped fresh parsley, thyme, or rosemary just before removing the pan from the heat. Fresh herbs provide a brighter, more aromatic finish to the meal.

    Expanding the Vegetable Mix

    Feel free to experiment with other frozen or fresh vegetables. Diced cauliflower, sliced mushrooms, or baby spinach are great additions that fit the pot pie theme. Spinach should be stirred in at the very end until just wilted.

    Increasing Umami Depth

    To add more depth to the sauce, consider adding a teaspoon of nutritional yeast or a drop of coconut aminos. These ingredients enhance the savory qualities of the chicken and broth. Be careful with additional salty additives, as the broth already contains sodium.

    Serving Suggestions

    Pairing with Fresh Greens

    A crisp garden salad with a lemon vinaigrette provides a refreshing acidity that cuts through the richness of the creamy sauce. Use mixed greens, cucumbers, and radishes for maximum crunch. This balance makes the meal feel lighter and more complete.

    Choosing a Whole Grain Base

    While this dish is crustless, serving it over brown rice or quinoa adds satisfying complex carbohydrates. These grains soak up the extra sauce, ensuring none of the flavor is wasted. Cauliflower rice is a great option for those sticking to a strict low-carb diet.

    Roasted Vegetable Accompaniments

    Pair the skillet with a side of roasted Brussels sprouts or steamed green beans. The caramelized flavor of roasted vegetables complements the savory notes of the chicken pot pie. This adds extra fiber and nutrients to the dinner.

    Storage and Reheating

    Refrigerator Storage Guidelines

    Store leftovers in an airtight glass or plastic container in the refrigerator. The dish will remain fresh and safe to eat for up to three days. You may notice the sauce thickening further as it cools, which is normal for flour-based sauces.

    Freezing for Meal Prep

    This skillet meal freezes well for up to three months. Use a freezer-safe container and leave a small amount of space at the top for expansion. Thaw the portion in the refrigerator overnight before reheating to maintain the best texture.

    Best Reheating Methods

    For the best results, reheat the dish in a small pot over medium-low heat on the stove. Add a splash of chicken broth or milk to loosen the sauce and restore its creaminess. If using a microwave, heat in short intervals and stir frequently to avoid hot spots.

    Troubleshooting and FAQ

    Can I make this dairy-free?

    Yes, you can substitute the milk with any unsweetened plant-based milk like almond or soy. The consistency remains creamy and the flavor profile is preserved.

    How should I store leftovers?

    Keep the leftovers in an airtight container in the refrigerator for up to three days. Ensure the food is cooled slightly before sealing the container to prevent excess condensation.

    Can I freeze this chicken pot pie?

    Yes, it can be frozen for up to three months in a sealed container. Reheat it slowly on the stovetop with a bit of extra liquid to return it to its original creamy state.

    What other vegetables can I use?

    You can use broccoli, bell peppers, or spinach. Just ensure denser vegetables are added early and leafy greens are added at the very end.

    How many servings does this recipe make?

    This recipe is designed to yield 4 servings. It is an ideal size for a family dinner or for preparing healthy lunches for the work week.

    Print
    clock clock iconcutlery cutlery iconflag flag iconfolder folder iconinstagram instagram iconpinterest pinterest iconfacebook facebook iconprint print iconsquares squares iconheart heart iconheart solid heart solid icon
    High Protein Crustless Chicken Pot Pie Skillet

    High Protein Crustless Chicken Pot Pie Skillet


    5 Stars 4 Stars 3 Stars 2 Stars 1 Star

    No reviews

    • Author: imageuploader
    • Total Time: 45 minutes
    • Yield: 4 servings 1x
    • Diet: High Protein

    Description

    A comforting Low Calorie High Protein Crustless Chicken Pot Pie Skillet that offers great taste without the guilt.


    Ingredients

    Scale
    • 1 lb chicken breast, diced
    • 2 medium carrots, diced
    • 2 stalks celery, diced
    • 1 cup frozen peas
    • 2 cups low-sodium chicken broth
    • 1/2 cup milk
    • 2 tbsp olive oil
    • 1/4 cup all-purpose flour
    • 1 tsp garlic powder
    • 1 tsp onion powder
    • 1/2 tsp black pepper
    • 1 tsp Italian seasoning

    Instructions

    1. Sauté: Heat the olive oil in a large skillet over medium heat. Once shimmering, add the diced chicken, cooking until it’s browned and no longer pink, about 6-8 minutes.
    2. Add: Toss in the diced carrots and celery. Stir well and cook for an additional 3-4 minutes until the vegetables soften and brighten in color.
    3. Stir: Add the frozen peas to the skillet, followed by the garlic powder, onion powder, and black pepper. Stir well to combine all the ingredients and let the flavors meld for 2 minutes.
    4. Whisk: In a separate bowl, whisk together the low-sodium chicken broth, milk, and flour until smooth. Gradually pour this mixture into the skillet, stirring continuously to avoid lumps.
    5. Simmer: Bring the liquid to a gentle boil, then reduce the heat. Let it simmer, stirring frequently, until the sauce thickens, approximately 5-7 minutes.
    6. Season: Sprinkle in the Italian seasoning, mixing well. Taste and adjust seasoning, adding more pepper if desired for that extra kick.
    7. Serve: Remove from heat and let the skillet sit for a few minutes before serving.

    Notes

    To reduce prep time, use rotisserie chicken instead of raw. Just toss it in during the last few minutes to warm it through.

    • Prep Time: 15 minutes
    • Cook Time: 30 minutes
    • Category: Dinner
    • Method: Skillet
    • Cuisine: American

    Nutrition

    • Serving Size: 1 serving
    • Calories: 320 kcal
    • Sugar: 3 g
    • Sodium: 450 mg
    • Fat: 10 g
    • Saturated Fat: 2 g
    • Unsaturated Fat: 8 g
    • Trans Fat: 0 g
    • Carbohydrates: 30 g
    • Fiber: 4 g
    • Protein: 35 g
    • Cholesterol: 100 mg
  • Thai Peanut Chicken Lettuce Wraps

    Thai Peanut Chicken Lettuce Wraps

    These Thai-inspired peanut chicken lettuce wraps offer a fresh, low-carb alternative to traditional tacos. They combine savory peanut sauce with tender chicken and crunchy vegetables for a balanced meal ready in under 40 minutes.

    Recipe image

    List of ingredients

    • 1 pound boneless, skinless chicken breasts or thighs, sliced into strips – use thighs for more moisture.
    • 1 tablespoon vegetable oil – for searing the chicken.
    • Salt, to taste – enhances all flavors.
    • Black pepper, to taste – adds a mild spicy note.
    • 1/3 cup creamy peanut butter – the base for the rich sauce.
    • 2 tablespoons soy sauce – provides umami; use gluten-free tamari if needed.
    • 1 tablespoon lime juice – adds essential acidity and brightness.
    • 1 tablespoon honey – provides a subtle sweet balance.
    • 1 tablespoon rice vinegar – adds a sharp, clean tang.
    • 1 teaspoon sesame oil – for a deep, toasted nut aroma.
    • 2 teaspoons sriracha or chili garlic sauce, to taste – controls the heat level.
    • 2 tablespoons warm water – thins the sauce for better coating.
    • 12 large butter lettuce leaves, washed and dried – serves as the natural wrap.
    • 1 medium carrot, julienned – adds sweetness and crunch.
    • 1 small cucumber, julienned – provides a cooling contrast.
    • 2 spring onions, thinly sliced – adds a mild onion bite.
    • 2 tablespoons roasted peanuts, chopped – adds texture and roasted flavor.
    • Fresh cilantro leaves, for garnish – provides a citrusy herbal finish.
    • Lime wedges, for serving – for a final splash of acidity.

    step-by-step instructions

    1. Prepare the sauce: In a medium mixing bowl, whisk together the peanut butter, soy sauce, lime juice, honey, rice vinegar, sesame oil, sriracha, and warm water. Stir until the mixture is completely smooth and the peanut butter is fully integrated.
    2. Sear the chicken: Heat the vegetable oil in a large skillet over medium-high heat. Season the chicken strips with salt and black pepper. Add them to the pan and cook for 6 to 8 minutes, stirring occasionally, until the chicken is lightly browned and cooked through.
    3. Glaze the meat: Reduce the skillet heat to low. Pour the prepared peanut sauce over the browned chicken. Toss the meat continuously for 2 to 3 minutes until the sauce thickens and glazes every piece of chicken.
    4. Arrange the wraps: Place the cleaned butter lettuce leaves on a platter or serving plates. Spoon a generous portion of the peanut chicken mixture into the center of each leaf.
    5. Add fresh toppings: Top each wrap with julienned carrots, julienned cucumbers, sliced spring onions, chopped roasted peanuts, and fresh cilantro leaves.
    6. Final touch: Serve the wraps immediately with lime wedges on the side, encouraging guests to squeeze fresh lime over the filling before eating.

    Pro Tips for Optimal Texture

    To prevent the lettuce wraps from becoming soggy, ensure the leaves are completely dry after washing. Use a salad spinner or pat them thoroughly with paper towels. Moisture on the leaf prevents the chicken from sitting securely and dilutes the sauce flavor.

    When browning the chicken, avoid overcrowding the skillet. If the pan is too full, the chicken will steam in its own juices rather than searing. Work in two batches if necessary to achieve those golden-brown edges that add depth to the dish.

    The temperature of the warm water used in the sauce is important. Warm water helps the peanut butter emulsify more quickly with the soy sauce and honey. This ensures a silky texture without lumps of peanut butter in the final glaze.

    Dietary Substitutions and Protein Swaps

    If you prefer a different protein, shrimp or firm tofu are excellent alternatives. For shrimp, sear them for only 2 minutes per side before adding the sauce to avoid overcooking. For tofu, press the block first to remove excess water, cube it, and fry until golden before glazing.

    To make this recipe nut-free, replace the peanut butter with sunflower seed butter or tahini. While the flavor profile will shift, the creaminess remains similar. Use toasted sunflower seeds or sesame seeds instead of roasted peanuts for the garnish.

    For those avoiding soy, coconut aminos are a direct replacement for soy sauce. They provide a similar salty and sweet profile but are naturally soy-free and gluten-free. This keeps the flavor authentic while accommodating dietary restrictions.

    Customizing Your Vegetable Toppings

    While carrots and cucumbers are classic, you can vary the crunch with other vegetables. Shredded purple cabbage adds a vibrant color and a slightly peppery taste. Red bell pepper strips offer a sweet, crisp element that pairs well with the peanut sauce.

    For a summer variation, try adding thinly sliced radishes or snap peas. These provide a sharp, fresh snap that cuts through the richness of the peanut butter. Consider using a mix of herbs, such as mint or Thai basil, alongside the cilantro for more complexity.

    If butter lettuce is unavailable, Romaine hearts or iceberg lettuce are sturdy alternatives. Romaine provides a more substantial crunch, while iceberg offers a cleaner, more neutral taste. Ensure the leaves are small enough to be manageable as wraps.

    Serving and Presentation Ideas

    For a dinner party, present the components as a DIY station. Place the warm peanut chicken in a central bowl and arrange the lettuce leaves and toppings in smaller bowls around it. This allows guests to customize their wraps based on their spice and vegetable preferences.

    Pair these wraps with a side of steamed jasmine rice or a cold sesame noodle salad. The neutrality of the rice helps balance the intense flavors of the peanut sauce. A simple slaw made with vinegar and lime also complements the meal well.

    When plating, focus on the contrast of colors. The bright orange of the carrots, the deep green of the cilantro, and the white of the cucumber make the dish visually appealing. Adding a final drizzle of extra peanut sauce over the top can enhance the look.

    Storage and Preservation Guide

    To maintain the best quality, store the cooked peanut chicken separately from the fresh vegetables. Place the chicken in an airtight container and refrigerate for up to three days. Keep the julienned vegetables in a separate container with a damp paper towel to keep them crisp.

    Do not assemble the wraps in advance. The salt and acidity in the peanut sauce will cause the lettuce to wilt and release water. Only fill the lettuce leaves immediately before serving to ensure a crisp bite.

    If you have leftover sauce that hasn’t touched the meat, it can be stored in the fridge for up to a week. It can be used as a dip for raw vegetables or as a dressing for a cold noodle salad.

    Reheating Instructions

    The best way to reheat the peanut chicken is on the stovetop over low heat. Add a tablespoon of water or broth to the pan to loosen the sauce, which may have thickened in the fridge. Stir gently until the chicken is warmed through.

    If using a microwave, heat the chicken in short 30-second intervals. Stir between each session to ensure even heating and to prevent the peanut butter from separating. Avoid overheating, as this can make the chicken rubbery.

    Once the chicken is reheated, spoon it into fresh, cold lettuce leaves. Never microwave the lettuce or the fresh vegetable toppings, as this destroys the texture and temperature contrast that makes the dish successful.

    Make-Ahead Preparation Strategy

    You can prepare the peanut sauce up to 24 hours in advance. Store it in a sealed jar in the refrigerator and give it a vigorous shake or whisk before using. If the sauce becomes too thick, stir in a teaspoon of warm water.

    Julienning the carrots and cucumbers can also be done a day early. Store them in airtight containers with a small amount of water or a damp paper towel to maintain their rigidity. This significantly reduces the active prep time on the day of serving.

    The chicken can be sliced and seasoned in advance and stored in the fridge. Ensure the chicken is patted dry before adding it to the hot oil to prevent splashing and to ensure a better sear.

    Troubleshooting Common Issues

    If the peanut sauce is too thick to pour, gradually add warm water one teaspoon at a time. Whisk thoroughly after each addition until the sauce reaches a pourable, glaze-like consistency that coats the chicken evenly.

    If the chicken is browning too quickly but remains raw in the center, lower the heat to medium. This allows the interior to cook through without burning the exterior. Using evenly sliced strips of meat helps ensure uniform cooking times.

    If the sauce tastes too salty, add a squeeze of extra lime juice or a small amount of honey. The acidity and sweetness will help neutralize the saltiness of the soy sauce and peanut butter.

    Frequently Asked Questions

    Can I use creamy or crunchy peanut butter? Both work, but creamy peanut butter creates a smoother, more professional glaze. If you use crunchy, the peanut bits will add a bit more texture to the sauce itself.

    Is this recipe suitable for meal prep? Yes, the chicken and sauce are excellent for meal prep. Just store the lettuce and fresh toppings separately and assemble them at the time of consumption.

    How can I make the wraps spicier? Increase the amount of sriracha or add a pinch of crushed red pepper flakes during the chicken searing process. You can also add sliced fresh bird’s eye chilies to the toppings for a sharp heat.

    Can I use chicken thighs instead of breasts? Yes, boneless skinless chicken thighs are often preferred because they stay juicier under high heat. They provide a richer flavor that pairs exceptionally well with the nuttiness of the sauce.

    Print
    clock clock iconcutlery cutlery iconflag flag iconfolder folder iconinstagram instagram iconpinterest pinterest iconfacebook facebook iconprint print iconsquares squares iconheart heart iconheart solid heart solid icon
    Thai Peanut Chicken Lettuce Wraps

    Thai Peanut Chicken Lettuce Wraps


    5 Stars 4 Stars 3 Stars 2 Stars 1 Star

    No reviews

    • Author: imageuploader
    • Total Time: 35 minutes
    • Yield: 4 portions 1x
    • Diet: Low Carb

    Description

    Juicy chicken and peanut sauce fill crisp lettuce, finished with fresh veggies and crunchy peanuts.


    Ingredients

    Scale
    • 1 pound boneless, skinless chicken breasts or thighs, sliced into strips
    • 1 tablespoon vegetable oil
    • Salt, to taste
    • Black pepper, to taste
    • 1/3 cup creamy peanut butter
    • 2 tablespoons soy sauce
    • 1 tablespoon lime juice
    • 1 tablespoon honey
    • 1 tablespoon rice vinegar
    • 1 teaspoon sesame oil
    • 2 teaspoons sriracha or chili garlic sauce
    • 2 tablespoons warm water
    • 12 large butter lettuce leaves, washed and dried
    • 1 medium carrot, julienned
    • 1 small cucumber, julienned
    • 2 spring onions, thinly sliced
    • 2 tablespoons roasted peanuts, chopped
    • Fresh cilantro leaves, for garnish
    • Lime wedges, for serving

    Instructions

    1. Make Sauce: In a medium mixing bowl, whisk peanut butter, soy sauce, lime juice, honey, rice vinegar, sesame oil, sriracha, and warm water until smooth. Set aside.
    2. Cook Chicken: Heat vegetable oil in a large skillet over medium-high heat. Season the chicken strips with salt and black pepper. Add the chicken to the skillet and cook for 6 to 8 minutes, stirring occasionally, until fully cooked and lightly browned.
    3. Glaze: Reduce heat to low. Pour prepared peanut sauce over the cooked chicken. Toss well to coat all pieces and cook for an additional 2 to 3 minutes until heated through. Remove skillet from heat.
    4. Assemble: Arrange butter lettuce leaves on serving plates. Spoon peanut chicken mixture into each leaf.
    5. Garnish: Garnish each wrap with julienned carrot, cucumber, spring onions, chopped peanuts, and fresh cilantro.
    6. Serve: Present lettuce wraps immediately with lime wedges on the side for squeezing over the top.

    Notes

    High in protein and fiber. Store cooked peanut chicken filling in a sealed container in the fridge up to three days. Keep lettuce and veggies separate until serving to maintain crispness.

    • Prep Time: 20 minutes
    • Cook Time: 15 minutes
    • Category: Dinner
    • Method: Stir-fry
    • Cuisine: Thai-Inspired

    Nutrition

    • Serving Size: 3 wraps
    • Calories: 390 kcal
    • Sugar: 9 g
    • Sodium: 620 mg
    • Fat: 22 g
    • Saturated Fat: 5 g
    • Unsaturated Fat: 17 g
    • Trans Fat: 0 g
    • Carbohydrates: 18 g
    • Fiber: 4 g
    • Protein: 31 g
    • Cholesterol: 85 mg
  • Red Lobster Baja Shrimp Bowl Recipe

    Red Lobster Baja Shrimp Bowl Recipe

    This vibrant seafood bowl combines succulent shrimp with a mix of fresh vegetables and a sweet-spicy glaze. It is a nutritious, light meal that is quick to assemble and perfect for a healthy dinner.

    Recipe image

    List of ingredients

    • 32 oz. Succulent Shrimp – peeled and deveined for easy eating.
    • 2 oz. Tender Baby Arugula – adds a peppery bite and fresh color.
    • 4 Plump Roma Tomatoes – ripe and diced into small pieces.
    • 12 oz. Sweet Corn Kernels – use fresh or frozen for a burst of sweetness.
    • 4 Fresh Jalapeño Peppers – seeded and finely diced for controlled heat.
    • 2 oz. Crispy Tortilla Strips – provides essential texture and crunch.
    • 3 cups Fragrant Jasmine Rice – cooked according to package directions.
    • 12 fl. oz. Sweet Chili Sauce – used to drizzle and balance the flavors.
    • 4 Zesty Limes – sliced or juiced for a bright citrus finish.

    step-by-step instructions

    1. Prepare the base: In a medium-sized saucepan, cook the jasmine rice following the package instructions. Once done, keep it warm.
    2. Sauté the shrimp: Heat a large pan over medium heat. Cook the shrimp until they turn pink and are fully cooked through.
    3. Combine vegetables: Add the diced jalapeños, baby arugula, diced tomatoes, and corn kernels to the pan with the shrimp. Sauté for another 2-3 minutes until the vegetables are tender.
    4. Crisp the toppings: In a separate small pan, heat the tortilla strips until they are hot and extra crispy.
    5. Build the bowl: Scoop a portion of cooked jasmine rice into each bowl. Top the rice with the combined shrimp and vegetable mixture.
    6. Add finishing touches: Drizzle the sweet chili sauce evenly over the top. Garnish each bowl with a handful of crispy tortilla strips.
    7. Add citrus: Squeeze fresh lime juice over each bowl immediately before serving to enhance the brightness.
    8. Serve: Present the bowls while hot for the best flavor and texture experience.

    Selecting the Best Shrimp

    For this recipe, choose large or jumbo shrimp to ensure they remain plump after cooking. Fresh shrimp should have a mild, salty scent like the ocean and should not smell fishy or like ammonia.

    If using frozen shrimp, thaw them completely in the refrigerator overnight or place them in a sealed bag under cold running water. Pat the shrimp dry with paper towels before cooking to ensure they sear rather than steam in the pan.

    Avoid overcooking the shrimp, as they can quickly become rubbery. The ideal cooking point is when they curl into a ‘C’ shape and turn opaque white with a pink exterior.

    Vegetable Preparation Techniques

    When preparing jalapeños, wear gloves or wash your hands immediately after handling. Remove the seeds and the white membranes inside the pepper to control the level of spiciness.

    For the Roma tomatoes, dice them into uniform quarters. If the tomatoes are overly juicy, you can lightly pat the diced pieces with a towel to prevent the bowl from becoming watery.

    Baby arugula is delicate and wilts quickly. Adding it at the very end of the sauté process ensures it retains some of its structure and peppery flavor without disappearing into the mix.

    Perfecting the Jasmine Rice

    To achieve fluffy, non-sticky jasmine rice, rinse the grains under cold water until the water runs clear. This removes excess surface starch that can cause clumping.

    Use a ratio of 1 part rice to 1.5 parts water. Bring the water to a boil, add the rice, cover with a tight-fitting lid, and reduce heat to the lowest setting for about 15 minutes.

    Once the cooking time is finished, remove the pan from the heat but keep the lid on for another 5-10 minutes. This allows the steam to finish the cooking process and makes the rice easier to fluff with a fork.

    Managing the Sweet Chili Sauce

    Sweet chili sauce provides the primary flavor profile for this dish. If you find store-bought versions too sweet, you can balance the flavor by adding a splash of rice vinegar or a pinch of salt.

    If the sauce is too thick to drizzle, warm it slightly in a small saucepan or microwave for 10 seconds. This reduces the viscosity and allows it to coat the shrimp and vegetables more evenly.

    For those who prefer a more intense heat, you can mix a teaspoon of sriracha or red pepper flakes into the sweet chili sauce before drizzling it over the bowls.

    Serving and Pairing Suggestions

    These bowls are visually appealing due to the contrast of red tomatoes, yellow corn, and green arugula. Serving them in wide, shallow bowls allows the ingredients to be spread out and showcased.

    To make the meal more substantial, serve the bowls with a side of black beans or chickpeas. These legumes add extra plant-based protein and complement the Baja flavor profile.

    A side of sliced avocado or a dollop of Greek yogurt can add a creamy element that balances the heat from the jalapeños and the acidity of the lime juice.

    Storage and Reheating Guide

    Store any leftovers in an airtight container in the refrigerator for up to 3 days. To maintain the best quality, store the tortilla strips in a separate container so they do not absorb moisture from the shrimp.

    When reheating, avoid the microwave if possible. Instead, place the rice and shrimp mixture in a skillet over medium heat with a tablespoon of water or oil to keep the seafood moist.

    Reheat the tortilla strips in a toaster oven or dry pan for 1-2 minutes. This restores their crunch, which is lost during refrigeration.

    Ingredient Substitutions

    If shrimp is not available, you can substitute it with cooked chicken breast or firm tofu cubes. Ensure the alternative protein is seasoned with salt and pepper before adding the vegetables.

    For a different vegetable base, replace the jalapeños with diced canned green chiles for a milder flavor. Zucchini or summer squash can be used in place of corn if you prefer a lower-carb option.

    If jasmine rice is unavailable, brown rice or quinoa are excellent healthy alternatives. Note that these grains may require different cooking times and water ratios than jasmine rice.

    Meal Prep Advice

    You can prepare several components of this recipe in advance to save time on busy weeknights. Cook the jasmine rice and store it in the fridge for up to 4 days.

    Dice the tomatoes, seed the jalapeños, and prepare the corn in advance. Store these vegetables in a combined container, but keep the baby arugula separate until the moment of cooking.

    Peel and devein the shrimp a day early and store them in a sealed container with a damp paper towel to keep them fresh. This reduces the assembly time to under 15 minutes.

    Common Troubleshooting

    If the vegetables release too much liquid in the pan, increase the heat to medium-high for a minute. This will evaporate the excess moisture and help the vegetables sauté rather than boil.

    If the rice turns out too mushy, you likely used too much water. Next time, reduce the water by a tablespoon or two and ensure you are not stirring the rice while it simmers.

    If the dish tastes too salty, increase the amount of fresh lime juice. The acidity of the lime helps cut through salt and balances the sweetness of the chili sauce.

    Frequently Asked Questions

    Can I freeze this dish? No, this bowl is not suitable for freezing. The arugula and tomatoes will lose their texture, and the shrimp may become rubbery upon thawing.

    Is this dish spicy? The spice level depends on the jalapeños. Removing all seeds and membranes makes it mild, while keeping some seeds increases the heat.

    Can I make this without oil? Yes, you can use a non-stick pan and a small amount of water or broth to sauté the shrimp and vegetables if you prefer an oil-free version.

    What is the best way to peel shrimp? Use a small paring knife to cut the outer shell along the back, then peel from the head toward the tail. Ensure the vein is removed for a cleaner taste.

    Print
    clock clock iconcutlery cutlery iconflag flag iconfolder folder iconinstagram instagram iconpinterest pinterest iconfacebook facebook iconprint print iconsquares squares iconheart heart iconheart solid heart solid icon
    Red Lobster Baja Shrimp Bowl Recipe

    Red Lobster Baja Shrimp Bowl Recipe


    5 Stars 4 Stars 3 Stars 2 Stars 1 Star

    No reviews

    • Author: imageuploader
    • Total Time: 60 minutes
    • Yield: 8 servings 1x
    • Diet: Seafood

    Description

    If you are looking for a light, flavorful, and easy meal then the Red Lobster Baja Shrimp Bowl is the perfect dish for you! This seafood dish is full of flavor and nutrition, and it is sure to be a crowd-pleaser.


    Ingredients

    Scale
    • 32 oz. Succulent Shrimp (peeled and deveined)
    • 2 oz. Tender Baby Arugula
    • 4 Plump Roma Tomatoes (ripe and diced)
    • 12 oz. Sweet Corn Kernels
    • 4 Fresh Jalapeño Peppers (seeded and finely diced)
    • 2 oz. Crispy Tortilla Strips
    • 3 cups Fragrant Jasmine Rice (cooked)
    • 12 fl. oz. Sweet Chili Sauce
    • 4 Zesty Limes

    Instructions

    1. Step 1: In a medium-sized saucepan, cook jasmine rice according to package instructions.
    2. Step 2: In a large pan, cook the shrimp over medium heat until they turn pink and are fully cooked.
    3. Step 3: Add diced jalapeños, arugula, tomatoes, and corn kernels to the pan with the shrimp. Cook for an additional 2-3 minutes until vegetables are tender.
    4. Step 4: In a separate pan, heat tortilla strips until crispy.
    5. Step 5: Assemble your Baja Shrimp Bowl by adding a scoop of jasmine rice to each bowl, topped with the shrimp and vegetable mixture.
    6. Step 6: Drizzle sweet chili sauce over the top and garnish with crispy tortilla strips.
    7. Step 7: Squeeze fresh lime juice over the bowls for added flavor.
    8. Step 8: Serve hot and enjoy your delicious Red Lobster Baja Shrimp Bowl!

    Notes

    Make sure to use fresh, quality shrimp for the best results. Feel free to adjust spices to suit your taste. For a milder dish, omit the jalapeño pepper.

    • Prep Time: 30 minutes
    • Cook Time: 30 minutes
    • Category: dinner
    • Method: Stovetop
    • Cuisine: American

    Nutrition

    • Serving Size: 1 bowl
    • Calories: 302 kcal
    • Sugar: 12 g
    • Sodium: 650 mg
    • Fat: 8 g
    • Saturated Fat: 2 g
    • Unsaturated Fat: 6 g
    • Trans Fat: 0 g
    • Carbohydrates: 38 g
    • Fiber: 4 g
    • Protein: 22 g
    • Cholesterol: 140 mg
  • Savory Ground Beef Gravy and Creamy Mashed Potatoes

    Savory Ground Beef Gravy and Creamy Mashed Potatoes

    This filling meal pairs a rich, savory beef gravy with smooth mashed potatoes. It is a practical choice for a hearty dinner using common pantry ingredients.

    Recipe image

    List of ingredients

    • 1 pound ground beef – used for the gravy base.
    • 1 medium onion, diced – adds aromatic sweetness.
    • 2 cloves garlic, minced – provides a pungent flavor depth.
    • 2 tablespoons all-purpose flour – acts as the thickening agent for the gravy.
    • 2 cups beef broth – the primary liquid for the sauce.
    • 1 tablespoon Worcestershire sauce – adds umami and saltiness.
    • 1 teaspoon thyme (optional) – adds a subtle earthy herb flavor.
    • 1 cup frozen peas and carrots (optional) – provides color and vegetable nutrients.
    • 2 pounds potatoes, peeled and quartered – for the mashed base.
    • 1/2 cup milk – creates a creamy consistency in the mash.
    • 1/4 cup butter – adds richness and smoothness to the potatoes.
    • Salt and pepper – used for seasoning to taste.

    step-by-step instructions

    1. Prepare the potatoes: Place peeled and quartered potatoes in a large pot. Cover them with water and bring to a boil. Cook for 15-20 minutes until they are tender when pierced with a fork. Drain the water, then mash the potatoes with milk and butter. Season with salt and pepper, and cover the pot to keep them warm.
    2. Brown the beef: Heat a large skillet over medium heat. Cook the ground beef until it is completely browned, breaking it up with a spatula as it cooks. Drain any excess fat from the pan to avoid a greasy sauce.
    3. Sauté aromatics: Add the diced onion and minced garlic to the skillet with the beef. Sauté for 3-5 minutes until the onions become soft and translucent.
    4. Thicken and simmer: Sprinkle the flour over the beef and onion mixture. Stir well for about 2 minutes to cook out the raw flour taste. Gradually pour in the beef broth while stirring constantly to prevent lumps. Stir in the Worcestershire sauce, salt, pepper, and thyme. Let the mixture simmer for 5 minutes until it thickens. Stir in frozen peas and carrots if using.
    5. Serve the dish: Spoon a generous portion of mashed potatoes onto plates. Ladle the ground beef gravy over the top. Garnish with fresh parsley if desired and serve while hot.

    Choosing the Best Potatoes for Mashing

    The type of potato you choose significantly impacts the texture of the final dish. Yukon Gold potatoes are often preferred because they have a naturally buttery flavor and a medium starch content. This results in a creamy, smooth mash that holds its shape well.

    Russet potatoes are a high-starch alternative that produces a fluffier, lighter texture. These are ideal if you prefer a more airy mash, though they may require slightly more butter or milk to achieve a creamy consistency.

    Red potatoes have a lower starch content and a waxy texture. While they can be used, they are more likely to result in a denser mash. If using red potatoes, ensure they are boiled until very tender to avoid lumps.

    Regardless of the variety, peeling the potatoes is essential for a smooth texture. Quartering them into uniform sizes ensures that every piece cooks at the same rate, preventing some pieces from becoming mushy while others remain hard.

    Beef Selection and Fat Management

    For this recipe, an 80/20 lean-to-fat ratio ground beef is recommended. This ratio provides enough fat to flavor the meat and create a base for the roux without making the gravy overly oily.

    If you use a leaner beef, such as 90/10 or 93/7, you may find the meat becomes dry. In this case, add an extra tablespoon of butter or oil to the skillet before browning the beef to compensate for the lack of natural fats.

    Draining the excess fat after browning is a critical step. While some fat is needed to combine with the flour for thickening, too much oil will cause the gravy to separate. This results in a layer of grease floating on top of the sauce.

    To drain the fat efficiently, tilt the pan and spoon out the liquid or use a colander lined with paper towels. Ensure you leave a small amount of fat in the pan to help sauté the onions and garlic.

    Mastering the Gravy Consistency

    The thickening process relies on a roux, which is the combination of fat and flour. Cooking the flour for 2 minutes after stirring it into the beef is necessary to remove the raw grain taste.

    When adding the beef broth, do so gradually. Pouring a small amount in and stirring until incorporated prevents the flour from clumping into small balls. This ensures a glossy, smooth gravy finish.

    If the gravy becomes too thick during the simmering process, stir in an additional tablespoon or two of beef broth or water. This will loosen the sauce without significantly altering the flavor profile.

    Conversely, if the gravy is too thin after 5 minutes of simmering, continue to cook it over medium heat. The liquid will reduce, and the flour will continue to bind, increasing the viscosity of the sauce.

    Adding Vegetable Variations

    While peas and carrots are the traditional addition, other vegetables can enhance the nutritional value of the dish. Sliced mushrooms provide an earthy depth and a meatier texture to the gravy.

    Diced celery and carrots can be sautéed along with the onions at the beginning of the process. This creates a Mirepoix base, which is a classic culinary foundation that adds complex sweetness and aroma.

    Fresh spinach can be stirred into the gravy during the final minute of cooking. The heat from the sauce will wilt the spinach quickly, adding a vibrant green color and a mild flavor.

    For a more rustic feel, consider adding diced parsnips or turnips. These root vegetables complement the beef and potato flavors while adding a slight peppery note to the meal.

    Potato Texture Enhancements

    To elevate the mashed potatoes beyond butter and milk, consider adding a few flavor boosters. A teaspoon of garlic powder or a tablespoon of minced sautéed garlic adds a savory punch to the base.

    Incorporating a dollop of sour cream or Greek yogurt provides a slight tanginess that cuts through the richness of the beef gravy. This also adds a thicker, more luxurious creaminess to the mash.

    For a cheesy version, stir in shredded sharp cheddar or parmesan cheese while the potatoes are still hot. The residual heat will melt the cheese, integrating it fully into the potato structure.

    Avoid over-mashing or using a food processor for the potatoes. Over-working the starch can turn the potatoes gluey. Use a hand masher or a ricer for the best professional texture.

    Recommended Side Dish Pairings

    Since this is a heavy, starch-rich meal, pairing it with light, acidic, or crunchy sides creates balance. Steamed green beans with a squeeze of lemon juice provide a fresh contrast to the savory gravy.

    A crisp garden salad with a vinaigrette dressing is an excellent choice. The acidity of the vinegar helps cleanse the palate between bites of the rich beef and potatoes.

    Roasted broccoli or cauliflower adds a charred, nutty flavor that complements the browned beef. Tossing them in olive oil and salt before roasting ensures they provide a textural contrast to the soft mash.

    If you want more carbohydrates, warm buttered rolls or crusty sourdough bread are ideal for mopping up any leftover gravy on the plate.

    Storage and Food Safety Guidelines

    Leftovers should be stored in airtight containers to prevent them from absorbing other refrigerator odors. The beef and gravy can be stored together, but it is often better to store the mashed potatoes in a separate container.

    Refrigerated leftovers will remain safe and tasty for up to three days. Ensure the food is cooled down to room temperature before sealing the lids to prevent excess condensation from forming inside the container.

    The beef gravy freezes exceptionally well. Place it in a freezer-safe bag or container for up to three months. However, mashed potatoes do not freeze well, as the emulsion of milk and butter often breaks, resulting in a grainy texture upon thawing.

    Always ensure the food is reheated to an internal temperature of 165 degrees Fahrenheit to ensure safety and restore the proper consistency of the fats.

    Reheating Instructions for Best Quality

    The best way to reheat the beef gravy is on the stovetop. Place the gravy in a small saucepan over medium-low heat and add a splash of beef broth or water to restore the moisture lost during refrigeration.

    For the mashed potatoes, a stovetop method is also preferred. Heat them slowly with a small amount of extra milk or a knob of butter to bring back the original creamy texture.

    If using a microwave, place the potatoes and gravy in a microwave-safe dish. Cover the dish with a damp paper towel to trap steam, which prevents the potatoes from drying out. Heat in 1-minute intervals, stirring in between.

    Avoid overheating the potatoes in the microwave, as this can lead to hot spots and a rubbery consistency. Stirring frequently ensures the heat is distributed evenly throughout the mass.

    Make-Ahead Strategies

    To save time on dinner nights, you can prepare the beef gravy a day in advance. Once cooled, store it in the fridge and simply reheat it when you are ready to serve.

    The potatoes are best made fresh, but you can peel and quarter them ahead of time. Store the cut potatoes in a bowl of cold water in the refrigerator to prevent them from oxidizing and turning brown.

    If you are prepping for a crowd, you can boil the potatoes, mash them, and keep them in a slow cooker on the ‘warm’ setting. This keeps them at a safe temperature without overcooking them.

    You can also pre-dice the onions and mince the garlic and store them in a small airtight container. This reduces the active prep time to just a few minutes of assembly and cooking.

    Troubleshooting Common Issues

    If your gravy ends up with lumps, you can quickly fix it by passing the sauce through a fine-mesh strainer. Alternatively, using an immersion blender for a few seconds can smooth out the texture.

    If the mashed potatoes are too runny, it is likely due to too much milk or the use of a very waxy potato. You can fix this by stirring in a small amount of instant potato flakes or simmering them in a pan for a few minutes to evaporate excess moisture.

    If the beef tastes bland despite adding salt and pepper, increase the amount of Worcestershire sauce. The fermented anchovies and tamarind in the sauce provide a deep saltiness that enhances the beef’s natural flavor.

    If the gravy is too salty, add a splash of water or unsalted beef broth. You can also stir in a teaspoon of sugar or a small amount of heavy cream to neutralize the saltiness.

    Ingredient Substitutions

    For a lighter meat option, ground turkey or ground chicken can replace the beef. If using turkey, add a bit more butter to the pan, as turkey is significantly leaner than beef.

    If you do not have beef broth, chicken broth or a mixture of water and beef bouillon cubes can be used. Vegetable broth is also an option, though the flavor will be less intense.

    For those avoiding dairy, replace the milk in the mashed potatoes with unsweetened almond milk or oat milk. Substitute the butter with a plant-based butter alternative or olive oil.

    If you lack all-purpose flour, cornstarch can be used as a thickener. Mix 1 tablespoon of cornstarch with 1 tablespoon of cold water to create a slurry, then stir it into the simmering gravy at the end.

    Print
    clock clock iconcutlery cutlery iconflag flag iconfolder folder iconinstagram instagram iconpinterest pinterest iconfacebook facebook iconprint print iconsquares squares iconheart heart iconheart solid heart solid icon
    Savory Ground Beef Gravy and Creamy Mashed Potatoes

    Savory Ground Beef Gravy and Creamy Mashed Potatoes


    5 Stars 4 Stars 3 Stars 2 Stars 1 Star

    No reviews

    • Author: imageuploader
    • Total Time: 40 minutes
    • Yield: 4 servings 1x
    • Diet: General

    Description

    This hearty dish combines savory ground beef gravy with creamy mashed potatoes, creating the ultimate comfort food. Perfect for family dinners or cozy nights, this recipe is quick, easy, and satisfying.


    Ingredients

    Scale
    • 1 pound ground beef
    • 1 medium onion, diced
    • 2 cloves garlic, minced
    • 2 tablespoons all-purpose flour
    • 2 cups beef broth
    • 1 tablespoon Worcestershire sauce
    • 1 teaspoon thyme
    • 1 cup frozen peas and carrots
    • 2 pounds potatoes, peeled and quartered
    • 1/2 cup milk
    • 1/4 cup butter
    • salt and pepper to taste

    Instructions

    1. Step 1: Place peeled and quartered potatoes in a large pot. Cover with water and bring to a boil. Cook for 15-20 minutes, until potatoes are tender. Drain, then mash with milk and butter. Season with salt and pepper, and cover to keep warm.
    2. Step 2: In a large skillet over medium heat, brown the ground beef until cooked through, breaking it up with a spatula. Drain any excess fat.
    3. Step 3: Add diced onion and minced garlic to the skillet. Sauté until onions are soft and translucent, about 3-5 minutes.
    4. Step 4: Sprinkle flour over the cooked beef and onions. Stir well to incorporate and cook for about 2 minutes. Gradually add beef broth, stirring to prevent lumps. Add Worcestershire sauce, salt, pepper, and thyme, if using. Let simmer for 5 minutes, stirring occasionally until thickened. Add frozen peas and carrots, if desired.
    5. Step 5: Spoon mashed potatoes onto plates and top with the ground beef gravy. Garnish with fresh parsley if desired, and serve hot.

    Notes

    This cozy dish pairs beautifully with a side of green beans or steamed vegetables. Feel free to substitute ground turkey for a lighter option.

    • Prep Time: 10 minutes
    • Cook Time: 30 minutes
    • Category: Comfort Food, Main Course
    • Method: Stovetop
    • Cuisine: American

    Nutrition

    • Serving Size: 1 serving
    • Calories: 450 kcal
    • Sugar: 6 g
    • Sodium: 780 mg
    • Fat: 21 g
    • Saturated Fat: 10 g
    • Unsaturated Fat: 11 g
    • Trans Fat: 0 g
    • Carbohydrates: 45 g
    • Fiber: 5 g
    • Protein: 30 g
    • Cholesterol: 85 mg