Blog

  • High-Protein Steak Fajita Power Bowls

    High-Protein Steak Fajita Power Bowls

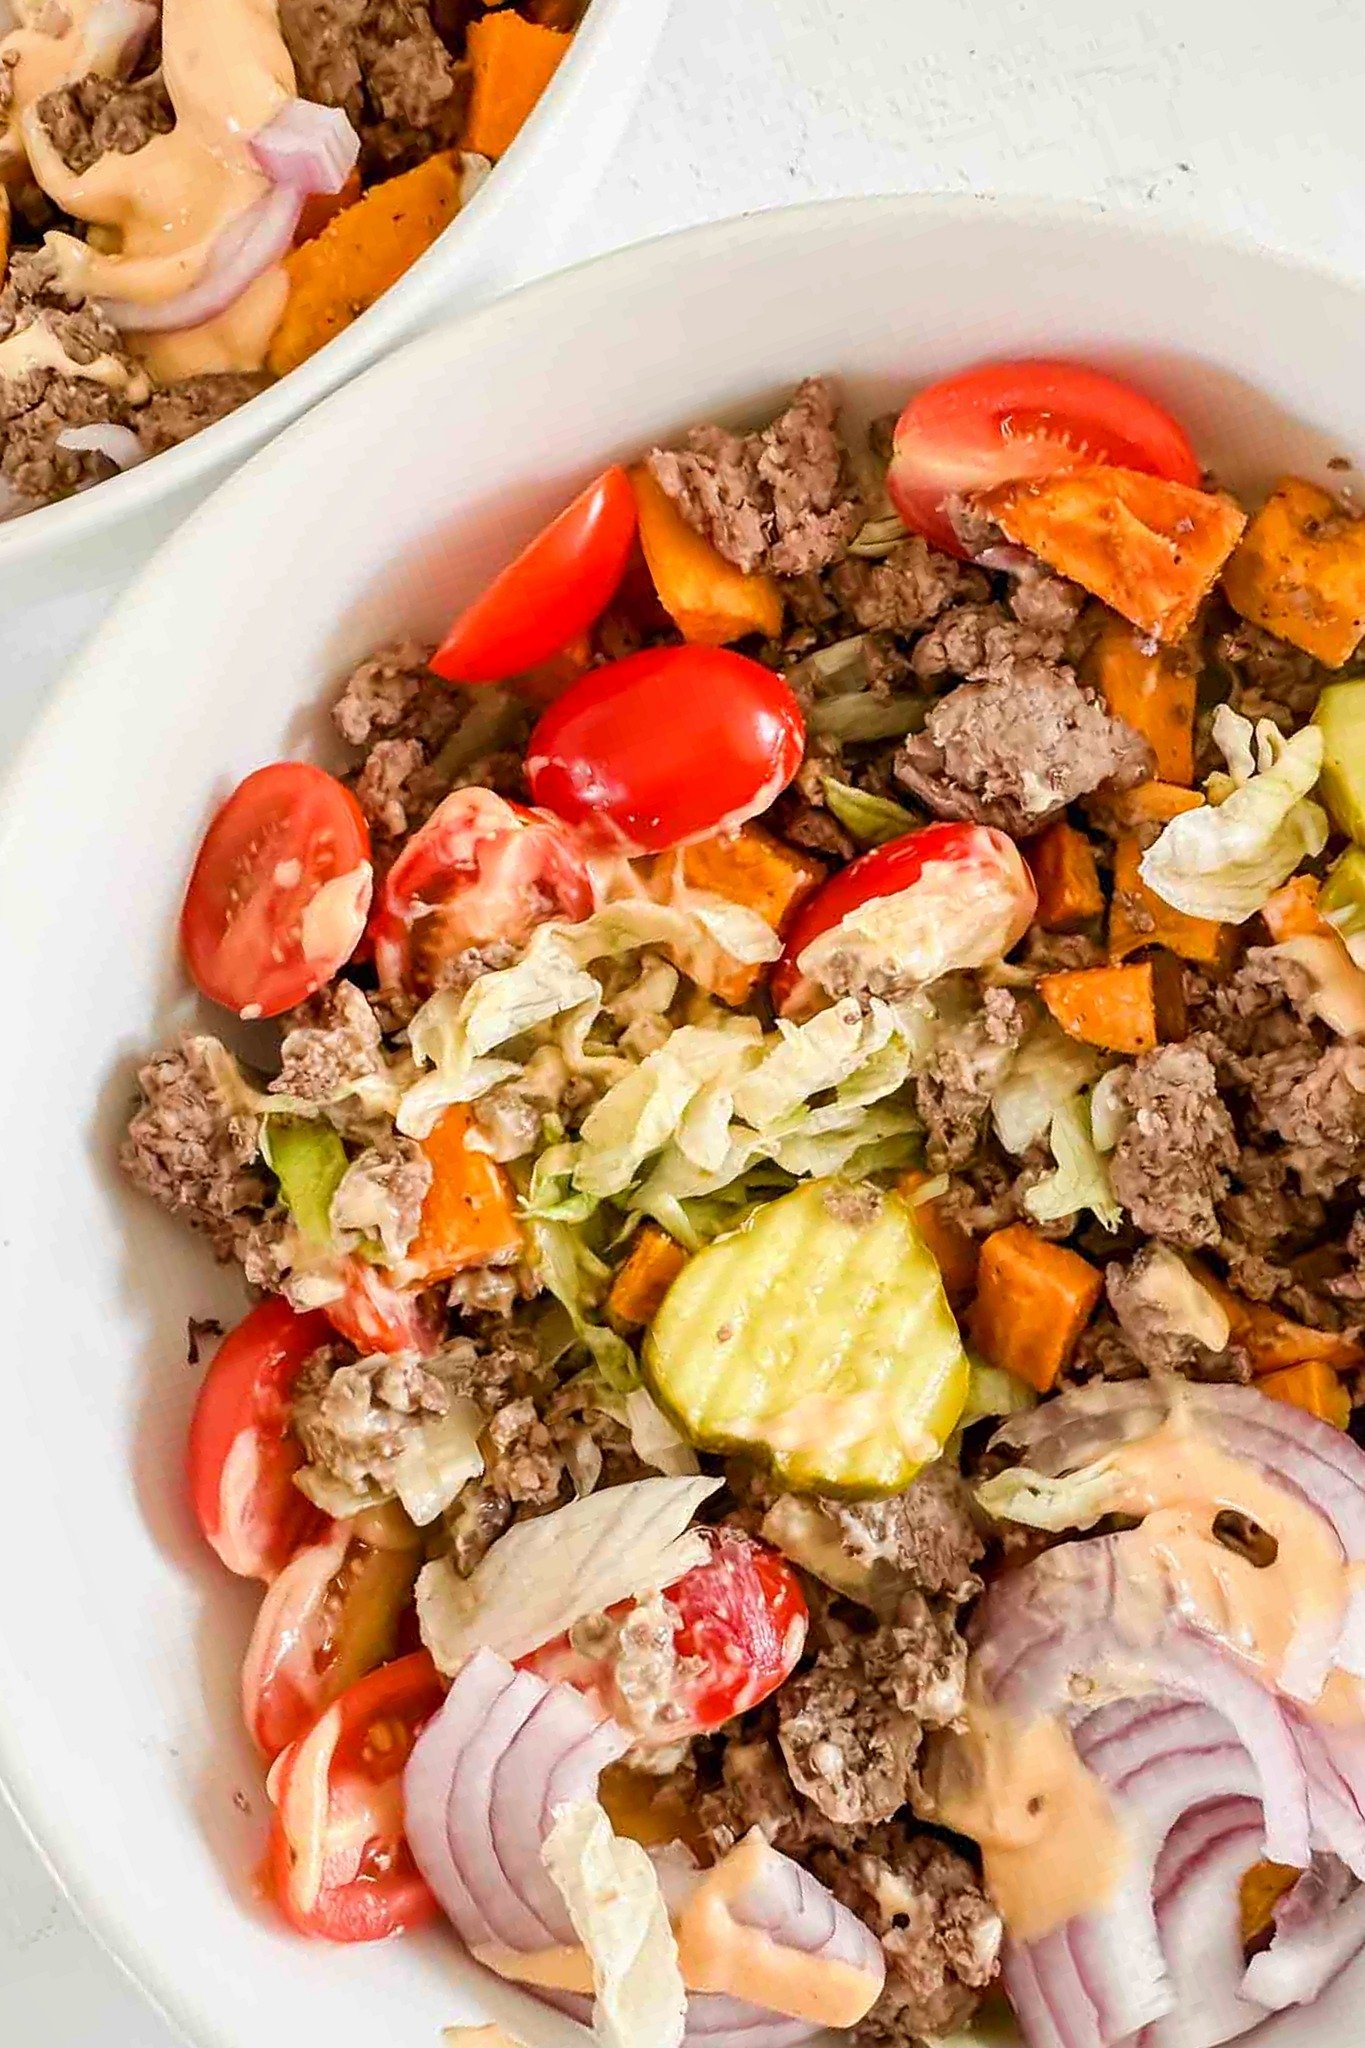
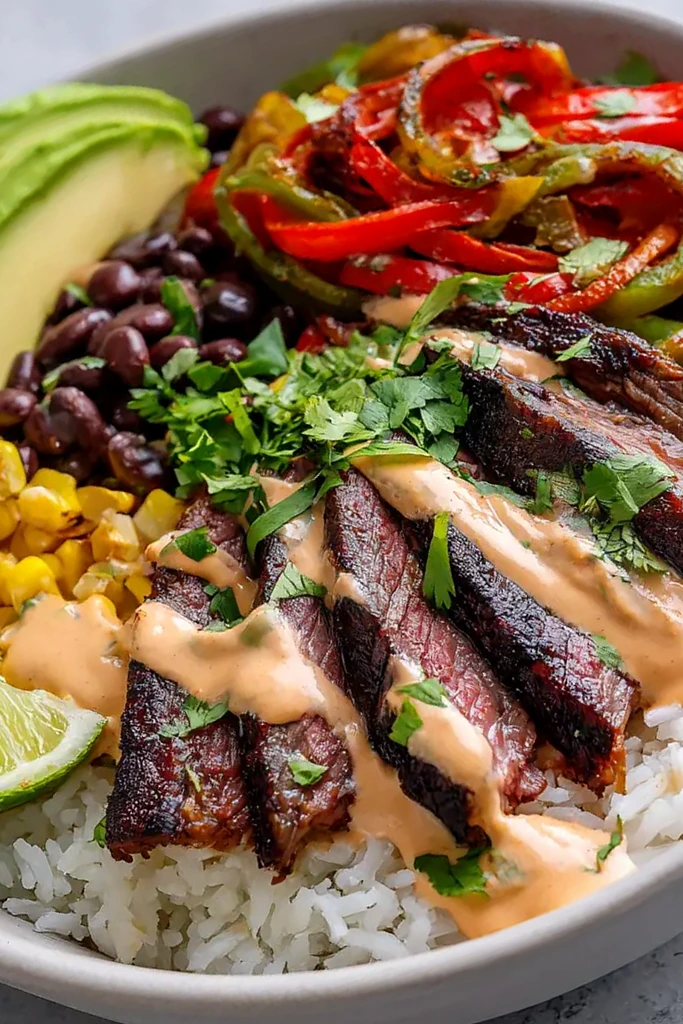
    These high-protein steak fajita bowls are an ideal solution for healthy weeknight dinners and efficient meal prep. They combine perfectly seared flank steak and blistered vegetables over a fluffy rice base for a balanced, nutrient-dense meal.

    Recipe image

    List of ingredients

    • 1.5 lbs flank steak (680g) – lean and flavorful for searing.
    • 1 tbsp olive oil (15ml) – for steak marinade.
    • 1 tsp chili powder – adds traditional Tex-Mex warmth.
    • 0.5 tsp smoked paprika – provides a deep, woody aroma.
    • 0.5 tsp cumin – adds earthy notes.
    • 0.5 tsp garlic powder – for savory depth.
    • 0.5 tsp onion powder – enhances the aromatic profile.
    • Salt and black pepper – to taste.
    • 1 red bell pepper, sliced – for sweetness and color.
    • 1 green bell pepper, sliced – for a classic fajita flavor.
    • 1 large white onion, sliced – caramelizes for natural sweetness.
    • 1 tbsp olive oil (15ml) – for sautéing vegetables.
    • 0.5 cup sour cream (120g) – the creamy base for the sauce.
    • 1-2 chipotle peppers in adobo – for smoky heat.
    • 1 tbsp adobo sauce (15ml) – adds concentrated flavor.
    • 1 tbsp fresh lime juice (15ml) – provides acidity.
    • 1 clove garlic, minced – adds a sharp aromatic kick.
    • 0.25 tsp salt – or to taste.
    • 1.5 cups long-grain white rice, uncooked (280g) – the neutral base.
    • 3 cups water or broth (720ml) – for cooking the rice.
    • 1 can (15 oz) black beans, rinsed (425g) – adds protein and fiber.
    • 1 cup corn kernels (165g) – frozen or canned, for roasting.
    • 1 large avocado – for healthy fats and creaminess.
    • 0.25 cup fresh cilantro, finely chopped (15g) – for a fresh garnish.
    • Lime wedges – for serving.

    step-by-step instructions

    1. Prepare the Base and Sauce: Cook the long-grain white rice according to the package directions. You may add a pinch of salt or a small amount of oil to the water for better flavor. Once cooked, fluff the rice with a fork and keep it covered. While the rice is cooking, place the sour cream, chipotle peppers, adobo sauce, lime juice, minced garlic, and salt into a blender. Process until the mixture is completely smooth. If the sauce is too thick, stir in water one teaspoon at a time until it reaches the desired consistency.
    2. Sear the Steak: Pat the flank steak dry with paper towels to ensure a proper sear. Rub the steak with 1 tablespoon of olive oil and coat it thoroughly with the chili powder, smoked paprika, cumin, garlic powder, onion powder, salt, and pepper. Heat a large cast-iron skillet over high heat until it begins to smoke slightly. Place the steak in the pan and sear for 3 to 5 minutes per side for medium-rare. Remove the meat from the skillet and let it rest on a cutting board for at least 10 minutes to redistribute the juices.
    3. Sauté the Vegetables and Corn: Reduce the skillet heat to medium-high. Add another tablespoon of olive oil, ensuring you scrape up the browned bits from the steak. Add the sliced bell peppers and white onion. Sauté for 8 to 10 minutes, stirring occasionally, until the vegetables are tender-crisp and show charred marks. Remove the vegetables from the pan. Add the corn kernels to the hot skillet and cook for 3 to 4 minutes without stirring frequently, allowing the corn to brown and roast.
    4. Assemble the Bowls: Slice the rested flank steak thinly across the grain to ensure maximum tenderness. Divide the cooked rice among four shallow bowls. Arrange the sliced steak, sautéed peppers, caramelized onions, black beans, and roasted corn in sections on top of the rice. Add fanned slices of fresh avocado to the side. Drizzle the creamy chipotle sauce over the ingredients. Garnish with chopped cilantro and serve with a lime wedge.

    Selecting the Best Cut of Beef

    Flank steak is the preferred choice for this recipe because it is lean and possesses a strong beefy flavor that stands up well to bold spices. Its long, coarse muscle fibers make it ideal for slicing into thin strips that remain satisfyingly chewy but tender when cut correctly.

    Skirt steak is an excellent alternative if flank steak is unavailable. Skirt steak typically has more fat marbling, which can result in a more succulent bite and a deeper flavor profile. When using skirt steak, be mindful that it can cook slightly faster than flank steak due to its thickness.

    Avoid using very lean cuts like eye of round or too fatty cuts like ribeye for this specific application. Round steak often becomes too tough under high heat, while ribeye may release too much fat, preventing the vegetables from searing properly in the same pan.

    Mastering the High-Heat Sear

    Achieving a restaurant-quality char requires a very hot cooking surface. A cast-iron skillet is the optimal tool because it retains heat significantly better than stainless steel or non-stick pans. This ensures the meat sears instantly upon contact, creating a dark crust known as the Maillard reaction.

    Patting the meat dry is a non-negotiable step. Any surface moisture on the steak will turn into steam when it hits the pan, which prevents the meat from browning and can lead to a grey, boiled appearance. Use heavy-duty paper towels to remove all visible moisture before applying oil and spices.

    Avoid overcrowding the pan. If the skillet is too small for the piece of meat, cook in batches. Overcrowding drops the pan temperature rapidly and releases moisture, which causes the steak to steam rather than sear, ruining the texture of the crust.

    The Science of Slicing Against the Grain

    Understanding the grain of the meat is the most important part of preparing flank steak. The grain refers to the direction in which the muscle fibers run. In flank steak, these fibers are long, prominent, and run lengthwise across the cut.

    Slicing perpendicular to these fibers, or against the grain, cuts the long muscle strands into very short pieces. This makes the meat much easier to chew and prevents the steak from feeling rubbery or tough. Slicing with the grain leaves the long fibers intact, requiring more effort to break down during eating.

    To identify the grain, look closely at the raw or cooked meat for the parallel lines of the muscle. Position your knife at a 90-degree angle to those lines. For the best results, slice the steak into thin strips about 1/4 inch thick.

    Optimizing the Chipotle Cream Sauce

    The chipotle sauce provides the necessary acidity and smokiness to balance the richness of the beef. Using chipotle peppers in adobo allows you to control the heat level precisely. For a mild sauce, use a single pepper; for a bolder kick, use two or more.

    If you prefer a higher protein version of the sauce, replace the sour cream with plain Greek yogurt. Greek yogurt provides a similar tang and creamy texture but increases the overall protein content of the bowl. You may need to add an extra teaspoon of lime juice to mimic the tartness of sour cream.

    For a dairy-free alternative, use a base of cashew cream or a thick vegan mayonnaise. Ensure the substitute is unsweetened to avoid clashing with the savory and smoky notes of the adobo sauce and spices.

    Grain and Base Substitutions

    While long-grain white rice is the traditional base, several alternatives can be used to change the nutritional profile. Brown rice offers more fiber and a nuttier flavor, though it requires a longer cooking time. Quinoa is another excellent high-protein option that cooks quickly and pairs well with the chipotle sauce.

    For those reducing carbohydrate intake, cauliflower rice is a practical substitute. Sauté the cauliflower rice in a separate pan with a small amount of olive oil and salt until tender. This keeps the bowl light while maintaining the volume and texture of the original recipe.

    Farro or barley can also be used for a heartier, chewier texture. These ancient grains absorb the flavors of the steak juices and sauce effectively, making them a satisfying alternative for meal prep.

    Vegetable Variations and Prep

    Bell peppers and onions are the classic fajita trio, but other vegetables can be added for variety. Sliced zucchini or yellow squash work well, as they cook quickly and absorb the spices. Portobello mushroom strips can be added for an extra savory, umami-rich element.

    To ensure the vegetables cook evenly, cut them into uniform strips. If the onion slices are too thick compared to the peppers, they may not caramelize at the same rate. Aim for strips approximately 1/4 to 1/2 inch wide.

    The goal for the vegetables is a blistered exterior and a tender interior. Avoid stirring the vegetables too frequently in the pan. Letting them sit undisturbed for a few minutes allows the natural sugars to caramelize and create those characteristic dark spots.

    Meal Prep and Storage Logic

    To maintain the quality of the ingredients, store the components separately. Place the cooked rice, seared steak, and sautéed vegetables in airtight containers. This prevents the rice from becoming mushy and the steak from overcooking during the reheating process.

    Store the chipotle sauce in a small, separate condiment container. The sauce is best enjoyed cold, and heating it can cause the dairy to separate. Similarly, keep the avocado separate or add it fresh to each bowl just before eating to prevent oxidation and browning.

    The cooked components will stay fresh in the refrigerator for up to four days. Ensure the containers are fully cooled before sealing them to prevent excess condensation, which can affect the texture of the seared meat and vegetables.

    Effective Reheating Methods

    To avoid turning the steak rubbery, avoid overheating it in the microwave. The best method is to gently reheat the steak and vegetables in a skillet over medium heat with a splash of water or broth to maintain moisture.

    If using a microwave, use a medium power setting and heat the rice and steak in short 30-second intervals. Stirring between intervals ensures the heat is distributed evenly, preventing the edges of the meat from becoming tough while the center remains cold.

    Once the base components are warm, assemble the bowl. Add the cold chipotle sauce, fresh avocado, and cilantro last. This contrast between the warm steak and vegetables and the cool toppings is essential for the dish’s flavor balance.

    Troubleshooting Common Issues

    If the steak comes out too tough, it is usually due to one of two reasons: it was not rested, or it was sliced with the grain. Always allow at least 10 minutes of resting time to let the muscle fibers relax and the juices redistribute.

    If the vegetables are soggy rather than charred, the pan was likely overcrowded or the heat was too low. To fix this in future batches, increase the heat and cook the vegetables in two smaller increments to ensure the pan stays hot enough for searing.

    If the chipotle sauce is too spicy, stir in an extra tablespoon of sour cream or Greek yogurt. The fat in the dairy helps neutralize the capsaicin from the chipotle peppers, mellowing the heat without losing the smoky flavor.

    Nutritional Balance and Pairing

    This bowl is naturally balanced with complex carbohydrates from the rice, lean protein from the beef and beans, and healthy fats from the avocado. To increase the nutrient density, you can stir raw baby spinach or shredded kale into the warm rice just before assembling.

    For a side dish, a crisp cucumber salad with lime and cilantro provides a refreshing contrast to the smoky flavors of the bowl. A side of sliced radishes can also add a peppery crunch that complements the richness of the steak.

    To make the meal even heartier, consider adding a scoop of pinto beans alongside the black beans. This adds a different texture and additional plant-based protein to the dish, making it more filling for active individuals.

    Print
    clock clock iconcutlery cutlery iconflag flag iconfolder folder iconinstagram instagram iconpinterest pinterest iconfacebook facebook iconprint print iconsquares squares iconheart heart iconheart solid heart solid icon
    High-Protein Steak Fajita Power Bowls

    High-Protein Steak Fajita Power Bowls


    5 Stars 4 Stars 3 Stars 2 Stars 1 Star

    No reviews

    • Author: imageuploader
    • Total Time: 45 minutes
    • Yield: 4 bowls 1x
    • Diet: General

    Description

    This Steak Fajita Bowl recipe features perfectly seared flank steak, blistered peppers, and caramelized onions over fluffy rice. Topped with a creamy chipotle sauce, this vibrant power bowl is a healthy, delicious, and easy-to-make weeknight dinner.


    Ingredients

    Scale
    • 1.5 lbs flank steak (680g)
    • 1 tbsp olive oil (15ml)
    • 1 tsp chili powder
    • 0.5 tsp smoked paprika
    • 0.5 tsp cumin
    • 0.5 tsp garlic powder
    • 0.5 tsp onion powder
    • Salt and black pepper to taste
    • 1 red bell pepper, sliced
    • 1 green bell pepper, sliced
    • 1 large white onion, sliced
    • 1 tbsp olive oil (15ml)
    • 0.5 cup sour cream (120g)
    • 12 chipotle peppers in adobo plus 1 tbsp (15ml) adobo sauce
    • 1 tbsp fresh lime juice (15ml)
    • 1 clove garlic, minced
    • 0.25 tsp salt
    • 1.5 cups long-grain white rice, uncooked (280g)
    • 3 cups water or vegetable broth (720ml)
    • 1 can (15 oz) black beans, rinsed (425g)
    • 1 cup corn kernels (165g)
    • 1 large avocado
    • 0.25 cup fresh cilantro, finely chopped (15g)
    • Lime wedges for serving

    Instructions

    1. Prepare the Rice and Chipotle Sauce: Cook the rice according to package directions; fluff with a fork and keep covered. Combine sour cream, chipotle peppers, adobo sauce, fresh lime juice, minced garlic, and salt in a blender, blend until smooth, and set aside.
    2. Cook the Steak: Pat flank steak dry, rub with 1 tbsp olive oil and season with chili powder, smoked paprika, cumin, garlic powder, onion powder, salt, and pepper. Sear in a hot cast-iron skillet for 3-5 minutes per side for medium-rare, then let rest for 10 minutes.
    3. Sauté the Vegetables and Corn: In the same skillet, add 1 tbsp olive oil and sauté sliced bell peppers and onion for 8-10 minutes until tender-crisp and blistered. Remove vegetables, then cook corn kernels in the skillet for 3-4 minutes until roasted and browned.
    4. Assemble Your Steak Fajita Bowl: Slice rested steak thinly against the grain. In bowls, layer white rice, sliced steak, blistered peppers and onions, black beans, and roasted corn. Top with sliced avocado, drizzle with chipotle sauce, and garnish with cilantro and a lime wedge.

    Notes

    Avoid overcrowding the pan to ensure searing rather than steaming. Use high heat for a proper char. Always slice flank steak perpendicular to the muscle fibers (against the grain) for maximum tenderness. Allow the steak to rest for 10 minutes to maintain juiciness.

    • Prep Time: 20 minutes
    • Cook Time: 25 minutes
    • Category: Dinner, Lunch, Main Course
    • Method: Sautéing
    • Cuisine: Mexican, Tex-Mex

    Nutrition

    • Serving Size: 1 bowl
    • Calories: 762 kcal
    • Sugar: 10 g
    • Sodium: 950 mg
    • Fat: 35 g
    • Saturated Fat: 12 g
    • Unsaturated Fat: 23 g
    • Trans Fat: 0 g
    • Carbohydrates: 72 g
    • Fiber: 15 g
    • Protein: 52 g
    • Cholesterol: 110 mg
  • Sweet Potato Burger Bowl

    Sweet Potato Burger Bowl

    This recipe transforms a traditional burger and fries meal into a nutrient-dense bowl. It is an efficient option for dinner or meal prep that maintains the classic flavor profile of a burger without the bun.

    Recipe image

    List of ingredients

    • 1 lb lean ground beef – provides the protein base.
    • 2 tsp worcestershire sauce – adds savory depth.
    • ½ tsp garlic powder – for aromatic flavor.
    • ½ tsp onion powder – complements the beef.
    • ½ tsp salt – enhances all flavors.
    • 1/4 tsp pepper – adds a slight bite.
    • 4 small sweet potatoes – used as the roasted base.
    • 1 tablespoon avocado oil – high smoke point for roasting.
    • ½ teaspoon garlic powder – seasons the potatoes.
    • ½ teaspoon onion powder – seasons the potatoes.
    • 1/4 tsp salt – seasons the potatoes.
    • 1/4 tsp pepper – seasons the potatoes.
    • 1 bag shredded lettuce (8 oz) – the fresh base for the bowl.
    • 1 red onion, thinly sliced – adds sharpness.
    • 1 pint diced tomatoes (10 oz) – adds freshness.
    • 1/2 cup pickles, diced – adds acidity.
    • Special sauce: ⅓ cup mayo, 2 tablespoon ketchup, 1 tablespoon mustard, 1 teaspoon apple cider vinegar, ½ teaspoon onion powder, salt and pepper to taste.

    step-by-step instructions

    1. Preheat: Set your oven to 400 degrees Fahrenheit.
    2. Prep Potatoes: Peel the sweet potatoes and dice them into uniform pieces. Place them in a large mixing bowl.
    3. Season Potatoes: Add avocado oil, garlic powder, onion powder, salt, and pepper to the bowl. Toss until the potatoes are evenly coated.
    4. Arrange: Spread the seasoned sweet potatoes across a lined baking sheet in a single layer.
    5. Roast: Bake for 30-40 minutes. Stir the potatoes halfway through the cooking time to ensure even browning.
    6. Sear Meat: While potatoes are roasting, heat oil in a large skillet over medium-high heat.
    7. Brown Beef: Add the lean ground beef to the skillet. Cook and break apart the meat until it is brown, approximately 8 minutes.
    8. Season Meat: Stir in the worcestershire sauce, garlic powder, onion powder, salt, and pepper. Mix well and remove from heat.
    9. Assemble: Once meat and potatoes are ready, layer each bowl starting with shredded lettuce, followed by roasted sweet potatoes, browned meat, sliced red onion, diced tomatoes, and pickles.
    10. Finish: Drizzle the special sauce over the top of each bowl.

    Optimizing Roasted Sweet Potatoes

    To achieve the best texture, dice the sweet potatoes into consistent 1/2-inch cubes. Uniform sizing ensures that every piece cooks at the same rate and prevents smaller pieces from burning while larger ones remain raw.

    Avoid overcrowding the baking sheet. If the potatoes are too close together, they will steam instead of roast, resulting in a soft texture rather than crisp edges. Use two sheets if necessary.

    Using avocado oil is recommended due to its high smoke point. This allows the potatoes to roast at 400 degrees without the oil breaking down or imparting a burnt taste to the vegetables.

    For a deeper color, ensure the potatoes are patted dry after washing and before oiling. Excess moisture on the surface of the vegetable creates steam, which inhibits the browning process.

    Beef Cooking Techniques

    Use a skillet with a heavy bottom, such as cast iron or stainless steel, to maintain a consistent temperature. This helps in achieving a better sear on the ground beef, which improves the overall flavor profile.

    Avoid stirring the meat constantly the moment it hits the pan. Let the beef sit for a minute or two to develop a brown crust before breaking it apart with a spatula.

    When using lean ground beef, be mindful of the heat. High heat is necessary for browning, but too much can cause lean meat to become dry. Keep the process efficient and remove it from heat as soon as it is browned.

    Drain any excess fat from the skillet before adding the seasonings. This prevents the worcestershire sauce and spices from becoming diluted in grease, ensuring the flavors adhere better to the meat.

    Special Sauce Preparation

    Combine the mayonnaise, ketchup, and mustard in a small mixing bowl. Stir vigorously until the colors merge and the texture is smooth and creamy.

    The apple cider vinegar is a critical component for balancing the richness of the mayo. If you prefer a tangier sauce, you can increase the vinegar by a small margin.

    Sift the onion powder into the sauce to avoid clumps. This ensures the flavor is distributed evenly throughout the condiment.

    Let the sauce sit in the refrigerator for at least 15 minutes before serving. This allow the flavors to meld and the sauce to thicken slightly for better adherence to the toppings.

    Customizing Your Bowl Toppings

    To add more creaminess, include sliced avocado or a dollop of Greek yogurt. Avocado pairs well with the sweetness of the roasted potatoes and the acidity of the pickles.

    For those who prefer extra richness, add shredded cheddar or pepper jack cheese. Add the cheese to the hot meat immediately after cooking so it melts slightly before being placed in the bowl.

    Fresh herbs like chopped parsley or cilantro can be sprinkled on top for added color and a fresh flavor note. These herbs cut through the heaviness of the beef and sauce.

    If you want a spicy element, add sliced jalapeños or a dash of hot sauce to the special sauce mixture. This creates a contrast with the naturally sweet potatoes.

    Ingredient Substitution Guide

    For a different protein, replace ground beef with ground turkey or ground chicken. Turkey provides a leaner alternative, while chicken offers a milder flavor that absorbs the seasonings well.

    To make this recipe plant-based, use canned black beans. Rinse and drain the beans, then lightly mash them with a fork before sautéing them with the same seasonings used for the beef.

    If sweet potatoes are unavailable, russet or Yukon Gold potatoes work as a substitute. Note that these may require a slightly different roasting time depending on the variety and size of the dice.

    For the lettuce base, you can swap romaine for spinach or a spring mix. Kale is also a viable option, though it should be massaged with a bit of oil and salt first to soften the leaves.

    Storage and Preservation

    Store the components of the burger bowl separately for maximum freshness. Place the cooked beef and roasted sweet potatoes in one airtight container and the fresh vegetables in another.

    The cooked meat and potatoes will remain safe in the refrigerator for up to 5 days. Ensure they are completely cooled to room temperature before sealing the container to prevent condensation.

    Keep the special sauce in a separate small jar or condiment container. This prevents the sauce from soaking into the other ingredients and making the lettuce wilt.

    When storing the sliced red onion, place them in a small container with a damp paper towel to keep them crisp. This prevents them from drying out or smelling too strong in the fridge.

    Reheating Methods

    To reheat the beef and potatoes, use a microwave-safe dish. Heat on medium power in 30-second intervals, stirring in between, until the food is warmed through.

    For a crispier texture on the potatoes, use an air fryer or oven. Heat them at 350 degrees for 3-5 minutes. This restores the roasted edges that may have softened during refrigeration.

    Avoid reheating the entire bowl. The heat from the meat and potatoes will wilt the lettuce and warm the tomatoes and pickles, which ruins the temperature contrast of the dish.

    After reheating the warm components, place them on top of the fresh lettuce and add the cold toppings. Finish with a fresh drizzle of the special sauce.

    Meal Prep Workflow

    Start by prepping all your vegetables. Peel and dice the potatoes, slice the onion, and dice the tomatoes and pickles before turning on any heat sources.

    Prepare the special sauce in advance. Because it is made of stable pantry ingredients, it can be made a day ahead and stored in the fridge.

    Utilize the oven time for the potatoes to cook the meat. By timing these two processes to end simultaneously, you reduce the total time spent in the kitchen and keep the food hot.

    Divide the ingredients into four equal portions across meal prep containers. Layer the heavy items at the bottom and keep the greens on top or in a separate compartment.

    Troubleshooting Common Issues

    If the sweet potatoes are too soft, you likely overcrowded the pan. In the future, leave more space between the cubes to allow hot air to circulate around each piece.

    If the meat is too greasy, you may have used beef with a higher fat percentage. Use a lean 90/10 blend or use a slotted spoon to transfer the meat to the bowls.

    If the sauce is too thick, stir in a teaspoon of water or extra apple cider vinegar. This will thin the consistency without significantly altering the flavor.

    If the potatoes are burnt on the outside but raw inside, lower the oven temperature to 375 degrees and increase the cooking time slightly.

    Frequently Asked Questions

    Can I use a slow cooker for the potatoes? No, roasting in the oven is required to get the necessary texture and browning. Slow cookers will result in mashed or steamed potatoes.

    Is it possible to freeze the meat? Yes, the cooked and seasoned beef can be frozen for up to 3 months. Thaw it in the refrigerator overnight before reheating.

    What is the best type of sweet potato to use? Garnet or Jewel sweet potatoes are recommended for their sweetness and ability to hold their shape when roasted.

    Can I make this without mayo? You can substitute the mayonnaise in the special sauce with mashed avocado or a vegan mayo alternative to maintain the creamy texture.

    Print
    clock clock iconcutlery cutlery iconflag flag iconfolder folder iconinstagram instagram iconpinterest pinterest iconfacebook facebook iconprint print iconsquares squares iconheart heart iconheart solid heart solid icon
    Sweet Potato Burger Bowl

    Sweet Potato Burger Bowl


    5 Stars 4 Stars 3 Stars 2 Stars 1 Star

    No reviews

    • Author: imageuploader
    • Total Time: 55 minutes
    • Yield: 4 servings 1x
    • Diet: General

    Description

    Get ready to enjoy my favorite burger order – a burger and side of sweet potato fries – but with a twist! Reinvent burger night at your house with these delicious Sweet Potato Burger Bowls.


    Ingredients

    Scale
    • 1 lb lean ground beef
    • 2 tsp worcestershire sauce
    • ½ tsp garlic powder
    • ½ tsp onion powder
    • ½ tsp salt
    • 1/4 tsp pepper
    • 4 small sweet potatoes
    • 1 tablespoon avocado oil
    • ½ teaspoon garlic powder
    • ½ teaspoon onion powder
    • 1/4 tsp salt
    • 1/4 tsp pepper
    • 8 oz shredded lettuce
    • 1 red onion, thinly sliced
    • 10 oz diced tomatoes
    • 1/2 cup pickles, diced
    • 1/3 cup mayo
    • 2 tablespoon ketchup
    • 1 tablespoon mustard
    • 1 teaspoon apple cider vinegar
    • 1/2 teaspoon onion powder
    • dash salt
    • dash pepper

    Instructions

    1. Preheat: Preheat the oven to 400 degrees.
    2. Prep Potatoes: Peel and dice sweet potatoes. Add to a large bowl.
    3. Season Potatoes: Toss sweet potatoes with avocado oil and spices.
    4. Arrange: Pour onto a lined baking sheet.
    5. Bake: Bake for 30-40 minutes, mixing half way.
    6. Heat Pan: While the sweet potatoes are cooking, heat a large skillet with oil.
    7. Brown Meat: Add meat. Cook until brown, about 8 minutes.
    8. Season Meat: Add seasonings and mix.
    9. Assemble: Once the meat and sweet potatoes are done cooking, assemble the bowls.
    10. Layer: Make layers of lettuce, sweet potatoes, meat, red onion, tomatoes, pickles, and top with special sauce.
    11. Serve: Enjoy!

    Notes

    Nutrition does not include special sauce. Special sauce is made with mayo, ketchup, mustard, apple cider vinegar, onion powder, salt and pepper.

    • Prep Time: 15 minutes
    • Cook Time: 40 minutes
    • Category: Main Course
    • Method: Baking
    • Cuisine: American

    Nutrition

    • Serving Size: 1 bowl
    • Calories: 369 kcal
    • Sugar: 8 g
    • Sodium: 900 mg
    • Fat: 14 g
    • Saturated Fat: 4 g
    • Unsaturated Fat: 10 g
    • Trans Fat: 0 g
    • Carbohydrates: 36 g
    • Fiber: 7 g
    • Protein: 26 g
    • Cholesterol: 65 mg
  • Crispy Air Fryer Chicken Bites

    Crispy Air Fryer Chicken Bites

    These air fryer chicken bites are a fast and nutritious option for snacks or main meals. They offer a crispy exterior and juicy center using minimal oil compared to traditional frying.

    Recipe image

    List of ingredients

    • 3 large boneless skinless chicken breasts, cut into 1.5 inch pieces – ensures uniform cooking.
    • 1 1/2 tablespoons olive oil – helps spices adhere and aids browning.
    • 1 teaspoon paprika – adds color and a smoky base.
    • 1 teaspoon chili powder – provides a mild warmth.
    • 1 teaspoon dried parsley – adds herbal notes and visual contrast.
    • 1/2 teaspoon onion powder – enhances the savory flavor profile.
    • 1/4 teaspoon garlic powder – provides a pungent, aromatic backbone.
    • 1/4 teaspoon red pepper flakes – adds a subtle spicy kick.
    • Salt and black pepper, to taste – essential for seasoning balance.
    • Cooking spray (such as Misto) – prevents chicken from sticking to the basket.

    step-by-step instructions

    1. Preheat: Set your air fryer to 380 degrees Fahrenheit. This ensures the cooking surface is hot enough to sear the meat immediately.
    2. Season: In a medium mixing bowl, combine the chicken pieces with olive oil, paprika, chili powder, dried parsley, onion powder, garlic powder, red pepper flakes, salt, and black pepper. Use tongs to mix thoroughly until every piece is evenly coated.
    3. Arrange: Lightly spray the air fryer basket with cooking spray. Place the seasoned chicken pieces in a single layer, making sure they do not overlap or overcrowd the space.
    4. Air Fry: Cook at 380 degrees Fahrenheit for 10 minutes. Halfway through the process, shake the basket gently to ensure all sides brown evenly.
    5. Serve: Once the chicken is cooked through and crispy, remove it from the air fryer. Serve immediately with potato wedges and a fresh salad.

    Optimizing Chicken Preparation

    Cutting the chicken into uniform 1.5-inch pieces is critical for consistent results. If the pieces vary in size, smaller bits will overcook and become dry while larger pieces may remain underdone.

    Using boneless skinless chicken breasts provides a lean protein source that cooks quickly. Ensure the meat is patted dry with paper towels before adding olive oil to help the spices stick better.

    Tongs are the most effective tool for coating the chicken. They allow you to toss the meat without crushing the pieces or leaving patches of unseasoned chicken.

    Understanding the Spice Blend

    Paprika serves as more than just a coloring agent. It provides a foundational earthiness that complements the savory notes of the garlic and onion powders.

    Chili powder and red pepper flakes provide two different types of heat. Chili powder offers a broad, warm flavor, while red pepper flakes provide sharp, pinpoint bursts of spice.

    Dried parsley adds a layer of herbal freshness that cuts through the richness of the oil. It also prevents the chicken from looking monochromatic after cooking.

    Salt and black pepper should be adjusted based on your dietary preferences. Adding them at the same time as the other spices ensures an even distribution of flavor across the surface of the meat.

    Air Fryer Technical Tips

    Preheating the air fryer is a non-negotiable step for achieving maximum crispiness. A hot basket prevents the chicken from sticking and starts the Maillard reaction immediately upon contact.

    Airflow is the primary mechanism of an air fryer. Overcrowding the basket blocks the circulation of hot air, which leads to steaming rather than frying, resulting in a soggy texture.

    If your air fryer is small, cook the chicken in batches. It is better to spend more time cooking in rounds than to compromise the texture by filling the basket to the top.

    The mid-cycle shake is essential. Because the heat source is typically at the top, flipping or shaking the chicken ensures the bottom surfaces get direct exposure to the hot air.

    Flavor Variations and Substitutions

    For a Mediterranean profile, replace the chili powder and red pepper flakes with dried oregano and thyme. This creates a brighter, more herbal taste that pairs well with lemon.

    To increase the heat level, add a pinch of cayenne pepper to the mixture. This adds a sharp, lingering spice that is more intense than standard chili powder.

    For a cheesy crust, stir in two tablespoons of finely grated Parmesan cheese after the olive oil but before the other spices. The cheese will caramelize and create a salty, savory crust.

    If chicken breasts are unavailable, boneless skinless chicken thighs can be used. Thighs have a higher fat content, making them more forgiving and juicy, though they may require an extra minute of cooking time.

    Recommended Dipping Sauces

    A classic ranch dressing provides a cool contrast to the spicy seasoning of the chicken. Its creaminess balances the heat from the red pepper flakes.

    Honey mustard is an excellent choice for those who prefer a sweet and tangy pairing. The acidity of the mustard cuts through the oil, while the honey enhances the paprika.

    For a bolder flavor, create a chipotle mayo by mixing mayonnaise, a small amount of adobo sauce, and a squeeze of lime juice. This complements the smoky notes of the recipe.

    Tzatziki, made from Greek yogurt, cucumber, and garlic, offers a refreshing alternative. This is particularly effective when using the Mediterranean herb variation of the recipe.

    Suggested Side Dish Pairings

    Homemade potato wedges are a natural companion. These can be air-fried using a similar temperature (380°F) and timing, making it easy to prepare both components in one appliance.

    A fresh green salad with a zesty vinaigrette provides necessary acidity. The crispness of raw vegetables balances the dense, savory nature of the chicken bites.

    Steamed broccoli or roasted cauliflower adds a nutritional boost to the meal. These vegetables can be seasoned with a bit of lemon and salt to keep the palate refreshed.

    For a heartier meal, serve the chicken bites over a bed of microwaveable quinoa or brown rice. This adds complex carbohydrates to the meal for sustained energy.

    Storage and Preservation

    Store leftover chicken bites in an airtight container. Place them in the refrigerator and consume them within four days to maintain quality.

    Allow the chicken to cool completely before sealing the container. Trapping steam inside the container will create moisture, which ruins the crispy exterior.

    For long-term storage, these bites can be frozen for up to three months. Use a freezer-safe bag and place parchment paper between layers to prevent the pieces from freezing together.

    Thaw frozen chicken bites in the refrigerator overnight. This gradual thawing process helps preserve the cellular structure of the meat and prevents it from becoming mushy.

    Reheating for Maximum Crunch

    The air fryer is the superior method for reheating. Return the bites to 380°F for 2-3 minutes, which evaporates surface moisture and restores the original crispiness.

    A skillet is a viable alternative if an air fryer is unavailable. Heat a small amount of oil over medium heat and sear the bites for one minute per side.

    Avoid using a microwave for reheating if possible. Microwaves heat the water molecules inside the meat, which pushes moisture to the surface and makes the coating soggy.

    If you must use a microwave, heat the chicken in short 30-second bursts. This reduces the risk of overcooking the meat and making it rubbery.

    Troubleshooting Common Issues

    If the chicken is sticking to the basket, increase the amount of cooking spray or use a perforated parchment liner. Ensure the liner does not completely block the airflow.

    If the bites are dry, check the internal temperature with a meat thermometer. Chicken is safe to eat at 165°F; cooking beyond this point leads to moisture loss.

    If the coating is not crispy, you likely overcrowded the basket. Reduce the amount of chicken per batch to ensure the air can circulate freely around each piece.

    If the spices taste burnt, lower the temperature to 360°F and increase the cooking time by 2 minutes. Some spice blends, especially those with sugar, can burn at higher temperatures.

    Frequently Asked Questions

    Can I use frozen chicken breasts? Yes, but they must be fully thawed before cutting and seasoning. Seasoning frozen meat is impossible and will lead to uneven cooking.

    Is preheating necessary for all air fryers? While some modern models preheat quickly, manual preheating ensures the meat sears immediately, which is key for the crust.

    Can I substitute olive oil with other oils? Any high-smoke point oil will work, such as avocado oil or canola oil. Avoid butter as it can burn at 380°F.

    How do I know when the chicken is done? The chicken should be golden brown on all sides. Use a meat thermometer to confirm the internal temperature has reached 165°F.

    Print
    clock clock iconcutlery cutlery iconflag flag iconfolder folder iconinstagram instagram iconpinterest pinterest iconfacebook facebook iconprint print iconsquares squares iconheart heart iconheart solid heart solid icon
    Crispy Air Fryer Chicken Bites

    Crispy Air Fryer Chicken Bites


    5 Stars 4 Stars 3 Stars 2 Stars 1 Star

    No reviews

    • Author: imageuploader
    • Total Time: 20 minutes
    • Yield: 4 servings 1x
    • Diet: Low Fat

    Description

    These Air Fryer Chicken Bites are a quick, flavorful, and healthy snack or meal option. Tender chicken pieces are coated in a blend of aromatic spices and cooked to crispy perfection in the air fryer, making them a guilt-free alternative to fried chicken bites.


    Ingredients

    Scale
    • 3 large boneless skinless chicken breasts, cut into 1.5 inch pieces
    • 1 1/2 tablespoons olive oil
    • 1 teaspoon paprika
    • 1 teaspoon chili powder
    • 1 teaspoon dried parsley
    • 1/2 teaspoon onion powder
    • 1/4 teaspoon garlic powder
    • 1/4 teaspoon red pepper flakes
    • Salt and black pepper, to taste
    • Cooking spray

    Instructions

    1. Preheat the Air Fryer: Set your air fryer to 380 degrees Fahrenheit to ensure it’s at the right temperature for cooking the chicken bites evenly and quickly.
    2. Prepare the Chicken: In a medium mixing bowl, combine the chicken pieces with olive oil, paprika, chili powder, dried parsley, onion powder, garlic powder, red pepper flakes, salt, and black pepper. Use tongs to mix thoroughly, making sure each piece is well coated with the spice blend.
    3. Arrange Chicken in Air Fryer: Lightly spray the basket of your air fryer with cooking spray to prevent sticking. Lay the seasoned chicken pieces in a single layer, avoiding overcrowding.
    4. Cook the Chicken Bites: Air fry the chicken at 380 degrees Fahrenheit for 10 minutes. Halfway through the cooking time, pause to shake the basket gently to ensure even cooking and browning on all sides.
    5. Serve: Once cooked through and crispy, serve the chicken bites immediately alongside potato wedges and a fresh salad for a satisfying meal.

    Notes

    Store leftover chicken bites in an airtight container in the refrigerator for up to 4 days. Reheat in an air fryer at 380°F for 2-3 minutes or in a skillet with a bit of oil. Freeze for up to 3 months.

    • Prep Time: 10 minutes
    • Cook Time: 10 minutes
    • Category: Snack
    • Method: Air Frying
    • Cuisine: American

    Nutrition

    • Serving Size: 1/4 of recipe
    • Calories: 220 kcal
    • Sugar: 0.5 g
    • Sodium: 350 mg
    • Fat: 8 g
    • Saturated Fat: 1.2 g
    • Unsaturated Fat: 6 g
    • Trans Fat: 0 g
    • Carbohydrates: 2 g
    • Fiber: 0.5 g
    • Protein: 33 g
    • Cholesterol: 85 mg
  • Healthy Ground Chicken Stir Fry

    Healthy Ground Chicken Stir Fry

    This ground chicken stir fry is a high-protein, nutrient-dense meal designed for quick weeknight preparation. It balances lean meat with crisp vegetables and a savory, gluten-free sauce for a satisfying dinner.

    Recipe image

    List of ingredients

    • 1 lbs. ground chicken (96/4) – lean protein base.
    • 1/2 cup shredded carrots – for color and sweetness.
    • 1/2 head broccoli, chopped (115g) – cut into small florets.
    • 3 oz. snow peas – kept whole for crunch.
    • 8 oz. whole water chestnuts, sliced – adds a distinct crisp texture.
    • 2 green onions, chopped – used for both cooking and garnish.
    • Salt and pepper – to taste.
    • 1/3 + 1/4 cup coconut aminos – a soy-free, savory alternative.
    • 1 tbsp. lite maple syrup – provides a hint of sweetness.
    • 1 tsp. sesame oil – for a nutty aromatic finish.
    • 1/2 tsp. chili garlic sauce – adds a mild spicy kick.
    • 2 garlic cloves, minced – fresh for maximum flavor.
    • 1/4 tsp. ground ginger – provides warm, zesty notes.
    • 1/2 tsp. tapioca flour – used as a thickener.
    • 1/2 tsp. water – to create the slurry.

    step-by-step instructions

    1. Brown the Meat: Spray a pan over medium heat with nonstick spray. Add the raw chicken and brown it, breaking the meat into bite-size pieces with a spatula.
    2. Prepare the Sauce: While the meat browns, combine coconut aminos (1/3 cup + 1/4 cup), maple syrup, sesame oil, chili garlic sauce, minced garlic, and ground ginger in a jar with a lid. Shake well to combine all ingredients.
    3. Pre-soften Broccoli: Chop the broccoli into bite-size pieces and place them in a shallow bowl. Add enough water to cover the bottom and microwave for 60 seconds to soften the stems.
    4. Sauté Vegetables: Once the chicken is browned, add the shredded carrots and the pre-softened broccoli to the pan. Stir and sauté on medium heat for 3 to 5 minutes.
    5. Simmer with Aromatics: Pour in the prepared stir fry sauce and add the sliced water chestnuts, chopped green onions, and snow peas. Stir until evenly combined and bring the mixture to a steady simmer for 5 minutes.
    6. Thicken the Sauce: Push the meat and vegetables to the side of the pan. In a small bowl, mix 1/2 tsp. of tapioca flour with 1/2 tsp. of water. Pour this slurry into the sauce area, stir until it thickens, then mix everything together to coat.
    7. Final Touch: Top the dish with extra chopped green onions, toasted sesame seeds, or red pepper flakes. Serve immediately.

    Choosing the Best Protein

    While this recipe uses 96/4 lean ground chicken, other lean ground meats work well. Ground turkey is a direct substitute that maintains the same nutritional profile and flavor absorption.

    If you prefer ground beef, choose an extra-lean variety like 93/7 to keep the calorie count low. Lean ground beef adds a richer, deeper flavor to the savory sauce.

    For those using sliced chicken breast instead of ground meat, cut the breast into very thin strips. Marinate the strips in a tablespoon of the sauce for 15 minutes before browning for better flavor penetration.

    Optimizing Your Vegetable Mix

    The combination of broccoli, carrots, snow peas, and water chestnuts provides a balance of textures. Water chestnuts are particularly important as they maintain their crunch even after simmering.

    You can easily swap snow peas for sugar snap peas for a slightly sweeter taste. Both options provide a similar crispness and nutritional value.

    To further increase the volume of the meal, consider adding sliced red bell peppers or baby corn. Add these during the sauté step with the carrots and broccoli to ensure they are cooked through.

    For a leafier addition, stir in chopped bok choy or spinach during the last two minutes of simmering. These greens wilt quickly and do not require long cooking times.

    Understanding the Stir Fry Sauce

    Coconut aminos serve as the primary salty component and are a great alternative to soy sauce. They are naturally lower in sodium and gluten-free, making the dish more accessible for various diets.

    The lite maple syrup balances the saltiness of the aminos. If maple syrup is unavailable, honey or agave nectar can be used in equal measurements to achieve the same glaze effect.

    Sesame oil is used sparingly because of its potent flavor. It provides the characteristic nutty aroma associated with traditional stir fry dishes.

    Chili garlic sauce provides a controlled amount of heat. If you prefer a spicier dish, increase the amount to a full teaspoon or add a pinch of crushed red pepper flakes at the end.

    The Role of the Slurry

    A slurry is a mixture of a starch and a liquid used to thicken sauces without adding clumps. Tapioca flour is an excellent choice here because it creates a clear, glossy finish.

    Cornstarch is the most common substitute for tapioca flour and works identically in this recipe. Use the same 1:1 ratio of starch to water for the thickening process.

    Arrowroot powder is another option for those seeking a gluten-free thickener. It provides a similar shine and viscosity to the sauce as tapioca flour does.

    Always mix the starch with cold water before adding it to the hot pan. Adding dry powder directly to the sauce will result in lumps that are difficult to stir out.

    Serving and Pairing Ideas

    For a traditional experience, serve this stir fry over steamed jasmine or brown rice. The rice absorbs the extra sauce, making the meal more filling.

    To keep the dish low-carb or keto-friendly, use cauliflower rice. Sauté the cauliflower rice separately with a pinch of salt and garlic powder before topping it with the chicken mixture.

    Zucchini noodles, or zoodles, are another great low-carb option. Toss the zoodles in the pan for the final 60 seconds of cooking just to warm them through without making them mushy.

    For a different presentation, serve the stir fry inside large romaine lettuce leaves. This creates a ‘lettuce wrap’ style meal that is light yet satisfying.

    Storage and Meal Prep Strategy

    This recipe is ideal for meal prep as it holds up well in the refrigerator. Store leftovers in airtight glass containers to maintain the freshness of the vegetables.

    The dish remains high quality for up to three days when refrigerated. Ensure the stir fry has cooled slightly before sealing the lid to prevent excessive condensation.

    When prepping for the week, you can chop all vegetables and whisk the sauce in advance. Store the sauce in a sealed jar and the chopped veggies in a reusable bag.

    Avoid freezing this stir fry if you want to maintain the crunch of the water chestnuts and snow peas. Freezing and thawing often makes these specific vegetables soft and rubbery.

    Reheating Best Practices

    The best way to reheat this stir fry is in a skillet over medium heat. Add one tablespoon of water or chicken broth to the pan to loosen the thickened sauce.

    Stir frequently for 3-5 minutes until the meat is heated through and the sauce returns to a glossy consistency. This method prevents the chicken from drying out.

    If using a microwave, place the portion in a microwave-safe dish and cover it with a damp paper towel. Heat in 45-second intervals, stirring in between to distribute the heat evenly.

    Avoid overcooking during the reheating process. Overheating can cause the vegetables to lose their color and the sauce to separate.

    Cooking Troubleshooting

    If the sauce becomes too thick after adding the slurry, stir in a teaspoon of water or coconut aminos. This will thin the sauce back to a pourable consistency.

    If the meat sticks to the pan, ensure your pan is sufficiently preheated before adding the chicken. Using a high-quality nonstick spray or a small amount of neutral oil helps prevent sticking.

    If the broccoli remains too hard, increase the microwave pre-softening time to 90 seconds. This ensures the thick stems are tender by the time the meat is finished.

    If the dish tastes too salty, add a squeeze of fresh lime juice or an extra teaspoon of maple syrup. The acidity or sweetness will balance the sodium levels of the coconut aminos.

    Essential Kitchen Tools

    A large nonstick skillet or a wok is the best tool for this recipe. A wok’s high walls allow you to toss ingredients quickly without spilling them over the sides.

    A sturdy spatula or wooden spoon is necessary for breaking up the ground chicken and stirring in the vegetables. A silicone spatula is excellent for scraping the sauce from the edges of the pan.

    Using a jar for the sauce preparation is more efficient than a bowl. The lid allows you to shake the ingredients vigorously, ensuring the maple syrup and sesame oil are fully emulsified.

    A sharp chef’s knife and a stable cutting board are essential for prepping the broccoli and green onions. Consistent chopping sizes ensure that everything cooks at the same rate.

    Maximizing Nutrient Density

    This dish is naturally rich in vitamins A, C, and K thanks to the broccoli, carrots, and snow peas. The coconut aminos provide essential minerals while keeping the sodium lower than soy sauce.

    Using lean ground chicken keeps the saturated fat low while providing a significant amount of protein. This makes it an excellent post-workout meal or a heart-healthy dinner.

    To increase the omega-3 content, garnish the final dish with toasted sesame seeds or a sprinkle of hemp hearts. These add a subtle nuttiness and healthy fats.

    The inclusion of ginger and garlic adds anti-inflammatory properties to the meal. Using fresh garlic cloves instead of powdered garlic provides a more potent flavor and health benefit.

    Print
    clock clock iconcutlery cutlery iconflag flag iconfolder folder iconinstagram instagram iconpinterest pinterest iconfacebook facebook iconprint print iconsquares squares iconheart heart iconheart solid heart solid icon
    Healthy Ground Chicken Stir Fry

    Healthy Ground Chicken Stir Fry


    5 Stars 4 Stars 3 Stars 2 Stars 1 Star

    No reviews

    • Author: imageuploader
    • Total Time: 20 minutes
    • Yield: 4 servings 1x
    • Diet: Gluten-free, Dairy-free

    Description

    Healthy weeknight dinners don’t have to be boring. With its savory sauce, crisp vegetables and tender ground chicken, this Ground Chicken Stir Fry proves it. This delicious dish is low calorie, low fat, high protein and ready in no time.


    Ingredients

    Scale
    • 1 lbs. ground chicken (96/4)
    • 1/2 cup shredded carrots
    • 1/2 head broccoli, chopped (115g)
    • 3 oz. snow peas
    • 8 oz. whole water chestnuts (sliced)
    • 2 green onion (chopped)
    • salt and pepper (to taste)
    • 1/3 + 1/4 cup coconut aminos
    • 1 tbsp. lite maple syrup
    • 1 tsp. sesame oil
    • 1/2 tsp. chili garlic sauce
    • 2 garlic cloves (minced)
    • 1/4 tsp. ground ginger
    • 1/2 tsp. tapioca flour
    • 1/2 tsp. water

    Instructions

    1. Step: Spray a pan over medium heat with nonstick spray. Add the raw chicken and brown. Break into bite size pieces.
    2. Step: While the meat is browning prep your stir fry sauce. Add the coconut aminos (yes, 1/3 cup + 1/4 cup), maple syrup, sesame oil, chili garlic auce, garlic and ginger to a jar with a lid and shake to combine.
    3. Step: Chop the broccoli into bite size pieces and add to a shallow bowl. Add just enough water to cover the bottom of the bowl and place in the microwave for 60 seconds to soften.
    4. Step: Once the meat has browned add the shredded carrots and broccoli to the pan. Stir and sauté on medium heat for 3-5 minutes.
    5. Step: Add the stir fry sauce, sliced water chestnuts, chopped green onions and snow peas to the pan. Stir together to get everything evenly combined and bring to a steady simmer. Simmer for 5 minutes.
    6. Step: Move the meat and vegetables to the side of the pan. Mix 1/2 tsp. of tapioca flour with 1/2 tsp. water in a small bowl and add to the sauce, separate from the meat and veggies. Stir the tapioca slurry in and you will immediately see the sauce begin to thicken. Mix together to evenly coat.
    7. Step: Top with extra chopped green onions, toasted sesame seeds and / or red pepper flakes. Serve alone, over rice or cauliflower rice or zoodles.

    Notes

    All nutrition facts are an estimate. Use any type of ground meat (excluding pork). Empty the fridge with whatever veggies you have ready to go bad.

    • Prep Time: 10 minutes
    • Cook Time: 10 minutes
    • Category: Main Course
    • Method: Stir-fry
    • Cuisine: American, Chinese

    Nutrition

    • Serving Size: 200 g
    • Calories: 227 kcal
    • Sugar: 10 g
    • Sodium: 858 mg
    • Fat: 6 g
    • Saturated Fat: 1.5 g
    • Unsaturated Fat: 4.5 g
    • Trans Fat: 0 g
    • Carbohydrates: 16 g
    • Fiber: 2 g
    • Protein: 25 g
    • Cholesterol: 75 mg
  • Cottage Cheese Banana Oatmeal Breakfast Bake

    Cottage Cheese Banana Oatmeal Breakfast Bake

    This protein-packed oatmeal bake is a convenient option for make-ahead breakfasts. It combines ripe bananas and cottage cheese for a moist, custard-like texture that stays fresh for several days.

    Recipe image

    List of ingredients

    • 1 cup cottage cheese – provides creaminess and a protein boost.
    • 2 ripe bananas, mashed – adds natural sweetness and moisture.
    • 2 cups rolled oats – creates a hearty and filling base.
    • 2 large eggs – serves as the binder for the mixture.
    • 1/4 cup honey – provides a gentle, natural sweetness.
    • 1 teaspoon vanilla extract – adds warmth and depth of flavor.
    • 1 teaspoon baking powder – helps the bake achieve a light lift.

    step-by-step instructions

    1. Prepare Oven: Preheat the oven to 350°F and grease a baking dish thoroughly to prevent sticking.
    2. Mix Wet Ingredients: In a large bowl, whisk together the eggs, honey, vanilla, and cottage cheese until the texture is creamy and smooth.
    3. Add Bananas: Stir in the mashed bananas until they are fully integrated into the wet mixture.
    4. Combine Dry Ingredients: Gently fold in the rolled oats and baking powder, stirring just until evenly distributed.
    5. Transfer to Pan: Pour the batter into the prepared baking dish and use a spatula to level the surface for even cooking.
    6. Bake: Place in the oven for 35 to 40 minutes until the center is set and the top is lightly golden brown.
    7. Cool and Slice: Remove from the oven and allow the bake to cool slightly before slicing into portions.

    Flavor and Texture Analysis

    The interplay of rolled oats and cottage cheese creates a distinct mouthfeel. The oats provide a chewy, hearty structure, while the cottage cheese breaks down during the baking process.

    This reaction results in a creamy, custard-like interior that differs from traditional baked oatmeal. The bananas melt into the batter, contributing both sweetness and a moist crumb that prevents the dish from feeling dry.

    The final result is a balanced flavor profile where the tanginess of the cheese is muted by the honey and vanilla. Each slice feels substantial and satisfying, making it an ideal meal for long mornings.

    Detailed Ingredient Selection

    Ripe bananas are essential for the success of this recipe. Bananas with brown spots contain higher levels of natural sugars and are significantly easier to mash into a smooth paste.

    This ensures the bake is naturally sweet without requiring excessive amounts of added honey. If using under-ripe bananas, the flavor will be less sweet and the texture may be slightly firmer.

    For the cottage cheese, full-fat versions provide the most richness and a superior creamy texture. If you prefer a completely smooth bake without visible curds, blend the cottage cheese in a food processor before adding it to the eggs.

    Recommended Oat Varieties

    Rolled oats are the recommended choice for this breakfast bake. They maintain their shape better than quick oats, which can make the final bake too soft or mushy.

    Steel-cut oats are not suitable for this specific recipe. They are too dense and will not soften sufficiently during the 40-minute bake time, resulting in a gritty texture.

    Using old-fashioned rolled oats ensures that the bake holds together in clean slices while still offering a satisfying chew in every bite.

    Customizable Mix-ins and Flavor Variations

    You can customize the flavor profile by adding a variety of pantry staples to the batter. For added warmth, stir in half a teaspoon of ground cinnamon or nutmeg.

    For a crunchier texture, fold in chopped walnuts, pecans, or slivered almonds. If you prefer a sweeter treat, dark chocolate chips or dried cranberries are excellent additions.

    Chia seeds and flaxseeds can be incorporated to increase the omega-3 fatty acids and fiber content. A swirl of peanut butter or almond butter through the batter adds depth and additional protein.

    For a fruit-forward variation, place thinly sliced banana coins on top of the batter before baking. This creates a caramelized topping that enhances the visual appeal and taste.

    Expert Baking Tips for Best Results

    Accuracy in oven temperature is critical for the correct set. Use an oven thermometer to ensure the internal temperature is exactly 350°F.

    Grease the baking dish thoroughly with butter or a high-quality non-stick spray. This ensures that the edges do not stick and allows for clean, professional-looking slices.

    If the top of the bake browns too quickly before the center has set, cover the dish loosely with aluminum foil for the remaining bake time.

    Let the bake rest for at least 10 to 15 minutes after removing it from the oven. This resting period allows the internal structure to firm up, making it much easier to cut into squares without them falling apart.

    Serving and Presentation Ideas

    This bake is versatile and can be served in several ways depending on your preference. For a classic experience, top each warm slice with a light drizzle of honey or maple syrup.

    A dollop of Greek yogurt adds a tangy contrast to the sweet bananas and adds an extra layer of protein. Fresh berries, such as blueberries, raspberries, or sliced strawberries, provide a burst of acidity.

    For those needing more sustained energy, a spread of almond or cashew butter on top of a warm slice is a great addition. It also pairs well with a side of fresh melon or citrus segments.

    Storage and Preservation Guidelines

    Proper storage is key to preserving the moisture and texture of the bake. Store leftover slices in an airtight container in the refrigerator immediately after they have cooled.

    The bake will remain fresh and safe to eat for up to five days when refrigerated. The texture stays soft, and the flavors often meld further over time.

    For long-term storage, wrap individual portions tightly in parchment paper and place them in a freezer-safe bag. Frozen slices can be kept for several weeks without losing quality.

    Effective Reheating Techniques

    Reheating should be done gently to avoid drying out the edges of the oats. For microwave reheating, place a slice on a microwave-safe plate and heat for 30 to 45 seconds.

    For oven reheating, place slices on a baking sheet and warm at 300°F for approximately 10 minutes. This method better preserves the slight crust on the top.

    If reheating from the freezer, it is best to thaw the slice in the refrigerator overnight before applying heat. This ensures the center warms through evenly without the edges becoming hard.

    Common Troubleshooting Solutions

    If the center of the bake remains too soft or jiggly, it may need an additional 5 to 7 minutes in the oven. Ensure the center is stable when the pan is lightly shaken.

    If the bake turns out too dry, check that you used very ripe bananas and did not exceed the maximum baking time. Overbaking is the primary cause of dryness in oatmeal bakes.

    If the cottage cheese curds are too prominent for your liking, the solution is to blend the cheese into a smooth cream before mixing it with the other wet ingredients.

    Frequently Asked Questions

    Many users ask if quick oats can be used as a substitute. While possible, the result will be a much softer, denser texture that lacks the structure of rolled oats.

    Regarding dairy-free options, you can use a plant-based cottage cheese alternative that is designed for baking. Ensure it has a similar moisture content to maintain the custard texture.

    The bake is designed to be gently sweet. If you prefer a more dessert-like flavor, you can increase the honey by one tablespoon or add a handful of raisins to the batter.

    Doubling the recipe is simple; use a larger baking dish and monitor the bake time. You may need to add 5 to 10 minutes to the timer depending on the depth of the batter.

    Nutritional Balance and Energy

    This recipe balances three primary macronutrients to provide sustained energy throughout the morning. The cottage cheese and eggs provide high-quality protein, which aids in satiety.

    Rolled oats offer complex carbohydrates and soluble fiber, which slow the digestion of sugars and prevent energy crashes. The natural sugars from bananas and honey provide an immediate energy boost.

    This combination prevents the blood sugar spikes often associated with processed breakfast cereals or pastries, making it a stable fuel source for a busy workday.

    Baking Pan Selection Guide

    The choice of baking dish affects both the cooking time and the final texture. A ceramic or stoneware dish distributes heat evenly, resulting in a consistent bake throughout.

    Glass dishes are also effective but may take slightly longer to reach the target temperature. Metal pans conduct heat more rapidly, which can lead to browned edges more quickly.

    An 8×8 inch or 9×9 inch square pan is generally ideal for this quantity of batter. Using a pan that is too large will result in a thinner bake that may dry out faster.

    Print
    clock clock iconcutlery cutlery iconflag flag iconfolder folder iconinstagram instagram iconpinterest pinterest iconfacebook facebook iconprint print iconsquares squares iconheart heart iconheart solid heart solid icon
    Cottage Cheese Banana Oatmeal Breakfast Bake

    Cottage Cheese Banana Oatmeal Breakfast Bake


    5 Stars 4 Stars 3 Stars 2 Stars 1 Star

    No reviews

    • Author: imageuploader
    • Total Time: 50 minutes
    • Yield: 6 servings 1x
    • Diet: General

    Description

    Cottage Cheese Banana Oatmeal Breakfast Bake is a warm, filling make-ahead breakfast that blends creamy cottage cheese, ripe bananas, and hearty oats into soft, sliceable squares. Naturally sweet and protein-rich, it’s perfect for cozy mornings and busy weeks alike.


    Ingredients

    Scale
    • 1 cup cottage cheese
    • 2 ripe bananas, mashed
    • 2 cups rolled oats
    • 2 large eggs
    • 1/4 cup honey
    • 1 teaspoon vanilla extract
    • 1 teaspoon baking powder

    Instructions

    1. Step: Preheat oven to 350°F and grease a baking dish.
    2. Step: Whisk eggs, honey, vanilla, and cottage cheese until creamy.
    3. Step: Stir in mashed bananas until smooth.
    4. Step: Fold in oats and baking powder gently.
    5. Step: Pour into baking dish and level the surface.
    6. Step: Bake 35–40 minutes until set and lightly golden.
    7. Step: Cool slightly before slicing and serving.

    Notes

    Use very ripe bananas for best sweetness. Full-fat cottage cheese gives the creamiest texture. Blend cottage cheese if you prefer a smoother bake. Let rest before slicing so it sets properly. Stores well for meal prep.

    • Prep Time: 10 minutes
    • Cook Time: 40 minutes
    • Category: Breakfast
    • Method: Baking
    • Cuisine: American

    Nutrition

    • Serving Size: 1 slice
    • Calories: 230 kcal
    • Sugar: 12 g
    • Sodium: 220 mg
    • Fat: 6 g
    • Saturated Fat: 2 g
    • Unsaturated Fat: 4 g
    • Trans Fat: 0 g
    • Carbohydrates: 34 g
    • Fiber: 4 g
    • Protein: 11 g
    • Cholesterol: 70 mg
  • High-Protein Cottage Cheese Flatbread Recipe

    High-Protein Cottage Cheese Flatbread Recipe

    This high-protein cottage cheese flatbread is a quick and nutritious alternative to traditional wraps or bread. It is easy to prepare and serves as a versatile base for both breakfast and dinner meals.

    Recipe image

    List of ingredients

    • 1 cup cottage cheese – provides the primary protein source and a creamy base.
    • 1 cup all-purpose flour – creates the necessary structure and chew.
    • 1 large egg – acts as a binder and adds richness to the dough.
    • 1 teaspoon baking powder – provides leavening for a fluffier texture.
    • 1/2 teaspoon salt – enhances all the other flavors in the batter.
    • 1 tablespoon olive oil – used for frying to ensure a golden finish.

    step-by-step instructions

    1. Combine Ingredients: In a mixing bowl, mix the cottage cheese, flour, egg, baking powder, and salt until the batter is fully combined.
    2. Prepare the Pan: Heat a non-stick skillet over medium heat and add a small amount of olive oil to coat the surface.
    3. Cook First Side: Pour a ladle of the batter onto the skillet and cook until bubbles begin to form on the surface.
    4. Flip and Brown: Flip the flatbread and cook for another minute until the other side is golden brown.
    5. Finish Batch: Repeat the process with the remaining batter until all flatbreads are completed.

    Ingredient Functional Breakdown

    Cottage cheese is the core of this recipe, offering a significant amount of protein and moisture. Using a small-curd variety typically results in a smoother batter, whereas large-curd cottage cheese adds more texture to the final flatbread.

    All-purpose flour provides the gluten structure required to keep the flatbread from falling apart. It balances the moisture of the cheese and egg to create a dough that is pourable yet thick enough to hold its shape.

    The egg serves two purposes: it binds the wet and dry ingredients and contributes additional protein. It also helps the flatbread achieve a richer, more golden color during the searing process.

    Baking powder is the leavening agent that creates small air pockets. This prevents the flatbread from becoming too dense or rubbery, giving it a slightly fluffy interior.

    Customizing Your Flatbread Batter

    For a savory profile, you can mix dried herbs directly into the batter. Dried oregano, basil, or thyme add an aromatic quality that pairs well with savory toppings like pesto or roasted vegetables.

    Adding finely chopped fresh spinach or minced bell peppers to the batter is another way to increase the nutrient density. Ensure the vegetables are finely diced so they do not disrupt the structural integrity of the flatbread.

    To create a sweet version, replace the salt with a pinch of cinnamon. You can also stir in a teaspoon of vanilla extract or a small amount of honey to the batter before cooking.

    Seeds such as chia, flax, or sesame can be folded into the mixture. These additions provide a slight crunch and increase the omega-3 fatty acid content of the snack.

    Optimizing Pan Temperature

    Maintaining a consistent medium heat is critical for the perfect texture. If the pan is too hot, the exterior will burn before the interior is fully cooked, leading to a raw center.

    If the heat is too low, the flatbread will absorb too much oil and fail to develop the characteristic bubbles on the surface. These bubbles are the signal that the bottom is set and ready to be flipped.

    Using a non-stick skillet is highly recommended to prevent the batter from clinging to the pan. If using stainless steel, ensure the oil is shimmering before pouring the batter to create a natural non-stick barrier.

    Avoid overcrowding the pan. Cooking the flatbreads one by one or in small batches ensures that the pan temperature does not drop significantly, which preserves the searing quality.

    Savory Topping Pairings

    A Mediterranean approach involves spreading a layer of hummus or tzatziki over the warm flatbread. Top this with sliced cucumbers, halved cherry tomatoes, and a sprinkle of feta cheese for a fresh meal.

    For a more filling lunch, use the flatbread as a pizza base. Add a thin layer of tomato sauce and microbial-rennet mozzarella, then broil in the oven for two minutes until the cheese melts.

    Avocado toast style is another great option. Mash a ripe avocado with lemon juice and salt, spread it on the flatbread, and top it with a poached egg or sliced radishes.

    For a protein-heavy dinner, top the flatbread with grilled chicken strips, sliced red onions, and a drizzle of tahini or a lemon-garlic dressing.

    Sweet Flavor Combinations

    Nut butters like almond, cashew, or peanut butter provide a rich base for sweet toppings. Spread the butter on a warm flatbread and add sliced bananas or fresh strawberries.

    A drizzle of honey or maple syrup adds a natural sweetness that complements the mild flavor of the cottage cheese. Adding a sprinkle of cinnamon or cocoa powder can further enhance the dessert-like quality.

    Fresh berries such as blueberries or raspberries can be pressed into the flatbread while it is still in the pan. This slightly caramelizes the fruit, creating a built-in topping.

    Greek yogurt can be used as a creamy spread, topped with granola and a few pomegranate seeds for a high-protein breakfast alternative.

    Complementary Meal Pairings

    These flatbreads pair exceptionally well with hearty soups. Use them as a substitute for sourdough or baguette when serving tomato basil soup or a thick lentil stew.

    They also work as a side for large salads. A crisp Caesar or Greek salad is balanced by the soft, protein-rich texture of the warm flatbread.

    For a brunch platter, serve the flatbread alongside smoked salmon, capers, and sliced red onion. The neutrality of the flatbread allows the salty flavors of the fish to stand out.

    In a dinner setting, serve the flatbread as a side to roasted vegetables or a grilled vegetable medley. The protein in the bread makes the meal more satisfying without needing a heavy meat side.

    Cold Storage Guidelines

    Store any unused flatbreads in an airtight container once they have cooled completely. Placing them in the refrigerator will keep them fresh for up to three days.

    To prevent the flatbreads from sticking together in the fridge, place a piece of parchment paper between each layer. This makes it easier to remove individual pieces for reheating.

    Avoid storing them while they are still warm, as this creates steam inside the container. Steam leads to excess moisture, which can make the flatbreads soggy and prone to mold.

    Ensure the container is tightly sealed to prevent the bread from absorbing odors from other refrigerated foods.

    Effective Reheating Methods

    The best way to restore the original texture is to use a skillet. Heat the pan over medium heat with a tiny drop of oil and toast each side for about 30 to 60 seconds.

    A toaster oven or standard oven also works well. Heat them at 350°F (175°C) for 3-5 minutes to regain a slightly crisp exterior while keeping the center soft.

    A microwave can be used for speed, but it may result in a softer, chewier texture. Heat on high for 15-20 seconds, but avoid overcooking as the bread can become rubbery very quickly.

    If reheating from frozen, it is best to let them thaw in the refrigerator overnight before using the skillet method for the best results.

    Batch Prep Strategy

    Since these flatbreads freeze well, preparing a double or triple batch is a time-saving strategy. This allows you to have a high-protein base ready for various meals throughout the week.

    Cool the flatbreads entirely on a wire rack before freezing. This ensures that no surface moisture turns into ice crystals, which could degrade the texture.

    Wrap each flatbread individually in parchment paper or plastic wrap. Place the wrapped pieces in a heavy-duty freezer bag and squeeze out as much air as possible to prevent freezer burn.

    Label the bag with the date of preparation. Most home-frozen flatbreads maintain their quality for up to one month.

    Common Troubleshooting Solutions

    If the batter seems too thin and spreads too much in the pan, stir in one additional tablespoon of flour. The batter should be thick enough to hold a circular shape when poured.

    If the flatbreads are tearing when you flip them, you may be flipping too early. Wait until the edges look set and the bubbles on the surface have popped and stayed open.

    If the result is too dense, check your baking powder. Ensure it is fresh and not expired, as old baking powder loses its ability to lift the batter.

    If the flatbreads are sticking to the pan despite using oil, check your heat. A pan that hasn’t reached the proper temperature will not sear the batter, causing it to stick.

    Nutritional Adjustments

    To increase the fiber content, you can replace half of the all-purpose flour with whole wheat flour or oat flour. This will result in a heartier, nuttier flavor and a denser texture.

    For those looking to reduce calories, low-fat cottage cheese can be used. However, the full-fat version provides a richer taste and a softer crumb.

    To adjust the protein ratio, you can add a tablespoon of nutritional yeast to the batter. This adds a cheesy flavor and a small boost of B vitamins and protein.

    If you prefer a different fat source, coconut oil can be used instead of olive oil. This adds a subtle sweetness and a different type of crispness to the exterior.

    Frequently Asked Questions

    Can I make this recipe gluten-free? Yes, you can substitute the all-purpose flour with a 1:1 gluten-free flour blend. You may need to add an extra tablespoon of flour if the batter is too runny.

    Is this flatbread suitable for meal prep? Yes, these are excellent for meal prep. They can be cooked in advance and stored in the fridge or freezer for quick assembly.

    Why are there bubbles on the surface? The bubbles are caused by the baking powder reacting to heat. They indicate that the bottom is cooked and the structure is set enough to flip.

    Can I use Greek yogurt instead of cottage cheese? While Greek yogurt provides protein, it has a different moisture content. You may need to increase the flour slightly to achieve the correct consistency.

    Print
    clock clock iconcutlery cutlery iconflag flag iconfolder folder iconinstagram instagram iconpinterest pinterest iconfacebook facebook iconprint print iconsquares squares iconheart heart iconheart solid heart solid icon
    High-Protein Cottage Cheese Flatbread Recipe

    High-Protein Cottage Cheese Flatbread Recipe


    5 Stars 4 Stars 3 Stars 2 Stars 1 Star

    No reviews

    • Author: imageuploader
    • Total Time: 25 minutes
    • Yield: 4 flatbreads 1x
    • Diet: High-Protein

    Description

    This Cottage Cheese Flatbread is a high-protein, delicious option that’s perfect for various toppings or as a healthy snack.


    Ingredients

    Scale
    • 1 cup cottage cheese
    • 1 cup all-purpose flour
    • 1 large egg
    • 1 teaspoon baking powder
    • 1/2 teaspoon salt
    • 1 tablespoon olive oil

    Instructions

    1. Step 1: In a bowl, mix cottage cheese, flour, egg, baking powder, and salt until combined.
    2. Step 2: Heat a non-stick skillet over medium heat and add a little olive oil.
    3. Step 3: Pour a ladle of the batter onto the skillet and cook until bubbles form on the surface.
    4. Step 4: Flip and cook for another minute until golden brown.
    5. Step 5: Repeat with remaining batter.

    Notes

    Best served warm. Can be topped with herbs or cheese. Stores well in the refrigerator for up to 3 days.

    • Prep Time: 10 minutes
    • Cook Time: 15 minutes
    • Category: Snacks
    • Method: stovetop
    • Cuisine: American

    Nutrition

    • Serving Size: 1 flatbread
    • Calories: 150 kcal
    • Sugar: 1 g
    • Sodium: 200 mg
    • Fat: 5 g
    • Saturated Fat: 1 g
    • Unsaturated Fat: 4 g
    • Trans Fat: 0 g
    • Carbohydrates: 20 g
    • Fiber: 1 g
    • Protein: 10 g
    • Cholesterol: 20 mg
  • Protein-Packed Cottage Cheese Crustless Quiche

    Protein-Packed Cottage Cheese Crustless Quiche

    This crustless quiche is a nutrient-dense option that replaces traditional pastry with a creamy cottage cheese base. It is an efficient meal for breakfast or dinner and can be easily customized with various vegetables.

    Recipe image

    List of ingredients

    • 6 large eggs – provides the necessary structure and binding.
    • 1 cup whole milk cottage cheese – creates a creamy texture and adds moisture.
    • 1/4 tsp salt – enhances the natural flavors of the eggs and vegetables.
    • 1/4 tsp ground black pepper – adds a mild spicy note to balance the richness.
    • 1/2 cup grated cheese (optional) – use cheddar or mozzarella for additional savory depth.
    • Up to 1 cup choice of vegetables and proteins – recommended options include bell peppers, spinach, mushrooms, or turkey bacon.

    step-by-step instructions

    1. Preheat Oven: Set your oven to 350°F (175°C) to ensure the dish cooks evenly from the edges to the center.
    2. Prepare Baking Dish: Lightly spray a 9-inch baking dish with cooking oil to prevent the eggs from sticking to the sides.
    3. Blend Base: Combine eggs, cottage cheese, salt, and pepper in a blender or food processor. Blend until the mixture is completely smooth and unified.
    4. Incorporate Fillings: Stir in the grated cheese and your selected vegetables and proteins by hand. Ensure ingredients are distributed evenly throughout the batter.
    5. Fill Dish: Pour the mixture into the prepared 9-inch dish, spreading it to the edges with a spatula.
    6. Bake: Bake for approximately 45 minutes. The quiche is done when the edges are golden brown and the center is fully set.
    7. Set and Cool: Remove from the oven and let it rest for a few minutes. This allows the custard to firm up for cleaner slicing.

    Optimizing Vegetable Selection

    Choosing the right vegetables is key to avoiding a watery quiche. Root vegetables like carrots or potatoes should be pre-cooked or thinly sliced to ensure they soften during the 45-minute bake time.

    Leafy greens such as spinach or kale release significant moisture. Sauté these greens first and squeeze out excess water before adding them to the egg mixture to prevent the quiche from becoming soggy.

    Bell peppers, onions, and zucchini work well when diced into small, uniform pieces. This ensures that every slice contains a balanced variety of vegetables and that they cook through simultaneously.

    Mushrooms contain a high percentage of water. Sautéing them in a pan until the liquid evaporates prevents them from leaking moisture into the egg custard during baking.

    Cheese Pairing Guide

    While grated cheddar is a classic choice, other cheeses can alter the flavor profile. Sharp cheddar provides a bold, salty taste that cuts through the creaminess of the cottage cheese.

    Mozzarella is ideal for those who prefer a milder flavor and a slightly stretchier texture. It pairs particularly well with tomato and basil vegetable combinations.

    Feta or goat cheese adds a tangy, salty dimension to the dish. If using these, reduce the added salt in the recipe to account for the naturally high sodium content of these cheeses.

    Swiss or Gruyere offers a nutty aroma and a sophisticated taste. These are excellent pairings if you are using mushrooms or smoked turkey as your protein source.

    Protein Substitution Options

    To keep this recipe protein-rich, consider using diced smoked turkey or turkey bacon. These alternatives provide a savory, smoky flavor without using pork products.

    Cooked chicken breast, diced into small cubes, adds substantial heartiness. Season the chicken with paprika or garlic powder before adding it to the mix for extra flavor.

    For a vegetarian version, omit the meat and increase the amount of vegetables. Adding extra chickpeas or diced tofu can provide a similar protein boost to the dish.

    Ensure all proteins are fully cooked before adding them to the egg mixture. The baking time for the quiche is intended to set the eggs, not to cook raw meats through.

    Mastering Texture and Consistency

    The use of a blender is the most effective way to achieve a professional, custard-like texture. Blending the cottage cheese removes the curds, resulting in a smooth, homogenous base.

    If you prefer a chunkier, more rustic texture, you can whisk the ingredients by hand. However, the final result will be less like a traditional quiche and more like a baked frittata.

    To avoid overcooking, use the jiggle test. Gently shake the pan; the edges should be firm, but the very center should have a slight, slow wobble.

    Avoid opening the oven door too frequently. This allows heat to escape and can lead to an uneven rise or a longer cooking time than the recommended 45 minutes.

    Serving and Presentation Ideas

    Garnish the sliced quiche with fresh herbs like chopped parsley, chives, or dill. This adds a pop of color and a fresh contrast to the rich, baked eggs.

    Pair the quiche with a side of fresh greens. A simple arugula salad with a lemon-olive oil vinaigrette provides acidity that balances the creaminess of the cottage cheese.

    For a brunch spread, serve the quiche alongside fresh seasonal berries or sliced melon. The sweetness of the fruit complements the savory notes of the cheese and vegetables.

    To present the dish formally, slice it into eight equal wedges. Place each wedge on a plate and drizzle a small amount of extra virgin olive oil over the top for a polished look.

    Storage and Shelf Life

    Store leftover quiche in an airtight glass or plastic container. This prevents the eggs from absorbing other odors in the refrigerator and keeps the edges from drying out.

    Refrigerated quiche remains fresh and safe to eat for up to three days. Ensure the dish is cooled completely before sealing the lid to avoid condensation buildup.

    If you notice moisture forming on the surface of the quiche in the fridge, gently pat it dry with a paper towel before reheating to maintain the texture.

    Avoid leaving the quiche at room temperature for more than two hours. Because of the dairy and egg content, it is highly perishable and requires consistent refrigeration.

    Freezing and Thawing Instructions

    This crustless quiche freezes exceptionally well. Wrap individual slices tightly in plastic wrap or parchment paper to prevent freezer burn and sticking.

    Place the wrapped slices into a heavy-duty freezer bag, removing as much air as possible. The quiche will maintain its quality for up to two months in the freezer.

    To thaw, move a slice from the freezer to the refrigerator overnight. This gradual thawing process preserves the structural integrity of the egg custard.

    If you are in a hurry, you can thaw a slice using the defrost setting on a microwave. Avoid thawing at room temperature to ensure food safety.

    Reheating Guidelines

    For the best texture, reheat slices in the oven at 325°F (160°C) for 10 to 15 minutes. This helps the quiche regain its firmness without becoming rubbery.

    When using a microwave, place the slice on a microwave-safe plate and cover it with a damp paper towel. Heat in 30-second intervals to avoid overcooking the eggs.

    Avoid reheating the quiche on high power for long periods. Overheating eggs causes them to release water (syneresis), which makes the quiche weep and become spongy.

    If reheating a large portion in the oven, cover the dish with foil for the first 10 minutes to trap moisture, then remove it to crisp the top.

    Troubleshooting Common Baking Problems

    If the quiche is too soggy, it is likely due to excess moisture in the vegetables. Always sauté water-heavy vegetables like spinach and zucchini before adding them to the batter.

    If the top is browning too quickly but the center is still liquid, lower the oven temperature by 25°F. You can also loosely cover the dish with aluminum foil to protect the surface.

    A rubbery texture is usually a sign of overcooking. Stick to the 45-minute guideline and remove the dish as soon as the center is set but slightly jiggly.

    If the quiche doesn’t slice cleanly, it was likely cut while too hot. Allow the quiche to rest for at least 10 to 15 minutes to allow the proteins to stabilize.

    Meal Prep and Batch Cooking Advice

    For individual portion control, bake the mixture in greased muffin tins instead of a 9-inch dish. These mini-quiches typically bake faster, usually in 20 to 25 minutes.

    You can prepare the blended egg and cottage cheese base a day in advance. Store the base in a sealed jar in the fridge, then stir in your fresh vegetables just before baking.

    When meal prepping for the week, bake two different variations. Use one for a veggie-heavy option and another with turkey protein to keep your meals varied.

    Label your freezer bags with the date and the specific fillings used. This helps in managing your inventory and ensures you use the oldest slices first.

    Print
    clock clock iconcutlery cutlery iconflag flag iconfolder folder iconinstagram instagram iconpinterest pinterest iconfacebook facebook iconprint print iconsquares squares iconheart heart iconheart solid heart solid icon
    Protein-Packed Cottage Cheese Crustless Quiche

    Protein-Packed Cottage Cheese Crustless Quiche


    5 Stars 4 Stars 3 Stars 2 Stars 1 Star

    No reviews

    • Author: imageuploader
    • Total Time: 1 hour
    • Yield: 8 servings 1x
    • Diet: Low Calorie

    Description

    This Cottage Cheese Crustless Quiche is a protein-packed, low-carb dish perfect for breakfast, brunch, or a light dinner. Featuring a smooth blend of eggs and cottage cheese, combined with your choice of vegetables and proteins, this quiche offers a creamy texture without the added calories of a crust.


    Ingredients

    Scale
    • 6 large eggs
    • 1 cup whole milk cottage cheese
    • 1/4 tsp salt
    • 1/4 tsp ground black pepper
    • 1/2 cup grated cheese (optional)
    • Up to 1 cup choice of vegetables and proteins (bell peppers, spinach, mushrooms, turkey bacon, or turkey ham)

    Instructions

    1. Step: Preheat your oven to 350°F (175°C) to ensure it is at the right temperature for baking the quiche evenly.
    2. Step: Spray a 9-inch baking dish with oil to prevent sticking and make for easy cleanup.
    3. Step: In a blender or food processor, combine the eggs, cottage cheese, salt, and pepper. Blend until smooth and creamy to create the quiche base.
    4. Step: Stir in the grated cheese and your selected vegetables and proteins. Mix thoroughly to ensure an even distribution of flavors and ingredients.
    5. Step: Pour the blended mixture into the prepared baking dish, spreading it evenly.
    6. Step: Bake in the preheated oven for about 45 minutes, or until the center is fully set and the edges turn golden brown, indicating it is cooked through.
    7. Step: Remove from the oven and allow the quiche to cool slightly before slicing. This helps it to set further and makes serving easier.

    Notes

    You can customize your quiche with any vegetables or proteins you prefer, such as onions, tomatoes, or cooked turkey sausage. For a lower-fat version, use low-fat or non-fat cottage cheese and omit the grated cheese. This quiche can be prepared a day in advance and reheated in the oven or microwave for convenience.

    • Prep Time: 15 minutes
    • Cook Time: 45 minutes
    • Category: Breakfast
    • Method: Baking
    • Cuisine: American

    Nutrition

    • Serving Size: 1 slice
    • Calories: 140 kcal
    • Sugar: 3 g
    • Sodium: 350 mg
    • Fat: 8 g
    • Saturated Fat: 3 g
    • Unsaturated Fat: 5 g
    • Trans Fat: 0 g
    • Carbohydrates: 4 g
    • Fiber: 1 g
    • Protein: 11 g
    • Cholesterol: 90 mg
  • Creamy Spinach and Chicken Bake with Mozzarella

    Creamy Spinach and Chicken Bake with Mozzarella

    This hearty chicken and spinach casserole is a creamy, satisfying meal perfect for busy weeknights. It combines tender shredded chicken and fresh greens in a rich cheese sauce for a comforting dinner.

    Recipe image

    List of ingredients

    • 2 cups cooked chicken, shredded – use rotisserie for convenience.
    • 2 cups fresh spinach, chopped – baby spinach works best.
    • 8 oz cream cheese, softened – ensures a smooth sauce.
    • 1 cup mozzarella cheese, shredded – use microbial-rennet cheese for a great melt.
    • 1/2 cup sour cream – adds a subtle tang.
    • 1/2 cup chicken broth – thins the sauce to a creamy consistency.
    • 1 teaspoon garlic powder – for a warm, aromatic flavor.
    • 1/2 teaspoon onion powder – adds savory depth.
    • Salt and pepper – adjust to your personal taste.
    • 1/2 cup breadcrumbs – optional for a crunchy topping.
    • 1 tablespoon olive oil – used for sautéing the spinach.

    step-by-step instructions

    1. Prep the oven: Preheat your oven to 350°F (175°C) to ensure it is hot before the dish goes in.
    2. Sauté the spinach: Heat olive oil in a large skillet over medium heat. Add the chopped spinach and cook for 2-3 minutes until wilted, then remove from heat and set aside.
    3. Mix the sauce: In a mixing bowl, combine the softened cream cheese, sour cream, chicken broth, garlic powder, onion powder, salt, and pepper. Stir until the mixture is completely smooth.
    4. Combine ingredients: Stir the shredded chicken and sautéed spinach into the cream cheese mixture until everything is evenly distributed.
    5. Transfer to pan: Pour the mixture into a 9×13 inch baking dish and spread it evenly with a spatula.
    6. Add toppings: Sprinkle the shredded mozzarella cheese over the top. If you prefer a crunchy texture, sprinkle breadcrumbs over the cheese.
    7. Bake: Place the dish in the oven and bake for 25-30 minutes. The casserole is ready when the cheese is melted and bubbling.
    8. Rest and serve: Remove from the oven and let the casserole cool for a few minutes to allow the sauce to set before serving.

    Choosing the Best Protein

    While this recipe calls for cooked shredded chicken, the type of chicken you use can change the flavor profile. Rotisserie chicken is a popular choice because it is pre-seasoned and saves significant preparation time.

    For a leaner option, you can poach chicken breasts in simmering water or vegetable broth. Simply simmer the breasts for 12-15 minutes until the internal temperature reaches 165°F, then shred with two forks.

    If you prefer a deeper flavor, oven-roasted chicken breasts are an excellent alternative. Roast them at 400°F until cooked through, let them rest for ten minutes, and then shred them for the casserole.

    Working with Spinach

    Fresh spinach is preferred for its bright color and mild taste. Sautéing the spinach before adding it to the mix is a critical step to remove excess moisture, which prevents the casserole from becoming watery.

    If you only have frozen spinach, you can still achieve great results. Thaw the spinach completely and place it in a clean kitchen towel or a fine-mesh sieve.

    Squeeze the frozen spinach firmly to remove as much water as possible. This ensures the cream cheese base remains thick and creamy rather than separating during the baking process.

    Mastering the Cheese Base

    The creaminess of this dish depends on the state of the cream cheese. Make sure the cream cheese is fully softened to room temperature before mixing to avoid lumps in your sauce.

    Mozzarella provides the characteristic gooey pull. Using a high-quality mozzarella made with microbial rennet ensures a consistent melt and a mild, buttery taste that complements the chicken.

    For those who want a more complex flavor, consider adding a small amount of grated Parmesan or Pecorino Romano. This adds a salty, sharp note that balances the richness of the cream cheese and sour cream.

    Vegetable Customizations

    You can easily boost the nutritional value of this casserole by adding more vegetables. Diced bell peppers, sliced mushrooms, or frozen peas are excellent additions that pair well with chicken and spinach.

    When adding watery vegetables like mushrooms or zucchini, sauté them first to evaporate excess liquid. This prevents the bottom of the casserole from becoming soggy.

    For a seasonal twist, try adding roasted butternut squash in the autumn or diced summer squash in the summer. These additions add a subtle sweetness and a variety of textures to every bite.

    Baking Techniques and Timing

    Maintaining a steady oven temperature is key to a perfect bake. If your oven tends to run hot, keep a close eye on the cheese topping to prevent it from burning before the center is heated.

    If you notice the cheese browning too quickly, loosely cover the baking dish with a sheet of aluminum foil. This protects the top while allowing the heat to penetrate the center of the casserole.

    The visual cue for doneness is the presence of bubbles around the edges of the pan. A slight jiggle in the center is normal, as the sauce will firm up slightly as it cools.

    Recommended Side Dishes

    Because this casserole is rich and creamy, it pairs best with sides that offer a fresh or acidic contrast. A crisp green salad with a lemon vinaigrette is an ideal choice to cleanse the palate.

    For those seeking a more filling meal, serve the casserole alongside garlic bread or toasted sourdough. The bread is perfect for scooping up any remaining cheese sauce from the plate.

    Another great option is a side of steamed grains, such as brown rice or quinoa. This adds a nutty flavor and extra fiber, making the meal more balanced and satisfying.

    Storage and Preservation

    Leftovers can be stored in the refrigerator for three to four days. Allow the casserole to cool to room temperature for about 20 minutes before covering it tightly with plastic wrap or foil.

    Using an airtight container is essential to prevent the chicken from drying out and to stop the dish from absorbing other odors from the fridge.

    Avoid freezing this casserole, as the cream cheese and sour cream can separate and change texture during the thawing process, leading to a grainy sauce.

    Reheating Methods

    To maintain the best texture, reheat the casserole in the oven. Place the dish in a cold oven and set it to 350°F, heating slowly for 15-20 minutes until the cheese bubbles again.

    For individual portions, a toaster oven is a convenient choice. Heat a slice under medium heat for about 10 minutes until the top is toasted and the center is hot.

    If using a microwave, transfer a portion to a microwave-safe bowl. Heat on medium power in 30-second bursts, stirring between each interval to prevent the cheese from becoming rubbery.

    Preparation in Advance

    This meal is excellent for make-ahead planning. You can assemble the entire casserole, including the cheese topping, and store it in the refrigerator for up to 24 hours before baking.

    When baking a chilled casserole, you will likely need to increase the cooking time by 5-10 minutes. Ensure the center reaches an internal temperature of 165°F for food safety.

    If you are adding breadcrumbs, wait to sprinkle them on right before the dish goes into the oven to keep them from softening in the refrigerator.

    Troubleshooting Common Issues

    If your sauce appears too thin or watery, it is usually due to excess moisture in the spinach or chicken. Next time, ensure you squeeze the spinach more thoroughly or pat the shredded chicken dry.

    If the taste is too bland, try adding a squeeze of fresh lemon juice or a pinch more salt after baking. The acidity of the lemon brightens the heavy dairy flavors.

    If the cheese doesn’t brown as expected, you can turn on the broiler for the last 2-3 minutes of cooking. Watch it closely to ensure the cheese caramelizes without burning.

    Common Recipe Questions

    Many people ask if they can substitute the cream cheese. Greek yogurt is a viable alternative for a tangier, slightly lighter version, though the sauce will be less thick.

    For those avoiding certain dairy products, dairy-free cream cheese and vegan mozzarella are available. Be aware that vegan cheeses may have a different melting point and texture compared to traditional dairy.

    If you want to swap the protein, shredded turkey or cubed tofu are great options. Turkey works particularly well with the spinach and cheese, while tofu provides a plant-based protein alternative.

    Print
    clock clock iconcutlery cutlery iconflag flag iconfolder folder iconinstagram instagram iconpinterest pinterest iconfacebook facebook iconprint print iconsquares squares iconheart heart iconheart solid heart solid icon
    Creamy Spinach and Chicken Bake with Mozzarella

    Creamy Spinach and Chicken Bake with Mozzarella


    5 Stars 4 Stars 3 Stars 2 Stars 1 Star

    No reviews

    • Author: imageuploader
    • Total Time: 50 minutes
    • Yield: 4 servings 1x
    • Diet: General

    Description

    A creamy and flavorful casserole combining chicken and spinach, perfect for a hearty meal.


    Ingredients

    Scale
    • 2 cups cooked chicken, shredded
    • 2 cups fresh spinach, chopped
    • 8 oz cream cheese, softened
    • 1 cup mozzarella cheese, shredded
    • 1/2 cup sour cream
    • 1/2 cup chicken broth
    • 1 teaspoon garlic powder
    • 1/2 teaspoon onion powder
    • salt and pepper to taste
    • 1/2 cup breadcrumbs (optional for topping)
    • 1 tablespoon olive oil

    Instructions

    1. Preheat: Preheat your oven to 350°F (175°C).
    2. Sauté: In a large skillet, heat olive oil over medium heat, sauté chopped spinach until wilted (2-3 minutes), then set aside.
    3. Mix: In a mixing bowl, combine softened cream cheese, sour cream, chicken broth, garlic powder, onion powder, salt, and pepper until smooth.
    4. Combine: Stir shredded chicken and sautéed spinach into the cream cheese mixture until well combined.
    5. Assemble: Pour mixture into a 9×13 inch baking dish and spread evenly.
    6. Top: Top with shredded mozzarella cheese and optional breadcrumbs.
    7. Bake: Bake for 25-30 minutes until the cheese is melted and bubbly.
    8. Cool: Remove from oven and let cool for a few minutes before serving.

    Notes

    Feel free to add other vegetables like bell peppers or mushrooms for added flavor. This casserole can be prepared ahead of time and stored in the refrigerator before baking; increase baking time by a few minutes if baking straight from the fridge.

    • Prep Time: 20 minutes
    • Cook Time: 30 minutes
    • Category: Main Course
    • Method: Baking
    • Cuisine: American

    Nutrition

    • Serving Size: 1 serving
    • Calories: 350 kcal
    • Sugar: 4 g
    • Sodium: 680 mg
    • Fat: 22 g
    • Saturated Fat: 12 g
    • Unsaturated Fat: 10 g
    • Trans Fat: 0 g
    • Carbohydrates: 15 g
    • Fiber: 2 g
    • Protein: 25 g
    • Cholesterol: 95 mg
  • Egg-Free Cinnamon Roll Breakfast Casserole

    Egg-Free Cinnamon Roll Breakfast Casserole

    This egg-free cinnamon roll casserole is a creamy and sweet breakfast option perfect for brunch gatherings. It utilizes refrigerated dough and a rich cream cheese topping to create a gooey, decadent treat.

    Recipe image

    List of ingredients

    • 2 cans (17.5 ounces each) Pillsbury refrigerated cinnamon rolls with icing – the main base for the bake.
    • 1 package (8 ounces) cream cheese – softened to room temperature for smooth mixing.
    • 2 tablespoons sugar – adds sweetness to the cream cheese layer.
    • 1 tablespoon milk – helps achieve a spreadable topping consistency.
    • 1 tablespoon maple syrup – adds a depth of maple flavor to the cream.

    step-by-step instructions

    1. Prepare the dough: Open both cans of cinnamon rolls and separate the dough into 16 individual rolls. Cut each cinnamon roll into four equal pieces.
    2. Arrange in pan: Spray a 9×12 inch casserole dish with non-stick baking spray. Layer all the cut cinnamon roll pieces evenly across the bottom of the dish.
    3. Mix the topping: Using a mixer with the paddle attachment, beat the softened cream cheese, sugar, milk, and maple syrup until the mixture is completely smooth.
    4. Apply topping: Spread the cream cheese mixture over the top of the arranged cinnamon roll pieces.
    5. Bake: Place the dish in a preheated oven at 375 degrees Fahrenheit. Bake for 20 to 24 minutes.
    6. Adjust halfway: About halfway through the baking process, remove the casserole from the oven. Use the back of a spoon to spread the cream cheese mixture evenly over the rolls to ensure full coverage.
    7. Cool: Remove the casserole from the oven and let it cool for several minutes.
    8. Prepare the glaze: Place the icing from both cans into a microwavable measuring cup. Heat in 15-second intervals, stirring in between, until the icing is pourable. Avoid overheating to prevent the icing from becoming too liquid.
    9. Finish and serve: Pour the warm icing over the casserole and serve immediately.

    Optimizing Cream Cheese Consistency

    To achieve a perfectly smooth topping, ensure the cream cheese is truly at room temperature. If the cream cheese is too cold, the mixture will remain lumpy regardless of how long you beat it.

    If you are short on time, you can microwave the cream cheese for 10 to 15 seconds on a low setting. Be careful not to melt it completely, as it should remain thick enough to hold its shape.

    Using a paddle attachment on a stand mixer is ideal for this recipe. The paddle pushes the ingredients against the sides of the bowl, which incorporates the sugar and maple syrup more efficiently than a whisk.

    If the mixture seems too thick to spread, add an extra teaspoon of milk. This will loosen the texture without significantly altering the flavor profile of the cream cheese layer.

    Selecting the Right Bakeware

    A 9×12 inch baking dish is recommended to provide the correct surface area for the rolls. This ensures that the pieces are not stacked too deeply, which allows them to bake evenly.

    Glass or ceramic dishes are excellent for this recipe because they distribute heat evenly. However, be mindful that these materials retain heat longer than metal, which may continue the cooking process after the dish is removed from the oven.

    Always use a high-quality non-stick baking spray. This prevents the sugar in the cinnamon rolls from caramelizing and sticking to the sides of the pan, making serving and cleanup much easier.

    If you only have a 9×13 inch pan, the recipe will still work. The rolls may spread slightly more, but the baking time should remain roughly the same.

    Mastering the Icing Technique

    The icing provided with refrigerated rolls is thick and can be difficult to spread over a large casserole. Microwaving it is the most effective way to achieve a professional, pourable glaze.

    Heat the icing in very short bursts. Overheating can cause the fats in the icing to separate, resulting in a greasy appearance or a thin, watery consistency that soaks into the rolls too quickly.

    Stir the icing after every 15-second interval. This ensures the heat is distributed evenly and prevents hot spots from forming in the center of the measuring cup.

    For a cleaner look, use a spoon to drizzle the icing in a zig-zag pattern across the top. This prevents the glaze from pooling in any low spots of the casserole.

    Suggested Ingredient Variations

    While the base recipe is delicious, you can customize it with additional mix-ins. Chopped pecans or walnuts added between the dough layers provide a pleasant crunch.

    For a fruitier version, thinly sliced Granny Smith apples can be layered with the dough. The tartness of the apple balances the sweetness of the maple syrup and icing.

    Chocolate chips can be sprinkled on top of the dough before adding the cream cheese mixture. This creates a chocolate-cinnamon flavor profile that is popular for special occasions.

    If you prefer a different flavor of syrup, honey or agave can be used as a substitute for maple syrup. Keep in mind that this will slightly change the overall flavor profile of the topping.

    Storage and Refrigeration Guide

    Leftovers should be allowed to cool completely to room temperature before storage. This prevents steam from trapping inside the container, which can make the rolls soggy.

    Place the remaining casserole in an airtight container or wrap the baking dish tightly with plastic wrap. Store the dish in the refrigerator for up to four days.

    Because of the cream cheese and milk content, this dish must be refrigerated. Leaving it at room temperature for more than two hours can compromise the safety of the dairy ingredients.

    When storing, keep the icing on the casserole. This helps preserve the moisture of the rolls and prevents the edges from drying out in the fridge.

    Reheating Instructions for Best Results

    To maintain the texture of the rolls, avoid reheating the casserole in the microwave on high power for long periods. This can make the dough rubbery.

    The best method is to use a conventional oven. Preheat the oven to 325 degrees Fahrenheit and place the casserole in a baking dish covered with aluminum foil.

    Baking the covered dish for 10 to 15 minutes warms the rolls through without drying out the cream cheese topping. The foil traps the moisture, keeping the dough soft.

    If you must use a microwave, use a medium power setting and heat in 30-second intervals. This allows the heat to penetrate the center without overcooking the edges.

    Freezing and Thawing Process

    This casserole can be frozen for long-term storage. It is best to freeze the baked casserole without the icing, as the glaze may change texture during the freezing process.

    Wrap the cooled, baked casserole tightly in a double layer of aluminum foil and then place it in a heavy-duty freezer bag. This prevents freezer burn and protects the cream cheese layer.

    The casserole will stay fresh in the freezer for up to two months. Label the bag with the date and the reheating instructions for convenience.

    To thaw, move the casserole to the refrigerator 24 hours before you plan to eat it. Once thawed, follow the oven reheating instructions mentioned previously.

    Serving Suggestions and Pairings

    This dish is very rich, so it pairs well with light, acidic sides. A fresh berry medley with blueberries, strawberries, and raspberries provides a refreshing contrast.

    For a more substantial meal, serve the casserole alongside a protein source. Sliced avocado or a plant-based breakfast sausage can add savory balance to the plate.

    Pair this breakfast with a strong cup of black coffee or a hot tea. The bitterness of the coffee cuts through the sweetness of the maple and cream cheese.

    For a brunch party, present the casserole in the baking dish and provide a side of fresh mint leaves for a decorative garnish that adds a hint of freshness.

    Troubleshooting Common Baking Issues

    If the cinnamon rolls are still doughy in the center after 24 minutes, your oven may be running cool. Increase the bake time by 3 to 5 minutes, checking every few minutes.

    If the cream cheese topping browns too quickly, lower the oven temperature to 350 degrees Fahrenheit for the remainder of the baking time.

    If the icing becomes too thin after microwaving, let it sit at room temperature for 5 minutes before pouring. This will allow it to thicken slightly while remaining pourable.

    If the rolls stick to the pan despite using spray, use a thin plastic offset spatula to gently lift the edges. In the future, consider lining the pan with parchment paper for an even cleaner release.

    Essential Kitchen Tools for Success

    A silicone measuring cup is highly recommended for heating the icing. Silicone is durable and handles the quick bursts of microwave heat without cracking or overheating the contents.

    A stand mixer with a paddle attachment is the most efficient way to ensure the cream cheese is smooth. If using a hand mixer, be sure to scrape the sides of the bowl frequently.

    A 9×12 inch baking dish is the standard for this recipe. If you are unsure of the size, measure the interior dimensions to ensure the rolls have enough space to expand.

    A non-stick baking spray with a flour additive is particularly helpful for sweet bakes. This creates a more effective barrier between the sugary dough and the pan surface.

    Print
    clock clock iconcutlery cutlery iconflag flag iconfolder folder iconinstagram instagram iconpinterest pinterest iconfacebook facebook iconprint print iconsquares squares iconheart heart iconheart solid heart solid icon
    Egg-Free Cinnamon Roll Breakfast Casserole

    Egg-Free Cinnamon Roll Breakfast Casserole


    5 Stars 4 Stars 3 Stars 2 Stars 1 Star

    No reviews

    • Author: imageuploader
    • Total Time: 34 minutes
    • Yield: 12 servings 1x
    • Diet: Egg-free

    Description

    Cinnamon Roll Recipe Casserole no eggs is made with canned cinnamon rolls, cream cheese, sugar and a little maple syrup.


    Ingredients

    Scale
    • 2 cans Pillsbury refrigerated cinnamon rolls with icing; 17.5 ounce size
    • 1 package cream cheese; 8 ounce size
    • 2 tablespoons sugar
    • 1 tablespoon milk
    • 1 tablespoon maple syrup

    Instructions

    1. Step 1: Open both cans of cinnamon rolls and separate the dough into 16 rolls. Cut each cinnamon roll into 4 pieces.
    2. Step 2: Layer the cinnamon roll pieces in the bottom of a 9X12 casserole dish that’s been sprayed with non-stick baking spray.
    3. Step 3: Set aside while you prepare the cream cheese mixture.
    4. Step 4: In the bowl of a KitchenAid mixer with the paddle attachment, beat the softened cream cheese, sugar, milk and maple sugar until smooth.
    5. Step 5: Add the cream cheese mixture to the top of the cut up cinnamon rolls.
    6. Step 6: Bake in a preheated 375 degree oven for about 20 to 24 minutes. About halfway through the cooking, remove the casserole from the oven and spread the cream cheese mixture over the cinnamon rolls using the back of a spoon.
    7. Step 7: Remove from oven and allow the breakfast casserole to cool for a few minutes while you prepare the icing that comes with the canned cinnamon rolls.
    8. Step 8: Add the two cans of icing to a microwavable measuring cup. Heat in 15 second intervals until the icing is pourable. Be careful not to overheat!
    9. Step 9: Pour the icing over the breakfast casserole.
    10. Step 10: Serve immediately.

    Notes

    You can stir in chopped nuts, plant-based breakfast sausage, plant-based bacon, and even chocolate chips before baking.

    • Prep Time: 10 minutes
    • Cook Time: 24 minutes
    • Category: Breakfast
    • Method: Baking
    • Cuisine: American

    Nutrition

    • Serving Size: 1 serving
    • Calories: 117 kcal
    • Sugar: 7 g
    • Sodium: 124 mg
    • Fat: 8 g
    • Saturated Fat: 4 g
    • Unsaturated Fat: 4 g
    • Trans Fat: 0 g
    • Carbohydrates: 10 g
    • Fiber: 1 g
    • Protein: 2 g
    • Cholesterol: 19 mg