Blog

  • High-Protein Egg Bites

    High-Protein Egg Bites

    These protein-dense egg bites are an efficient solution for quick breakfasts or meal-prepped snacks. By blending cottage cheese into the eggs, you achieve a soft, velvety texture similar to sous-vide recipes.

    Recipe image

    List of ingredients

    • 8 large eggs – provides the primary structure and protein.
    • 1/2 cup low-fat cottage cheese – ensures a creamy, fluffy consistency.
    • Pinch of salt – balances the savory flavors.
    • 1/2 teaspoon black pepper – adds a subtle heat.
    • 1 lb turkey bacon, cooked and crumbled or 1/2 lb turkey breakfast sausage, browned – provides a savory, protein-rich base.
    • 1 cup shredded sharp cheddar cheese – adds saltiness and richness.

    step-by-step instructions

    1. Prepare Oven: Preheat your oven to 325°F (163°C). Place a baking dish containing a few inches of very hot water on the bottom rack to act as a water bath, then close the door to maintain heat.
    2. Blend Base: Combine the large eggs, low-fat cottage cheese, salt, and black pepper in a blender. Blend on high until the mixture is completely smooth and creamy.
    3. Assemble Pans: Place two 24-cup mini silicone muffin pans on a large half-sheet pan for stability. Distribute a small amount of crumbled turkey bacon or browned turkey sausage into each cup, then top with shredded cheddar cheese.
    4. Fill Cups: Pour the blended egg mixture over the meat and cheese fillings. Fill each cup just below the rim to allow for slight expansion during baking.
    5. Bake: Place the pans in the oven and bake for 20°25 minutes. Rotate the sheet pan halfway through the cooking time to ensure an even bake across all bites.
    6. Cool and Set: Remove the pans from the oven and let the egg bites cool inside the silicone cups for 2°3 minutes. Transfer them to a wire cooling rack to finish setting.
    7. Storage: Serve them immediately while warm, or let them cool completely before transferring to an airtight container for refrigeration.

    Optimal Equipment Selection

    Using a high-speed blender is the most effective way to integrate the cottage cheese. This process breaks down the curds, resulting in a homogenous custard rather than a chunky texture.

    Silicone muffin pans are highly recommended over metal pans. The non-stick properties of silicone allow the egg bites to be popped out easily without tearing the delicate structure.

    A half-sheet pan is necessary when using silicone molds. Because silicone is flexible, the pan can sag when filled; the metal sheet provides the rigidity needed to move the bites into the oven safely.

    Understanding the Water Bath Technique

    The water bath, or bain-marie, is critical for achieving a professional texture. It creates a humid environment that prevents the eggs from cooking too quickly or drying out.

    Without the steam, the edges of the egg bites often become rubbery or brown before the centers are fully set. The gentle heat ensures a consistent, tender curd throughout the bite.

    Ensure the water in the baking dish is hot when you start. This ensures the oven environment reaches the necessary humidity level immediately as the egg bites begin to bake.

    Texture and Consistency Troubleshooting

    If your egg bites are too soft in the center, increase the bake time by 2 to 5 minutes. Use a toothpick to check the center; it should come out clean without any liquid egg clinging to it.

    To avoid rubbery eggs, avoid raising the oven temperature. High heat causes the proteins in the eggs to contract tightly, which squeezes out moisture and creates a tough texture.

    If you notice the egg bites ‘weeping’ or releasing water after cooking, it is often due to overcooking. Stick strictly to the 325°F temperature to maintain the custard-like quality.

    Cheese and Flavor Variations

    While sharp cheddar is the standard, you can substitute it with other melting cheeses. Mozzarella provides a milder flavor and a stretchier texture, while pepper jack adds a spicy kick.

    Gouda or Gruyère can be used for a more sophisticated, nutty flavor profile. Ensure the cheese is finely shredded so it distributes evenly within the mini muffin cups.

    You can also incorporate fresh herbs into the blender stage. Finely chopped chives, parsley, or a handful of baby spinach can add nutritional value and color without altering the structure.

    Vegetable Add-in Strategies

    Adding vegetables is an easy way to increase the nutrient density of these bites. Finely dice red bell peppers, green onions, or mushrooms and sauté them briefly before adding them to the cups.

    Pre-cooking the vegetables is essential because they release water during the baking process. Adding raw vegetables can lead to soggy egg bites that do not set properly.

    For a low-carb option, replace the meat with sautéed zucchini or cauliflower florets. Maintain the same ratio of egg mixture to fillings to ensure the bites remain stable.

    Dietary Modifications

    To reduce the calorie count, you can replace half of the whole eggs with liquid egg whites. This maintains the high protein content while lowering the overall fat and cholesterol levels.

    For those avoiding dairy, substitute the cottage cheese with a blended silken tofu. Use a plant-based cheddar alternative to maintain the savory flavor profile of the original recipe.

    If you prefer a lower-sodium version, use unsalted butter for browning the sausage and select a low-sodium cottage cheese. Control the salt levels manually with the pinch of salt in the blender.

    Detailed Storage Guidelines

    Stored in an airtight container, these egg bites remain fresh in the refrigerator for 3 to 4 days. Keep them in a single layer or separate layers with parchment paper to prevent sticking.

    Cool the bites completely before sealing the container. Placing warm eggs in a closed container creates condensation, which can make the surface of the egg bites soggy.

    Ensure the container has a tight seal to prevent the eggs from absorbing other odors from the refrigerator. Glass containers are often preferred for maintaining the cleanest flavor.

    Reheating for Maximum Quality

    The best way to reheat egg bites is in a conventional oven or air fryer. Heat them at 325°F for about 5 to 10 minutes until they are warmed through and the edges are slightly crisp.

    For a faster option, use a microwave. Heat 2 to 3 bites on a microwave-safe plate for 30 to 45 seconds. Avoid over-microwaving, as this can make the eggs rubbery.

    If using a microwave, cover the bites with a damp paper towel. This helps trap a small amount of steam, mimicking the original water bath and keeping the interior moist.

    Freezing and Thawing Instructions

    These egg bites freeze exceptionally well. For the best results, flash-freeze them on a baking sheet for one hour before transferring them to a freezer-safe bag.

    Flash-freezing prevents the bites from clumping together in the bag. This allows you to remove only the number of bites you need for a specific meal.

    To thaw, move the bites from the freezer to the refrigerator overnight. If you are in a hurry, you can reheat them directly from frozen in the oven or microwave, adding a few extra minutes to the time.

    Serving and Pairing Suggestions

    These bites are designed to be portable, making them ideal for on-the-go mornings. Pair them with a side of fresh berries or sliced melon for a balanced breakfast.

    For a heartier meal, serve 3 to 4 egg bites alongside a slice of whole-grain toast topped with mashed avocado. The creaminess of the avocado complements the savory cheddar.

    They also work well as a high-protein appetizer. Serve them on a platter with a side of sriracha mayo or a dollop of Greek yogurt mixed with lemon and dill for dipping.

    Meal Prep Workflow

    To maximize efficiency, brown your turkey sausage or cook your turkey bacon in a large batch at the start of the week. Store the cooked meat in the fridge until you are ready to assemble the pans.

    Since this recipe uses mini muffin pans, you can produce a large quantity of bites in one baking session. Use multiple pans and rotate them to ensure every batch is cooked evenly.

    Portion the cooled egg bites into daily containers immediately. This removes the decision-making process during busy mornings and ensures consistent protein intake throughout the week.

    Print
    clock clock iconcutlery cutlery iconflag flag iconfolder folder iconinstagram instagram iconpinterest pinterest iconfacebook facebook iconprint print iconsquares squares iconheart heart iconheart solid heart solid icon
    High-Protein Egg Bites

    High-Protein Egg Bites


    5 Stars 4 Stars 3 Stars 2 Stars 1 Star

    No reviews

    • Author: imageuploader
    • Total Time: 45 minutes
    • Yield: 8 servings 1x
    • Diet: Low Carb

    Description

    High-protein egg bites made with eggs, cottage cheese, turkey bacon or turkey sausage, and shredded cheddar. Soft, fluffy, and easy to make in mini muffin pans, perfect for meal prep.


    Ingredients

    Scale
    • 8 large eggs
    • 1/2 cup low-fat cottage cheese
    • Pinch of salt
    • 1/2 teaspoon black pepper
    • 1 lb turkey bacon, cooked and crumbled or 1/2 lb turkey breakfast sausage, browned
    • 1 cup shredded sharp cheddar cheese

    Instructions

    1. Preheat: Preheat the oven to 325°F (163°C). Place a baking dish with a couple of inches of very hot water on the bottom rack to create a water bath. Close the oven door while preheating.
    2. Blend: In a blender, combine eggs, cottage cheese, salt, and pepper. Blend until smooth and creamy.
    3. Fill: Set two 24-cup mini silicone muffin pans on a half-sheet pan. Fill each cup with a small amount of crumbled turkey bacon or turkey sausage, then add shredded cheddar cheese. Pour the egg mixture over the fillings, stopping just below the top of each cup.
    4. Bake: Bake for 20–25 minutes, rotating the pan halfway through, until the centers are fully set.
    5. Cool: Let the egg bites cool in the muffin pans for 2–3 minutes before removing. Transfer to a cooling rack.
    6. Serve: Serve warm, or cool completely and store in an airtight container in the fridge for 3–4 days.

    Notes

    Use a blender for extra smooth and creamy egg bites. Silicone muffin pans make it easier to pop out the bites without sticking. Rotate the pan halfway through baking for even cooking.

    • Prep Time: 20 minutes
    • Cook Time: 25 minutes
    • Category: Breakfast
    • Method: Baking
    • Cuisine: American

    Nutrition

    • Serving Size: 1 serving
    • Calories: 367 kcal
    • Sugar: 4 g
    • Sodium: 680 mg
    • Fat: 26 g
    • Saturated Fat: 11 g
    • Unsaturated Fat: 15 g
    • Trans Fat: 0 g
    • Carbohydrates: 7 g
    • Fiber: 0 g
    • Protein: 24 g
    • Cholesterol: 310 mg
  • The Ultimate Guide to Stove Top Hard-Boiled Eggs

    The Ultimate Guide to Stove Top Hard-Boiled Eggs

    Mastering the art of the hard-boiled egg ensures you have a versatile, high-protein staple ready for any meal. This guide provides two reliable stove top techniques to achieve consistent results and shells that slide off effortlessly.

    Recipe image

    List of ingredients

    • 6-12 large eggs – use fridge-cold eggs for the best peeling results.
    • Water – enough to fully submerge the eggs (approximately 3 quarts).
    • Ice – used to create a cold bath to stop the cooking process immediately.

    step-by-step instructions

    1. Prepare the Water: Fill a large pot with about 3 quarts of water. Bring the water to a full, rolling boil over high heat.
    2. Lower the Temperature: Once the water is boiling, reduce the heat to low. This prevents the eggs from cracking upon entry.
    3. Add the Eggs: Using a slotted spoon or spider strainer, carefully lower the fridge-cold eggs into the water. Avoid dropping them in with your hands to prevent shell fractures.
    4. Choose Your Cooking Method: Follow either the Simmer Method or the Steady Boil Method.
    5. Simmer Method (Lid): Increase the heat to bring the water back to a medium boil and boil uncovered for 30 seconds. Then, turn the heat back to low, place a lid on the pot, and simmer for your preferred time.
    6. Steady Boil Method (No Lid): Increase the heat to bring the water back to a gentle, medium boil. Keep the pot uncovered and boil for your preferred time.
    7. Set the Timer: Use the following durations based on your desired yolk consistency: 6-7 minutes for soft-boiled, 8-9 minutes for jammy yolks, or 11-12 minutes for fully set hard-boiled eggs.
    8. Immediate Cooling: Carefully remove the eggs with a slotted spoon and place them immediately into a bowl filled with ice and water.
    9. Chill Thoroughly: Let the eggs remain in the ice bath for at least 15 minutes. This halts the cooking process and helps the egg contract away from the shell.
    10. Peel the Eggs: Gently tap the wide end of the egg to crack the shell. Peel the egg under a thin stream of cool running water for a smoother finish.

    Selecting Your Ideal Egg Doneness

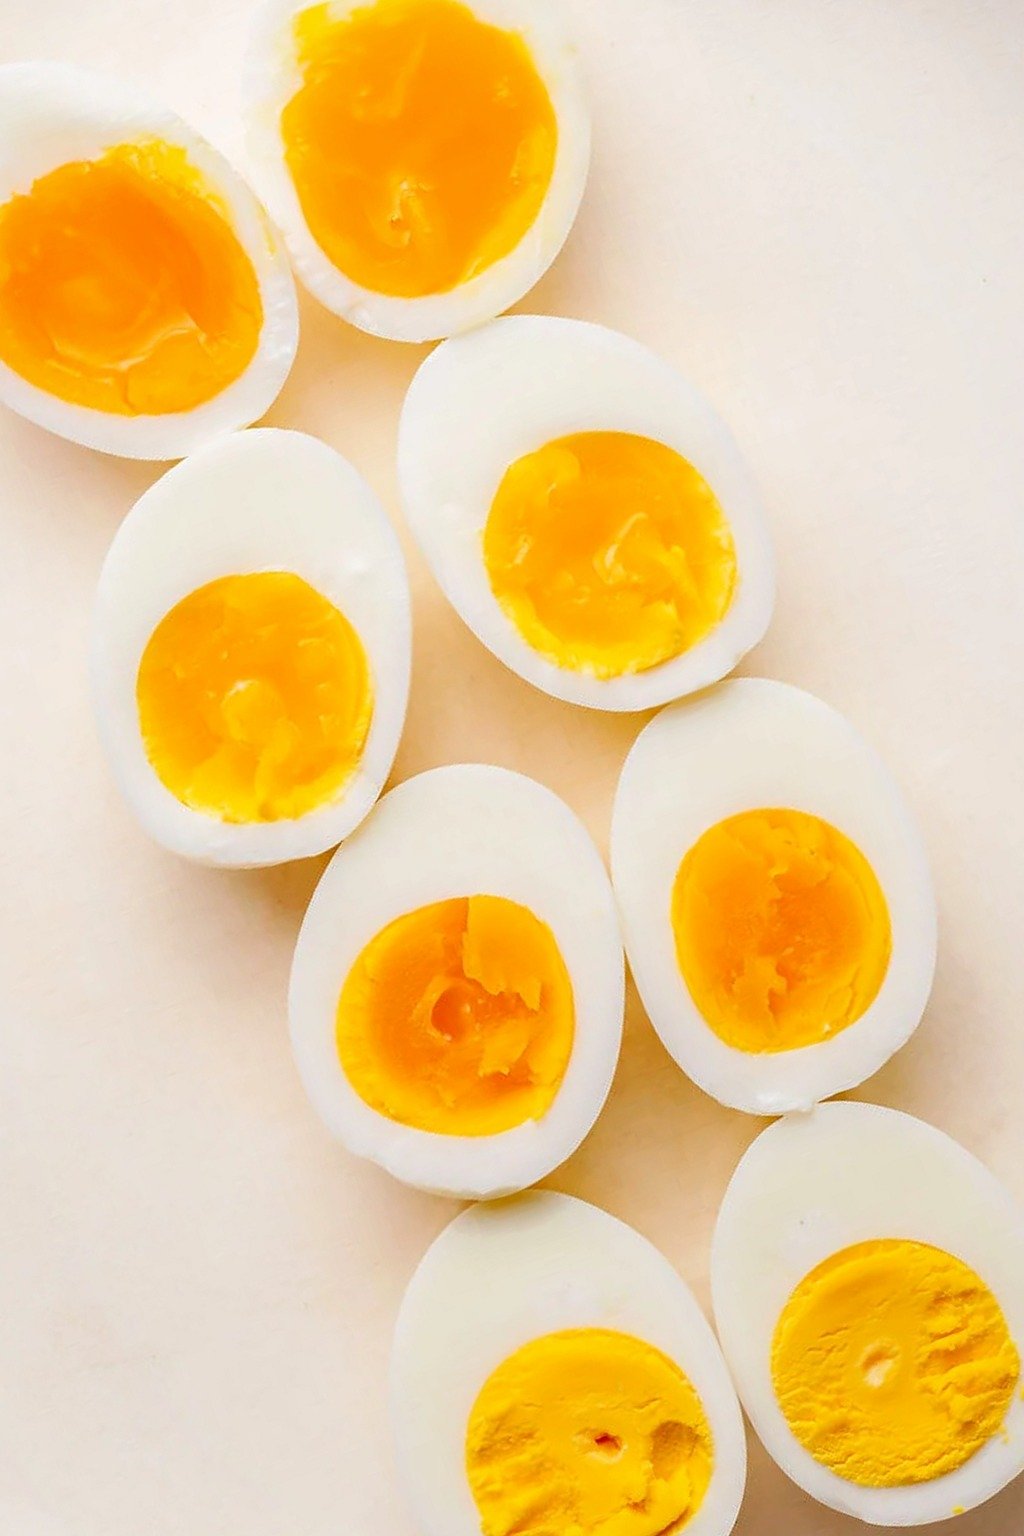
    The texture of the yolk depends entirely on the precise timing of the boil. For soft-boiled eggs, 6 to 7 minutes results in a liquid yolk and soft whites, ideal for dipping toast.

    Jammy or custardy yolks are achieved between 8 and 9 minutes. This texture is popular for ramen toppings or avocado toast where a thick but semi-liquid center is desired.

    For traditional hard-boiled eggs, 11 to 12 minutes is the sweet spot for large eggs. This produces a fully set, bright yellow yolk that is firm but not chalky.

    Avoid cooking eggs for 14 to 15 minutes. Overcooking leads to a rubbery white and the development of a gray-green ring around the yolk due to a reaction between sulfur and iron.

    Mastering the Art of Easy Peeling

    The most frustrating part of boiling eggs is often the shell. Starting with boiling water, rather than cold water, creates a thermal shock that causes the egg white to contract instantly.

    This immediate contraction pulls the membrane away from the shell, making it much easier to remove later. Using fridge-cold eggs enhances this temperature differential.

    The ice bath is equally critical. It stops the internal heat from continuing to cook the egg and further shrinks the egg inside the shell.

    When peeling, always start at the wider end of the egg. This is where the air pocket is located, providing a natural starting point to get under the membrane.

    Peeling under running water helps lubricate the space between the shell and the white. The water flushes away small fragments of shell and helps the membrane slide off.

    Professional Cooking Tips for Consistency

    Egg age plays a significant role in how easily they peel. Eggs that are 5 to 10 days old typically peel better than farm-fresh eggs because the pH level of the white increases over time.

    Always cook eggs in a single layer. If eggs are crowded or stacked, they may cook unevenly, and the water temperature will drop too significantly when they are added.

    Use a digital timer for every batch. Even a difference of 60 seconds can change a jammy yolk into a hard-boiled one, so precision is key for consistency.

    Avoid adding vinegar or baking soda to the water. While common in some traditions, these additives are unnecessary if you use the boiling water start and the ice bath method.

    If using extra-large or jumbo eggs, add approximately 30 to 60 seconds to the cook time. Larger eggs have more mass and require more time for heat to reach the center.

    Essential Storage and Freshness Guidelines

    For maximum freshness, store hard-boiled eggs in their shells. In an airtight container in the refrigerator, unpeeled eggs will stay fresh for up to 7 days.

    If you prefer to peel your eggs in advance, store them in an airtight container with a damp paper towel. This prevents the whites from drying out and becoming rubbery.

    Peeled eggs have a shorter shelf life and should be consumed within 3 days. Always ensure the container is sealed to prevent the eggs from absorbing odors from other foods.

    Follow the two-hour rule for food safety. Refrigerate your cooked eggs within two hours of cooking, and do not leave them at room temperature for longer than two hours.

    Never freeze hard-boiled eggs. Freezing alters the protein structure of the egg whites, resulting in a watery and rubbery texture once thawed that is unpleasant to eat.

    Troubleshooting Common Egg Issues

    If you notice a gray or green ring around the yolk, your eggs are overcooked. This is a chemical reaction and, while safe to eat, it indicates the egg was boiled too long or not cooled quickly enough.

    Cracked shells during the boiling process usually happen because the eggs were dropped in too aggressively. Using a slotted spoon to lower them gently minimizes this risk.

    If the shell is sticking to the white despite an ice bath, try peeling the egg by rolling it gently on the counter first. This creates a network of small cracks over the entire surface.

    Watery whites can occur if the eggs are undercooked or if they were frozen and thawed. Ensure you stick to the timing guides for the specific size of egg you are using.

    If the eggs are difficult to peel even with the hot-start method, consider the age of the eggs. Very fresh eggs have a stronger bond between the membrane and the shell.

    Serving and Culinary Applications

    Hard-boiled eggs are an excellent base for a variety of dishes. For a classic egg salad, mash hard-boiled eggs with mayonnaise, mustard, salt, and pepper.

    They are a staple for Cobb salads, providing a rich protein element alongside greens, chicken, and avocado. Slice them lengthwise for a professional presentation.

    For a quick healthy snack, slice a hard-boiled egg and season it with paprika, salt, and a dash of hot sauce. They are perfect for meal-prepping throughout the work week.

    Jammy eggs are ideal for ramen, shakshuka, or as a topping for steamed vegetables. The semi-liquid yolk acts as a natural sauce for the other ingredients.

    Deviled eggs are a classic appetizer. Halve the hard-boiled eggs and mix the yolks with creamy condiments and spices before piping them back into the whites.

    Frequently Asked Questions

    Why should I use fridge-cold eggs instead of room-temperature eggs? The temperature shock of cold eggs hitting boiling water helps the shell release more easily.

    Can I use a different pot for boiling? Any deep saucepan will work, as long as it is large enough to hold the eggs in a single layer with plenty of water to cover them.

    Is it necessary to bring the water to a boil first? Yes, the “hot start” is the most effective way to ensure the eggs are easy to peel compared to the “cold start” method.

    What is the best way to prevent the eggs from bouncing and cracking? Lowering the heat to low before adding the eggs and using a spoon prevents them from hitting the bottom of the pot.

    Can I boil eggs in salted water? Adding salt does not significantly affect the peeling process, but it can help seal small cracks if an egg happens to break during cooking.

    Print
    clock clock iconcutlery cutlery iconflag flag iconfolder folder iconinstagram instagram iconpinterest pinterest iconfacebook facebook iconprint print iconsquares squares iconheart heart iconheart solid heart solid icon
    The Ultimate Guide to Stove Top Hard-Boiled Eggs

    The Ultimate Guide to Stove Top Hard-Boiled Eggs


    5 Stars 4 Stars 3 Stars 2 Stars 1 Star

    No reviews

    • Author: imageuploader
    • Total Time: 32 minutes
    • Yield: 6 eggs 1x
    • Diet: Vegetarian

    Description

    Want perfect hard-boiled eggs every single time? I tested multiple stove top methods and found 2 easy techniques that deliver consistent, delicious results and eggs that peel effortlessly.


    Ingredients

    Scale
    • 612 large eggs
    • water
    • ice

    Instructions

    1. Bring water to a boil: Bring a large pot (about 3 quarts) of water to a full, rolling boil over high heat.
    2. Lower the heat & add in eggs: Reduce the heat to low, then carefully lower the eggs into the water using a stainless steel spider skimmer/strainer or slotted spoon.
    3. Return to a medium boil to boil briefly: Bring the water back to a medium boil (not aggressive) and boil the eggs, uncovered, for 30 seconds.
    4. Cover & reduce heat: Cover the pot, reduce the heat to low, and maintain a gentle simmer for your desired cook time.
    5. Cook: Soft-boiled: 6-7 minutes; Jammy: 8-9 minutes; Hard-boiled: 11-12 minutes.
    6. Ice bath: Remove eggs with a slotted spoon and transfer immediately to an ice water bath. Chill for at least 15 minutes.
    7. Peel: Gently tap the bottom (wide end) of the egg to crack the shell. Peel under a thin stream of cold running water.

    Notes

    Don’t crowd the eggs. For extra large or jumbo eggs, adjust cook time by ~1 minute more. Store unpeeled eggs in the refrigerator for up to 7 days, or peeled eggs for up to 3 days.

    • Prep Time: 5 minutes
    • Cook Time: 12 minutes
    • Category: Breakfast
    • Method: Stove Top
    • Cuisine: American

    Nutrition

    • Serving Size: 1 egg
    • Calories: 63 kcal
    • Sugar: 0.2 g
    • Sodium: 62 mg
    • Fat: 4 g
    • Saturated Fat: 1 g
    • Unsaturated Fat: 3 g
    • Trans Fat: 0.02 g
    • Carbohydrates: 0.3 g
    • Fiber: 0 g
    • Protein: 6 g
    • Cholesterol: 164 mg
  • Mediterranean Ground Chicken Skillet

    Mediterranean Ground Chicken Skillet

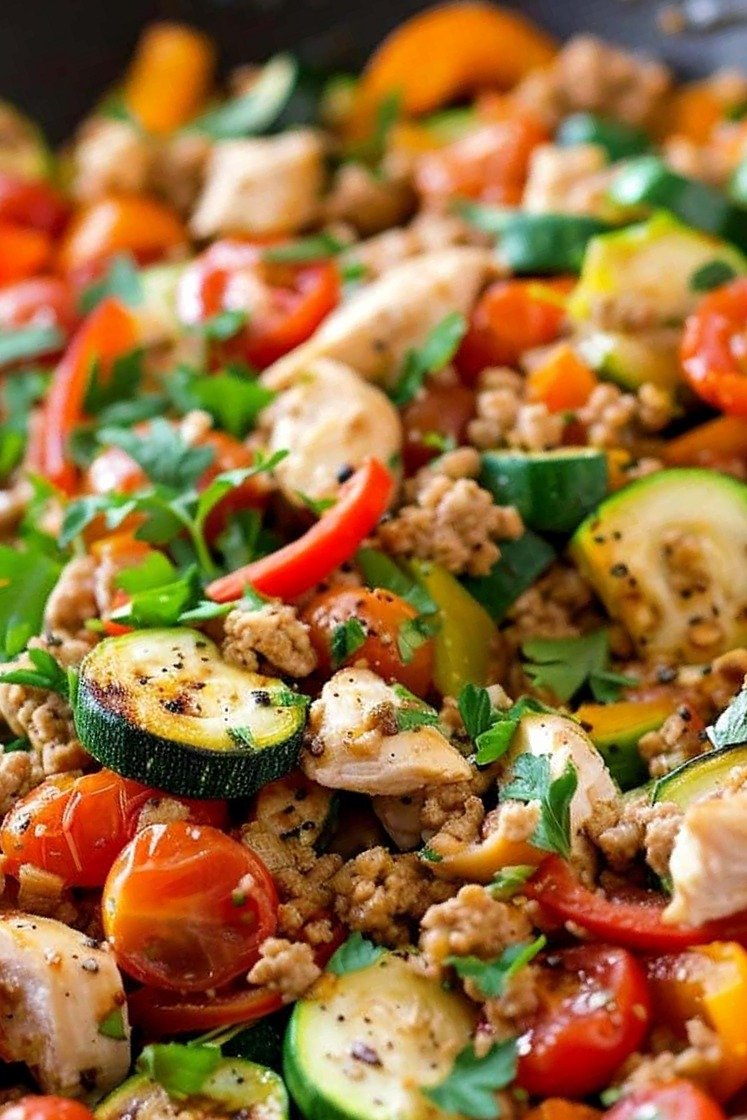
    This one-pan meal combines lean ground chicken with a variety of fresh vegetables and savory spices. It is designed for efficient preparation and high protein content, making it suitable for weeknight dinners.

    Recipe image

    List of ingredients

    • 1 lb ground chicken – lean protein base.
    • 1 tbsp olive oil – for sautéing and adding healthy fats.
    • 1 onion, chopped – provides a savory aromatic base.
    • 2 cloves garlic, minced – adds sharp, pungent flavor.
    • 1 bell pepper, chopped – adds texture and sweetness.
    • 1 zucchini, diced – adds moisture and bulk.
    • 1 cup cherry tomatoes, halved – provides acidity and juiciness.
    • 1 tsp dried oregano – classic earthy Mediterranean herb.
    • 1 tsp paprika – adds warmth and color.
    • Salt and pepper to taste – essential for flavor enhancement.
    • Fresh parsley for garnish – adds a fresh, herbaceous finish.

    step-by-step instructions

    1. Heat the Oil: Place a large skillet over medium heat and add 1 tablespoon of olive oil. Wait until the oil is shimmering to ensure vegetables sear rather than steam.
    2. Sauté Aromatics: Add the chopped onion and minced garlic to the pan. Cook for 3-4 minutes, stirring frequently until the onions are translucent and the garlic is fragrant.
    3. Cook Primary Vegetables: Stir in the chopped bell pepper and diced zucchini. Sauté for 5 minutes, allowing the edges to soften and slightly brown.
    4. Brown the Chicken: Add the ground chicken to the skillet. Use a spatula to break the meat into small crumbles, cooking for 5-7 minutes until no longer pink.
    5. Season and Simmer: Stir in the halved cherry tomatoes, dried oregano, paprika, salt, and pepper. Mix thoroughly to coat the meat and vegetables in the spices.
    6. Final Cook: Simmer the mixture for another 10 minutes. This allows the tomatoes to burst and the flavors to integrate.
    7. Garnish: Remove from heat and sprinkle with freshly chopped parsley before serving.

    Professional Sautéing Techniques

    To achieve the best texture in this skillet, maintain a consistent medium heat. If the pan is too hot, the garlic may burn and become bitter. If it is too cool, the vegetables will release too much water and boil instead of sautéing.

    When browning the ground chicken, avoid stirring too constantly. Allow the meat to sit undisturbed for a minute or two to develop a brown crust. This process, known as the Maillard reaction, adds depth to the overall flavor of the dish.

    Ensure your vegetables are cut into uniform sizes. Dicing the zucchini and bell pepper consistently ensures they cook at the same rate. This prevents some pieces from becoming mushy while others remain raw.

    Ingredient Substitutions and Alternatives

    If ground chicken is unavailable, ground turkey is a direct substitute. Ground turkey offers a similar lean protein profile and pairs well with the same spice blend. For a different flavor profile, lean ground beef can be used, though it will result in a richer, heavier dish.

    For vegetable substitutions, yellow squash can replace zucchini without changing the cooking time. If you prefer a different pepper, try poblano for a mild heat or red bell peppers for maximum sweetness. Spinach or kale can be stirred in during the last two minutes of cooking for additional nutrients.

    If you lack dried oregano, thyme or basil are suitable alternatives. These herbs maintain the Mediterranean theme while offering slightly different aromatic notes. For the paprika, smoked paprika can be used to add a subtle wood-fired taste to the chicken.

    Flavor Balancing and Enhancements

    The balance of acidity is crucial in this recipe. The cherry tomatoes provide some acidity, but adding a squeeze of fresh lemon juice just before serving can brighten the flavors. This cuts through the richness of the olive oil and protein.

    For those who prefer more heat, add a pinch of red pepper flakes during the aromatic sauté phase. This distributes the spice evenly throughout the dish. Alternatively, a dash of cayenne pepper can be mixed with the paprika for a consistent heat level.

    To increase the savory depth, consider adding a small amount of tomato paste when adding the spices. This thickens the sauce and intensifies the tomato flavor. A small amount of grated parmesan or a sprinkle of crumbled feta cheese can also add a salty, creamy dimension.

    Pairing and Serving Suggestions

    This skillet can be served as a standalone low-carb meal. However, pairing it with a grain increases the satiety of the dish. Basmati or jasmine rice are excellent choices as they absorb the pan juices.

    Quinoa or couscous are traditional Mediterranean alternatives that provide a nutty flavor and additional protein. For a more tactile eating experience, serve the mixture inside warm pita bread or over a bed of hummus.

    A side of Greek salad consisting of cucumbers, olives, and red onions complements the cooked vegetables in the skillet. The contrast between the warm chicken and a cold, crisp salad creates a balanced meal. A dollop of tzatziki sauce on top adds a cooling effect that balances the paprika.

    Storage and Reheating Guidelines

    Store any leftover chicken skillet in an airtight container in the refrigerator. It will remain fresh and safe for consumption for up to three to four days. Ensure the food is cooled slightly before sealing the lid to prevent excess condensation.

    To reheat on the stovetop, add a tablespoon of water or broth to a skillet over medium heat. Add the leftovers and stir until heated through. This method prevents the ground chicken from drying out during the reheating process.

    Microwave reheating is also an option for convenience. Place the food in a microwave-safe dish and cover it with a damp paper towel. Heat in 30-second intervals, stirring in between, to ensure the center is hot without overcooking the edges.

    Advanced Meal Prep Tips

    To save time during the week, perform all vegetable chopping on your prep day. Store the chopped onions, garlic, peppers, and zucchini in separate containers or one large divided container. This reduces active kitchen time to under 20 minutes.

    You can cook the entire skillet in advance and portion it into four separate containers. This makes it an ideal high-protein lunch for work or school. Because the dish contains a variety of cooked vegetables, it holds its structure well over several days.

    When prepping in bulk, avoid adding the fresh parsley until the day of consumption. Fresh herbs can wilt or turn dark when refrigerated in a cooked dish. Adding them fresh ensures a vibrant color and a sharp, clean taste.

    Troubleshooting Common Cooking Issues

    If the skillet becomes too watery, increase the heat to medium-high for the last few minutes of cooking. This allows the excess liquid from the zucchini and tomatoes to evaporate, concentrating the sauce. Avoid adding more oil if the pan seems wet.

    If the chicken is browning too quickly before the vegetables are soft, remove the meat from the pan temporarily. Finish cooking the vegetables, then return the chicken to the skillet to finish simmering with the tomatoes. This ensures a balanced texture.

    In cases where the dish tastes flat, increase the salt or add a small amount of apple cider vinegar. Often, a lack of salt or acidity is the reason for a muted flavor profile. Taste the dish at the very end and adjust the seasonings accordingly.

    Nutrition and Dietary Modifications

    To make this recipe lower in calories, reduce the olive oil to a teaspoon or use an oil sprayer. You can also increase the ratio of zucchini and bell peppers relative to the meat to lower the calorie density per serving.

    For a dairy-free version, this recipe is already naturally compatible. If adding cheese as a variation, ensure you use a plant-based feta or nutritional yeast for a similar salty, cheesy flavor. This keeps the dish accessible for those with lactose intolerance.

    To increase the fiber content, serve the chicken over cauliflower rice or add a cup of diced carrots during the vegetable sauté phase. These additions provide more micronutrients and keep you full for longer without significantly altering the flavor profile.

    Print
    clock clock iconcutlery cutlery iconflag flag iconfolder folder iconinstagram instagram iconpinterest pinterest iconfacebook facebook iconprint print iconsquares squares iconheart heart iconheart solid heart solid icon
    One-Pan Mediterranean Ground Chicken Skillet

    Mediterranean Ground Chicken Skillet


    5 Stars 4 Stars 3 Stars 2 Stars 1 Star

    No reviews

    • Author: imageuploader
    • Total Time: 30 minutes
    • Yield: 4 servings 1x
    • Diet: Low Fat

    Description

    A healthy and flavorful dish combining ground chicken with Mediterranean ingredients.


    Ingredients

    Scale
    • 1 lb ground chicken
    • 1 tbsp olive oil
    • 1 onion, chopped
    • 2 cloves garlic, minced
    • 1 bell pepper, chopped
    • 1 zucchini, diced
    • 1 cup cherry tomatoes, halved
    • 1 tsp dried oregano
    • 1 tsp paprika
    • Salt and pepper to taste
    • Fresh parsley for garnish

    Instructions

    1. Step 1: Heat olive oil in a skillet over medium heat.
    2. Step 2: Add onion and garlic, sauté until softened.
    3. Step 3: Add bell pepper and zucchini, cook for 5 minutes.
    4. Step 4: Add ground chicken, cook until browned.
    5. Step 5: Stir in cherry tomatoes, oregano, paprika, salt, and pepper.
    6. Step 6: Cook for another 10 minutes until chicken is fully cooked.
    7. Step 7: Garnish with fresh parsley before serving.

    Notes

    Serve with rice or pita bread. Can substitute chicken with turkey. Adjust vegetables based on preference.

    • Prep Time: 10 minutes
    • Cook Time: 20 minutes
    • Category: Main Course
    • Method: Skillet
    • Cuisine: Mediterranean

    Nutrition

    • Serving Size: 1 serving
    • Calories: 320 kcal
    • Sugar: 4 g
    • Sodium: 350 mg
    • Fat: 15 g
    • Saturated Fat: 3 g
    • Unsaturated Fat: 10 g
    • Trans Fat: 0 g
    • Carbohydrates: 10 g
    • Fiber: 2 g
    • Protein: 30 g
    • Cholesterol: 80 mg
  • Savory Garlic Parmesan Shrimp

    Savory Garlic Parmesan Shrimp

    This quick seafood dish combines rich butter, pungent garlic, and salty parmesan cheese for a gourmet meal. It takes only 20 minutes to prepare, making it an ideal choice for busy weeknights or entertaining guests.

    Recipe image

    List of ingredients

    • 1 lb shrimp, peeled and deveined – pat these dry for better searing.
    • 4 cloves garlic, minced – use fresh cloves to ensure maximum aroma.
    • 1/4 cup butter – unsalted butter is preferred to maintain control over seasoning.
    • 1/2 cup grated parmesan cheese – freshly grated cheese melts more evenly than pre-shredded options.
    • 1 tablespoon lemon juice – fresh lemon juice provides a necessary acidic balance.
    • Salt and pepper to taste – essential for enhancing the natural flavor of the seafood.
    • Fresh parsley – finely chopped to provide a bright, fresh finish.

    step-by-step instructions

    1. Melt Butter: Place a large skillet over medium heat and melt 1/4 cup of butter. Monitor the heat to ensure the butter does not brown or burn.
    2. Sauté Garlic: Add the minced garlic to the melted butter. Sauté for approximately 1 minute, stirring constantly until the garlic is fragrant but not browned.
    3. Cook Shrimp: Add the peeled and deveined shrimp to the pan. Season with salt and pepper, then cook for 3 to 4 minutes. Turn the shrimp occasionally until they become pink and opaque.
    4. Add Flavorings: Stir in the grated parmesan cheese and the lemon juice. Mix thoroughly to coat the shrimp in the cheese mixture.
    5. Final Simmer: Continue cooking for an additional 2 minutes. Stir frequently to ensure the cheese melts and forms a cohesive sauce.
    6. Garnish: Remove the skillet from the heat. Sprinkle chopped fresh parsley over the shrimp before serving.

    Pro Tips for Perfect Shrimp Texture

    The most common mistake when cooking shrimp is overcooking them. Shrimp cook very quickly and can turn from tender to rubbery in less than a minute. Watch for the shape of the shrimp; they are perfectly cooked when they form a ‘C’ shape.

    If the shrimp curl tightly into an ‘O’ shape, they are likely overcooked. To prevent this, remove the pan from the heat as soon as the shrimp turn opaque. The residual heat from the pan will finish the cooking process without toughening the meat.

    Ensure your shrimp are completely thawed before they hit the pan. If you use frozen shrimp that are still icy, they will release excess water. This causes the shrimp to steam rather than sauté, preventing them from developing a golden-brown exterior.

    Patting the shrimp dry with paper towels before adding them to the butter is a critical step. Removing surface moisture allows the shrimp to sear immediately. This creates a better texture and helps the garlic butter sauce adhere to the protein.

    Selecting the Right Ingredients

    When buying shrimp, look for those with a mild, salty scent like the ocean. Avoid any shrimp that smell strongly of ammonia, as this indicates they are no longer fresh. Medium to large shrimp work best for this recipe as they hold up well to the sautéing process.

    Freshly grated parmesan cheese is highly recommended over the canned variety. Pre-shredded cheeses often contain anti-caking agents like cellulose. These additives can prevent the cheese from melting smoothly into the butter, resulting in a grainy sauce.

    For the garlic, use fresh cloves rather than pre-minced jarred garlic. Fresh garlic contains volatile oils that provide a sharper, more authentic flavor. Minced garlic loses its potency quickly, so chop your cloves immediately before starting the cooking process.

    Use a high-quality unsalted butter. This allows you to control the exact amount of sodium in the dish, which is important because parmesan cheese is naturally quite salty. If you only have salted butter, reduce the amount of additional salt you add during the cooking phase.

    Recommended Side Dish Pairings

    This shrimp dish is versatile and pairs well with various bases. For a classic Italian-style meal, serve the shrimp over linguine or angel hair pasta. The garlic parmesan sauce acts as a rich coating for the noodles.

    If you prefer a lower-carbohydrate option, serve the shrimp over a bed of sautéed spinach or zoodles (zucchini noodles). The acidity of the lemon juice in the sauce complements the earthiness of the greens perfectly.

    White rice or quinoa are also excellent choices for soaking up the extra butter sauce. To add more nutrition, you can serve the shrimp alongside steamed broccoli or roasted asparagus. These vegetables provide a crisp contrast to the richness of the cheese.

    For a crusty accompaniment, serve the dish with toasted sourdough or a French baguette. The bread is perfect for dipping into the remaining garlic parmesan butter left in the skillet after the shrimp are plated.

    Dietary Substitutions and Variations

    To make this recipe dairy-free, substitute the butter with a plant-based butter alternative or olive oil. Replace the parmesan cheese with nutritional yeast, which provides a similar nutty and salty flavor profile without the animal products.

    If you want to change the protein, this method works well with sea scallops or diced chicken breast. If using chicken, increase the cooking time for the protein phase to ensure the meat is cooked through to an internal temperature of 165°F.

    For those who enjoy heat, add a pinch of crushed red pepper flakes when sautéing the garlic. This introduces a subtle spicy kick that cuts through the richness of the butter and parmesan.

    You can also incorporate vegetables directly into the skillet. Add cherry tomatoes or sliced mushrooms during the shrimp cooking phase. These additions add color and a different layer of flavor to the final dish.

    Detailed Storage and Reheating Guide

    Leftover garlic parmesan shrimp should be stored in an airtight container. Place them in the refrigerator as soon as they have cooled to room temperature. These will stay fresh and safe to eat for up to two days.

    Avoid freezing this dish. Shrimp can change texture significantly when frozen after being cooked, often becoming mushy. It is best to freeze shrimp raw and cook them fresh for the best dining experience.

    When reheating, avoid using the microwave if possible. Microwaving seafood often leads to overcooking and a rubbery texture. Instead, place the leftovers in a small skillet over low heat.

    Add a teaspoon of butter or a splash of water to the pan during reheating. This helps re-emulsify the parmesan sauce and prevents the shrimp from drying out. Heat gently until the sauce is bubbly and the shrimp are warmed through.

    Make-Ahead Preparation Strategies

    While the final cooking process is fast, you can save time by prepping ingredients in advance. Peel and devein the shrimp several hours before cooking. Store them in a sealed container in the refrigerator.

    Mince the garlic and chop the parsley ahead of time. Keep the chopped parsley in a small container with a damp paper towel to keep it from wilting before it is used for garnish.

    Grate your parmesan cheese in advance and store it in an airtight container. This ensures that when you are ready to cook, you can focus entirely on the timing of the shrimp to avoid overcooking.

    Measure out your lemon juice and have your salt and pepper ready. Having a ‘mise en place’ (everything in its place) is especially important for fast-cooking recipes where seconds matter.

    Troubleshooting Common Issues

    If your sauce is too thick or clumpy, it is likely due to the cheese not melting properly. This can happen if the heat is too high or if you used pre-shredded cheese. Add a tablespoon of water or a small knob of butter and stir on low heat to smooth it out.

    If the garlic tastes bitter, it may have burned during the sauté process. Burnt garlic cannot be fixed, so it is important to keep the garlic moving in the pan and remove it as soon as it becomes fragrant.

    If the dish tastes too salty, increase the amount of lemon juice. The acid in the lemon helps neutralize the perception of salt. You can also serve the shrimp over an unseasoned starch, like plain white rice, to balance the flavor.

    If the shrimp are releasing too much water in the pan, you may have overcrowded the skillet. Cook the shrimp in batches if necessary. This ensures there is enough room for each piece to sear rather than boil in its own juices.

    Frequently Asked Questions

    Can I use frozen shrimp? Yes, frozen shrimp are perfectly fine. However, they must be completely thawed. Thaw them in the refrigerator overnight or place the sealed bag in a bowl of cold water for a faster result.

    Is this recipe gluten-free? Yes, this recipe is naturally gluten-free. All the primary ingredients, including butter, garlic, and cheese, do not contain gluten. Ensure your parmesan cheese brand is certified gluten-free if you have a severe allergy.

    Can I use a different cheese? While parmesan is traditional, you can use Pecorino Romano for a saltier taste. Avoid using soft cheeses like mozzarella, as they will stretch rather than create a smooth sauce.

    How do I know when the shrimp are done? Look for the color change from translucent gray to an opaque pinkish-white. Once they form a slight curve, they are ready to be finished with the cheese and lemon.

    Print
    clock clock iconcutlery cutlery iconflag flag iconfolder folder iconinstagram instagram iconpinterest pinterest iconfacebook facebook iconprint print iconsquares squares iconheart heart iconheart solid heart solid icon
    Garlic Parmesan Shrimp

    Savory Garlic Parmesan Shrimp


    5 Stars 4 Stars 3 Stars 2 Stars 1 Star

    No reviews

    • Author: imageuploader
    • Total Time: 20 minutes
    • Yield: 4 servings 1x
    • Diet: Gluten Free

    Description

    A delicious garlic parmesan shrimp dish that is quick and easy to prepare.


    Ingredients

    Scale
    • 1 lb shrimp, peeled and deveined
    • 4 cloves garlic, minced
    • 1/4 cup butter
    • 1/2 cup grated parmesan cheese
    • 1 tablespoon lemon juice
    • Salt and pepper to taste
    • Fresh parsley for garnish

    Instructions

    1. Melt: In a large skillet, melt the butter over medium heat.
    2. Sauté: Add the minced garlic and sauté for 1 minute until fragrant.
    3. Cook: Add the shrimp, salt, and pepper. Cook for 3-4 minutes until shrimp are pink and opaque.
    4. Mix: Stir in the parmesan cheese and lemon juice.
    5. Combine: Cook for an additional 2 minutes, stirring to combine.
    6. Garnish: Garnish with fresh parsley before serving.

    Notes

    Use fresh shrimp for best flavor. Adjust garlic according to your taste. Serve over pasta or rice for a complete meal.

    • Prep Time: 10 minutes
    • Cook Time: 10 minutes
    • Category: Seafood
    • Method: Sauté
    • Cuisine: Italian

    Nutrition

    • Serving Size: 1 serving
    • Calories: 350 kcal
    • Sugar: 1 g
    • Sodium: 600 mg
    • Fat: 22 g
    • Saturated Fat: 10 g
    • Unsaturated Fat: 8 g
    • Trans Fat: 0 g
    • Carbohydrates: 5 g
    • Fiber: 0 g
    • Protein: 30 g
    • Cholesterol: 200 mg
  • Homemade Roasted Red Pepper Egg White Bites

    Homemade Roasted Red Pepper Egg White Bites

    These high-protein egg white bites are a practical, homemade version of the popular cafe breakfast. They provide a soft, creamy consistency and are ideal for those seeking a convenient meal-prep option.

    Recipe image

    List of ingredients

    • 2 cups egg whites (or one 16-ounce container) – provides a lean protein base.
    • 3/4 cup full fat cottage cheese – creates the signature creamy texture.
    • 1/2 cup shredded monterey jack cheese – ensures a smooth melt.
    • 1/2 cup feta cheese – adds a salty, tangy flavor profile.
    • 1 1/2 teaspoons hot sauce – provides a subtle kick and depth.
    • 1 tablespoon cornstarch – prevents the bites from becoming too watery.
    • 1/2 teaspoon salt – enhances overall seasoning.
    • 1/4 teaspoon pepper – adds a light spice.
    • 1/4 cup roasted red bell pepper – patted very dry and finely chopped for smoky flavor.
    • 1/4 cup spinach – finely chopped for added nutrients.
    • 2 tablespoons green onion – sliced for a mild onion taste.

    step-by-step instructions

    1. Prepare Oven and Pan: Preheat your oven to 350 degrees F. Grease a 12-tin muffin pan with cooking oil or use a silicone muffin pan for easier release.
    2. Blend Base: Combine the egg whites, cottage cheese, monterey jack cheese, feta cheese, hot sauce, cornstarch, salt, and pepper in a blender. Process on high speed for approximately 30 seconds until the mixture is completely smooth.
    3. Layer Vegetables: Distribute the chopped vegetables evenly into the bottom of each muffin tin. To prevent the spinach from floating to the top, layer them in this specific order: spinach first, then green onions, and finally the roasted red peppers.
    4. Fill Tins: Pour the blended egg mixture evenly over the vegetables in each tin. Avoid overfilling to prevent uneven cooking.
    5. Bake and Cool: Bake for 22-25 minutes. Let the bites cool in the muffin tins for 10-15 minutes before removing them and placing them in an airtight storage container.

    Texture Optimization Secrets

    The smooth, velvety texture of these egg bites depends heavily on the blending process. By blending the cottage cheese directly into the egg whites, you eliminate the curdled texture usually associated with cottage cheese.

    Using high speed for a full 30 seconds ensures that the cheeses and cornstarch are fully emulsified. This prevents the mixture from separating during the baking process, which can lead to pockets of liquid in the finished product.

    The inclusion of cornstarch is a critical step for stability. Egg whites contain a high percentage of water, and as they cook and cool, they can release moisture. Cornstarch acts as a stabilizer that binds this liquid, resulting in a firmer yet tender bite.

    If you prefer an even lighter texture, ensure your egg whites are at room temperature before blending. This allows the fats in the cottage cheese and Monterey Jack to incorporate more evenly into the liquid base.

    Detailed Ingredient Substitutions

    For those who prefer whole eggs over egg whites, you can modify the base. Replace the 2 cups of egg whites with 8 whole eggs. When making this switch, reduce the cottage cheese amount to 1/2 cup to maintain the correct moisture balance.

    The cheese blend can be adjusted based on available ingredients. Mozzarella is a great substitute for Monterey Jack if you want a milder flavor and a stretchier texture. Sharp cheddar can be used for a bolder taste, though it may change the color of the bites slightly.

    If feta is unavailable, goat cheese is an excellent alternative. It provides a similar tanginess and creamy consistency. Be mindful that goat cheese can be softer, so it may blend more quickly into the base.

    For the vegetables, kale or finely chopped broccoli can replace spinach. If using broccoli, ensure the pieces are minced very small so they do not create large air gaps in the egg mixture.

    Customizing Vegetable Mix-ins

    When adding vegetables, the most important factor is moisture control. Roasted red peppers should be patted very dry with a paper towel before chopping. Excess moisture from jarred peppers can cause the egg bites to become soggy.

    Finely chopping the spinach is necessary for even distribution. Large leaves tend to clump together and float to the surface, which can lead to some bites having too much spinach and others having none.

    If you wish to add more vegetables, such as mushrooms or zucchini, sauté them briefly first to remove excess water. Raw zucchini, for instance, releases a significant amount of moisture during baking that can ruin the texture.

    For those who want a heartier version, adding finely diced deli meats or cooked bacon bits is a viable option. Add these to the bottom of the tin along with the vegetables before pouring in the egg mixture.

    Equipment Advice and Pan Selection

    A silicone muffin pan is highly recommended for this recipe. Silicone is naturally non-stick and flexible, allowing the egg bites to be popped out without breaking the delicate edges.

    If using a traditional metal muffin pan, a generous coating of non-stick spray or a small amount of oil is essential. Without this, the proteins in the egg whites will bond to the metal, making removal difficult.

    For those using an Instant Pot, you can use silicone egg bite molds. The cooking method will differ, shifting from baking to pressure cooking, but the ingredient ratios remain the same for the best flavor.

    Ensure your blender is capable of handling the volume of liquid. If your blender is small, blend the mixture in two batches to avoid overflow and ensure a consistent blend across all 12 bites.

    Storage and Preservation Methods

    Store these egg bites in the refrigerator in an airtight container. They will remain fresh and safe to eat for up to 4 days. Glass containers are often preferred over plastic as they keep the bites fresher and are easier to heat.

    For long-term storage, these bites freeze exceptionally well. Once completely cooled, place them on a baking sheet to flash-freeze for an hour before transferring them to a freezer-safe bag. This prevents them from sticking together.

    When frozen, the egg bites will last for up to 2 months. Ensure you squeeze as much air as possible out of the freezer bag to prevent freezer burn, which can affect the taste of the cheese.

    Label your containers with the date of preparation. Because they are high in protein and moisture, tracking the freshness is important for maintaining the best quality and flavor.

    Precision Reheating Techniques

    To reheat refrigerated egg bites, use a microwave. The key to maintaining the soft texture is to cover the bites with a damp paper towel. This creates a small amount of steam that prevents the eggs from drying out.

    Heat the bites in short intervals of 15 to 20 seconds. This gradual heating prevents the eggs from overcooking and becoming rubbery, which often happens when microwaved for a long stretch.

    For frozen egg bites, the reheating time will increase. Thawed bites typically take about 30 seconds, while frozen bites usually require 60 to 90 seconds depending on the microwave wattage.

    Alternatively, you can reheat them in a toaster oven at 300 degrees F for about 5-8 minutes. This method provides a slightly firmer exterior while keeping the center creamy.

    Common Troubleshooting Tips

    If your egg bites are puffing up too high and then collapsing, you are likely overfilling the muffin tins. Fill the cups only 1/2 to 2/3 of the way full to allow space for the eggs to rise without overflowing.

    If the texture is too watery, check your cornstarch measurement. Ensure you are using a level tablespoon. Additionally, double-check that your roasted red peppers were patted completely dry before being added.

    If the bites are sticking to the pan despite greasing, allow them to cool for the full 10-15 minutes. As the eggs cool, they contract slightly, which makes them release more easily from the sides of the pan.

    If the vegetables are all at the top of the bite, it means the egg mixture was too thin or the vegetables weren’t layered correctly. Always place the heaviest and flattest ingredients (like spinach) at the very bottom.

    Meal Prep Scheduling

    To optimize your morning, prepare a double batch of these egg bites on Sunday. Since they last 4 days in the fridge, you can cover your entire work week’s breakfast in one session.

    When prepping, use a scale or a measuring cup to pour the egg mixture. This ensures that every bite has the same amount of protein and cooks at the same rate in the oven.

    If you are freezing a large quantity, organize them in portions of two or three per bag. This allows you to take out only what you need for a single breakfast without thawing the entire batch.

    Prepare your vegetable mise en place before starting the blender. Having the spinach, onions, and peppers chopped and ready allows you to fill the tins quickly while the egg mixture is still fresh and aerated.

    Serving Ideas and Pairings

    These egg bites are designed to be grab-and-go, but they can be plated for a more complete meal. Pair them with a side of fresh avocado slices for added healthy fats and a creamy contrast.

    A side of fresh berries or a sliced apple provides a sweetness that balances the salty flavors of the feta and Monterey Jack cheese.

    For a more savory brunch, serve the bites alongside a small portion of sautéed mushrooms or roasted tomatoes. This complements the smoky flavor of the roasted red peppers.

    If you prefer a crunch, serve the egg bites with a slice of toasted whole-grain bread. The contrast between the soft eggs and the crispy toast enhances the overall eating experience.

    Print
    clock clock iconcutlery cutlery iconflag flag iconfolder folder iconinstagram instagram iconpinterest pinterest iconfacebook facebook iconprint print iconsquares squares iconheart heart iconheart solid heart solid icon
    Homemade Roasted Red Pepper Egg White Bites

    Homemade Roasted Red Pepper Egg White Bites


    5 Stars 4 Stars 3 Stars 2 Stars 1 Star

    No reviews

    • Author: imageuploader
    • Total Time: 30 minutes
    • Yield: 12 egg bites 1x
    • Diet: Low Carb

    Description

    These roasted red pepper egg bites are flavorful, cheesy, and a copycat of your fave Starbucks egg white bites. They’re high protein and great for meal prep.


    Ingredients

    Scale
    • 2 cups egg whites
    • 3/4 cup full fat cottage cheese
    • 1/2 cup shredded monterey jack cheese
    • 1/2 cup feta cheese
    • 1 1/2 teaspoons hot sauce
    • 1 tablespoon cornstarch
    • 1/2 teaspoon salt
    • 1/4 teaspoon pepper
    • 1/4 cup roasted red bell pepper, patted very dry and finely chopped
    • 1/4 cup spinach, finely chopped
    • 2 tablespoons green onion, sliced

    Instructions

    1. Preheat: Preheat oven to 350 degrees F. Prepare a 12-tin muffin pan by spraying with oil or use a silicone muffin pan (what I recommend for the easiest removal).
    2. Blend: Add egg whites, cottage cheese, monterey jack and feta cheeses, hot sauce, cornstarch, salt and pepper to a blender. Blend on high speed for 30 seconds.
    3. Layer: Add veggies evenly to the bottom of each muffin tin. The spinach tends to float to the top, so I recommend layering them in this order: spinach, green onions, roasted red peppers.
    4. Pour: Pour the egg mixture evenly into muffin tins on top of the veggies.
    5. Bake: Bake for 22-25 minutes. Allow to cool in muffin tins for 10-15 minutes before removing and storing in an airtight container.

    Notes

    Use cornstarch to prevent the bites from getting watery and improve texture. Avoid over-filling the muffin cups (fill no more than two-thirds full) to ensure even cooking. A silicone muffin pan is highly recommended for easy removal.

    • Prep Time: 10 minutes
    • Cook Time: 20 minutes
    • Category: Breakfast
    • Method: Baking
    • Cuisine: American

    Nutrition

    • Serving Size: 1 egg bite
    • Calories: 72 kcal
    • Sugar: 1 g
    • Sodium: 413 mg
    • Fat: 3 g
    • Saturated Fat: 2 g
    • Unsaturated Fat: 1.1 g
    • Trans Fat: 0 g
    • Carbohydrates: 2 g
    • Fiber: 0.1 g
    • Protein: 8 g
    • Cholesterol: 12 mg
  • Creamy Low Carb Chicken Casserole

    Creamy Low Carb Chicken Casserole

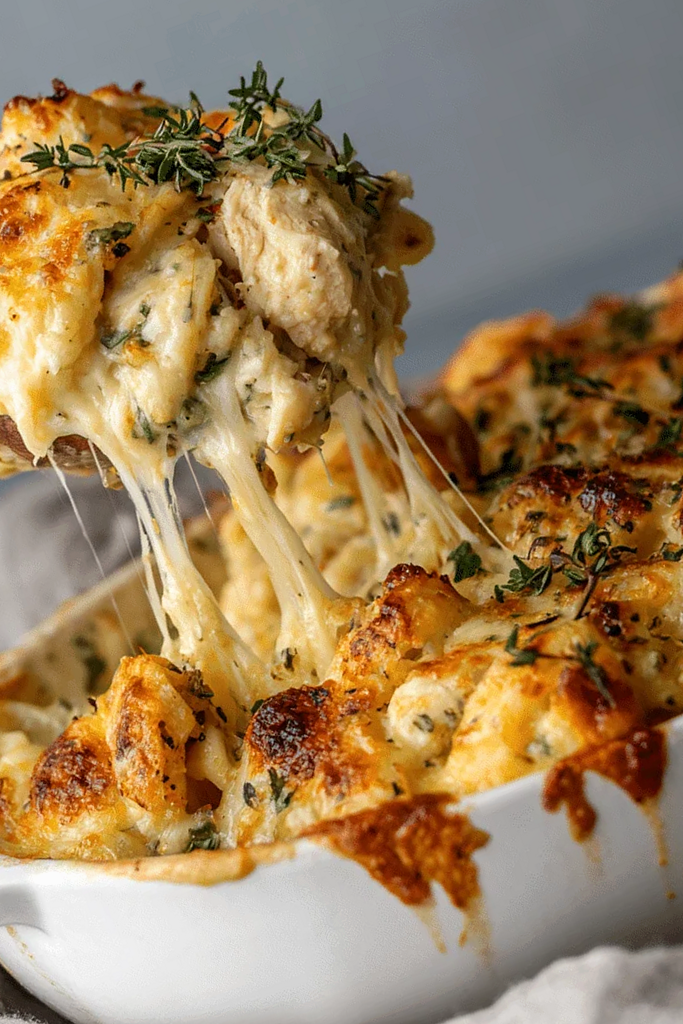
    This creamy chicken casserole is a low-carb, cheesy dinner that is easy to prepare and highly satisfying. It combines tender chicken and steamed vegetables in a rich sauce for a hearty meal.

    Recipe image

    List of ingredients

    • 3 cups cooked, shredded chicken – rotisserie chicken works well for convenience.
    • 8 oz cream cheese, softened – ensures a smooth, lump-free sauce.
    • ½ cup sour cream – adds a slight tang and richness.
    • ¼ cup mayonnaise – provides body and creamy texture.
    • 1½ cups shredded cheddar cheese, divided – use sharp cheddar for better flavor.
    • ¼ cup grated Parmesan cheese – adds a salty, nutty finish.
    • 2 cups broccoli florets, steamed – keep them slightly firm to avoid mushiness.
    • 1 cup cauliflower florets, steamed and chopped – a great low-carb filler.
    • ½ tsp garlic powder – provides a savory base.
    • ½ tsp onion powder – adds depth to the sauce.
    • ½ tsp dried thyme or Italian seasoning – provides a subtle herbal note.
    • Salt and pepper to taste – used for overall flavor balance.
    • Fresh parsley – for a colorful and fresh garnish.

    step-by-step instructions

    1. Prepare the Oven: Preheat your oven to 375°F. Grease a 9×13-inch baking dish with butter or nonstick spray to prevent sticking.
    2. Mix the Sauce: In a large mixing bowl, combine the softened cream cheese, sour cream, mayonnaise, garlic powder, onion powder, thyme, salt, and pepper. Stir until the mixture is completely smooth.
    3. Combine Main Ingredients: Fold the shredded chicken, steamed broccoli, steamed cauliflower, and 1 cup of the shredded cheddar cheese into the sauce. Mix until everything is evenly coated.
    4. Assemble the Bake: Transfer the chicken and vegetable mixture into the greased baking dish. Spread it evenly and top with the remaining ½ cup of cheddar cheese and the grated Parmesan.
    5. Bake and Brown: Bake for 25 to 30 minutes until the casserole is bubbly. Broil for 2 to 3 minutes at the end to achieve a golden-brown top.
    6. Rest and Garnish: Allow the casserole to cool for 5 minutes to let the sauce set. Garnish with fresh parsley and serve immediately.

    Essential Cooking Tips

    Softening Cream Cheese for Smoothness

    To achieve a perfectly smooth sauce, the cream cheese must be fully softened to room temperature. If the cheese is too cold, it will create small lumps that are difficult to stir out. You can leave it on the counter for two hours or microwave it in very short bursts.

    Drying Steamed Vegetables to Prevent Sogginess

    Always pat your steamed broccoli and cauliflower with paper towels before adding them to the bowl. Excess water on the surface of the vegetables will thin out the sauce and make the casserole watery. This step ensures the creamy consistency remains thick and rich.

    Choosing Block Cheese Over Pre-Shredded

    Grate your cheddar cheese from a block rather than using pre-bagged shredded cheese. Pre-shredded cheeses are coated in potato starch or cellulose to prevent clumping in the bag. This coating can hinder the melting process and affect the overall texture of the sauce.

    Selecting the Right Baking Pan

    A glass or ceramic 9×13-inch baking dish is ideal for this recipe because it distributes heat evenly. Metal pans tend to heat up faster and may brown the edges of the casserole too quickly. Ensure the dish is well-greased to make serving and cleanup easier.

    Customizable Substitutions

    Replacing Chicken with Other Proteins

    You can replace the shredded chicken with cooked turkey or firm white fish. If using shrimp, add them at the very end of the mixing process to avoid overcooking. Ensure all alternative proteins are fully cooked before adding them to the sauce.

    Integrating Different Low-Carb Vegetables

    While broccoli and cauliflower are standard, you can use spinach, zucchini, or chopped asparagus. If using zucchini, salt the slices first and let them drain to remove excess moisture. This prevents the vegetable from releasing water during the baking process.

    Using Dairy-Free Alternatives

    For a dairy-free version, use almond-based cream cheese and a plant-based cheddar substitute. Coconut yogurt or cashew cream can replace the sour cream for a similar tang. Ensure the dairy-free cheese is rated for melting to get the right consistency.

    Adjusting the Herbal Flavor Profile

    If you prefer a different aroma, swap the dried thyme for dried oregano, basil, or a mix of both. Fresh rosemary, finely chopped, also adds a sophisticated woody flavor. Keep the quantity the same to avoid overpowering the cheese.

    Creative Recipe Variations

    Adding Smoked Paprika for Depth

    To introduce a smoky element without using meat products, stir in one teaspoon of smoked paprika. This adds a rich, charred flavor that complements the cheddar cheese perfectly. It provides a depth of flavor similar to smoked meats.

    Creating a Spicy Version with Chiles

    For those who enjoy heat, add two tablespoons of diced green chiles or a pinch of cayenne pepper to the sauce. These additions provide a mild to moderate kick that cuts through the richness of the cream cheese. You can also add diced jalapeños for extra texture.

    Modifying for Buffalo Chicken Style

    Replace half of the mayonnaise with a high-quality buffalo hot sauce. This transforms the dish into a spicy, tangy meal reminiscent of buffalo wings. Top the casserole with blue cheese crumbles instead of Parmesan for an authentic flavor.

    Increasing Vegetable Ratios for Lower Calories

    To reduce the calorie density, increase the amount of cauliflower and broccoli while slightly reducing the chicken. This increases the fiber content and makes the dish more nutrient-dense. The sauce will still bind everything together effectively.

    Serving and Pairing Ideas

    Pairing with a Fresh Side Salad

    Serve this rich casserole with a crisp Caesar salad without croutons or a simple spinach salad. The acidity from a lemon-based vinaigrette helps balance the heavy fats in the cheese sauce. This creates a more balanced meal overall.

    Serving with Low-Carb Bread Options

    Pair the dish with keto-friendly garlic bread or cloud bread for extra comfort. These options allow you to scoop up any extra sauce left on the plate. They provide the satisfying texture of bread without the added carbohydrates.

    Adding Roasted Green Vegetables

    Side dishes like roasted asparagus or sautéed green beans provide a nice textural contrast. Toss them in olive oil and lemon juice before roasting at 400°F. This adds a bright, fresh element to the plate.

    Organizing the Dish for Meal Prep

    This casserole is excellent for weekly meal planning. Portion the finished bake into airtight glass containers immediately after it has cooled. These portions can be kept in the fridge and eaten as convenient lunches throughout the week.

    Storage and Reheating Guide

    Storing Leftovers in the Refrigerator

    Store any remaining casserole in an airtight container in the refrigerator for up to four days. Ensure the dish has cooled completely before sealing it to avoid condensation. This prevents the top from becoming soggy during storage.

    Freezing the Casserole for Future Use

    You can freeze the baked casserole by wrapping it tightly in aluminum foil and placing it in a freezer bag. It will remain high quality for up to two months. Thaw it in the refrigerator overnight before reheating to maintain the best texture.

    Reheating in the Oven for Best Texture

    To reheat, place the casserole in a 350°F oven until it is heated through and bubbly. Cover the dish with foil to prevent the cheese from drying out or burning. This method preserves the original consistency of the sauce.

    Using the Microwave for Quick Heating

    For a faster option, reheat individual portions in the microwave on medium power. Heat in 30-second intervals, stirring gently between each session. This ensures the center is hot without overcooking the edges.

    Common Troubleshooting

    Preventing a Watery Consistency

    If your casserole comes out too watery, it is usually due to under-drained vegetables. Ensure that all steamed vegetables are patted dry with a towel. Avoid overcooking the vegetables during the steaming phase, as they will continue to cook in the oven.

    Correcting Bland Flavor Profiles

    If the dish tastes bland, add a pinch more salt or a squeeze of fresh lemon juice before serving. The acidity of the lemon brightens the heavy dairy flavors. You can also add a dash of Worcestershire sauce for extra umami.

    Avoiding Burnt Cheese Toppings

    If the cheese on top browns too quickly, cover the dish with foil for the remainder of the baking time. Only use the broiler for the final two minutes. Keep a close eye on the oven as broilers can burn cheese in seconds.

    Preventing Sauce Separation

    Sauce separation happens when the ingredients are not emulsified correctly or are at wildly different temperatures. Ensure the cream cheese is truly soft before mixing. Stir vigorously to ensure a homogeneous blend before adding the chicken and vegetables.

    Protein and Veggie Prep

    Using Rotisserie Chicken for Speed

    A store-bought rotisserie chicken is the fastest way to get shredded meat for this recipe. Remove the skin and bones, then use two forks to pull the meat apart. This meat is usually well-seasoned, which adds to the casserole’s flavor.

    Poaching Chicken for Tenderness

    For a cleaner taste, poach chicken breasts in simmering water or vegetable broth. Simmer gently until the internal temperature reaches 165°F. This method keeps the meat moist and tender for shredding.

    Shredding Chicken Efficiently

    To shred chicken quickly, use a handheld electric mixer on low speed while the meat is still warm. The beaters will pull the meat apart in seconds. Alternatively, a sharp knife and cutting board work well for a more chunky texture.

    Proper Steaming Times for Broccoli

    Steam broccoli for only 3 to 5 minutes until it is bright green and tender-crisp. Oversteaming will cause the florets to break apart in the casserole. Use a steamer basket to avoid boiling the vegetables in water.

    Consistency in Cauliflower Chop

    Cut cauliflower florets into small, uniform bite-sized pieces. This ensures that every forkful of the casserole has a consistent mix of ingredients. Uniform pieces also cook evenly during the steaming process.

    Managing Moisture in Zucchini

    If substituting with zucchini, slice the rounds and sprinkle them with salt. Let them sit for 15 minutes, then squeeze the excess water out with a paper towel. This prevents the zucchini from turning the sauce into a soup.

    Equipment Recommendations

    Utilizing Glass vs Metal Pans

    Glass pans are superior for casseroles because they hold heat longer and are easier to monitor. Metal pans conduct heat faster, which can lead to scorched edges. Always choose a pan that allows the ingredients to sit about 2 inches deep.

    Choosing a Sturdy Mixing Bowl

    Use a large stainless steel or ceramic mixing bowl to combine the ingredients. A larger bowl prevents the sauce from splashing over the sides during mixing. This makes it easier to fold in the chicken and vegetables without crushing them.

    Frequently Asked Questions

    Can I make this with raw chicken?

    This recipe is designed for pre-cooked chicken to ensure the sauce doesn’t break. If you have raw chicken, roast or poach it first, let it cool slightly, then shred it for the casserole.

    Is this recipe naturally keto?

    Yes, this recipe is keto-friendly because it relies on high-fat dairy and low-carb vegetables. It avoids grains, starches, and sugars, making it suitable for a ketogenic diet.

    Can I use Greek yogurt instead of sour cream?

    Yes, plain Greek yogurt is an excellent substitute for sour cream. It provides a similar tang and creamy texture while adding a bit more protein to the dish.

    What is the best cheese for melting?

    Sharp cheddar is the best choice for its bold flavor and excellent melting properties. For an even smoother melt, always grate your own cheese from a block.

    Can I add eggs to this casserole?

    You can whisk one or two eggs into the sauce to help bind the ingredients more firmly. This makes the texture more like a breakfast bake, though it is not necessary for the standard version.

    Print
    clock clock iconcutlery cutlery iconflag flag iconfolder folder iconinstagram instagram iconpinterest pinterest iconfacebook facebook iconprint print iconsquares squares iconheart heart iconheart solid heart solid icon
    Creamy Low Carb Chicken Casserole

    Creamy Low Carb Chicken Casserole


    5 Stars 4 Stars 3 Stars 2 Stars 1 Star

    No reviews

    • Author: imageuploader
    • Total Time: 40 minutes
    • Yield: 6 servings 1x
    • Diet: Keto

    Description

    This Creamy Low Carb Chicken Casserole is a rich, cheesy, keto-friendly dish made with shredded chicken, broccoli, cauliflower, and a velvety cream cheese sauce. Perfect for weeknight dinners or meal prep.


    Ingredients

    Scale
    • 3 cups cooked, shredded chicken
    • 8 oz cream cheese, softened
    • ½ cup sour cream
    • ¼ cup mayonnaise
    • 1½ cups shredded cheddar cheese (divided)
    • ¼ cup grated Parmesan cheese
    • 2 cups broccoli florets, steamed
    • 1 cup cauliflower florets, steamed and chopped
    • ½ tsp garlic powder
    • ½ tsp onion powder
    • ½ tsp dried thyme or Italian seasoning
    • Salt and pepper to taste
    • Fresh parsley (for garnish)

    Instructions

    1. Preheat: Preheat oven to 375°F. Grease a 9×13-inch baking dish.
    2. Mix: In a bowl, mix cream cheese, sour cream, mayo, garlic powder, onion powder, thyme, salt, and pepper until smooth.
    3. Combine: Fold in chicken, broccoli, cauliflower, and 1 cup cheddar cheese.
    4. Assemble: Transfer to casserole dish. Top with remaining cheddar and Parmesan.
    5. Bake: Bake 25–30 minutes until bubbly. Broil 2–3 minutes for golden top.
    6. Serve: Cool 5 minutes. Garnish with parsley and serve

    Notes

    To prevent a watery casserole, ensure steamed vegetables are drained and patted dry before adding. Full-fat dairy is recommended for the best creamy texture.

    • Prep Time: 10 minutes
    • Cook Time: 30 minutes
    • Category: Dinner
    • Method: Baking
    • Cuisine: American

    Nutrition

    • Serving Size: 1 serving
    • Calories: 485 kcal
    • Sugar: 6 g
    • Sodium: 920 mg
    • Fat: 38 g
    • Saturated Fat: 22 g
    • Unsaturated Fat: 14 g
    • Trans Fat: 0 g
    • Carbohydrates: 12 g
    • Fiber: 4 g
    • Protein: 27 g
    • Cholesterol: 118 mg
  • Cream Cheese Vanilla Breakfast Loaf

    Cream Cheese Vanilla Breakfast Loaf

    This soft and tender breakfast bread uses blended cream cheese to achieve a rich, bakery-style crumb. It is lightly sweetened and aromatic, making it a versatile option for morning meals or afternoon snacks.

    Recipe image

    List of ingredients

    • 2 large eggs – provides necessary lift and structure.
    • 3/4 cup granulated sugar – adds sweetness and helps aerate the batter.
    • 4 oz cream cheese, softened – ensures a plush, tender interior crumb.
    • 1/3 cup neutral oil – keeps the loaf moist for several days.
    • 1 cup milk – softens the crumb and balances the richness.
    • 1 teaspoon vanilla extract – provides the primary warm aroma.
    • 2 cups all-purpose flour – the structural base of the loaf.
    • 1 teaspoon baking powder – acts as the leavening agent for rise.
    • Pinch of salt – balances the sugar and enhances overall flavor.

    step-by-step instructions

    1. Prepare oven and pan: Preheat your oven to 350°F (175°C) and grease a standard loaf pan thoroughly, ensuring the corners are coated to prevent sticking.
    2. Cream eggs and sugar: In a large bowl, whisk the eggs and sugar together until the mixture looks pale and slightly thickened to incorporate air.
    3. Blend in cream cheese: Add the softened cream cheese to the egg mixture and beat until fully incorporated and completely smooth with no visible lumps.
    4. Add liquids: Stir in the neutral oil, milk, and vanilla extract until the batter is cohesive and silky in texture.
    5. Combine dry ingredients: In a separate bowl, whisk together the flour, baking powder, and salt to ensure the leavening agent is evenly distributed.
    6. Fold in flour: Gently fold the dry ingredients into the wet batter until just combined; avoid overmixing to keep the loaf tender.
    7. Fill pan: Pour the batter into the prepared loaf pan and smooth the top evenly with a spatula for a professional look.
    8. Bake: Bake for 45–50 minutes until the loaf is lightly golden and a toothpick inserted into the center comes out clean.
    9. Cool: Let the loaf cool in the pan for 10 minutes, then transfer to a wire rack to cool completely before slicing for the cleanest pieces.

    Advanced Baking Techniques for Success

    Using the Spoon and Level Method for Flour

    To avoid using too much flour, spoon the flour into your measuring cup until it overflows and then level it off with a knife. Packing flour directly with the cup can compress it, leading to a dense or dry loaf. This technique ensures a consistent weight and a softer final texture.

    Ensuring Cream Cheese is Fully Softened

    Cream cheese must be at room temperature to blend seamlessly into the batter. If it is too cold, it will create small white lumps that will not disappear during baking. Let it sit on the counter for two hours or microwave it in short 5-second bursts until spreadable.

    Preventing Gluten Overdevelopment

    Once you add the flour to the wet ingredients, stop mixing as soon as no dry streaks remain. Overmixing develops too much gluten, which can make the bread tough and rubbery rather than tender. Use a spatula to gently fold the ingredients together rather than using a whisk.

    Managing Oven Heat and Surface Browning

    If the top of the loaf browns too quickly before the center is set, loosely cover it with a piece of aluminum foil. This creates a heat shield that prevents the crust from burning while the interior continues to bake. Check for doneness with a toothpick to be certain the middle is fully cooked.

    Flavor Variations and Add-ins

    Adding Bright Citrus Notes

    Stir in one teaspoon of fresh lemon or orange zest into the sugar and egg mixture. This adds a bright, citrusy acidity that cuts through the richness of the cream cheese. It transforms the loaf into a refreshing option for spring or summer brunches.

    Folding in Fresh Berries

    Gently fold in a half-cup of fresh blueberries or raspberries just before pouring the batter into the pan. Toss the berries in a teaspoon of flour first to prevent them from sinking to the bottom. This adds bursts of natural sweetness and a vibrant color to each slice.

    Incorporating Mini Chocolate Chips

    Add a half-cup of mini semi-sweet chocolate chips for a more indulgent version of the loaf. Mini chips are preferable to standard chips because they distribute more evenly throughout the crumb. They provide a rich contrast to the subtle vanilla flavor of the bread.

    Swirling in Fruit Preserves

    After pouring the batter into the pan, drop small spoonfuls of apricot or raspberry jam on top. Use a knife to gently swirl the jam into the batter in a figure-eight pattern. This creates pockets of concentrated fruit flavor without altering the base batter’s chemistry.

    Substituting Almond Extract

    Replace the vanilla extract with an equal amount of almond extract for a nuttier, more sophisticated aroma. Almond extract is more potent than vanilla, so ensure you measure it accurately. This variation pairs exceptionally well with the cream cheese base.

    Creating a Cinnamon Sugar Crust

    Mix one tablespoon of granulated sugar with a pinch of cinnamon and sprinkle it over the top of the batter before baking. The sugar caramelizes in the oven, creating a thin, crisp crust. This adds a textural contrast to the soft interior of the loaf.

    Applying a Simple Vanilla Glaze

    Whisk together half a cup of powdered sugar, one tablespoon of milk, and a drop of vanilla extract. Drizzle this glaze over the completely cooled loaf for an extra layer of sweetness. This is ideal if you are serving the loaf as a light dessert rather than breakfast.

    Serving and Pairing Suggestions

    Serving Plain with Hot Beverages

    This loaf is designed to be enjoyed plain to appreciate the subtle vanilla and creamy notes. It pairs perfectly with a cup of black coffee or a strong Earl Grey tea. The bitterness of the beverage balances the mild sweetness of the bread.

    Using Butter or Fruit Preserves

    For added richness, spread a thin layer of salted butter on a warm slice. Alternatively, use a tart preserve like orange marmalade or blackberry jam. The acidity of the preserves complements the richness of the cream cheese crumb.

    Creating a Balanced Breakfast Plate

    Pair a slice of the loaf with a side of Greek yogurt and fresh seasonal berries. This adds protein and vitamins to the meal, making it a more complete breakfast. The tanginess of the yogurt mirrors the subtle tang of the cream cheese in the bread.

    Lightly Toasting Slices

    Place slices in a toaster or under a broiler for 60 seconds to create crisp edges. Toasting enhances the aroma of the vanilla and gives the loaf a satisfying crunch. Keep the center soft by avoiding over-toasting.

    Incorporating into Brunch Menus

    Serve the loaf as part of a larger brunch spread alongside savory dishes like scrambled eggs or avocado toast. It acts as a bridge between the savory and sweet elements of the meal. Slice it thinly to allow guests to sample it without feeling overly full.

    Presenting as a Simple Dessert

    Serve a slice at room temperature topped with a dollop of lightly sweetened whipped cream. Add a few fresh mint leaves and a raspberry for a polished presentation. This turns the breakfast loaf into an elegant, low-sugar dessert option.

    Storage and Preservation

    Room Temperature Storage

    Store the loaf in an airtight container or wrap it tightly in plastic wrap at room temperature. It will stay fresh and moist for up to two days. Keep it away from direct sunlight to prevent the oils from oxidizing.

    Refrigeration Guidelines

    For longer storage, keep the loaf in the refrigerator for up to five days. The cream cheese content makes it highly stable under refrigeration. However, the bread may firm up, so it is best to let slices return to room temperature before eating.

    Freezing Individual Slices

    Wrap individual slices in parchment paper and then place them in a heavy-duty freezer bag. This prevents the slices from sticking together and allows you to thaw only what you need. Frozen slices maintain their quality for up to three months.

    Thawing Frozen Bread

    Thaw slices overnight in the refrigerator for the best texture preservation. Alternatively, leave a slice on the counter for about 30 minutes before reheating. Avoid thawing in the microwave for too long, as this can make the bread rubbery.

    Reheating Methods

    Quick Microwave Warming

    Place a slice on a microwave-safe plate and heat for 10 to 15 seconds. This is the fastest way to soften the crumb and release the vanilla aroma. Be careful not to overheat, as the sugar can cause the bread to toughen quickly.

    Using a Toaster for Texture

    Use a standard toaster on a medium setting to achieve a golden-brown exterior. This method is best for slices that have been refrigerated or frozen. It restores the contrast between the crisp crust and the soft interior.

    Low-Temperature Oven Warming

    Wrap the loaf or individual slices in foil and place them in a 300°F (150°C) oven for 5 to 10 minutes. This gently warms the bread without drying out the moisture. It is the best method for warming a larger portion for several people.

    Troubleshooting Common Baking Issues

    Addressing a Cracked Top

    A crack appearing down the center of the loaf is completely normal and usually indicates a good rise. It happens when the interior expands faster than the crust can stretch. It does not affect the taste or texture of the bread.

    Dealing with Lumps in the Batter

    If you notice lumps of cream cheese after mixing, do not overmix the batter to get rid of them. Instead, use a whisk to vigorously beat the cream cheese into the eggs before adding the flour. If lumps persist, a quick pulse with an immersion blender can smooth the wet ingredients.

    Correcting an Underbaked Center

    If a toothpick comes out wet, return the loaf to the oven in 5-minute increments. If the top is already brown, cover it with foil to prevent further darkening. Ensure the oven is fully preheated to maintain a consistent internal temperature.

    Managing a Dense Texture

    A dense loaf is often the result of too much flour or overmixing the batter. Ensure you are using the spoon-and-level method for flour and stopping the mixing process as soon as the flour is incorporated. Check that your baking powder is fresh and not expired.

    Frequently Asked Questions

    Can I use butter instead of oil?

    Yes, you can substitute 1/3 cup of melted butter for the neutral oil. While butter adds a richer flavor, oil ensures the loaf stays softer for a longer period. Butter-based loaves tend to firm up more quickly when cooled or refrigerated.

    Can I make this loaf dairy-free?

    You can use a plant-based cream cheese alternative and an unsweetened plant-based milk like almond or soy. The texture may be slightly different, and the rise might be marginally lower. Ensure the dairy-free cream cheese is fully softened before blending.

    Can I reduce the sugar?

    You can reduce the sugar by up to two tablespoons without significantly affecting the structure. However, reducing it further may result in a less tender crumb and a shorter shelf life. Sugar helps retain moisture and tenderizes the gluten.

    Can I bake this in mini loaf pans?

    Yes, the batter can be divided into smaller pans. Reduce the baking time to approximately 25 to 30 minutes. Begin checking for doneness with a toothpick earlier than you would for a full-sized loaf.

    Print
    clock clock iconcutlery cutlery iconflag flag iconfolder folder iconinstagram instagram iconpinterest pinterest iconfacebook facebook iconprint print iconsquares squares iconheart heart iconheart solid heart solid icon
    Cream Cheese Vanilla Breakfast Loaf

    Cream Cheese Vanilla Breakfast Loaf


    5 Stars 4 Stars 3 Stars 2 Stars 1 Star

    No reviews

    • Author: imageuploader
    • Total Time: 65 minutes
    • Yield: 1 loaf 1x
    • Diet: Vegetarian

    Description

    Cream Cheese Vanilla Breakfast Loaf is a soft, tender breakfast bread made with cream cheese blended directly into the batter for a rich yet light crumb. Gently sweetened and warmly scented with vanilla, this loaf slices cleanly and stays moist for days.


    Ingredients

    Scale
    • 2 large eggs
    • 3/4 cup granulated sugar
    • 4 oz cream cheese, softened
    • 1/3 cup neutral oil
    • 1 cup milk
    • 1 teaspoon vanilla extract
    • 2 cups all-purpose flour
    • 1 teaspoon baking powder
    • Pinch of salt

    Instructions

    1. Step: Preheat oven to 350°F (175°C) and grease a standard loaf pan.
    2. Step: In a large bowl, whisk eggs and sugar until pale and slightly thickened.
    3. Step: Beat in softened cream cheese until smooth and fully incorporated.
    4. Step: Stir in oil, milk, and vanilla extract until cohesive.
    5. Step: In a separate bowl, mix flour, baking powder, and salt.
    6. Step: Fold dry ingredients gently into the batter until just combined.
    7. Step: Pour batter into the prepared loaf pan and smooth the top.
    8. Step: Bake for 45–50 minutes until set and a toothpick inserted comes out clean.
    9. Step: Cool briefly in the pan, then transfer to a rack and cool completely before slicing.

    Notes

    Ensure cream cheese is fully softened to avoid lumps. Avoid overmixing once flour is added to keep the crumb tender. If the top browns too quickly, tent loosely with foil near the end.

    • Prep Time: 15 minutes
    • Cook Time: 50 minutes
    • Category: Breakfast
    • Method: Baking
    • Cuisine: American

    Nutrition

    • Serving Size: 1 slice
    • Calories: 265 kcal
    • Sugar: 15 g
    • Sodium: 250 mg
    • Fat: 10 g
    • Saturated Fat: 5 g
    • Unsaturated Fat: 5 g
    • Trans Fat: 0 g
    • Carbohydrates: 36 g
    • Fiber: 1 g
    • Protein: 6 g
    • Cholesterol: 60 mg
  • Ground Turkey Orzo Skillet

    Ground Turkey Orzo Skillet

    This one-pan ground turkey orzo skillet is a balanced, nutrient-dense meal that comes together in just 30 minutes. It combines lean protein, tender pasta, and fresh greens for an efficient weeknight dinner solution.

    Recipe image

    List of ingredients

    • 1 tablespoon olive oil – used for sautéing the meat and vegetables.
    • 1 pound lean ground turkey – provides a lean protein base for the dish.
    • 1 small yellow onion, diced – adds a foundational savory sweetness.
    • 3 cloves garlic, minced – provides aromatic depth and flavor.
    • 1 teaspoon Italian seasoning – a blend of herbs for Mediterranean flavor.
    • 1/2 teaspoon salt – enhances all the other flavors in the skillet.
    • 1/4 teaspoon black pepper – adds a subtle hint of spice.
    • 1 cup uncooked orzo – a small rice-shaped pasta that absorbs the broth.
    • 1 can (14.5 oz) fire roasted diced tomatoes – adds smokiness and acidity.
    • 2 cups low-sodium chicken broth – the primary cooking liquid for the pasta.
    • 2 cups fresh baby spinach – adds color and essential vitamins.
    • 1/2 cup grated Parmesan (optional) – adds a salty, nutty finish.
    • Fresh basil or parsley, for garnish (optional) – provides a bright, fresh top note.

    step-by-step instructions

    1. Brown the meat: Heat olive oil in a large skillet over medium heat. Add ground turkey and cook, breaking it apart with a spoon, until browned (6–8 minutes).
    2. Sauté aromatics: Add diced onion and cook for 3–4 minutes until softened. Stir in garlic, Italian seasoning, salt, and pepper, then cook for 1 minute until fragrant.
    3. Combine base: Stir in the uncooked orzo to coat it in the oil and seasonings. Pour in the fire roasted diced tomatoes with their juices and the chicken broth, stirring well to combine.
    4. Simmer the pasta: Bring the mixture to a boil, then reduce the heat to low. Cover the skillet and simmer for 10–12 minutes until the orzo is tender and most of the liquid is absorbed.
    5. Fold in greens: Turn off the heat. Stir in the baby spinach and Parmesan cheese until the spinach is wilted and the cheese is melted.
    6. Rest and serve: Let the dish rest for 3–5 minutes to allow the sauce to thicken. Garnish with fresh basil or parsley before serving.

    Optimizing Your Cooking Technique

    Browning Turkey for Maximum Flavor

    To get the best taste, avoid crowding the pan and let the turkey sear undisturbed for a few minutes. This creates a brown crust through the Maillard reaction, which adds a deeper savory dimension to the final dish. Stir occasionally to ensure even browning across all pieces.

    The Benefit of Toasting Orzo

    Stirring the dry orzo into the sautéed meat and oil before adding liquid effectively toasts the pasta. This process releases a nutty aroma and helps the orzo maintain its structure during simmering. It prevents the pasta from becoming overly mushy or clumping together.

    Managing Heat to Prevent Sticking

    Use a heavy-bottomed skillet or a cast-iron pan to ensure even heat distribution. If the turkey begins to stick, add a small splash of broth or more oil to deglaze the pan. Maintaining a consistent medium heat prevents the garlic from burning while the onions soften.

    Achieving the Perfect Orzo Texture

    Check the pasta at the 10-minute mark to ensure it remains al dente. Orzo can go from perfectly cooked to overdone very quickly due to its small size. If it is still too firm, add one more minute of simmering time under the lid.

    Layering Seasonings for Depth

    Adding salt and pepper early to the meat allows the seasoning to penetrate the protein. Adding the Italian herbs just before the liquid ensures the oils in the dried herbs are activated by the heat. This layering technique creates a more complex flavor profile than seasoning at the end.

    Ingredient Alternatives and Customizations

    Substituting Ground Turkey for Other Proteins

    You can replace ground turkey with ground chicken for a very similar taste and texture. For a plant-based version, use crumbled firm tofu or cooked lentils. Adjust the simmering time slightly if using legumes to ensure they are fully tender.

    Selecting the Best Gluten-Free Orzo

    If you need a gluten-free option, look for orzo made from brown rice or corn. Be aware that gluten-free pastas often absorb liquid differently and may require an extra 1/4 cup of broth. Stir more frequently to prevent the starch from sticking to the bottom.

    Dairy-Free and Vegan Cheese Swaps

    Replace the Parmesan cheese with nutritional yeast for a similar salty and cheesy flavor. Alternatively, a plant-based Parmesan alternative works well. If you prefer no cheese, a squeeze of fresh lemon juice can provide the necessary brightness.

    Integrating Seasonal Vegetables

    In the summer, stir in diced zucchini or yellow squash during the onion sauté phase. For autumn, try adding small cubes of butternut squash or carrots. In winter, swap the spinach for chopped kale or Swiss chard for a heartier green.

    Using Different Tomato Varieties

    Fire roasted tomatoes provide a smoky depth, but regular diced tomatoes offer a cleaner, brighter taste. For a thicker sauce, you can use half a can of tomato paste mixed with a bit of extra broth. Crushed tomatoes will result in a more cohesive, sauce-like consistency.

    Adjusting the Broth for Different Profiles

    Low-sodium chicken broth is the standard, but vegetable broth works perfectly for a lighter taste. For a richer flavor, you can use a mixture of beef broth and water. Always use low-sodium options to maintain control over the overall salt level.

    Comprehensive Storage and Preservation

    Optimal Refrigeration Practices

    Place leftovers in an airtight glass or plastic container once the dish has cooled to room temperature. This prevents condensation from making the pasta mushy. The skillet meal will stay fresh and safe to eat for up to 4 days in the refrigerator.

    Freezing Instructions for Long-Term Storage

    Divide the recipe into single-serving portions and freeze them in freezer-safe bags or containers. Remove as much air as possible to prevent freezer burn. This meal can be stored in the freezer for up to 3 months without losing significant quality.

    Restoring Moisture During Reheating

    Pasta tends to absorb remaining moisture while sitting in the fridge. When reheating on the stove or in the microwave, add 1-2 tablespoons of water or broth. This loosens the orzo and restores the creamy consistency of the sauce.

    Assessing Food Safety for Leftovers

    Ensure the turkey is reheated to an internal temperature of 165 degrees Fahrenheit. If the dish has been sitting at room temperature for more than two hours, it should be discarded. Always smell and inspect the spinach for freshness before reheating.

    Serving Suggestions and Flavor Pairings

    Balancing Flavors with Acidic Garnishes

    A drizzle of fresh lemon juice or a sprinkle of lemon zest added right before serving cuts through the richness of the turkey and cheese. This acidity brightens the herbs and makes the dish feel lighter. It is a simple way to elevate the flavor profile.

    Creating a Complete Meal with Sides

    Pair this skillet with a crisp green salad or a Greek beet salad for a refreshing contrast. A side of toasted garlic herb bread is excellent for scooping up any remaining sauce. For a lighter pairing, steamed broccoli or roasted asparagus works well.

    Presentation for Large Groups

    For a rustic look, serve the meal directly from the skillet in the center of the table. For individual portions, use wide, shallow bowls to showcase the colors of the spinach and tomatoes. Top each bowl with an extra pinch of Parmesan for a professional finish.

    Enhancing Visual Appeal with Fresh Herbs

    Freshly chopped parsley adds a vibrant green color and a clean taste. Basil provides a more aromatic, peppery note that complements the Italian seasoning. Adding these herbs at the very end prevents them from wilting or losing their flavor.

    Troubleshooting and Common Kitchen Errors

    Fixing a Soupy Consistency

    If the orzo is cooked but the sauce is too thin, simmer the mixture without the lid for 2-3 minutes. This allows the excess liquid to evaporate and thicken. Avoid adding more pasta, as it will overcook and become mushy.

    Preventing Mushy Pasta

    Mushiness usually occurs from overcooking or using too much liquid. Always follow the measurements exactly and start checking for doneness a few minutes early. Remember that the pasta continues to cook slightly during the resting phase.

    Addressing Bland Flavor Profiles

    If the dish tastes flat, it likely needs more salt or acidity. Add a pinch of salt or a teaspoon of balsamic vinegar or lemon juice. This awakens the flavors of the garlic and Italian herbs without requiring more cooking time.

    Handling Meat Clumping in the Pan

    If the ground turkey forms large chunks, use a sturdy wooden spoon or a meat masher to break it down while browning. Doing this in the first few minutes of cooking ensures a consistent texture throughout the dish. Avoid over-stirring, as this can prevent proper browning.

    Frequently Asked Questions

    Can this be made in a slow cooker?

    It is not recommended to use a slow cooker for this recipe because orzo pasta breaks down and becomes mushy over long cook times. The skillet method ensures the pasta remains tender and distinct.

    Is there a way to make it low-carb?

    To reduce the carbohydrates, you can replace the orzo pasta with cauliflower rice. Since cauliflower rice does not absorb liquid like pasta, reduce the chicken broth by half and simmer for only 5 minutes.

    How do I store the fresh spinach?

    Keep your baby spinach in a breathable container with a paper towel to absorb excess moisture. This keeps the leaves crisp and prevents them from becoming slimy before you add them to the skillet.

    What is the best pan for this recipe?

    A 12-inch stainless steel or cast-iron skillet with a tight-fitting lid is ideal. These materials distribute heat evenly and provide the necessary seal to simmer the orzo efficiently.

    Print
    clock clock iconcutlery cutlery iconflag flag iconfolder folder iconinstagram instagram iconpinterest pinterest iconfacebook facebook iconprint print iconsquares squares iconheart heart iconheart solid heart solid icon
    Ground Turkey Orzo Skillet

    Ground Turkey Orzo Skillet


    5 Stars 4 Stars 3 Stars 2 Stars 1 Star

    No reviews

    • Author: imageuploader
    • Total Time: 30 minutes
    • Yield: 4 servings 1x
    • Diet: General

    Description

    This Ground Turkey Orzo Skillet is a fast, flavorful, and healthy one-pan dinner that’s ready in under 30 minutes. Made with lean turkey, tender orzo, juicy tomatoes, and fresh spinach, it’s the perfect weeknight meal for busy families, meal preppers, or anyone seeking nutritious comfort food.


    Ingredients

    Scale
    • 1 tablespoon olive oil
    • 1 pound lean ground turkey
    • 1 small yellow onion, diced
    • 3 cloves garlic, minced
    • 1 teaspoon Italian seasoning
    • 1/2 teaspoon salt
    • 1/4 teaspoon black pepper
    • 1 cup uncooked orzo
    • 1 can (14.5 oz) fire roasted diced tomatoes
    • 2 cups low-sodium chicken broth
    • 2 cups fresh baby spinach
    • 1/2 cup grated Parmesan (optional)
    • Fresh basil or parsley, for garnish (optional)

    Instructions

    1. Step: Heat olive oil in a large skillet over medium heat. Add ground turkey and cook, breaking apart, until browned (6–8 minutes).
    2. Step: Add diced onion and cook for 3–4 minutes until softened. Stir in garlic, Italian seasoning, salt, and pepper. Cook for 1 minute.
    3. Step: Stir in the orzo to coat. Add diced tomatoes (with juice) and chicken broth. Stir well.
    4. Step: Bring to a boil, then reduce heat to low, cover, and simmer for 10–12 minutes until orzo is tender and most liquid is absorbed.
    5. Step: Turn off heat. Stir in baby spinach and Parmesan (if using) until wilted and melted.
    6. Step: Let rest for 3–5 minutes before serving. Garnish with fresh herbs if desired.

    Notes

    Use gluten-free orzo if needed to make this dish gluten-free. Toast orzo for a nuttier flavor before adding liquid. Omit cheese or use nutritional yeast for a dairy-free version. Add more veggies like bell peppers or zucchini to bulk up the dish. Store leftovers for 4 days or freeze in portions for meal prep.

    • Prep Time: 10 minutes
    • Cook Time: 20 minutes
    • Category: Dinner
    • Method: Stovetop
    • Cuisine: American

    Nutrition

    • Serving Size: 1 bowl
    • Calories: 420 kcal
    • Sugar: 4 g
    • Sodium: 580 mg
    • Fat: 14 g
    • Saturated Fat: 5 g
    • Unsaturated Fat: 8 g
    • Trans Fat: 0 g
    • Carbohydrates: 40 g
    • Fiber: 3 g
    • Protein: 32 g
    • Cholesterol: 75 mg
  • Savory Baked Egg Muffins with Cheese and Veggies

    Savory Baked Egg Muffins with Cheese and Veggies

    These protein-rich egg muffins are a practical solution for quick morning meals. They are easy to prepare in large batches and maintain their quality when stored for the week.

    Recipe image

    List of ingredients

    • 12 large eggs – provide the structural base and protein.
    • 1 cup shredded cheddar cheese – adds richness and a savory flavor.
    • ½ cup red bell pepper, diced – adds color and a mild sweetness.
    • ½ cup fresh spinach, chopped – provides vitamins and a mild earthy taste.
    • ½ cup cooked and crumbled beef bacon – adds a salty, smoky element.
    • ½ teaspoon salt – enhances the overall flavor profile.
    • ¼ teaspoon pepper – adds a subtle spice.

    step-by-step instructions

    1. Prepare Oven and Pan: Preheat your oven to 350°F. Coat a 12-cup muffin pan thoroughly with non-stick spray to prevent the eggs from adhering to the sides.
    2. Beat the Eggs: Crack the eggs into a large mixing bowl. Beat them vigorously until the mixture is light and frothy to ensure a fluffier texture.
    3. Combine Ingredients: Stir in the shredded cheddar cheese, diced red bell pepper, chopped spinach, crumbled beef bacon, salt, and pepper. Mix until all components are evenly distributed.
    4. Fill the Pan: Pour the mixture into each muffin cup. Leave a small amount of space at the top of each cup to allow the muffins to rise during baking.
    5. Bake: Place the pan in the oven and bake for 15-20 minutes. The muffins are ready when the tops are firm and do not jiggle. Let them cool slightly before removing them from the pan.

    Optimal Preparation Techniques

    For the best results, ensure your eggs are at room temperature before beating. Room temperature eggs incorporate air more easily, which leads to a lighter and less dense muffin.

    When chopping the vegetables, aim for a consistent, small dice. Small pieces of red bell pepper and spinach distribute more evenly throughout the mixture, ensuring every muffin has a balanced ratio of ingredients.

    The non-stick preparation is critical for this recipe. If you do not have a high-quality non-stick spray, consider using silicone muffin liners. These liners allow for a completely clean release without the need for excess oil.

    Avoid overmixing the batter once the add-ins are incorporated. Stir just until the cheese and vegetables are combined. Overmixing can lead to a tougher texture in the final product.

    Protein and Vegetable Alternatives

    If you prefer a different protein, you can substitute beef bacon with cooked turkey bacon or diced smoked tofu. Ensure the substitute is fully cooked and drained of excess grease before adding it to the eggs.

    For different vegetable profiles, replace the red bell pepper with green bell pepper or finely diced carrots. Zucchini is also an excellent substitute, provided you squeeze out excess moisture first.

    Spinach can be swapped for chopped kale or Swiss chard. If using kale, remove the tough center stems and chop the leaves very finely to avoid a chewy texture.

    Mushrooms are another great addition. Sauté them briefly before adding them to the mixture to remove excess water and concentrate the flavor.

    Flavor Enhancement Options

    You can adjust the flavor profile by using different types of cheese. Replace cheddar with feta for a saltier, tangier taste, or use mozzarella for a milder, stretchier consistency.

    Adding dried herbs can enhance the aroma. A pinch of dried oregano, basil, or parsley mixed into the eggs provides a Mediterranean flavor profile.

    For a spicier version, incorporate a small amount of cayenne pepper or diced jalapeños. These additions provide a heat that complements the richness of the cheese.

    Garlic powder or onion powder are excellent for adding depth. Use about a quarter teaspoon of either to provide a savory backbone without altering the texture of the muffins.

    Serving and Pairing Recommendations

    Serve these egg muffins with a side of fresh seasonal fruit. Sliced strawberries, blueberries, or melon provide a natural sweetness and acidity that balances the savory eggs.

    To add more creaminess, top the warm muffins with a slice of fresh avocado. A small dollop of salsa or hot sauce can also add a fresh, zesty contrast to the dish.

    Pair these muffins with a piece of whole-grain toasted bread for additional fiber. This combination creates a more filling meal that sustains energy levels longer.

    For a beverage pairing, a green smoothie or a cup of black coffee complements the protein-heavy nature of the muffins. These options provide a balanced start to the day.

    Long-Term Storage and Preservation

    Store leftover egg muffins in an airtight container in the refrigerator. They will remain fresh and safe to eat for up to 5 days.

    To prevent the muffins from absorbing other odors in the fridge, ensure the container has a tight seal. Placing a piece of parchment paper between layers of muffins can prevent them from sticking together.

    For longer storage, these muffins can be frozen. Allow them to cool completely, then place them on a baking sheet in the freezer for one hour before transferring them to a freezer-safe bag.

    Frozen egg muffins can be stored for up to 2 months. Label the bag with the date of preparation to ensure you use them within the optimal window.

    Effective Reheating Methods

    The fastest way to reheat egg muffins is using a microwave. Wrap a muffin in a damp paper towel and heat on medium power for 30-60 seconds.

    The damp paper towel helps steam the muffin, preventing it from becoming rubbery or dry. Check the internal temperature to ensure it is heated through.

    For a crispier exterior, use a conventional oven or toaster oven. Preheat the oven to 300°F and heat the muffins for 5-10 minutes on a wire rack.

    Air fryers are also an efficient option. Heat them at 320°F for 3-5 minutes. This method maintains the structure while warming the center quickly.

    Advanced Meal Prep Strategy

    Prepare these muffins on a Sunday to cover the entire work week. By making 12 or 24 at once, you eliminate the need for daily morning cooking.

    Divide the muffins into individual portions or containers immediately after they have cooled. This makes it easier to grab a pre-measured serving as you head out the door.

    If you enjoy variety, divide your egg mixture into two batches before adding the mix-ins. You can make half with beef bacon and cheddar and the other half with spinach and feta.

    Plan your grocery shopping around the vegetable requirements. Buying pre-chopped spinach or frozen diced peppers can save significant time during the preparation phase.

    Common Baking Troubleshooting

    If your muffins are sticking to the pan, you may not have used enough non-stick spray. Let the muffins cool for 2-3 minutes before attempting to remove them; this allows them to pull away from the edges naturally.

    Soggy muffins are usually caused by excess moisture in the vegetables. If using frozen spinach or mushrooms, ensure they are thoroughly thawed and squeezed dry before adding them to the eggs.

    Rubbery texture is often a sign of overcooking. Use a timer and check the muffins at the 15-minute mark. They should be set but not browned or puffed up excessively.

    If the muffins do not rise, ensure you beat the eggs until they are frothy. The air bubbles created during this process are what provide the lift and lightness in the final bake.

    Frequently Asked Questions

    How do I know when the muffins are perfectly cooked? The muffins are done when the center no longer jiggles when the pan is gently shaken. A toothpick inserted into the center should come out clean.

    Can I make these without a muffin pan? Yes, you can use silicone molds or even oven-safe ramekins. Adjust the baking time slightly based on the depth and material of the container used.

    Are these suitable for a low-carb diet? Yes, these muffins are naturally low in carbohydrates as they rely on eggs, cheese, and vegetables. Avoid pairing them with toast to keep the carb count low.

    Can I add liquid to the eggs for more fluffiness? You can add a tablespoon of heavy cream or whole milk per 6 eggs. This adds a bit more fat, which can result in a creamier texture, though it is not strictly necessary.

    Print
    clock clock iconcutlery cutlery iconflag flag iconfolder folder iconinstagram instagram iconpinterest pinterest iconfacebook facebook iconprint print iconsquares squares iconheart heart iconheart solid heart solid icon
    Savory Baked Egg Muffins with Cheese and Veggies

    Savory Baked Egg Muffins with Cheese and Veggies


    5 Stars 4 Stars 3 Stars 2 Stars 1 Star

    No reviews

    • Author: imageuploader
    • Total Time: 30 minutes
    • Yield: 12 muffins 1x
    • Diet: Low-Carb

    Description

    These quick and versatile breakfast egg muffins are easy to make and packed with flavor and nutrition, perfect for busy mornings.


    Ingredients

    Scale
    • 12 large eggs
    • 1 cup Shredded cheddar cheese
    • ½ cup Red bell pepper, diced
    • ½ cup Fresh spinach, chopped
    • ½ cup Cooked and crumbled beef bacon
    • ½ teaspoon Salt
    • ¼ teaspoon Pepper

    Instructions

    1. Preheat: Preheat the oven to 350°F and prepare a 12-cup muffin pan by spraying it with non-stick spray.
    2. Beat: In a large mixing bowl, crack in the eggs and beat them until they are light and frothy.
    3. Mix: Add the shredded cheddar cheese, diced red bell pepper, chopped spinach, crumbled bacon, salt, and pepper into the beaten eggs. Stir everything together until well combined.
    4. Fill: Carefully fill each muffin cup with the egg mixture, leaving a little room for the muffins to rise.
    5. Bake: Place the muffin pan in the preheated oven and bake for 15-20 minutes until the tops feel firm and no longer jiggle. Allow them to cool slightly before serving.

    Notes

    For best results, use fresh ingredients, avoid overmixing, and store leftovers in an airtight container in the refrigerator for up to 5 days.

    • Prep Time: 10 minutes
    • Cook Time: 20 minutes
    • Category: Breakfast
    • Method: Baking
    • Cuisine: American

    Nutrition

    • Serving Size: 1 muffin
    • Calories: 150 kcal
    • Sugar: 1 g
    • Sodium: 220 mg
    • Fat: 11 g
    • Saturated Fat: 5 g
    • Unsaturated Fat: 6 g
    • Trans Fat: 0 g
    • Carbohydrates: 2 g
    • Fiber: 1 g
    • Protein: 10 g
    • Cholesterol: 200 mg
  • Creamy Island-Style Macaroni Salad

    Creamy Island-Style Macaroni Salad

    This island-style macaroni salad is a creamy, tangy side dish perfect for summer gatherings. It combines tender pasta with a rich dressing and crunchy vegetables for a balanced flavor profile.

    Recipe image

    List of ingredients

    • 2 cups Elbow Macaroni – any small pasta shape can be used as a substitute.
    • 3 tbsp Cider Vinegar – provides the necessary tang; white vinegar is a suitable alternative.
    • 2 cups Mayonnaise – the primary creamy base; Greek yogurt can be used to lighten the dish.
    • 1/4 cup Milk – helps thin the dressing; plant-based milk works for dairy-free versions.
    • 1 large Grated Carrot – adds color and natural sweetness; shredded zucchini is an alternative.
    • 1 rib Chopped Celery – optional, used for added crunch.
    • 2 tbsp Grated Onion – adds depth; green onions or shallots are milder alternatives.
    • 1 tbsp Brown Sugar – balances the acidity of the vinegar.
    • 1/2 tsp Salt – adjust according to personal preference.
    • 1/2 tsp Pepper – fresh ground pepper is recommended for better flavor.
    • Chopped Green Onions – optional, used for final garnish.

    step-by-step instructions

    1. Cook the Pasta: Boil the elbow macaroni in salted water according to the package directions until tender. Drain the pasta and rinse it under cold water immediately to stop the cooking process and remove excess starch.
    2. Initial Seasoning: Place the cooled macaroni in a bowl and toss it with 1 tablespoon of the cider vinegar. Let the pasta sit until completely cool, which allows the vinegar to penetrate the pasta and improve the overall texture.
    3. Prepare the Dressing: In a separate small mixing bowl, whisk together the remaining 2 tablespoons of cider vinegar, mayonnaise, milk, grated carrot, chopped celery, grated onion, brown sugar, salt, and pepper. Mix until the dressing is smooth and all ingredients are fully combined.
    4. Combine Ingredients: Transfer the macaroni to a large mixing bowl and pour the prepared creamy dressing over the top. Gently fold the pasta using a spatula or spoon until every piece is evenly coated.
    5. Chill the Salad: Cover the bowl and place the salad in the refrigerator. Allow it to chill for at least one hour before serving to let the flavors meld.
    6. Final Garnish: Just before serving, sprinkle the chopped green onions over the top for a fresh burst of color and flavor.

    Optimizing Your Pasta Choice

    While elbow macaroni is the traditional choice for this dish, the shape of the pasta affects how the dressing clings to the noodles. Elbows are ideal because their curved shape traps the creamy sauce inside the tube.

    If you prefer a different texture, small shells or rotini are excellent alternatives. Shells act like small scoops for the mayonnaise and vegetables, while rotini’s spirals provide more surface area for the dressing to adhere to.

    Avoid using large pasta shapes like penne or rigatoni, as they can make the salad feel clunky. The goal is a consistent, creamy bite where the pasta and dressing are well-integrated.

    Cooking the pasta slightly past the al dente stage is recommended for this specific recipe. Softer pasta absorbs the vinegar and dressing more effectively, resulting in a more cohesive flavor profile.

    Managing the Tangy Balance

    The acidity in this recipe comes primarily from the cider vinegar, which is essential for cutting through the richness of the mayonnaise. Apple cider vinegar offers a slightly fruity undertone that complements the brown sugar.

    If you find cider vinegar too strong, white distilled vinegar is a cleaner, sharper alternative. For those who prefer a citrusy note, a combination of lemon juice and white vinegar can be used to achieve a similar brightness.

    The amount of vinegar can be adjusted based on the brand of mayonnaise used. Some mayonnaises are naturally tangier than others, so taste the dressing before adding the full amount of vinegar.

    Adding the first tablespoon of vinegar directly to the hot or warm pasta is a critical step. This ensures the pasta is seasoned from the inside out, preventing the salad from tasting bland despite the creamy coating.

    Creamy Base Alternatives

    Mayonnaise provides the traditional richness and stability for the salad. For a lighter version, you can replace half of the mayonnaise with plain Greek yogurt. This increases the protein content and adds a natural tang.

    If you are making a dairy-free version, use a plant-based mayonnaise made from oil and pea protein or aquafaba. Ensure the vegan mayo has a similar consistency to traditional mayo to avoid a runny salad.

    The addition of milk is used to control the viscosity of the dressing. Depending on the size of your vegetables, you may need slightly more or less milk to reach the desired creaminess.

    For a richer flavor, you can use heavy cream or coconut milk instead of regular milk. Coconut milk adds a subtle tropical note that aligns well with the island theme of the dish.

    Vegetable Preparation for Texture

    The carrots should be grated using a medium-hole box grater. This ensures they are small enough to be distributed evenly throughout the salad without creating large, chunky bites.

    If using celery, dice it into very small, uniform pieces. The celery is optional, but it provides a necessary textural contrast to the soft pasta and creamy sauce.

    Grated onion provides a more integrated flavor than diced onion. By grating the onion, the juices blend into the dressing, providing a savory depth without the harsh bite of raw onion chunks.

    For those who find raw onion too pungent, you can soak the grated onion in cold water for ten minutes and then drain it before adding it to the dressing. This removes the sulfurous edge while keeping the flavor.

    Perfecting the Seasoning

    Brown sugar is used to balance the acidity of the vinegar and the saltiness of the mayonnaise. It provides a subtle sweetness that is characteristic of authentic island-style macaroni salads.

    If you prefer a completely savory profile, you can omit the brown sugar entirely. However, a small amount helps to round out the flavor and prevents the vinegar from tasting too sharp.

    Salt and pepper should be added incrementally. Since mayonnaise often contains a significant amount of salt, it is important to taste the combined mixture before adding the full measured amount of salt.

    Using freshly cracked black pepper provides a more robust flavor than pre-ground powder. The floral notes of fresh pepper complement the sweetness of the carrots and brown sugar.

    Ideal Serving Pairings

    This macaroni salad is designed to be a side dish that complements smoky and savory main courses. Grilled chicken breast or thighs with a teriyaki glaze are classic pairings that mirror the sweet and salty balance of the salad.

    For a plant-based feast, pair the salad with grilled cauliflower steaks or marinated tofu skewers. The creaminess of the pasta balances the charred edges of grilled vegetables.

    Grilled pineapple rings are another excellent accompaniment. The acidity and sweetness of the warm pineapple provide a refreshing contrast to the cool, rich dressing of the macaroni salad.

    To complete a full platter, serve the salad alongside corn on the cob and a crisp green salad with a light vinaigrette. This variety of textures and temperatures creates a satisfying meal.

    Preservation and Storage Methods

    Store the finished macaroni salad in an airtight glass or plastic container. This prevents the salad from absorbing other odors from the refrigerator and keeps the dressing from drying out.

    The salad will stay fresh for up to four days when kept at a constant refrigerated temperature. Because of the mayonnaise and milk, it is sensitive to temperature fluctuations.

    Avoid leaving the salad at room temperature for more than two hours during a BBQ or picnic. To keep it cold, place the serving bowl inside a larger bowl filled with ice.

    If the salad is stored for several days, the pasta may absorb more of the dressing, making it appear dry. This is normal and can be easily fixed before serving.

    Freezing and Recovery Steps

    While not ideal for texture, this salad can be frozen for up to two months. Use a freezer-safe container and leave a small amount of headspace to allow for expansion during freezing.

    To thaw the salad, move it from the freezer to the refrigerator overnight. Do not thaw it at room temperature, as this can cause the mayonnaise to separate and become oily.

    After thawing, the salad will likely lose some of its creaminess. Stir in one tablespoon of fresh mayonnaise or milk to restore the emulsion and smooth out the texture.

    Note that the vegetables, particularly the celery and carrots, may lose some of their crunch after the freezing and thawing process.

    Advanced Planning and Prep

    This recipe is excellent for make-ahead meal planning. You can cook the pasta and prepare the dressing up to 24 hours in advance, storing them in separate containers.

    Keep the cooked and vinegar-tossed pasta in one container and the whisked dressing in another. This prevents the pasta from over-absorbing the dressing before the event.

    When you are ready to serve, simply combine the two components and stir. This method ensures the salad maintains a fresh, creamy consistency right up until it reaches the table.

    If preparing for a large crowd, you can double the recipe easily. Just ensure you use a mixing bowl large enough to toss the ingredients without crushing the macaroni.

    Common Texture and Flavor Fixes

    If the salad is too dry after refrigeration, stir in a teaspoon of warm water or a small amount of extra mayonnaise. This re-emulsifies the dressing and restores the luscious mouthfeel.

    If the salad tastes too sweet, add an extra teaspoon of cider vinegar or a pinch of salt. This will help neutralize the sugar and bring the flavor back into balance.

    If the flavor is too bland, increase the amount of salt and pepper. Sometimes the pasta absorbs the seasoning, requiring a small adjustment just before serving.

    For those wanting a savory boost without using pork products, stir in small cubes of seasoned smoked tofu or plant-based savory protein. This adds a salty, umami element that complements the creaminess.

    Print
    clock clock iconcutlery cutlery iconflag flag iconfolder folder iconinstagram instagram iconpinterest pinterest iconfacebook facebook iconprint print iconsquares squares iconheart heart iconheart solid heart solid icon
    Creamy Island-Style Macaroni Salad

    Creamy Island-Style Macaroni Salad


    5 Stars 4 Stars 3 Stars 2 Stars 1 Star

    No reviews

    • Author: imageuploader
    • Total Time: 1 hour 30 minutes
    • Yield: 6 servings 1x
    • Diet: General

    Description

    This Hawaiian Macaroni Salad combines creamy dressing with vibrant flavors, perfect for BBQs and gatherings.


    Ingredients

    Scale
    • 2 cups Elbow Macaroni
    • 3 tbsp Cider Vinegar
    • 2 cups Mayonnaise
    • 1/4 cup Milk
    • 1 large Grated Carrot
    • 1 rib Chopped Celery
    • 2 tbsp Grated Onion
    • 1 tbsp Brown Sugar
    • 1/2 tsp Salt
    • 1/2 tsp Pepper
    • Chopped Green Onions

    Instructions

    1. Step: Boil elbow macaroni according to package instructions until tender, then drain and rinse under cold water to stop the cooking process.
    2. Step: Toss the cooled macaroni with 1 tablespoon of cider vinegar, allowing it to sit until completely cool.
    3. Step: In a small bowl, whisk together the remaining vinegar, mayonnaise, milk, grated carrot, chopped celery, grated onion, brown sugar, salt, and pepper until smooth.
    4. Step: In a large bowl, add the macaroni and pour the creamy dressing over it. Gently toss until coated.
    5. Step: Place the salad in the refrigerator and chill until serving.
    6. Step: Garnish with chopped green onions before serving.

    Notes

    Store in an airtight container for up to 4 days in the fridge. For a classic twist, add diced pineapple or smoked tofu.

    • Prep Time: 20 minutes
    • Cook Time: 10 minutes
    • Category: Lunch
    • Method: Boiling and Mixing
    • Cuisine: Hawaiian

    Nutrition

    • Serving Size: 1 cup
    • Calories: 350 kcal
    • Sugar: 3 g
    • Sodium: 350 mg
    • Fat: 20 g
    • Saturated Fat: 3 g
    • Unsaturated Fat: 3 g
    • Trans Fat: 0 g
    • Carbohydrates: 40 g
    • Fiber: 2 g
    • Protein: 6 g
    • Cholesterol: 15 mg