Author: imageuploader

  • Creamy Garlic Steak and Tortellini Skillet

    Creamy Garlic Steak and Tortellini Skillet

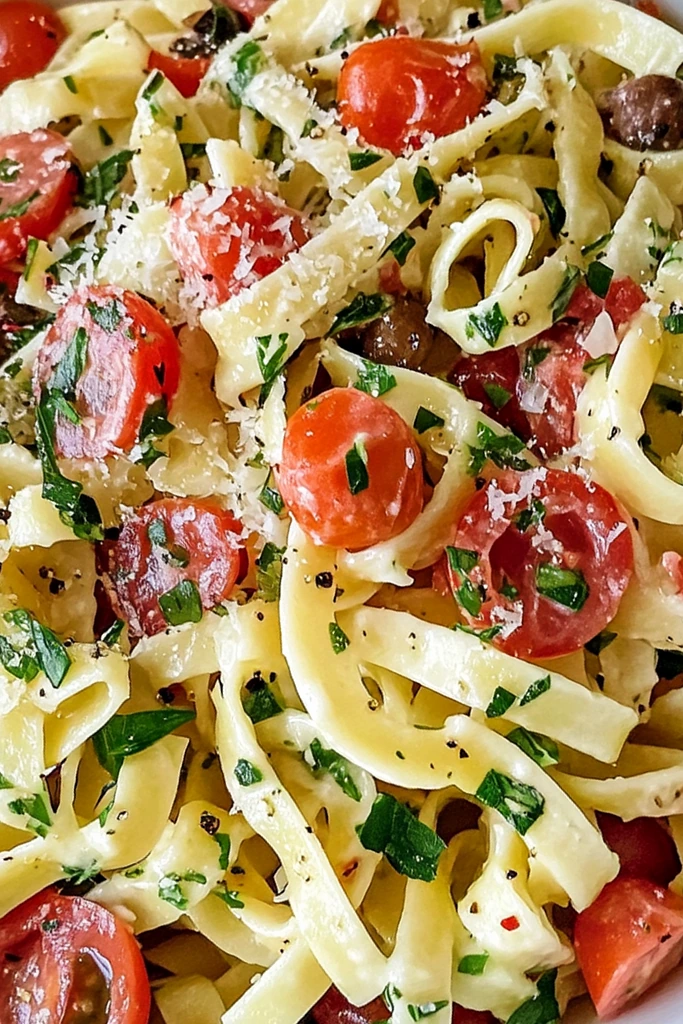
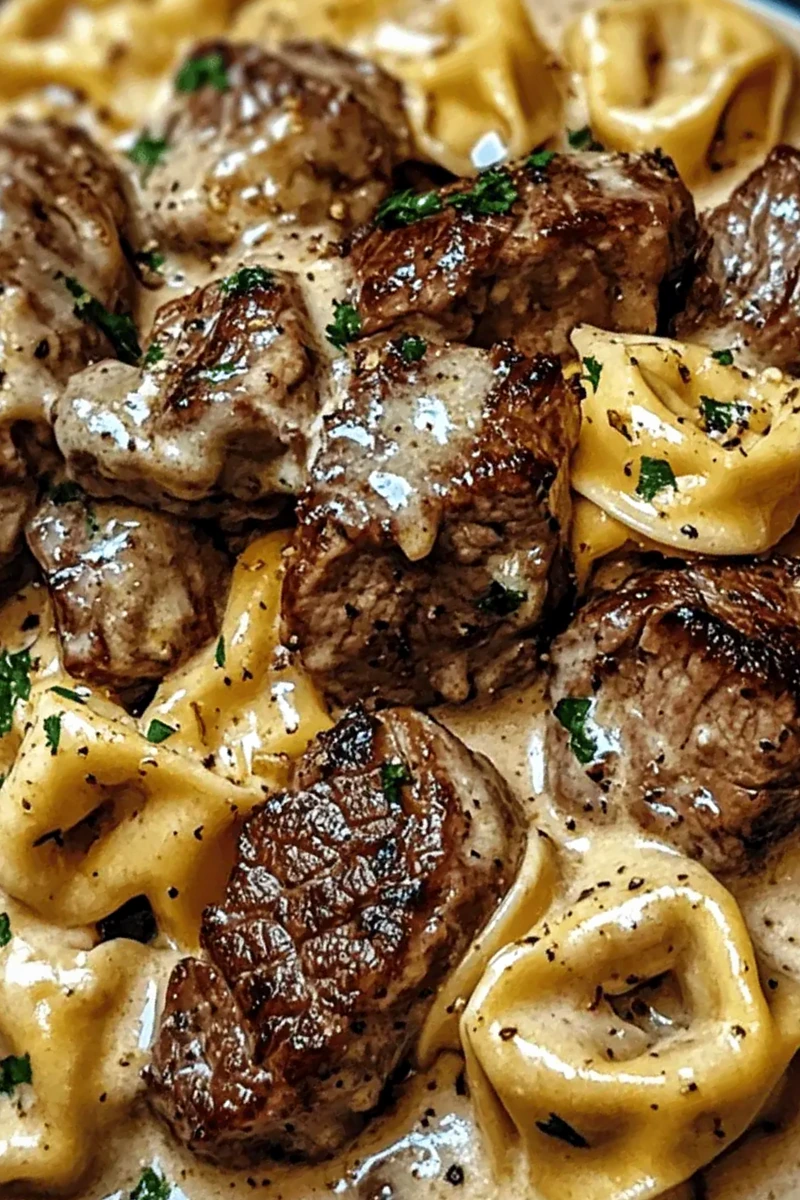
    This one-pan meal combines tender seared steak bites with cheesy pasta in a rich garlic cream sauce. It is a hearty, gourmet-style dinner that comes together in just 30 minutes.

    Recipe image

    List of ingredients

    • 20 oz cheese tortellini – fresh or refrigerated varieties provide the best texture.
    • 1 lb steak, sirloin or ribeye – sirloin is leaner, while ribeye is more tender.
    • Salt – for seasoning the steak.
    • Black pepper – for seasoning the steak.
    • Garlic powder – adds a concentrated garlic flavor to the meat.
    • Smoked paprika – provides a subtle woodsy depth.
    • 2 tbsp olive oil – essential for achieving a high-heat sear on the steak.
    • 4 tbsp butter – forms the base of the aromatic garlic sauce.
    • 5 cloves garlic, minced – adds a pungent, aromatic richness.
    • 1 cup heavy cream – creates a velvety and thick consistency.
    • 3/4 cup whole milk – balances the richness of the heavy cream.
    • 1 1/4 cups parmesan cheese, shredded – use a microbial-rennet variety for a savory finish.
    • Chopped parsley (optional) – used for a fresh, colorful garnish.
    • Red pepper flakes (optional) – adds a mild spicy kick.
    • Cracked black pepper (optional) – used as a final flavor enhancer.

    step-by-step instructions

    1. Cook the pasta: Bring a large pot of salted water to a boil over high heat. Add the cheese tortellini and cook for 3-5 minutes, or according to the package directions, until al dente. Drain the pasta and set it aside.
    2. Sear the steak: Heat olive oil in a large skillet over medium-high heat. Season the steak cubes with salt, black pepper, garlic powder, and smoked paprika. Sear the steak bites for 3-5 minutes until browned on all sides, then remove them from the pan and let them rest.
    3. Sauté the garlic: Reduce the skillet heat to medium and melt the butter. Add the minced garlic and sauté for about 1 minute until it is golden and fragrant.
    4. Simmer the cream: Pour in the heavy cream and whole milk, stirring the mixture to combine. Let the sauce simmer for 3-4 minutes until it reduces slightly and thickens.
    5. Melt the cheese: Gradually stir in the shredded parmesan cheese. Continue stirring until the cheese is completely melted and the sauce is smooth. Adjust the salt and pepper to your preference.
    6. Combine components: Return the seared steak and cooked tortellini to the skillet. Gently toss all ingredients together for about 2 minutes to ensure everything is evenly coated in the sauce.
    7. Garnish and serve: Sprinkle with chopped parsley, red pepper flakes, and cracked black pepper if desired. Serve the dish immediately while hot.

    Protein Selection and Preparation

    Choosing Sirloin for a Leaner Protein Option

    Sirloin is an excellent choice for those who prefer a leaner cut of meat with less fat. It provides a firm texture that holds up well when cubed and seared. This option reduces the overall calorie density of the meal without sacrificing protein.

    Utilizing Ribeye for Enhanced Tenderness

    Ribeye is highly marbled, which results in a more tender and juicy bite. The higher fat content melts during the searing process, adding additional flavor to the pan. Use this cut if you prefer a more decadent, steakhouse-style experience.

    Cutting Steak into Uniform Cubes for Even Cooking

    Cut the steak into consistent 1-inch cubes before seasoning. Uniform sizes ensure that every piece cooks at the same rate, preventing some bites from being overdone while others remain raw. This precision is key to maintaining juiciness.

    Perfecting the Garlic Cream Sauce

    Preventing Garlic from Burning During Sautéing

    Sauté garlic over medium heat and stir frequently. Garlic burns quickly, and burnt garlic introduces a bitter taste that can ruin the entire sauce. Remove the garlic from the heat as soon as it becomes fragrant and light golden.

    Controlling the Reduction of the Cream Sauce

    Allow the cream and milk to simmer gently rather than boiling rapidly. A slow simmer helps the sauce thicken naturally through evaporation without breaking the emulsion. This results in a more stable and velvety texture.

    Incorporating Parmesan for a Smooth Texture

    Add the shredded parmesan cheese gradually while whisking or stirring constantly. Adding all the cheese at once can lead to clumping. Slow incorporation ensures the cheese emulsifies perfectly into the cream base.

    Ingredient Substitutions and Variations

    Substituting Chicken for a Lighter Meal

    Replace the steak with cubed chicken breast for a leaner alternative. Season the chicken with the same blend of garlic powder and smoked paprika. Sear the chicken until fully cooked through before proceeding with the sauce.

    Adapting the Recipe for Shrimp

    Use peeled and deveined shrimp instead of steak for a seafood version. Sauté the shrimp quickly over high heat until pink, then remove them from the pan. Add the shrimp back into the skillet at the very end to avoid overcooking them.

    Selecting Gluten-Free Tortellini Alternatives

    Use gluten-free cheese tortellini, often made from rice or corn flour, to accommodate dietary restrictions. Since the sauce is naturally gluten-free, only the pasta needs to be swapped. Ensure the gluten-free pasta is not overcooked, as it can become mushy more quickly than wheat pasta.

    Adding Fresh Spinach for Nutrient Density

    Stir a few handfuls of fresh baby spinach into the sauce just before adding the steak and pasta. The residual heat from the cream will wilt the spinach in about one minute. This adds color and essential vitamins to the dish.

    Using Mascarpone to Increase Sauce Richness

    Substitute half of the heavy cream with mascarpone cheese for an ultra-thick sauce. Mascarpone adds a buttery, slightly sweet depth that enhances the savory parmesan. This variation is ideal for special occasions where a richer flavor is desired.

    Using Pecorino Romano for a Saltier Profile

    Swap the parmesan for Pecorino Romano if you prefer a sharper, saltier taste. Pecorino is made from sheep’s milk and has a more pungent aroma. If using this cheese, reduce the amount of added salt to avoid oversalting the dish.

    Ideal Side Dish Pairings

    Pairing with Toasted Garlic Bread

    Serve the tortellini with slices of toasted baguette spread with garlic butter. The crunch of the bread provides a texture contrast to the soft pasta. It also serves as a practical tool for cleaning the remaining cream sauce from the plate.

    Balancing the Meal with a Mixed Green Salad

    A fresh garden salad with a lemon-based vinaigrette helps balance the richness of the cream sauce. The acidity of the vinegar cuts through the heavy fats of the steak and cream. This creates a more balanced and refreshing dining experience.

    Incorporating Roasted Seasonal Vegetables

    Roasted broccoli, asparagus, or Brussels sprouts make excellent sides. Toss the vegetables in olive oil, salt, and pepper, then roast at 400°F until tender. These vegetables add a charred flavor that complements the seared steak.

    Adding Sautéed Spinach as a Side

    Quickly sauté spinach with a touch of garlic and a squeeze of fresh lemon juice. This side dish mirrors the garlic flavors in the main course. It provides a vibrant green contrast and a light, earthy flavor.

    Storage and Reheating Guidelines

    Storing Leftovers in the Refrigerator

    Place leftover tortellini in an airtight container and store it in the refrigerator. The dish will remain fresh and safe to eat for up to three days. Ensure the container is sealed tightly to prevent the pasta from drying out.

    Freezing for Long-Term Storage

    Transfer the cooked meal into freezer-safe containers or bags, removing as much air as possible. The dish can be frozen for up to three months. Thaw the container in the refrigerator overnight before reheating to maintain the best texture.

    Restoring Creaminess During the Reheating Process

    Reheat the pasta in a skillet over low heat rather than in the microwave. Add a tablespoon of milk or heavy cream to the pan to help emulsify the sauce. Stir gently to prevent the cheese from separating as it warms.

    Make-Ahead Strategies

    Pre-cooking Pasta for Faster Assembly

    Boil the tortellini a day in advance and toss them with a small amount of olive oil to prevent sticking. Store them in an airtight container in the fridge. Simply add them to the sauce during the final combining step.

    Searing Steak in Advance for Meal Prep

    Sear the steak bites to a medium-rare finish and store them separately in the refrigerator. When ready to serve, add them to the hot sauce for just a minute. This prevents the steak from becoming overcooked and tough during reheating.

    Preparing the Cream Base Ahead of Time

    You can prepare the garlic cream base without the cheese up to 24 hours in advance. Store the sauce in the fridge and reheat it gently on the stove. Stir in the parmesan cheese only when the sauce is hot to ensure a smooth melt.

    Common Cooking Challenges

    Thinning a Sauce That Has Become Too Thick

    If the sauce reduces too much and becomes overly thick, stir in a small amount of whole milk. Add the milk one tablespoon at a time over low heat. Stir until the desired consistency is achieved.

    Preventing the Cream Sauce from Separating

    Avoid boiling the sauce aggressively once the cheese has been added. Excessive heat can cause the fats to separate from the liquids, resulting in an oily appearance. Keep the heat on low or medium-low during the final stages.

    Correcting Overcooked Steak Texture

    If the steak becomes too firm, avoid reheating it for a long period. Add the steak to the sauce at the very last second. The heat from the sauce will warm the meat without further toughening the proteins.

    Frequently Asked Questions

    What type of steak is best for this recipe?

    Sirloin is recommended for a leaner result, while ribeye is best for those who prefer a more tender, marbled texture. Both work well as long as they are cut into uniform cubes.

    How long can I store the leftovers?

    Leftovers can be stored in an airtight container in the refrigerator for up to three days. For longer storage, they can be frozen for up to three months.

    Can I make this dish without heavy cream?

    You can substitute heavy cream with a mixture of whole milk and a small amount of cornstarch slurry to thicken the sauce. Alternatively, coconut cream can be used for a dairy-free version, though the flavor will change.

    How do I stop the pasta from getting mushy?

    Cook the tortellini strictly until al dente, which usually means removing them one minute before the package instructions suggest. They will finish cooking when tossed in the hot cream sauce.

    Can I add other vegetables to the skillet?

    Yes, mushrooms, peas, or kale can be added. Sauté mushrooms with the garlic or stir in peas and kale during the final simmering step.

    Is it possible to use a different cheese?

    Pecorino Romano or Gruyère are great alternatives to parmesan. Be mindful that some cheeses melt differently and may require a bit more stirring to stay smooth.

    Print
    clock clock iconcutlery cutlery iconflag flag iconfolder folder iconinstagram instagram iconpinterest pinterest iconfacebook facebook iconprint print iconsquares squares iconheart heart iconheart solid heart solid icon
    Creamy Garlic Steak and Tortellini Skillet

    Creamy Garlic Steak and Tortellini Skillet


    5 Stars 4 Stars 3 Stars 2 Stars 1 Star

    No reviews

    • Author: imageuploader
    • Total Time: 30 minutes
    • Yield: 4 servings 1x
    • Diet: General

    Description

    This Cracked Garlic Steak Tortellini in Creamhouse Sauce is a quick and comforting skillet dinner perfect for busy weeknights.


    Ingredients

    Scale
    • 20 oz cheese tortellini
    • 1 lb steak (sirloin or ribeye)
    • salt
    • black pepper
    • garlic powder
    • smoked paprika
    • 2 tbsp olive oil
    • 4 tbsp butter
    • 5 cloves garlic, minced
    • 1 cup heavy cream
    • 3/4 cup whole milk
    • 1 1/4 cups parmesan, shredded or freshly grated
    • parsley, chopped (optional)
    • red pepper flakes (optional)
    • cracked black pepper (optional garnish)

    Instructions

    1. Cook the Tortellini: Bring a large pot of salted water to a boil. Add cheese tortellini and cook according to package instructions, about 3-5 minutes, until al dente. Drain and set aside.
    2. Season and Sear the Steak: In a large skillet, heat olive oil. Season steak with salt, black pepper, garlic powder, and smoked paprika. Sear for about 3-5 minutes until browned. Remove and set aside.
    3. Prepare the Garlic Cream Sauce: In the same skillet, melt butter. Add minced garlic and sauté for 1 minute until fragrant.
    4. Create the Cream Sauce: Add heavy cream and whole milk, stirring to combine. Let simmer for 3-4 minutes until slightly thickened.
    5. Incorporate the Cheese: Gradually whisk in parmesan cheese, stirring until melted and smooth. Season if desired.
    6. Combine the Ingredients: Return seared steak and tortellini to the skillet and toss to combine for about 2 minutes.
    7. Garnish and Serve: Sprinkle with parsley, cracked black pepper, and red pepper flakes, if desired. Serve immediately.

    Notes

    Store leftovers in an airtight container in the refrigerator for up to 3 days. Reheat over low heat with a splash of milk to restore creaminess.

    • Prep Time: 10 minutes
    • Cook Time: 20 minutes
    • Category: Dinner
    • Method: Skillet
    • Cuisine: Italian

    Nutrition

    • Serving Size: 1 serving
    • Calories: 650 kcal
    • Sugar: 4 g
    • Sodium: 800 mg
    • Fat: 36 g
    • Saturated Fat: 20 g
    • Unsaturated Fat: 16 g
    • Trans Fat: 1 g
    • Carbohydrates: 45 g
    • Fiber: 2 g
    • Protein: 34 g
    • Cholesterol: 110 mg
  • Authentic Mexican Shrimp Sauté

    Authentic Mexican Shrimp Sauté

    This zesty Mexican shrimp dish is a fast, high-protein meal perfect for busy weeknights. It combines bright citrus notes with savory spices to create a versatile protein for tacos or bowls.

    Recipe image

    List of ingredients

    • 1 pound large shrimp, peeled and deveined – use wild-caught for a cleaner flavor.
    • 3 tablespoons olive oil – use extra virgin for better aromatic quality.
    • 4 cloves garlic, minced – fresh garlic provides the most pungent flavor.
    • 1 teaspoon chili powder – adds a mild, earthy heat.
    • 1 teaspoon cumin – gives the dish its signature smoky Mexican aroma.
    • 1 lime (juice and zest) – the zest contains essential oils for deeper citrus notes.
    • Salt and pepper to taste – adjust based on your preference for sodium.
    • 1/4 cup fresh cilantro, chopped – adds a bright, herbal finish.
    • 1 cup diced tomatoes – Roma tomatoes work best as they are less watery.
    • 1/2 cup diced red onion – provides a sharp, sweet contrast.
    • Warm tortillas for serving – corn or flour options both work well.

    step-by-step instructions

    1. Prepare the Shrimp: Rinse the shrimp under cold water and pat them dry with paper towels. Dry shrimp sear better in the pan and avoid steaming.
    2. Marinate the Shrimp: In a bowl, combine olive oil, garlic, chili powder, cumin, lime juice, lime zest, salt, and pepper. Add the shrimp and toss to coat evenly, then let marinate for 15 minutes to absorb the flavors.
    3. Cook the Shrimp: Heat a skillet over medium-high heat. Add the marinated shrimp, cooking for about 3-4 minutes on each side until they turn pink and opaque.
    4. Add the Vegetables: Incorporate diced tomatoes and red onion into the skillet, stirring to combine. Allow everything to cook for an additional 2-3 minutes until the vegetables are tender.
    5. Season and Finish: Stir in the chopped cilantro and adjust seasoning if necessary. Remove from heat once everything is heated through to prevent overcooking the shrimp.
    6. Prepare for Serving: Warm the tortillas in a separate skillet or microwave. Keep them covered with a clean cloth to retain heat and moisture.
    7. Serve: Spoon the shrimp mixture onto the warmed tortillas and garnish with additional cilantro for a fresh look.

    Optimal Serving Methods

    Customizing Taco Tortillas

    For the best experience, lightly toast corn tortillas on a dry skillet until slightly charred. This adds a nutty flavor and prevents the tortilla from breaking under the weight of the shrimp. If using flour tortillas, microwave them for 15 seconds wrapped in a damp paper towel.

    Creating Mexican Shrimp Bowls

    Instead of tortillas, serve the shrimp over a bed of cilantro-lime rice or quinoa. Adding a scoop of black beans and corn kernels transforms this recipe into a complete, filling meal. This option is ideal for those seeking a gluten-free or lower-carb alternative.

    Adding Fresh Toppings

    Enhance the dish with sliced avocado or a dollop of Greek yogurt for a creamy contrast. Thinly sliced radishes and pickled red onions add a crunch and acidity that balances the smoky cumin. Freshly diced jalapeños can be added for those who prefer a higher heat level.

    Choosing Complementary Side Dishes

    Pair the shrimp with a side of Mexican street corn, known as elote, for a festive feel. A crisp cabbage slaw dressed with lime juice and vinegar provides a refreshing textural contrast. For a heartier meal, serve with a side of refried beans seasoned with garlic.

    Selecting Refreshing Beverage Pairings

    Serve this meal with sparkling lime water or a fresh hibiscus tea (agua de jamaica). These drinks offer a tart profile that cuts through the richness of the olive oil and garlic. Freshly blended mango lassi or a pineapple smoothie also complements the tropical notes of the lime.

    Flavor Modifications and Substitutions

    Increasing the Spice Intensity

    If you want a spicier dish, add a half teaspoon of cayenne pepper or smoked paprika to the marinade. Finely diced habaneros can be stirred in with the onions for a significant kick. Chipotle peppers in adobo sauce can also be added for a smoky, spicy depth.

    Adding Umami Depth

    A small splash of low-sodium soy sauce or a few drops of Worcestershire sauce in the marinade enhances the savory profile. These ingredients add a fermented depth that complements the garlic and cumin. Keep the amount small to avoid overshadowing the citrus notes.

    Incorporating a Vegetable Medley

    Toss in diced bell peppers, sliced zucchini, or frozen corn kernels during the vegetable sauté step. These additions increase the nutritional value and add a variety of textures to the final dish. Ensure the vegetables are diced small so they cook in the same timeframe as the onions.

    Creating a Creamy Coconut Twist

    Replace one tablespoon of olive oil with a tablespoon of thick coconut milk for a tropical variation. This creates a subtle sweetness and a creamier sauce that coats the shrimp. This version pairs exceptionally well with steamed jasmine rice instead of tortillas.

    Alternative Cooking Techniques

    Grilling for a Smoky Profile

    Thread the marinated shrimp onto skewers and grill them over medium-high heat. Cook for about 2-3 minutes per side until charred and opaque. This method introduces a smoky flavor that cannot be achieved in a skillet.

    Using an Air Fryer

    Place the marinated shrimp in a single layer in the air fryer basket. Cook at 400 degrees Fahrenheit for 6-8 minutes, shaking the basket halfway through. This result is slightly firmer and uses less oil than the pan-fry method.

    Sheet Pan Roasting

    Spread the marinated shrimp and vegetables on a parchment-lined baking sheet. Roast in a preheated oven at 425 degrees Fahrenheit for 8-10 minutes. This is an efficient way to cook for larger groups without needing to stand over the stove.

    Preparation and Storage Guidelines

    Optimizing the Marination Process

    Stick to the 15-minute marination window to avoid the lime juice “cooking” the shrimp. The citric acid in the lime can break down the proteins, making the shrimp mushy if left too long. For deeper flavor without the acid risk, marinate without the lime and add the juice during the final cooking stage.

    Refrigeration Best Practices

    Store leftover shrimp in a glass airtight container to maintain freshness. Keep the container in the coldest part of the refrigerator and consume the shrimp within 48 hours. Avoid storing the shrimp in the tortillas to prevent them from becoming soggy.

    Guidelines for Freezing Cooked Shrimp

    Flash freeze cooked shrimp on a baking sheet before transferring them to a vacuum-sealed bag. This prevents the shrimp from clumping together in a single mass. Cooked shrimp can be stored in the freezer for up to three months without significant quality loss.

    Correct Thawing Procedures

    Thaw frozen shrimp slowly in the refrigerator overnight to preserve the texture. If you are in a hurry, place the sealed bag in a bowl of cold water, changing the water every 30 minutes. Never thaw shrimp at room temperature to avoid bacterial growth.

    Cooking Troubleshooting and Tips

    Identifying the Perfect Doneness

    Shrimp are perfectly cooked when they form a ‘C’ shape; if they curl into a tight ‘O’, they are overcooked. Overcooked shrimp become rubbery and lose their natural sweetness. Remove them from the heat the moment they turn opaque pink.

    Preventing Sogginess in Tortillas

    Avoid steaming tortillas in a microwave for too long, as this can make them gummy. Instead, use a dry cast-iron skillet over medium heat for 30 seconds per side. This creates a structural barrier that keeps the tortilla firm when the juicy shrimp are added.

    Managing Pan Temperature

    Ensure the olive oil is shimmering but not smoking before adding the shrimp. If the oil smokes, it has reached its smoke point and can impart a bitter taste to the food. If the pan is too cold, the shrimp will release water and boil rather than sear.

    Achieving Consistent Vegetable Texture

    Dice the onions and tomatoes into uniform pieces to ensure they cook evenly. If the onion pieces are too large, they may remain raw while the tomatoes break down too much. Consistent chopping ensures a balanced bite in every taco.

    Frequently Asked Questions

    How can I tell when the shrimp is cooked?

    Shrimp are done when they change from translucent grey to a pink, opaque color. They should feel firm to the touch and have a gentle curve without being tightly curled.

    Can I use frozen shrimp for this recipe?

    Yes, frozen shrimp are a great option. However, you must thaw them completely and pat them dry with paper towels to ensure they sear properly in the skillet.

    What can I serve with this dish besides tortillas?

    This shrimp mixture is versatile and can be served over brown rice, quinoa, or a fresh bed of mixed greens. It also works well as a topping for grilled polenta or inside a hollowed-out avocado.

    Can I use other seafood?

    You can substitute the shrimp with scallops or chunks of firm white fish like cod or halibut. Adjust the cooking time based on the thickness of the seafood to avoid overcooking.

    Is this recipe gluten-free?

    The ingredients are naturally gluten-free if you use corn tortillas or serve the shrimp without tortillas. Always check the labels on your store-bought chili powder and cumin to ensure no gluten-based fillers are added.

    Print
    clock clock iconcutlery cutlery iconflag flag iconfolder folder iconinstagram instagram iconpinterest pinterest iconfacebook facebook iconprint print iconsquares squares iconheart heart iconheart solid heart solid icon
    Authentic Mexican Shrimp Sauté

    Authentic Mexican Shrimp Sauté


    5 Stars 4 Stars 3 Stars 2 Stars 1 Star

    No reviews

    • Author: imageuploader
    • Total Time: 25 minutes
    • Yield: 4 servings 1x
    • Diet: Gluten-free

    Description

    A culinary masterpiece that marries fresh ingredients with vibrant flavors, featuring succulent shrimp seasoned with garlic, lime, and cilantro.


    Ingredients

    Scale
    • 1 pound large shrimp, peeled and deveined
    • 3 tablespoons olive oil
    • 4 cloves garlic, minced
    • 1 teaspoon chili powder
    • 1 teaspoon cumin
    • 1 lime (juice and zest)
    • Salt and pepper to taste
    • 1/4 cup fresh cilantro, chopped
    • 1 cup diced tomatoes
    • 1/2 cup diced red onion
    • Warm tortillas for serving

    Instructions

    1. Prepare the Shrimp: Rinse the shrimp under cold water and pat them dry with paper towels.
    2. Marinate the Shrimp: In a bowl, combine olive oil, garlic, chili powder, cumin, lime juice, lime zest, salt, and pepper. Add the shrimp and toss to coat evenly. Let it marinate for 15 minutes.
    3. Cook the Shrimp: Heat a skillet over medium-high heat. Add the marinated shrimp to the skillet, cooking for about 3-4 minutes on each side until they turn pink and opaque.
    4. Add the Vegetables: Incorporate diced tomatoes and red onion into the skillet, stirring to combine. Allow everything to cook for an additional 2-3 minutes until the vegetables are tender.
    5. Season and Finish: Stir in the chopped cilantro and adjust seasoning if necessary. Remove from heat once everything is heated through.
    6. Prepare for Serving: Warm the tortillas in a separate skillet or microwave, keeping them covered to retain heat.
    7. Serve: Spoon the shrimp mixture onto the warmed tortillas and garnish with additional cilantro.

    Notes

    For extra heat, add diced jalapeños or cayenne pepper. This dish can also be served over rice or beans.

    • Prep Time: 10 minutes
    • Cook Time: 15 minutes
    • Category: Main Course
    • Method: Sautéing
    • Cuisine: Mexican

    Nutrition

    • Serving Size: 1 serving
    • Calories: 320 kcal
    • Sugar: 6 g
    • Sodium: 650 mg
    • Fat: 16 g
    • Saturated Fat: 3 g
    • Unsaturated Fat: 13 g
    • Trans Fat: 0 g
    • Carbohydrates: 15 g
    • Fiber: 3 g
    • Protein: 28 g
    • Cholesterol: 185 mg
  • High Protein Crustless Chicken Pot Pie Skillet

    High Protein Crustless Chicken Pot Pie Skillet

    Enjoy a comforting, creamy dinner that delivers high protein and low calories without the heavy pastry crust. This one-pan meal is designed for easy preparation and quick cleanup.

    Recipe image

    List of ingredients

    • 1 lb chicken breast, diced – provides lean protein to keep the meal filling.
    • 2 medium carrots, diced – adds natural sweetness and color.
    • 2 stalks celery, diced – contributes a fresh crunch and aromatic base.
    • 1 cup frozen peas – maintains sweetness and adds vibrant green color.
    • 2 cups low-sodium chicken broth – creates a savory base for the creamy sauce.
    • 1/2 cup milk – provides creaminess; substitute with almond milk for a dairy-free version.
    • 2 tbsp olive oil – used for sautéing and preventing sticking.
    • 1/4 cup all-purpose flour – acts as the thickening agent for the sauce.
    • 1 tsp garlic powder – adds a subtle, savory depth.
    • 1 tsp onion powder – enhances the overall savory profile.
    • 1/2 tsp black pepper – seasons the dish and adds a mild heat.
    • 1 tsp Italian seasoning – a blend of herbs for a fragrant finish.

    step-by-step instructions

    1. Sauté the Protein: Heat olive oil in a large skillet over medium heat. Add diced chicken and cook for 6-8 minutes until browned and no longer pink.
    2. Soften Vegetables: Add diced carrots and celery to the skillet. Stir and cook for 3-4 minutes until they begin to soften and brighten.
    3. Add Aromatics: Mix in the frozen peas, garlic powder, onion powder, and black pepper. Stir well for 2 minutes to allow flavors to meld.
    4. Create the Sauce Base: In a separate bowl, whisk together chicken broth, milk, and flour until completely smooth. Gradually pour this mixture into the skillet, stirring constantly to prevent lumps.
    5. Thicken the Mixture: Bring the liquid to a gentle boil, then reduce heat to a simmer. Stir frequently for 5-7 minutes until the sauce thickens and coats the back of a spoon.
    6. Final Seasoning: Sprinkle in the Italian seasoning and stir well. Taste the sauce and add more black pepper if a stronger kick is desired.
    7. Rest and Serve: Remove the skillet from heat and let it sit for a few minutes before serving to allow the sauce to set.

    Practical Cooking Tips

    Achieving the Perfect Chicken Sear

    To get a golden-brown exterior on the chicken, ensure the olive oil is shimmering before adding the meat. Avoid overcrowding the skillet, as too much meat can release excess moisture and cause the chicken to steam instead of brown. Cook the pieces undisturbed for a few minutes to develop a deep flavor profile.

    Preventing Lumps in the Sauce

    Whisking the flour into the cold broth and milk before adding it to the pan is essential for a silky texture. This creates a slurry that integrates easily into the hot skillet. Continue stirring frequently during the simmering process to ensure the flour is evenly distributed and fully cooked.

    Managing Vegetable Textures

    Add the carrots and celery first because they are denser and require more time to soften. Frozen peas should be added later in the process to prevent them from becoming mushy or losing their bright color. This staggered approach ensures every vegetable maintains the ideal bite.

    Using Rotisserie Chicken for Speed

    If you are short on time, you can replace raw chicken breast with pre-cooked rotisserie chicken. Simply omit the initial searing step and add the shredded chicken during the final simmering phase. This reduces the total cook time by approximately 10 minutes.

    Ingredient Substitutions

    Dairy-Free Milk Alternatives

    You can easily replace cow’s milk with unsweetened almond milk, soy milk, or cashew milk. Cashew milk is particularly recommended for its naturally creamy consistency, which closely mimics dairy. Ensure the substitute is unsweetened to avoid altering the savory flavor of the pot pie.

    Low-Carb Flour Replacements

    For a lower-carbohydrate version, substitute all-purpose flour with almond flour or a small amount of xanthan gum. If using almond flour, you may need a slightly longer simmering time to achieve the desired thickness. Cornstarch is another option, though it creates a glossier sauce than flour does.

    Plant-Based Protein Options

    To make this recipe vegetarian, replace the chicken with canned chickpeas or firm diced tofu. Use vegetable broth instead of chicken broth to maintain a consistent flavor profile. Chickpeas add a hearty texture that complements the carrots and peas perfectly.

    Using Different Lean Meats

    Turkey breast is an excellent alternative to chicken, offering a similar protein profile and taste. You can also use diced shrimp or white fish for a seafood twist. When using seafood, add the protein at the very end of the cooking process to avoid overcooking.

    Flavor Enhancements and Variations

    Adding a Spicy Element

    If you prefer a bit of heat, stir in diced jalapeños during the vegetable sautéing phase. Alternatively, add a pinch of cayenne pepper or red pepper flakes along with the garlic and onion powder. This adds a bold contrast to the creamy sauce.

    Utilizing Fresh Herbs

    While dried Italian seasoning is convenient, fresh herbs can elevate the dish. Stir in chopped fresh parsley, thyme, or rosemary just before removing the pan from the heat. Fresh herbs provide a brighter, more aromatic finish to the meal.

    Expanding the Vegetable Mix

    Feel free to experiment with other frozen or fresh vegetables. Diced cauliflower, sliced mushrooms, or baby spinach are great additions that fit the pot pie theme. Spinach should be stirred in at the very end until just wilted.

    Increasing Umami Depth

    To add more depth to the sauce, consider adding a teaspoon of nutritional yeast or a drop of coconut aminos. These ingredients enhance the savory qualities of the chicken and broth. Be careful with additional salty additives, as the broth already contains sodium.

    Serving Suggestions

    Pairing with Fresh Greens

    A crisp garden salad with a lemon vinaigrette provides a refreshing acidity that cuts through the richness of the creamy sauce. Use mixed greens, cucumbers, and radishes for maximum crunch. This balance makes the meal feel lighter and more complete.

    Choosing a Whole Grain Base

    While this dish is crustless, serving it over brown rice or quinoa adds satisfying complex carbohydrates. These grains soak up the extra sauce, ensuring none of the flavor is wasted. Cauliflower rice is a great option for those sticking to a strict low-carb diet.

    Roasted Vegetable Accompaniments

    Pair the skillet with a side of roasted Brussels sprouts or steamed green beans. The caramelized flavor of roasted vegetables complements the savory notes of the chicken pot pie. This adds extra fiber and nutrients to the dinner.

    Storage and Reheating

    Refrigerator Storage Guidelines

    Store leftovers in an airtight glass or plastic container in the refrigerator. The dish will remain fresh and safe to eat for up to three days. You may notice the sauce thickening further as it cools, which is normal for flour-based sauces.

    Freezing for Meal Prep

    This skillet meal freezes well for up to three months. Use a freezer-safe container and leave a small amount of space at the top for expansion. Thaw the portion in the refrigerator overnight before reheating to maintain the best texture.

    Best Reheating Methods

    For the best results, reheat the dish in a small pot over medium-low heat on the stove. Add a splash of chicken broth or milk to loosen the sauce and restore its creaminess. If using a microwave, heat in short intervals and stir frequently to avoid hot spots.

    Troubleshooting and FAQ

    Can I make this dairy-free?

    Yes, you can substitute the milk with any unsweetened plant-based milk like almond or soy. The consistency remains creamy and the flavor profile is preserved.

    How should I store leftovers?

    Keep the leftovers in an airtight container in the refrigerator for up to three days. Ensure the food is cooled slightly before sealing the container to prevent excess condensation.

    Can I freeze this chicken pot pie?

    Yes, it can be frozen for up to three months in a sealed container. Reheat it slowly on the stovetop with a bit of extra liquid to return it to its original creamy state.

    What other vegetables can I use?

    You can use broccoli, bell peppers, or spinach. Just ensure denser vegetables are added early and leafy greens are added at the very end.

    How many servings does this recipe make?

    This recipe is designed to yield 4 servings. It is an ideal size for a family dinner or for preparing healthy lunches for the work week.

    Print
    clock clock iconcutlery cutlery iconflag flag iconfolder folder iconinstagram instagram iconpinterest pinterest iconfacebook facebook iconprint print iconsquares squares iconheart heart iconheart solid heart solid icon
    High Protein Crustless Chicken Pot Pie Skillet

    High Protein Crustless Chicken Pot Pie Skillet


    5 Stars 4 Stars 3 Stars 2 Stars 1 Star

    No reviews

    • Author: imageuploader
    • Total Time: 45 minutes
    • Yield: 4 servings 1x
    • Diet: High Protein

    Description

    A comforting Low Calorie High Protein Crustless Chicken Pot Pie Skillet that offers great taste without the guilt.


    Ingredients

    Scale
    • 1 lb chicken breast, diced
    • 2 medium carrots, diced
    • 2 stalks celery, diced
    • 1 cup frozen peas
    • 2 cups low-sodium chicken broth
    • 1/2 cup milk
    • 2 tbsp olive oil
    • 1/4 cup all-purpose flour
    • 1 tsp garlic powder
    • 1 tsp onion powder
    • 1/2 tsp black pepper
    • 1 tsp Italian seasoning

    Instructions

    1. Sauté: Heat the olive oil in a large skillet over medium heat. Once shimmering, add the diced chicken, cooking until it’s browned and no longer pink, about 6-8 minutes.
    2. Add: Toss in the diced carrots and celery. Stir well and cook for an additional 3-4 minutes until the vegetables soften and brighten in color.
    3. Stir: Add the frozen peas to the skillet, followed by the garlic powder, onion powder, and black pepper. Stir well to combine all the ingredients and let the flavors meld for 2 minutes.
    4. Whisk: In a separate bowl, whisk together the low-sodium chicken broth, milk, and flour until smooth. Gradually pour this mixture into the skillet, stirring continuously to avoid lumps.
    5. Simmer: Bring the liquid to a gentle boil, then reduce the heat. Let it simmer, stirring frequently, until the sauce thickens, approximately 5-7 minutes.
    6. Season: Sprinkle in the Italian seasoning, mixing well. Taste and adjust seasoning, adding more pepper if desired for that extra kick.
    7. Serve: Remove from heat and let the skillet sit for a few minutes before serving.

    Notes

    To reduce prep time, use rotisserie chicken instead of raw. Just toss it in during the last few minutes to warm it through.

    • Prep Time: 15 minutes
    • Cook Time: 30 minutes
    • Category: Dinner
    • Method: Skillet
    • Cuisine: American

    Nutrition

    • Serving Size: 1 serving
    • Calories: 320 kcal
    • Sugar: 3 g
    • Sodium: 450 mg
    • Fat: 10 g
    • Saturated Fat: 2 g
    • Unsaturated Fat: 8 g
    • Trans Fat: 0 g
    • Carbohydrates: 30 g
    • Fiber: 4 g
    • Protein: 35 g
    • Cholesterol: 100 mg
  • Thai Peanut Chicken Lettuce Wraps

    Thai Peanut Chicken Lettuce Wraps

    These Thai-inspired peanut chicken lettuce wraps offer a fresh, low-carb alternative to traditional tacos. They combine savory peanut sauce with tender chicken and crunchy vegetables for a balanced meal ready in under 40 minutes.

    Recipe image

    List of ingredients

    • 1 pound boneless, skinless chicken breasts or thighs, sliced into strips – use thighs for more moisture.
    • 1 tablespoon vegetable oil – for searing the chicken.
    • Salt, to taste – enhances all flavors.
    • Black pepper, to taste – adds a mild spicy note.
    • 1/3 cup creamy peanut butter – the base for the rich sauce.
    • 2 tablespoons soy sauce – provides umami; use gluten-free tamari if needed.
    • 1 tablespoon lime juice – adds essential acidity and brightness.
    • 1 tablespoon honey – provides a subtle sweet balance.
    • 1 tablespoon rice vinegar – adds a sharp, clean tang.
    • 1 teaspoon sesame oil – for a deep, toasted nut aroma.
    • 2 teaspoons sriracha or chili garlic sauce, to taste – controls the heat level.
    • 2 tablespoons warm water – thins the sauce for better coating.
    • 12 large butter lettuce leaves, washed and dried – serves as the natural wrap.
    • 1 medium carrot, julienned – adds sweetness and crunch.
    • 1 small cucumber, julienned – provides a cooling contrast.
    • 2 spring onions, thinly sliced – adds a mild onion bite.
    • 2 tablespoons roasted peanuts, chopped – adds texture and roasted flavor.
    • Fresh cilantro leaves, for garnish – provides a citrusy herbal finish.
    • Lime wedges, for serving – for a final splash of acidity.

    step-by-step instructions

    1. Prepare the sauce: In a medium mixing bowl, whisk together the peanut butter, soy sauce, lime juice, honey, rice vinegar, sesame oil, sriracha, and warm water. Stir until the mixture is completely smooth and the peanut butter is fully integrated.
    2. Sear the chicken: Heat the vegetable oil in a large skillet over medium-high heat. Season the chicken strips with salt and black pepper. Add them to the pan and cook for 6 to 8 minutes, stirring occasionally, until the chicken is lightly browned and cooked through.
    3. Glaze the meat: Reduce the skillet heat to low. Pour the prepared peanut sauce over the browned chicken. Toss the meat continuously for 2 to 3 minutes until the sauce thickens and glazes every piece of chicken.
    4. Arrange the wraps: Place the cleaned butter lettuce leaves on a platter or serving plates. Spoon a generous portion of the peanut chicken mixture into the center of each leaf.
    5. Add fresh toppings: Top each wrap with julienned carrots, julienned cucumbers, sliced spring onions, chopped roasted peanuts, and fresh cilantro leaves.
    6. Final touch: Serve the wraps immediately with lime wedges on the side, encouraging guests to squeeze fresh lime over the filling before eating.

    Pro Tips for Optimal Texture

    To prevent the lettuce wraps from becoming soggy, ensure the leaves are completely dry after washing. Use a salad spinner or pat them thoroughly with paper towels. Moisture on the leaf prevents the chicken from sitting securely and dilutes the sauce flavor.

    When browning the chicken, avoid overcrowding the skillet. If the pan is too full, the chicken will steam in its own juices rather than searing. Work in two batches if necessary to achieve those golden-brown edges that add depth to the dish.

    The temperature of the warm water used in the sauce is important. Warm water helps the peanut butter emulsify more quickly with the soy sauce and honey. This ensures a silky texture without lumps of peanut butter in the final glaze.

    Dietary Substitutions and Protein Swaps

    If you prefer a different protein, shrimp or firm tofu are excellent alternatives. For shrimp, sear them for only 2 minutes per side before adding the sauce to avoid overcooking. For tofu, press the block first to remove excess water, cube it, and fry until golden before glazing.

    To make this recipe nut-free, replace the peanut butter with sunflower seed butter or tahini. While the flavor profile will shift, the creaminess remains similar. Use toasted sunflower seeds or sesame seeds instead of roasted peanuts for the garnish.

    For those avoiding soy, coconut aminos are a direct replacement for soy sauce. They provide a similar salty and sweet profile but are naturally soy-free and gluten-free. This keeps the flavor authentic while accommodating dietary restrictions.

    Customizing Your Vegetable Toppings

    While carrots and cucumbers are classic, you can vary the crunch with other vegetables. Shredded purple cabbage adds a vibrant color and a slightly peppery taste. Red bell pepper strips offer a sweet, crisp element that pairs well with the peanut sauce.

    For a summer variation, try adding thinly sliced radishes or snap peas. These provide a sharp, fresh snap that cuts through the richness of the peanut butter. Consider using a mix of herbs, such as mint or Thai basil, alongside the cilantro for more complexity.

    If butter lettuce is unavailable, Romaine hearts or iceberg lettuce are sturdy alternatives. Romaine provides a more substantial crunch, while iceberg offers a cleaner, more neutral taste. Ensure the leaves are small enough to be manageable as wraps.

    Serving and Presentation Ideas

    For a dinner party, present the components as a DIY station. Place the warm peanut chicken in a central bowl and arrange the lettuce leaves and toppings in smaller bowls around it. This allows guests to customize their wraps based on their spice and vegetable preferences.

    Pair these wraps with a side of steamed jasmine rice or a cold sesame noodle salad. The neutrality of the rice helps balance the intense flavors of the peanut sauce. A simple slaw made with vinegar and lime also complements the meal well.

    When plating, focus on the contrast of colors. The bright orange of the carrots, the deep green of the cilantro, and the white of the cucumber make the dish visually appealing. Adding a final drizzle of extra peanut sauce over the top can enhance the look.

    Storage and Preservation Guide

    To maintain the best quality, store the cooked peanut chicken separately from the fresh vegetables. Place the chicken in an airtight container and refrigerate for up to three days. Keep the julienned vegetables in a separate container with a damp paper towel to keep them crisp.

    Do not assemble the wraps in advance. The salt and acidity in the peanut sauce will cause the lettuce to wilt and release water. Only fill the lettuce leaves immediately before serving to ensure a crisp bite.

    If you have leftover sauce that hasn’t touched the meat, it can be stored in the fridge for up to a week. It can be used as a dip for raw vegetables or as a dressing for a cold noodle salad.

    Reheating Instructions

    The best way to reheat the peanut chicken is on the stovetop over low heat. Add a tablespoon of water or broth to the pan to loosen the sauce, which may have thickened in the fridge. Stir gently until the chicken is warmed through.

    If using a microwave, heat the chicken in short 30-second intervals. Stir between each session to ensure even heating and to prevent the peanut butter from separating. Avoid overheating, as this can make the chicken rubbery.

    Once the chicken is reheated, spoon it into fresh, cold lettuce leaves. Never microwave the lettuce or the fresh vegetable toppings, as this destroys the texture and temperature contrast that makes the dish successful.

    Make-Ahead Preparation Strategy

    You can prepare the peanut sauce up to 24 hours in advance. Store it in a sealed jar in the refrigerator and give it a vigorous shake or whisk before using. If the sauce becomes too thick, stir in a teaspoon of warm water.

    Julienning the carrots and cucumbers can also be done a day early. Store them in airtight containers with a small amount of water or a damp paper towel to maintain their rigidity. This significantly reduces the active prep time on the day of serving.

    The chicken can be sliced and seasoned in advance and stored in the fridge. Ensure the chicken is patted dry before adding it to the hot oil to prevent splashing and to ensure a better sear.

    Troubleshooting Common Issues

    If the peanut sauce is too thick to pour, gradually add warm water one teaspoon at a time. Whisk thoroughly after each addition until the sauce reaches a pourable, glaze-like consistency that coats the chicken evenly.

    If the chicken is browning too quickly but remains raw in the center, lower the heat to medium. This allows the interior to cook through without burning the exterior. Using evenly sliced strips of meat helps ensure uniform cooking times.

    If the sauce tastes too salty, add a squeeze of extra lime juice or a small amount of honey. The acidity and sweetness will help neutralize the saltiness of the soy sauce and peanut butter.

    Frequently Asked Questions

    Can I use creamy or crunchy peanut butter? Both work, but creamy peanut butter creates a smoother, more professional glaze. If you use crunchy, the peanut bits will add a bit more texture to the sauce itself.

    Is this recipe suitable for meal prep? Yes, the chicken and sauce are excellent for meal prep. Just store the lettuce and fresh toppings separately and assemble them at the time of consumption.

    How can I make the wraps spicier? Increase the amount of sriracha or add a pinch of crushed red pepper flakes during the chicken searing process. You can also add sliced fresh bird’s eye chilies to the toppings for a sharp heat.

    Can I use chicken thighs instead of breasts? Yes, boneless skinless chicken thighs are often preferred because they stay juicier under high heat. They provide a richer flavor that pairs exceptionally well with the nuttiness of the sauce.

    Print
    clock clock iconcutlery cutlery iconflag flag iconfolder folder iconinstagram instagram iconpinterest pinterest iconfacebook facebook iconprint print iconsquares squares iconheart heart iconheart solid heart solid icon
    Thai Peanut Chicken Lettuce Wraps

    Thai Peanut Chicken Lettuce Wraps


    5 Stars 4 Stars 3 Stars 2 Stars 1 Star

    No reviews

    • Author: imageuploader
    • Total Time: 35 minutes
    • Yield: 4 portions 1x
    • Diet: Low Carb

    Description

    Juicy chicken and peanut sauce fill crisp lettuce, finished with fresh veggies and crunchy peanuts.


    Ingredients

    Scale
    • 1 pound boneless, skinless chicken breasts or thighs, sliced into strips
    • 1 tablespoon vegetable oil
    • Salt, to taste
    • Black pepper, to taste
    • 1/3 cup creamy peanut butter
    • 2 tablespoons soy sauce
    • 1 tablespoon lime juice
    • 1 tablespoon honey
    • 1 tablespoon rice vinegar
    • 1 teaspoon sesame oil
    • 2 teaspoons sriracha or chili garlic sauce
    • 2 tablespoons warm water
    • 12 large butter lettuce leaves, washed and dried
    • 1 medium carrot, julienned
    • 1 small cucumber, julienned
    • 2 spring onions, thinly sliced
    • 2 tablespoons roasted peanuts, chopped
    • Fresh cilantro leaves, for garnish
    • Lime wedges, for serving

    Instructions

    1. Make Sauce: In a medium mixing bowl, whisk peanut butter, soy sauce, lime juice, honey, rice vinegar, sesame oil, sriracha, and warm water until smooth. Set aside.
    2. Cook Chicken: Heat vegetable oil in a large skillet over medium-high heat. Season the chicken strips with salt and black pepper. Add the chicken to the skillet and cook for 6 to 8 minutes, stirring occasionally, until fully cooked and lightly browned.
    3. Glaze: Reduce heat to low. Pour prepared peanut sauce over the cooked chicken. Toss well to coat all pieces and cook for an additional 2 to 3 minutes until heated through. Remove skillet from heat.
    4. Assemble: Arrange butter lettuce leaves on serving plates. Spoon peanut chicken mixture into each leaf.
    5. Garnish: Garnish each wrap with julienned carrot, cucumber, spring onions, chopped peanuts, and fresh cilantro.
    6. Serve: Present lettuce wraps immediately with lime wedges on the side for squeezing over the top.

    Notes

    High in protein and fiber. Store cooked peanut chicken filling in a sealed container in the fridge up to three days. Keep lettuce and veggies separate until serving to maintain crispness.

    • Prep Time: 20 minutes
    • Cook Time: 15 minutes
    • Category: Dinner
    • Method: Stir-fry
    • Cuisine: Thai-Inspired

    Nutrition

    • Serving Size: 3 wraps
    • Calories: 390 kcal
    • Sugar: 9 g
    • Sodium: 620 mg
    • Fat: 22 g
    • Saturated Fat: 5 g
    • Unsaturated Fat: 17 g
    • Trans Fat: 0 g
    • Carbohydrates: 18 g
    • Fiber: 4 g
    • Protein: 31 g
    • Cholesterol: 85 mg
  • Red Lobster Baja Shrimp Bowl Recipe

    Red Lobster Baja Shrimp Bowl Recipe

    This vibrant seafood bowl combines succulent shrimp with a mix of fresh vegetables and a sweet-spicy glaze. It is a nutritious, light meal that is quick to assemble and perfect for a healthy dinner.

    Recipe image

    List of ingredients

    • 32 oz. Succulent Shrimp – peeled and deveined for easy eating.
    • 2 oz. Tender Baby Arugula – adds a peppery bite and fresh color.
    • 4 Plump Roma Tomatoes – ripe and diced into small pieces.
    • 12 oz. Sweet Corn Kernels – use fresh or frozen for a burst of sweetness.
    • 4 Fresh Jalapeño Peppers – seeded and finely diced for controlled heat.
    • 2 oz. Crispy Tortilla Strips – provides essential texture and crunch.
    • 3 cups Fragrant Jasmine Rice – cooked according to package directions.
    • 12 fl. oz. Sweet Chili Sauce – used to drizzle and balance the flavors.
    • 4 Zesty Limes – sliced or juiced for a bright citrus finish.

    step-by-step instructions

    1. Prepare the base: In a medium-sized saucepan, cook the jasmine rice following the package instructions. Once done, keep it warm.
    2. Sauté the shrimp: Heat a large pan over medium heat. Cook the shrimp until they turn pink and are fully cooked through.
    3. Combine vegetables: Add the diced jalapeños, baby arugula, diced tomatoes, and corn kernels to the pan with the shrimp. Sauté for another 2-3 minutes until the vegetables are tender.
    4. Crisp the toppings: In a separate small pan, heat the tortilla strips until they are hot and extra crispy.
    5. Build the bowl: Scoop a portion of cooked jasmine rice into each bowl. Top the rice with the combined shrimp and vegetable mixture.
    6. Add finishing touches: Drizzle the sweet chili sauce evenly over the top. Garnish each bowl with a handful of crispy tortilla strips.
    7. Add citrus: Squeeze fresh lime juice over each bowl immediately before serving to enhance the brightness.
    8. Serve: Present the bowls while hot for the best flavor and texture experience.

    Selecting the Best Shrimp

    For this recipe, choose large or jumbo shrimp to ensure they remain plump after cooking. Fresh shrimp should have a mild, salty scent like the ocean and should not smell fishy or like ammonia.

    If using frozen shrimp, thaw them completely in the refrigerator overnight or place them in a sealed bag under cold running water. Pat the shrimp dry with paper towels before cooking to ensure they sear rather than steam in the pan.

    Avoid overcooking the shrimp, as they can quickly become rubbery. The ideal cooking point is when they curl into a ‘C’ shape and turn opaque white with a pink exterior.

    Vegetable Preparation Techniques

    When preparing jalapeños, wear gloves or wash your hands immediately after handling. Remove the seeds and the white membranes inside the pepper to control the level of spiciness.

    For the Roma tomatoes, dice them into uniform quarters. If the tomatoes are overly juicy, you can lightly pat the diced pieces with a towel to prevent the bowl from becoming watery.

    Baby arugula is delicate and wilts quickly. Adding it at the very end of the sauté process ensures it retains some of its structure and peppery flavor without disappearing into the mix.

    Perfecting the Jasmine Rice

    To achieve fluffy, non-sticky jasmine rice, rinse the grains under cold water until the water runs clear. This removes excess surface starch that can cause clumping.

    Use a ratio of 1 part rice to 1.5 parts water. Bring the water to a boil, add the rice, cover with a tight-fitting lid, and reduce heat to the lowest setting for about 15 minutes.

    Once the cooking time is finished, remove the pan from the heat but keep the lid on for another 5-10 minutes. This allows the steam to finish the cooking process and makes the rice easier to fluff with a fork.

    Managing the Sweet Chili Sauce

    Sweet chili sauce provides the primary flavor profile for this dish. If you find store-bought versions too sweet, you can balance the flavor by adding a splash of rice vinegar or a pinch of salt.

    If the sauce is too thick to drizzle, warm it slightly in a small saucepan or microwave for 10 seconds. This reduces the viscosity and allows it to coat the shrimp and vegetables more evenly.

    For those who prefer a more intense heat, you can mix a teaspoon of sriracha or red pepper flakes into the sweet chili sauce before drizzling it over the bowls.

    Serving and Pairing Suggestions

    These bowls are visually appealing due to the contrast of red tomatoes, yellow corn, and green arugula. Serving them in wide, shallow bowls allows the ingredients to be spread out and showcased.

    To make the meal more substantial, serve the bowls with a side of black beans or chickpeas. These legumes add extra plant-based protein and complement the Baja flavor profile.

    A side of sliced avocado or a dollop of Greek yogurt can add a creamy element that balances the heat from the jalapeños and the acidity of the lime juice.

    Storage and Reheating Guide

    Store any leftovers in an airtight container in the refrigerator for up to 3 days. To maintain the best quality, store the tortilla strips in a separate container so they do not absorb moisture from the shrimp.

    When reheating, avoid the microwave if possible. Instead, place the rice and shrimp mixture in a skillet over medium heat with a tablespoon of water or oil to keep the seafood moist.

    Reheat the tortilla strips in a toaster oven or dry pan for 1-2 minutes. This restores their crunch, which is lost during refrigeration.

    Ingredient Substitutions

    If shrimp is not available, you can substitute it with cooked chicken breast or firm tofu cubes. Ensure the alternative protein is seasoned with salt and pepper before adding the vegetables.

    For a different vegetable base, replace the jalapeños with diced canned green chiles for a milder flavor. Zucchini or summer squash can be used in place of corn if you prefer a lower-carb option.

    If jasmine rice is unavailable, brown rice or quinoa are excellent healthy alternatives. Note that these grains may require different cooking times and water ratios than jasmine rice.

    Meal Prep Advice

    You can prepare several components of this recipe in advance to save time on busy weeknights. Cook the jasmine rice and store it in the fridge for up to 4 days.

    Dice the tomatoes, seed the jalapeños, and prepare the corn in advance. Store these vegetables in a combined container, but keep the baby arugula separate until the moment of cooking.

    Peel and devein the shrimp a day early and store them in a sealed container with a damp paper towel to keep them fresh. This reduces the assembly time to under 15 minutes.

    Common Troubleshooting

    If the vegetables release too much liquid in the pan, increase the heat to medium-high for a minute. This will evaporate the excess moisture and help the vegetables sauté rather than boil.

    If the rice turns out too mushy, you likely used too much water. Next time, reduce the water by a tablespoon or two and ensure you are not stirring the rice while it simmers.

    If the dish tastes too salty, increase the amount of fresh lime juice. The acidity of the lime helps cut through salt and balances the sweetness of the chili sauce.

    Frequently Asked Questions

    Can I freeze this dish? No, this bowl is not suitable for freezing. The arugula and tomatoes will lose their texture, and the shrimp may become rubbery upon thawing.

    Is this dish spicy? The spice level depends on the jalapeños. Removing all seeds and membranes makes it mild, while keeping some seeds increases the heat.

    Can I make this without oil? Yes, you can use a non-stick pan and a small amount of water or broth to sauté the shrimp and vegetables if you prefer an oil-free version.

    What is the best way to peel shrimp? Use a small paring knife to cut the outer shell along the back, then peel from the head toward the tail. Ensure the vein is removed for a cleaner taste.

    Print
    clock clock iconcutlery cutlery iconflag flag iconfolder folder iconinstagram instagram iconpinterest pinterest iconfacebook facebook iconprint print iconsquares squares iconheart heart iconheart solid heart solid icon
    Red Lobster Baja Shrimp Bowl Recipe

    Red Lobster Baja Shrimp Bowl Recipe


    5 Stars 4 Stars 3 Stars 2 Stars 1 Star

    No reviews

    • Author: imageuploader
    • Total Time: 60 minutes
    • Yield: 8 servings 1x
    • Diet: Seafood

    Description

    If you are looking for a light, flavorful, and easy meal then the Red Lobster Baja Shrimp Bowl is the perfect dish for you! This seafood dish is full of flavor and nutrition, and it is sure to be a crowd-pleaser.


    Ingredients

    Scale
    • 32 oz. Succulent Shrimp (peeled and deveined)
    • 2 oz. Tender Baby Arugula
    • 4 Plump Roma Tomatoes (ripe and diced)
    • 12 oz. Sweet Corn Kernels
    • 4 Fresh Jalapeño Peppers (seeded and finely diced)
    • 2 oz. Crispy Tortilla Strips
    • 3 cups Fragrant Jasmine Rice (cooked)
    • 12 fl. oz. Sweet Chili Sauce
    • 4 Zesty Limes

    Instructions

    1. Step 1: In a medium-sized saucepan, cook jasmine rice according to package instructions.
    2. Step 2: In a large pan, cook the shrimp over medium heat until they turn pink and are fully cooked.
    3. Step 3: Add diced jalapeños, arugula, tomatoes, and corn kernels to the pan with the shrimp. Cook for an additional 2-3 minutes until vegetables are tender.
    4. Step 4: In a separate pan, heat tortilla strips until crispy.
    5. Step 5: Assemble your Baja Shrimp Bowl by adding a scoop of jasmine rice to each bowl, topped with the shrimp and vegetable mixture.
    6. Step 6: Drizzle sweet chili sauce over the top and garnish with crispy tortilla strips.
    7. Step 7: Squeeze fresh lime juice over the bowls for added flavor.
    8. Step 8: Serve hot and enjoy your delicious Red Lobster Baja Shrimp Bowl!

    Notes

    Make sure to use fresh, quality shrimp for the best results. Feel free to adjust spices to suit your taste. For a milder dish, omit the jalapeño pepper.

    • Prep Time: 30 minutes
    • Cook Time: 30 minutes
    • Category: dinner
    • Method: Stovetop
    • Cuisine: American

    Nutrition

    • Serving Size: 1 bowl
    • Calories: 302 kcal
    • Sugar: 12 g
    • Sodium: 650 mg
    • Fat: 8 g
    • Saturated Fat: 2 g
    • Unsaturated Fat: 6 g
    • Trans Fat: 0 g
    • Carbohydrates: 38 g
    • Fiber: 4 g
    • Protein: 22 g
    • Cholesterol: 140 mg
  • Savory Ground Beef Gravy and Creamy Mashed Potatoes

    Savory Ground Beef Gravy and Creamy Mashed Potatoes

    This filling meal pairs a rich, savory beef gravy with smooth mashed potatoes. It is a practical choice for a hearty dinner using common pantry ingredients.

    Recipe image

    List of ingredients

    • 1 pound ground beef – used for the gravy base.
    • 1 medium onion, diced – adds aromatic sweetness.
    • 2 cloves garlic, minced – provides a pungent flavor depth.
    • 2 tablespoons all-purpose flour – acts as the thickening agent for the gravy.
    • 2 cups beef broth – the primary liquid for the sauce.
    • 1 tablespoon Worcestershire sauce – adds umami and saltiness.
    • 1 teaspoon thyme (optional) – adds a subtle earthy herb flavor.
    • 1 cup frozen peas and carrots (optional) – provides color and vegetable nutrients.
    • 2 pounds potatoes, peeled and quartered – for the mashed base.
    • 1/2 cup milk – creates a creamy consistency in the mash.
    • 1/4 cup butter – adds richness and smoothness to the potatoes.
    • Salt and pepper – used for seasoning to taste.

    step-by-step instructions

    1. Prepare the potatoes: Place peeled and quartered potatoes in a large pot. Cover them with water and bring to a boil. Cook for 15-20 minutes until they are tender when pierced with a fork. Drain the water, then mash the potatoes with milk and butter. Season with salt and pepper, and cover the pot to keep them warm.
    2. Brown the beef: Heat a large skillet over medium heat. Cook the ground beef until it is completely browned, breaking it up with a spatula as it cooks. Drain any excess fat from the pan to avoid a greasy sauce.
    3. Sauté aromatics: Add the diced onion and minced garlic to the skillet with the beef. Sauté for 3-5 minutes until the onions become soft and translucent.
    4. Thicken and simmer: Sprinkle the flour over the beef and onion mixture. Stir well for about 2 minutes to cook out the raw flour taste. Gradually pour in the beef broth while stirring constantly to prevent lumps. Stir in the Worcestershire sauce, salt, pepper, and thyme. Let the mixture simmer for 5 minutes until it thickens. Stir in frozen peas and carrots if using.
    5. Serve the dish: Spoon a generous portion of mashed potatoes onto plates. Ladle the ground beef gravy over the top. Garnish with fresh parsley if desired and serve while hot.

    Choosing the Best Potatoes for Mashing

    The type of potato you choose significantly impacts the texture of the final dish. Yukon Gold potatoes are often preferred because they have a naturally buttery flavor and a medium starch content. This results in a creamy, smooth mash that holds its shape well.

    Russet potatoes are a high-starch alternative that produces a fluffier, lighter texture. These are ideal if you prefer a more airy mash, though they may require slightly more butter or milk to achieve a creamy consistency.

    Red potatoes have a lower starch content and a waxy texture. While they can be used, they are more likely to result in a denser mash. If using red potatoes, ensure they are boiled until very tender to avoid lumps.

    Regardless of the variety, peeling the potatoes is essential for a smooth texture. Quartering them into uniform sizes ensures that every piece cooks at the same rate, preventing some pieces from becoming mushy while others remain hard.

    Beef Selection and Fat Management

    For this recipe, an 80/20 lean-to-fat ratio ground beef is recommended. This ratio provides enough fat to flavor the meat and create a base for the roux without making the gravy overly oily.

    If you use a leaner beef, such as 90/10 or 93/7, you may find the meat becomes dry. In this case, add an extra tablespoon of butter or oil to the skillet before browning the beef to compensate for the lack of natural fats.

    Draining the excess fat after browning is a critical step. While some fat is needed to combine with the flour for thickening, too much oil will cause the gravy to separate. This results in a layer of grease floating on top of the sauce.

    To drain the fat efficiently, tilt the pan and spoon out the liquid or use a colander lined with paper towels. Ensure you leave a small amount of fat in the pan to help sauté the onions and garlic.

    Mastering the Gravy Consistency

    The thickening process relies on a roux, which is the combination of fat and flour. Cooking the flour for 2 minutes after stirring it into the beef is necessary to remove the raw grain taste.

    When adding the beef broth, do so gradually. Pouring a small amount in and stirring until incorporated prevents the flour from clumping into small balls. This ensures a glossy, smooth gravy finish.

    If the gravy becomes too thick during the simmering process, stir in an additional tablespoon or two of beef broth or water. This will loosen the sauce without significantly altering the flavor profile.

    Conversely, if the gravy is too thin after 5 minutes of simmering, continue to cook it over medium heat. The liquid will reduce, and the flour will continue to bind, increasing the viscosity of the sauce.

    Adding Vegetable Variations

    While peas and carrots are the traditional addition, other vegetables can enhance the nutritional value of the dish. Sliced mushrooms provide an earthy depth and a meatier texture to the gravy.

    Diced celery and carrots can be sautéed along with the onions at the beginning of the process. This creates a Mirepoix base, which is a classic culinary foundation that adds complex sweetness and aroma.

    Fresh spinach can be stirred into the gravy during the final minute of cooking. The heat from the sauce will wilt the spinach quickly, adding a vibrant green color and a mild flavor.

    For a more rustic feel, consider adding diced parsnips or turnips. These root vegetables complement the beef and potato flavors while adding a slight peppery note to the meal.

    Potato Texture Enhancements

    To elevate the mashed potatoes beyond butter and milk, consider adding a few flavor boosters. A teaspoon of garlic powder or a tablespoon of minced sautéed garlic adds a savory punch to the base.

    Incorporating a dollop of sour cream or Greek yogurt provides a slight tanginess that cuts through the richness of the beef gravy. This also adds a thicker, more luxurious creaminess to the mash.

    For a cheesy version, stir in shredded sharp cheddar or parmesan cheese while the potatoes are still hot. The residual heat will melt the cheese, integrating it fully into the potato structure.

    Avoid over-mashing or using a food processor for the potatoes. Over-working the starch can turn the potatoes gluey. Use a hand masher or a ricer for the best professional texture.

    Recommended Side Dish Pairings

    Since this is a heavy, starch-rich meal, pairing it with light, acidic, or crunchy sides creates balance. Steamed green beans with a squeeze of lemon juice provide a fresh contrast to the savory gravy.

    A crisp garden salad with a vinaigrette dressing is an excellent choice. The acidity of the vinegar helps cleanse the palate between bites of the rich beef and potatoes.

    Roasted broccoli or cauliflower adds a charred, nutty flavor that complements the browned beef. Tossing them in olive oil and salt before roasting ensures they provide a textural contrast to the soft mash.

    If you want more carbohydrates, warm buttered rolls or crusty sourdough bread are ideal for mopping up any leftover gravy on the plate.

    Storage and Food Safety Guidelines

    Leftovers should be stored in airtight containers to prevent them from absorbing other refrigerator odors. The beef and gravy can be stored together, but it is often better to store the mashed potatoes in a separate container.

    Refrigerated leftovers will remain safe and tasty for up to three days. Ensure the food is cooled down to room temperature before sealing the lids to prevent excess condensation from forming inside the container.

    The beef gravy freezes exceptionally well. Place it in a freezer-safe bag or container for up to three months. However, mashed potatoes do not freeze well, as the emulsion of milk and butter often breaks, resulting in a grainy texture upon thawing.

    Always ensure the food is reheated to an internal temperature of 165 degrees Fahrenheit to ensure safety and restore the proper consistency of the fats.

    Reheating Instructions for Best Quality

    The best way to reheat the beef gravy is on the stovetop. Place the gravy in a small saucepan over medium-low heat and add a splash of beef broth or water to restore the moisture lost during refrigeration.

    For the mashed potatoes, a stovetop method is also preferred. Heat them slowly with a small amount of extra milk or a knob of butter to bring back the original creamy texture.

    If using a microwave, place the potatoes and gravy in a microwave-safe dish. Cover the dish with a damp paper towel to trap steam, which prevents the potatoes from drying out. Heat in 1-minute intervals, stirring in between.

    Avoid overheating the potatoes in the microwave, as this can lead to hot spots and a rubbery consistency. Stirring frequently ensures the heat is distributed evenly throughout the mass.

    Make-Ahead Strategies

    To save time on dinner nights, you can prepare the beef gravy a day in advance. Once cooled, store it in the fridge and simply reheat it when you are ready to serve.

    The potatoes are best made fresh, but you can peel and quarter them ahead of time. Store the cut potatoes in a bowl of cold water in the refrigerator to prevent them from oxidizing and turning brown.

    If you are prepping for a crowd, you can boil the potatoes, mash them, and keep them in a slow cooker on the ‘warm’ setting. This keeps them at a safe temperature without overcooking them.

    You can also pre-dice the onions and mince the garlic and store them in a small airtight container. This reduces the active prep time to just a few minutes of assembly and cooking.

    Troubleshooting Common Issues

    If your gravy ends up with lumps, you can quickly fix it by passing the sauce through a fine-mesh strainer. Alternatively, using an immersion blender for a few seconds can smooth out the texture.

    If the mashed potatoes are too runny, it is likely due to too much milk or the use of a very waxy potato. You can fix this by stirring in a small amount of instant potato flakes or simmering them in a pan for a few minutes to evaporate excess moisture.

    If the beef tastes bland despite adding salt and pepper, increase the amount of Worcestershire sauce. The fermented anchovies and tamarind in the sauce provide a deep saltiness that enhances the beef’s natural flavor.

    If the gravy is too salty, add a splash of water or unsalted beef broth. You can also stir in a teaspoon of sugar or a small amount of heavy cream to neutralize the saltiness.

    Ingredient Substitutions

    For a lighter meat option, ground turkey or ground chicken can replace the beef. If using turkey, add a bit more butter to the pan, as turkey is significantly leaner than beef.

    If you do not have beef broth, chicken broth or a mixture of water and beef bouillon cubes can be used. Vegetable broth is also an option, though the flavor will be less intense.

    For those avoiding dairy, replace the milk in the mashed potatoes with unsweetened almond milk or oat milk. Substitute the butter with a plant-based butter alternative or olive oil.

    If you lack all-purpose flour, cornstarch can be used as a thickener. Mix 1 tablespoon of cornstarch with 1 tablespoon of cold water to create a slurry, then stir it into the simmering gravy at the end.

    Print
    clock clock iconcutlery cutlery iconflag flag iconfolder folder iconinstagram instagram iconpinterest pinterest iconfacebook facebook iconprint print iconsquares squares iconheart heart iconheart solid heart solid icon
    Savory Ground Beef Gravy and Creamy Mashed Potatoes

    Savory Ground Beef Gravy and Creamy Mashed Potatoes


    5 Stars 4 Stars 3 Stars 2 Stars 1 Star

    No reviews

    • Author: imageuploader
    • Total Time: 40 minutes
    • Yield: 4 servings 1x
    • Diet: General

    Description

    This hearty dish combines savory ground beef gravy with creamy mashed potatoes, creating the ultimate comfort food. Perfect for family dinners or cozy nights, this recipe is quick, easy, and satisfying.


    Ingredients

    Scale
    • 1 pound ground beef
    • 1 medium onion, diced
    • 2 cloves garlic, minced
    • 2 tablespoons all-purpose flour
    • 2 cups beef broth
    • 1 tablespoon Worcestershire sauce
    • 1 teaspoon thyme
    • 1 cup frozen peas and carrots
    • 2 pounds potatoes, peeled and quartered
    • 1/2 cup milk
    • 1/4 cup butter
    • salt and pepper to taste

    Instructions

    1. Step 1: Place peeled and quartered potatoes in a large pot. Cover with water and bring to a boil. Cook for 15-20 minutes, until potatoes are tender. Drain, then mash with milk and butter. Season with salt and pepper, and cover to keep warm.
    2. Step 2: In a large skillet over medium heat, brown the ground beef until cooked through, breaking it up with a spatula. Drain any excess fat.
    3. Step 3: Add diced onion and minced garlic to the skillet. Sauté until onions are soft and translucent, about 3-5 minutes.
    4. Step 4: Sprinkle flour over the cooked beef and onions. Stir well to incorporate and cook for about 2 minutes. Gradually add beef broth, stirring to prevent lumps. Add Worcestershire sauce, salt, pepper, and thyme, if using. Let simmer for 5 minutes, stirring occasionally until thickened. Add frozen peas and carrots, if desired.
    5. Step 5: Spoon mashed potatoes onto plates and top with the ground beef gravy. Garnish with fresh parsley if desired, and serve hot.

    Notes

    This cozy dish pairs beautifully with a side of green beans or steamed vegetables. Feel free to substitute ground turkey for a lighter option.

    • Prep Time: 10 minutes
    • Cook Time: 30 minutes
    • Category: Comfort Food, Main Course
    • Method: Stovetop
    • Cuisine: American

    Nutrition

    • Serving Size: 1 serving
    • Calories: 450 kcal
    • Sugar: 6 g
    • Sodium: 780 mg
    • Fat: 21 g
    • Saturated Fat: 10 g
    • Unsaturated Fat: 11 g
    • Trans Fat: 0 g
    • Carbohydrates: 45 g
    • Fiber: 5 g
    • Protein: 30 g
    • Cholesterol: 85 mg
  • Quick and Healthy Air Fryer Chicken and Broccoli

    Quick and Healthy Air Fryer Chicken and Broccoli

    This air fryer chicken and broccoli recipe delivers a nutritious, flavor-packed meal in under 30 minutes. It is an ideal option for busy weeknights or healthy meal prep due to its minimal cleanup and simple assembly.

    Recipe image

    List of ingredients

    • 1 lb boneless, skinless chicken breast, cut into 1-inch cubes – ensure pieces are uniform for even cooking.
    • 2 cup broccoli florets – bite-sized pieces work best.
    • 1 small onion, sliced (optional) – adds a mild sweetness to the dish.
    • 2 tablespoon soy sauce – provides the primary salty, savory base.
    • 2 tablespoon alcohol-free teriyaki sauce or honey – adds sweetness and thickness to the glaze.
    • 1 tablespoon avocado oil or olive oil – helps with browning and prevents sticking.
    • 2 cloves garlic, minced – adds fresh, pungent flavor.
    • 1/2 teaspoon garlic powder – enhances the savory depth of the marinade.
    • 1/2 teaspoon ground ginger – provides a warm, aromatic zing.
    • 1/2 teaspoon sesame oil – adds a distinct toasted nutty aroma.
    • Salt and pepper to taste – basic seasoning for the protein.
    • Optional: sesame seeds and green onions for garnish – adds visual appeal and a fresh finish.

    step-by-step instructions

    1. Preheat the Air Fryer: Start by preheating your air fryer to 390-400°F for about 5 minutes. This ensures the chicken sears immediately upon contact with the basket.
    2. Make the Marinade: In a large bowl, combine the soy sauce, alcohol-free teriyaki sauce or honey, avocado/olive oil, minced garlic, garlic powder, ground ginger, sesame oil, salt, and pepper. Stir well until the honey or teriyaki sauce is fully integrated.
    3. Marinate the Chicken and Broccoli: Add the cubed chicken and broccoli florets to the bowl. Toss thoroughly until every piece is evenly coated in the marinade.
    4. Arrange in the Basket: Carefully place the marinated mixture into the air fryer basket. Arrange the ingredients in a single layer to ensure maximum airflow.
    5. Air Fry to Perfection: Cook at 390-400°F for a total of 10 minutes. Shake the basket or flip the ingredients at the 5-minute mark to ensure even browning.
    6. Check for Doneness: Use a meat thermometer to confirm the chicken has reached an internal temperature of 165°F. The broccoli should be tender-crisp with slight charring on the edges.

    Optimization Techniques for Air Frying

    Cut Ingredients into Uniform Sizes

    Cutting the chicken into consistent 1-inch cubes ensures that every piece cooks at the same rate. If pieces vary in size, smaller cubes may overcook and become dry before larger pieces reach the safe internal temperature of 165°F.

    Prevent Overcrowding the Basket

    Air fryers rely on the rapid circulation of hot air to crisp food. Overfilling the basket blocks this airflow, which can lead to steaming instead of roasting, resulting in soggy broccoli and pale chicken.

    Utilize the Preheating Phase

    Preheating the air fryer mimics the effect of a hot skillet. When cold marinated chicken hits a preheated basket, it begins searing immediately, which locks in juices and creates a better exterior texture.

    Ingredient Substitutions for Dietary Needs

    Use Tamari for Gluten-Free Requirements

    If you need a gluten-free version, replace the soy sauce with tamari or coconut aminos. These alternatives provide a similar salty, umami flavor without the wheat found in traditional soy sauce.

    Swap Chicken for Plant-Based Proteins

    Extra-firm tofu or tempeh are excellent meat alternatives for this recipe. For tofu, press out the excess water and cube it similarly to the chicken to ensure it absorbs the marinade and crisps properly.

    Choose High-Smoke Point Oils

    While olive oil works well, avocado oil is preferred for high-temperature air frying. Avocado oil has a higher smoke point, meaning it won’t break down or produce smoke at 400°F.

    Adjust Sweeteners for Low-Sugar Diets

    If you prefer less sugar, replace the honey or teriyaki sauce with a small amount of maple syrup or a pinch of stevia. You can also increase the amount of ginger and garlic to maintain a bold flavor profile.

    Flavor Variations and Customizations

    Add Spicy Heat to the Marinade

    For a spicy kick, stir in a teaspoon of Sriracha or a pinch of crushed red pepper flakes. Adding cayenne pepper to the dry spice mix also provides a consistent heat throughout the dish.

    Incorporate Additional Colorful Vegetables

    Sliced red bell peppers, carrots, or snap peas can be added to the mix for more nutrition. Add denser vegetables like carrots slightly earlier or cut them thinner to match the cooking time of the broccoli.

    Infuse with Fresh Citrus Notes

    Squeezing fresh lime or lemon juice over the dish immediately after cooking adds a bright acidity. This cuts through the richness of the sesame oil and enhances the savory notes of the soy sauce.

    Create a Creamier Glaze

    For a thicker sauce, whisk a teaspoon of cornstarch into the marinade before tossing the ingredients. This creates a heavier coating that clings to the chicken and broccoli during the air frying process.

    Serving Suggestions and Side Pairings

    Pair with Hearty Whole Grains

    Serve this dish over steamed brown rice, quinoa, or farro for a complete meal. These grains provide a nutty base that complements the Asian-inspired flavors of the marinade.

    Use Low-Carb Vegetable Bases

    For a low-carbohydrate option, serve the chicken and broccoli over cauliflower rice or zucchini noodles. These alternatives keep the meal light while maintaining the volume of a traditional bowl.

    Enhance Presentation with Fresh Garnishes

    Sprinkle toasted sesame seeds and thinly sliced green onions over the finished meal. These additions provide a professional look and a fresh, sharp contrast to the cooked ingredients.

    Storage and Reheating Guidelines

    Proper Refrigeration Methods

    Store leftovers in an airtight glass container in the refrigerator for up to four days. Keeping the chicken and broccoli separate from the grains can help maintain the texture of the vegetables.

    Freezing for Long-Term Storage

    While the chicken freezes well, broccoli can become mushy upon thawing. If freezing, undercook the broccoli slightly and freeze the portioned meals in vacuum-sealed bags for up to two months.

    Restore Texture with the Air Fryer

    Reheat leftovers in the air fryer at 300°F for 5 to 8 minutes. This is the best method to restore the crispness of the broccoli and prevent the chicken from becoming rubbery.

    Quick Reheating in the Microwave

    If using a microwave, heat on medium power and add a teaspoon of water to the container. This creates steam that helps keep the chicken moist and prevents it from drying out.

    Meal Prep Strategies for the Week

    Prepare Components in Advance

    Cube the chicken and chop the broccoli florets up to 24 hours before cooking. Store them in separate airtight containers to keep them fresh and ready for quick assembly.

    Marinate Overnight for Depth

    Allowing the chicken to marinate in the refrigerator for 4 to 12 hours deepens the flavor profile. Ensure the chicken is stored in a sealed bag or container to prevent cross-contamination.

    Batch Cooking for Work Lunches

    Cook double portions and divide them into four equal meal-prep containers. Pair each portion with a pre-measured serving of quinoa or brown rice for a balanced daily lunch.

    Troubleshooting Common Issues

    Preventing Burnt Broccoli Florets

    Broccoli can burn if the florets are too small or if they are placed too close to the heating element. Cut larger florets or add the broccoli to the basket 2 minutes after the chicken has started cooking.

    Ensuring Chicken Stays Juicy

    Avoid cooking the chicken beyond the internal temperature of 165°F. Overcooking lean breast meat quickly leads to a dry, tough texture that is difficult to mask even with sauce.

    Managing Sticky Air Fryer Baskets

    If the marinade sticks to the basket, lightly brush the grate with oil before adding the food. Alternatively, use a perforated parchment liner designed specifically for air fryers to simplify cleanup.

    Frequently Asked Questions

    Can I use frozen broccoli in this recipe?

    Yes, you can use frozen broccoli, but do not thaw it before adding it to the marinade. Thawing releases excess water, which prevents the broccoli from crisping and can make the chicken soggy.

    What can I use if I do not have teriyaki sauce?

    You can make a quick substitute by mixing equal parts soy sauce and honey or brown sugar. This provides the necessary balance of salt and sweetness required for the glaze.

    How long can this meal stay in the fridge?

    This dish remains safe and tasty for up to four days when stored in an airtight container. Always ensure the food has cooled slightly before sealing the lid to prevent condensation.

    Is it possible to use chicken thighs instead of breasts?

    Chicken thighs are a great alternative and often result in a juicier dish due to higher fat content. They may require an additional 1 to 2 minutes of cooking time to reach the safe temperature.

    Can I add the onion at the start?

    Yes, you can add the sliced onion at the beginning with the chicken and broccoli. The onion will caramelize beautifully during the 10-minute cooking process.

    Print
    clock clock iconcutlery cutlery iconflag flag iconfolder folder iconinstagram instagram iconpinterest pinterest iconfacebook facebook iconprint print iconsquares squares iconheart heart iconheart solid heart solid icon
    Quick and Healthy Air Fryer Chicken and Broccoli

    Quick and Healthy Air Fryer Chicken and Broccoli


    5 Stars 4 Stars 3 Stars 2 Stars 1 Star

    No reviews

    • Author: imageuploader
    • Total Time: 20 minutes
    • Yield: 4 servings 1x
    • Diet: General

    Description

    Deliciously Crispy Air Fryer Chicken and Broccoli is a flavorful and healthy dish featuring tender chicken cubes and crisp broccoli florets in a savory marinade.


    Ingredients

    Scale
    • 1 lb boneless, skinless chicken breast, cut into 1-inch cubes
    • 2 cup broccoli florets
    • 1 small onion, sliced (optional)
    • 2 tablespoon soy sauce
    • 2 tablespoon teriyaki sauce or honey
    • 1 tablespoon avocado oil or olive oil
    • 2 cloves garlic, minced
    • 1/2 teaspoon garlic powder
    • 1/2 teaspoon ground ginger
    • 1/2 teaspoon sesame oil
    • Salt and pepper to taste
    • Optional: sesame seeds and green onions for garnish

    Instructions

    1. Preheat the Air Fryer: Start by preheating your air fryer to 390-400°F for about 5 minutes.
    2. Make the Marinade: In a large bowl, combine the soy sauce, teriyaki sauce or honey, avocado/olive oil, minced garlic, garlic powder, ground ginger, sesame oil, salt, and pepper.
    3. Marinate the Chicken and Broccoli: Add the cubed chicken and broccoli florets to the marinade and toss everything together until the ingredients are evenly coated.
    4. Arrange in the Basket: Carefully place the marinated chicken and broccoli in the air fryer basket, arranging them in a single layer to ensure even cooking.
    5. Air Fry to Perfection: Air fry the chicken and broccoli at 390-400°F for a total of 10 minutes, shaking or flipping the basket halfway through at the 5-minute mark.
    6. Check for Doneness: Keep a close eye on the air fryer as cooking times may vary slightly depending on your specific model. The chicken should reach an internal temperature of 165°F, and the broccoli should be tender-crisp with a delightful char.

    Notes

    Serve this versatile meal over a bed of fluffy white rice, nutty quinoa, or even cauliflower rice for a low-carb option.

    • Prep Time: 10 minutes
    • Cook Time: 10 minutes
    • Category: Main Course
    • Method: Air Frying
    • Cuisine: Asian

    Nutrition

    • Serving Size: 1 serving
    • Calories: 245 kcal
    • Sugar: 4 g
    • Sodium: 625 mg
    • Fat: 8 g
    • Saturated Fat: 2 g
    • Unsaturated Fat: 6 g
    • Trans Fat: 0 g
    • Carbohydrates: 10 g
    • Fiber: 3 g
    • Protein: 34 g
    • Cholesterol: 75 mg
  • Island-Style Creamy Macaroni Salad

    Island-Style Creamy Macaroni Salad

    This creamy Hawaiian macaroni salad is a refreshing and tangy side dish ideal for summer barbecues. It balances a rich, creamy dressing with a hint of sweetness and crisp vegetables.

    Recipe image

    List of ingredients

    • 2 cups Elbow Macaroni – any small pasta shape can be used as a substitute.
    • 3 tbsp Cider Vinegar – provides a sharp, tangy lift; white vinegar is a viable alternative.
    • 2 cups Mayonnaise – creates the rich, creamy base; Greek yogurt can be used for a lighter version.
    • 1/4 cup Milk – thins the dressing for a smoother consistency; use plant-based milk for a dairy-free option.
    • 1 large Grated Carrot – adds natural sweetness and vibrant color; shredded zucchini is a good alternative.
    • 1 rib Chopped Celery – optional; add for extra crunch or omit for a smoother texture.
    • 2 tbsp Grated Onion – adds depth and savory notes; substitute with shallots or green onions for a milder taste.
    • 1 tbsp Brown Sugar – balances the acidity of the vinegar; omit for a less sweet profile.
    • 1/2 tsp Salt – enhances all flavors; adjust to personal preference.
    • 1/2 tsp Pepper – adds a subtle kick; freshly ground pepper is recommended.
    • Chopped Green Onions – used for a fresh, colorful garnish.

    step-by-step instructions

    1. Cook the Pasta: Boil the elbow macaroni according to the package directions until tender. Drain the pasta and rinse it thoroughly under cold water to stop the cooking process and remove excess starch.
    2. Pre-Season the Macaroni: Place the cooled pasta in a bowl and toss it with 1 tablespoon of the cider vinegar. Allow the pasta to sit until it is completely cool to ensure the flavor is absorbed.
    3. Prepare the Dressing: In a separate mixing bowl, whisk together the remaining cider vinegar, mayonnaise, milk, grated carrot, chopped celery, grated onion, brown sugar, salt, and pepper until the mixture is smooth.
    4. Combine Ingredients: Transfer the macaroni to a large mixing bowl and pour the prepared creamy dressing over it. Gently fold the pasta until every piece is evenly coated.
    5. Chill the Salad: Cover the bowl and place it in the refrigerator. Chill for at least one hour before serving to let the flavors meld.
    6. Final Garnish: Just before serving, sprinkle the chopped green onions over the top for a vibrant finish.

    Optimizing Pasta Texture

    For an authentic island-style result, cook the macaroni slightly past the al dente stage. This softer texture allows the pasta to better absorb the dressing and creates a more cohesive mouthfeel.

    Rinsing the pasta under cold water is a critical step. This removes surface starches that would otherwise make the salad gummy or prevent the dressing from adhering properly to the noodles.

    Tossing the pasta with vinegar immediately after cooling creates a flavor base. The acidity penetrates the pasta, ensuring that the final dish is not overly reliant on the mayonnaise for taste.

    Customizing the Creamy Dressing

    The ratio of mayonnaise to milk determines the thickness of your salad. If you prefer a thicker, more traditional consistency, reduce the milk by one tablespoon.

    To create a lighter version, replace half of the mayonnaise with plain Greek yogurt. This adds a pleasant tang and increases the protein content without sacrificing the creamy texture.

    For those avoiding dairy, use a high-quality vegan mayonnaise and an unsweetened almond or soy milk. These substitutions maintain the creamy profile while making the dish plant-based.

    Creative Mix-in Ideas

    To add a savory element, fold in cubes of smoked tofu or plant-based ham. These alternatives provide the salty, smoky contrast typically found in traditional island versions of this recipe.

    For a tropical twist, incorporate diced fresh pineapple. The sweetness of the fruit complements the tang of the cider vinegar and the richness of the mayonnaise.

    If you enjoy a bit of heat, add finely diced jalapeños or a pinch of cayenne pepper to the dressing. This balances the sweetness of the carrots and brown sugar.

    For added texture, consider folding in toasted macadamia nuts or cashews just before serving. This adds a buttery crunch that elevates the overall experience.

    Perfect Serving Pairings

    This salad pairs exceptionally well with grilled proteins. Try serving it alongside grilled chicken breasts marinated in a citrus-herb glaze for a fresh summer meal.

    For a hearty feast, pair the macaroni salad with plant-based ribs or slow-cooked beef ribs. The acidity of the salad cuts through the richness of the meat.

    Complement the meal with grilled corn on the cob brushed with lime butter. The charred sweetness of the corn mirrors the sweetness in the macaroni salad.

    A side of fresh pineapple skewers, grilled until caramelized, adds a bright, acidic element that cleanses the palate between bites of the creamy pasta.

    Storage and Preservation

    Store the completed macaroni salad in an airtight glass or plastic container. Keep it refrigerated at all times to maintain the quality of the mayonnaise-based dressing.

    The salad remains fresh for up to four days in the refrigerator. Be sure to stir it gently before serving to redistribute the dressing, as some liquid may settle.

    Avoid leaving the salad at room temperature for more than two hours. This is especially important during outdoor gatherings to prevent spoilage of the dairy and egg components.

    Refreshing and Reheating

    Because of the starch in the pasta, the salad may thicken and appear dry after a day or two in the fridge. This is a natural process as the noodles absorb the dressing.

    To restore the creamy consistency, stir in a tablespoon of milk or extra mayonnaise. This refreshes the emulsion and brings back the original texture.

    Do not reheat this salad. The mayonnaise will separate if heated, resulting in an oily and unappealing consistency. Always serve this dish chilled.

    Advanced Make-Ahead Guide

    To save time, you can prepare the pasta and the dressing separately up to 24 hours in advance. Store them in separate airtight containers in the fridge.

    When you are ready to serve, combine the chilled pasta and the chilled dressing. This method ensures the pasta does not over-absorb the sauce, keeping the salad creamier for longer.

    If preparing for a large crowd, mix the salad in batches. This prevents the pasta at the bottom of the bowl from being crushed under the weight of the ingredients.

    Troubleshooting Common Issues

    If the salad tastes too acidic, add a small pinch more of brown sugar or a teaspoon of maple syrup. This will neutralize the sharp notes of the cider vinegar.

    If the dressing feels too heavy or cloying, stir in a teaspoon of lemon juice. The fresh citrus notes break through the richness of the mayonnaise.

    If the carrots are too chunky, use a finer grating attachment on your food processor. A finer grate allows the carrots to blend into the sauce more seamlessly.

    Frequently Asked Questions

    Can I use a different pasta shape? Yes, any small pasta like shells, rotini, or cavatappi works. Just ensure the shape is small enough to be coated evenly by the thick dressing.

    Can this salad be frozen? It is not recommended to freeze mayonnaise-based salads. The emulsion will break upon thawing, and the pasta may become mushy. It is best enjoyed fresh or from the fridge.

    What is the best vinegar to use? Cider vinegar is the standard for this recipe due to its mild fruitiness. However, white distilled vinegar provides a cleaner, sharper tang if that is preferred.

    Can I omit the onion? If you find raw onion too strong, you can substitute it with onion powder or omit it entirely. The celery and vinegar provide enough flavor to carry the dish.

    Print
    clock clock iconcutlery cutlery iconflag flag iconfolder folder iconinstagram instagram iconpinterest pinterest iconfacebook facebook iconprint print iconsquares squares iconheart heart iconheart solid heart solid icon
    Creamy Island-Style Macaroni Salad

    Island-Style Creamy Macaroni Salad


    5 Stars 4 Stars 3 Stars 2 Stars 1 Star

    No reviews

    • Author: imageuploader
    • Total Time: 90 minutes
    • Yield: 6 servings 1x
    • Diet: General

    Description

    This Hawaiian Macaroni Salad combines creamy dressing with vibrant flavors, perfect for BBQs and gatherings.


    Ingredients

    Scale
    • 2 cups Elbow Macaroni
    • 3 tbsp Cider Vinegar
    • 2 cups Mayonnaise
    • 1/4 cup Milk
    • 1 large Grated Carrot
    • 1 rib Chopped Celery
    • 2 tbsp Grated Onion
    • 1 tbsp Brown Sugar
    • 1/2 tsp Salt
    • 1/2 tsp Pepper
    • Chopped Green Onions

    Instructions

    1. Cook Pasta: Boil elbow macaroni according to package instructions until tender, then drain and rinse under cold water to stop the cooking process.
    2. Cool Macaroni: Toss the cooled macaroni with 1 tablespoon of cider vinegar, allowing it to sit until it’s completely cool.
    3. Make Dressing: In a small bowl, whisk together the remaining vinegar, mayonnaise, milk, grated carrot, chopped celery, grated onion, brown sugar, salt, and pepper until smooth and combined.
    4. Combine: In a large bowl, add the macaroni and pour the creamy dressing over it; gently toss the pasta until every elbow is well coated.
    5. Refrigerate: Place the salad in the refrigerator and chill until serving.
    6. Garnish: Garnish with chopped green onions before serving.

    Notes

    Store in an airtight container for up to 4 days in the fridge. For a twist, add diced pineapple for a tropical flavor.

    • Prep Time: 20 minutes
    • Cook Time: 10 minutes
    • Category: Lunch
    • Method: Mixing
    • Cuisine: Hawaiian

    Nutrition

    • Serving Size: 1 cup
    • Calories: 350 kcal
    • Sugar: 3 g
    • Sodium: 350 mg
    • Fat: 20 g
    • Saturated Fat: 3 g
    • Unsaturated Fat: 3 g
    • Trans Fat: 0 g
    • Carbohydrates: 40 g
    • Fiber: 2 g
    • Protein: 6 g
    • Cholesterol: 15 mg
  • Zesty Italian Pasta Salad

    Zesty Italian Pasta Salad

    This colorful and refreshing pasta salad combines al dente rotini with a variety of crisp vegetables and a tangy homemade vinaigrette. It is an ideal choice for meal prep, outdoor picnics, or as a light summer side dish.

    Recipe image

    List of ingredients

    • 1 pound rotini pasta – spiral shape helps hold the dressing.
    • Salt for pasta water – used for seasoning the noodles.
    • 8 oz beef salami, diced – cut into bite-sized pieces.
    • 8 oz fresh mozzarella pearls – small balls or cubed block cheese.
    • 1 pint cherry tomatoes, halved – mixed colors provide better visual appeal.
    • 1 large cucumber, seeded and diced – skin can be left on or peeled.
    • 1 red bell pepper, diced – yellow or orange alternatives work well.
    • 1/2 red onion, finely diced – soak in ice water to mellow the flavor.
    • 1 cup pitted olives, halved – a combination of kalamata and green olives.
    • 1/2 cup pepperoncini, sliced – adds a tangy, pickled element.
    • 1/2 cup fresh basil, torn or chopped – avoid using dried basil.
    • 1/4 cup fresh parsley, chopped – fresh leaves are essential for flavor.
    • 1/2 cup artichoke hearts, quartered – marinated, drained, and patted dry.
    • 1/3 cup grated parmesan cheese – use high-quality grated parmesan.
    • 1/2 cup extra virgin olive oil – use a high-quality oil for better taste.
    • 1/4 cup red wine vinegar – provides the primary tang.
    • 2 tablespoons fresh lemon juice – adds bright acidity.
    • 1 tablespoon Dijon mustard – acts as an emulsifier for the dressing.
    • 3 cloves garlic, minced – adjust quantity based on preference.
    • 2 teaspoons Italian seasoning – a blend of dried Mediterranean herbs.
    • 1 teaspoon honey – balances the acidic vinegar and lemon.
    • 1/2 teaspoon red pepper flakes – adjust for preferred spice level.
    • 1 teaspoon salt – for dressing balance.
    • 1/2 teaspoon fresh cracked black pepper – for seasoning.
    • 1 tablespoon finely grated parmesan – adds deep umami to the dressing.

    step-by-step instructions

    1. Boil the pasta: Bring a large pot of water to a boil and add 1-2 tablespoons of salt. Cook the rotini for about one minute less than the package directions to ensure it is firmly al dente.
    2. Cool and rinse: Drain the pasta and immediately rinse it under cold water to stop the cooking process and remove excess starch. Spread the noodles on a baking sheet to cool completely before adding other ingredients.
    3. Prepare the dressing: Place all dressing ingredients into a jar with a tight lid. Shake vigorously until the mixture is fully emulsified and combined.
    4. Chop the vegetables: Dice the beef salami, cucumber, bell pepper, and red onion into uniform, bite-sized pieces. Halve the cherry tomatoes and olives, and slice the pepperoncini.
    5. Combine ingredients: In a very large bowl, combine the cooled pasta with the chopped vegetables, salami, mozzarella, artichokes, and parmesan.
    6. Dress the salad: Pour approximately three-quarters of the dressing over the mixture and toss gently using a scooping motion.
    7. Finish with herbs: Fold in the fresh basil and parsley, then add the remaining dressing. Toss one last time and adjust salt or pepper to taste.

    Techniques for Better Texture

    Cooking Pasta Al Dente

    Cooking the pasta slightly under the recommended time prevents it from becoming mushy. Since the noodles will absorb the dressing over time, a firmer texture ensures the salad maintains its structure.

    Rinsing Cold Water

    Rinsing the pasta removes the surface starch that typically makes noodles stick together. In cold salads, this step is necessary to keep the individual spirals distinct and prevent a gummy consistency.

    Using a Baking Sheet to Cool

    Spreading pasta on a flat tray allows it to cool rapidly and evenly. This prevents the residual heat from melting the mozzarella pearls or wilting the fresh herbs upon mixing.

    Ingredient Substitutions and Options

    Replacing Beef Salami with Plant-Based Proteins

    For a meat-free version, replace the beef salami with chickpeas or smoked tofu cubes. These options provide a similar protein content and heartiness while remaining plant-based.

    Alternative Pasta Shapes

    While rotini is recommended for its ability to trap dressing, fusilli or farfalle are excellent alternatives. Avoid smooth pastas like penne, as the dressing may slide off the surface.

    Substituting Mozzarella for Feta

    Feta cheese can be used instead of mozzarella for a saltier, more pungent flavor profile. If using feta, slightly reduce the amount of added salt in the dressing to compensate.

    Using Different Vinegars

    If red wine vinegar is unavailable, apple cider vinegar or white wine vinegar can be used. These alternatives maintain the necessary acidity, though the flavor profile will be slightly milder.

    Custom Variations for Different Tastes

    Adding Grilled Proteins

    To turn this side dish into a main course, add sliced grilled chicken breast or sautéed shrimp. Add the proteins after the pasta has cooled to maintain the salad’s temperature.

    Incorporating Roasted Vegetables

    Add roasted zucchini, eggplant, or asparagus to the mix for a deeper, smokier flavor. Ensure the roasted vegetables are completely cooled before adding them to the fresh components.

    Creating a Pesto-Style Twist

    Replace half of the homemade dressing with a high-quality basil pesto. Increase the amount of parmesan cheese and add toasted pine nuts for added crunch and richness.

    Increasing the Heat Level

    For a spicier version, double the amount of red pepper flakes in the dressing. You can also use spicy beef salami or add diced jalapeños for an extra kick.

    Serving and Presentation Ideas

    Optimizing Serving Temperature

    Remove the salad from the refrigerator about 30 minutes before serving. Cold temperatures can mute the flavors and make the pasta feel too firm, so a slight warm-up enhances the taste.

    Plating for Crowds

    Use a wide, shallow bowl rather than a deep one to showcase the colorful ingredients. Garnish the top with extra torn basil leaves and a fresh sprinkle of parmesan cheese.

    Pairing with Side Dishes

    This salad pairs well with grilled garlic bread or a light platter of marinated olives and nuts. It also complements grilled fish or lean grilled meats perfectly.

    Storage and Freshness Guidelines

    Refrigeration Duration

    This pasta salad can be stored in an airtight container in the refrigerator for up to four days. The flavors typically intensify and improve after the first 24 hours of chilling.

    Maintaining Texture During Storage

    If preparing the salad more than a day in advance, reserve a small portion of the dressing. Mix the reserved dressing in right before serving to refresh the moisture levels.

    Why Freezing is Not Recommended

    Do not freeze this salad, as the freezing and thawing process destroys the texture of the pasta and vegetables. The result will be a mushy consistency and separated dressing.

    Refreshing and Reheating Tips

    Adjusting Dryness

    Pasta tends to absorb liquid over time, which can leave the salad looking dry. Drizzle a small amount of extra virgin olive oil over the top to restore the gloss and moisture.

    Brightening the Flavor

    A fresh squeeze of lemon juice just before serving can wake up the flavors. This adds a burst of acidity that cuts through the richness of the cheese and salami.

    Adding Final Herbs

    Stir in a handful of freshly chopped parsley or basil immediately before serving. This ensures the herbs look vibrant and provide a fresh aroma that might fade during storage.

    Troubleshooting Common Issues

    Preventing a Watery Salad

    Always seed the cucumber and pat the marinated artichokes dry before adding them. Excess moisture from these ingredients can dilute the dressing and make the salad soggy.

    Balancing Excessive Acidity

    If the dressing tastes too sharp, stir in a small amount of additional honey or olive oil. This helps neutralize the vinegar and lemon juice for a smoother taste.

    Correcting Bland Pasta

    If the noodles taste bland, it is usually due to under-salting the boiling water. To fix this, add a pinch more salt or a splash of red wine vinegar to the final toss.

    Frequently Asked Questions

    Can I use dried herbs instead of fresh basil and parsley?

    Fresh herbs are strongly recommended for this recipe to provide brightness and aroma. Dried herbs have a different, more concentrated flavor that can become overpowering or taste dusty in a cold salad.

    How do I remove the strong bite from raw red onions?

    Dice the onions first and soak them in a bowl of ice water for 10 minutes. Drain and pat them dry before adding to the salad to keep the flavor crisp but mild.

    What is the best type of olive to use?

    A mixture of salty kalamata and buttery green olives provides the best balance. However, any pitted olive that fits your taste preference will work well in this recipe.

    Is it possible to make this recipe without parmesan cheese?

    Yes, you can omit the parmesan cheese entirely for a dairy-free option if you also replace the mozzarella. The dressing will still be flavorful, though it will lose some of its umami depth.

    Print
    clock clock iconcutlery cutlery iconflag flag iconfolder folder iconinstagram instagram iconpinterest pinterest iconfacebook facebook iconprint print iconsquares squares iconheart heart iconheart solid heart solid icon
    Zesty Italian Pasta Salad

    Zesty Italian Pasta Salad


    5 Stars 4 Stars 3 Stars 2 Stars 1 Star

    No reviews

    • Author: imageuploader
    • Total Time: 40 minutes
    • Yield: 10 servings 1x
    • Diet: General

    Description

    A zingy, colorful Italian pasta salad loaded with fresh vegetables, cheese, and a homemade Italian dressing that gets better as it sits.


    Ingredients

    Scale
    • 1 pound rotini pasta
    • Salt for pasta water
    • 8 oz beef salami, diced into bite-sized pieces
    • 8 oz fresh mozzarella pearls
    • 1 pint cherry tomatoes, halved
    • 1 large cucumber, seeded and diced
    • 1 red bell pepper, diced
    • 1/2 red onion, finely diced
    • 1 cup pitted olives, halved
    • 1/2 cup pepperoncini, sliced
    • 1/2 cup fresh basil, roughly torn or chopped
    • 1/4 cup fresh parsley, chopped
    • 1/2 cup artichoke hearts, quartered
    • 1/3 cup grated parmesan cheese
    • 1/2 cup olive oil
    • 1/4 cup red wine vinegar
    • 2 tablespoons fresh lemon juice
    • 1 tablespoon Dijon mustard
    • 3 cloves garlic, minced
    • 2 teaspoons Italian seasoning
    • 1 teaspoon honey
    • 1/2 teaspoon red pepper flakes
    • 1 teaspoon salt
    • 1/2 teaspoon fresh cracked black pepper
    • 1 tablespoon finely grated parmesan

    Instructions

    1. Cook Pasta: Bring a large pot of salted water to a boil, cook pasta 1 minute less than package directions, drain, and rinse under cold water immediately.
    2. Make Dressing: Combine olive oil, red wine vinegar, lemon juice, Dijon mustard, minced garlic, Italian seasoning, honey, red pepper flakes, salt, black pepper, and finely grated parmesan in a jar and shake until combined.
    3. Chop Ingredients: Dice the beef salami, cucumber, red bell pepper, and red onion; halve the cherry tomatoes and olives; slice pepperoncini; and quarter artichoke hearts.
    4. Assemble: In a large bowl, combine cooled pasta and all chopped ingredients except fresh herbs; pour about 3/4 of the dressing over and toss gently.
    5. Final Touch: Add fresh basil, fresh parsley, and the remaining dressing, tossing gently before tasting for final adjustments.

    Notes

    For best results, refrigerate for at least 2 hours before serving. This salad keeps in the fridge for up to 4 days. Do not freeze.

    • Prep Time: 30 minutes
    • Cook Time: 10 minutes
    • Category: Lunch
    • Method: Mixing
    • Cuisine: Italian

    Nutrition

    • Serving Size: 1 bowl
    • Calories: 430 kcal
    • Sugar: 6 g
    • Sodium: 850 mg
    • Fat: 24 g
    • Saturated Fat: 8 g
    • Unsaturated Fat: 14 g
    • Trans Fat: 0 g
    • Carbohydrates: 32 g
    • Fiber: 4 g
    • Protein: 16 g
    • Cholesterol: 45 mg
  • High Protein Creamy Garlic Shrimp Pasta

    High Protein Creamy Garlic Shrimp Pasta

    This high-protein pasta dish utilizes Greek yogurt to create a creamy texture without the need for heavy cream. It is a fast meal that takes approximately 25 minutes to prepare from start to finish.

    Recipe image

    List of ingredients

    • 8 oz high-protein chickpea or lentil rotini pasta – provides a nutrient-dense base.
    • 1 lb large shrimp, peeled and deveined – lean protein source.
    • 1 cup plain non-fat Greek yogurt, room temperature – creates the creamy sauce base.
    • 1/2 cup low-sodium chicken broth – used for thinning and flavoring the sauce.
    • 4 cloves garlic, minced – adds pungent aromatic flavor.
    • 1 tbsp extra virgin olive oil – for searing the shrimp.
    • 1/2 cup freshly grated parmesan cheese – adds saltiness and thickness.
    • 1 tsp crushed red pepper flakes – provides a mild heat.
    • 1/2 tsp kosher salt – for seasoning.
    • 1/4 tsp ground black pepper – for seasoning.
    • 2 cups fresh baby spinach – adds vitamins and color.
    • 1 tbsp fresh Italian parsley, finely chopped – for a fresh garnish.

    step-by-step instructions

    1. Cook Pasta: Bring a large pot of salted water to a boil. Cook the high-protein pasta according to the package directions until al dente. Drain the pasta, but reserve 1/4 cup of the cooking water for later use.
    2. Sear Shrimp: Heat olive oil in a large non-stick skillet over medium-high heat. Season the shrimp with salt and pepper. Add them to the pan and sear for 2 minutes per side until they are pink and opaque. Remove the shrimp from the pan and set them aside.
    3. Sauté Aromatics: Reduce the skillet heat to medium. Add the minced garlic and red pepper flakes. Sauté for about 60 seconds until the garlic becomes fragrant.
    4. Build the Sauce: Slowly whisk in the chicken broth and room-temperature Greek yogurt. Maintain a medium-low heat to prevent the yogurt from curdling.
    5. Thicken: Stir in the grated parmesan cheese. Continue stirring until the sauce is smooth and the cheese has completely melted.
    6. Wilt Greens: Add the fresh baby spinach to the sauce. Stir constantly until the leaves are just wilted.
    7. Combine: Return the seared shrimp and the cooked pasta to the skillet.
    8. Final Toss: Toss all ingredients together to ensure everything is thoroughly coated. If the sauce is too thick, add the reserved pasta water one tablespoon at a time until you reach the desired consistency.
    9. Garnish: Sprinkle with chopped fresh parsley and serve immediately.

    Technical Tips for a Smooth Sauce

    Managing the temperature of your dairy is critical in this recipe. Using room temperature Greek yogurt reduces the temperature shock when it hits the pan. This significantly lowers the risk of the sauce separating or curdling.

    The heat setting must remain at medium-low once the yogurt is added. High heat causes the proteins in the yogurt to tighten and squeeze out moisture, resulting in a grainy texture. Constant whisking helps maintain a stable emulsion.

    Do not discard the pasta water. The starch released during the boiling process acts as a natural thickener and binder. It helps the sauce adhere to the pasta more effectively than plain water or extra broth.

    Searing the shrimp quickly on high heat ensures they remain juicy. Overcooking shrimp leads to a rubbery texture. Remove them from the pan as soon as they turn opaque and form a slight curl.

    Ingredient Substitutions and Alternatives

    For the pasta, chickpea or lentil rotini is recommended for maximum protein. However, you can use whole-grain wheat pasta or gluten-free brown rice pasta. If you require a low-carb option, zucchini noodles or spaghetti squash work well.

    If you prefer a different protein, grilled chicken breast is a direct substitute for shrimp. Cut the chicken into bite-sized pieces and sauté them until fully cooked before proceeding with the garlic and sauce steps.

    To make this dish dairy-free, replace the Greek yogurt with an unsweetened plain coconut yogurt or a cashew-based cream. Use nutritional yeast or a vegan parmesan alternative to replicate the salty, cheesy flavor.

    Vegetable broth can be used instead of chicken broth. This makes the recipe suitable for those avoiding meat-based stocks without altering the flavor profile significantly.

    Flavor Variations and Additions

    Adding a squeeze of fresh lemon juice at the end brightens the overall flavor. The acidity cuts through the richness of the yogurt and parmesan. You can also add lemon zest during the garlic sauté phase.

    For additional vegetables, consider adding sautéed mushrooms, diced bell peppers, or frozen peas. Add harder vegetables like carrots or broccoli early in the process, or steam them separately to ensure they are tender.

    If you prefer a more intense heat, increase the red pepper flakes to two teaspoons. Alternatively, stir in a teaspoon of Sriracha or chipotle paste for a smoky, spicy dimension.

    Sun-dried tomatoes are another excellent addition. Stir them in with the spinach to add a concentrated sweetness and tartness that complements the garlic and shrimp.

    Serving and Pairing Suggestions

    Serve this pasta in warmed bowls to keep the sauce creamy for longer. Garnish with additional parmesan cheese or a pinch of paprika for visual contrast.

    Pair this meal with a side of roasted vegetables. Broccoli, asparagus, or Brussels sprouts roasted with olive oil and salt provide a crisp contrast to the creamy pasta.

    A light side salad with a lemon-vinaigrette dressing balances the richness of the Greek yogurt sauce. Use mixed greens, cucumber, and cherry tomatoes for a refreshing accompaniment.

    If you want a heartier meal, serve the pasta with toasted whole-grain garlic bread. The bread is useful for soaking up any remaining sauce left on the plate.

    Storage and Preservation

    Store leftover pasta in an airtight container in the refrigerator. It will remain fresh for up to two days. Ensure the container is sealed tightly to prevent the pasta from drying out.

    The sauce may thicken significantly as it cools. This is normal due to the nature of Greek yogurt and the starches in the high-protein pasta. Do not attempt to stir it vigorously while cold as it may break the emulsion.

    Avoid freezing this dish. Greek yogurt and parmesan cheese often separate when frozen and thawed, which results in a grainy, unappealing texture in the sauce.

    If storing for more than 24 hours, consider storing the pasta and the sauce in separate containers. This prevents the pasta from absorbing all the sauce and becoming mushy.

    Reheating Guidelines

    Reheat the pasta gently on the stove over low to medium-low heat. Avoid using high heat, which can cause the yogurt sauce to curdle or split.

    Add a small splash of water, chicken broth, or milk during the reheating process. This restores the creaminess of the sauce and prevents the dish from becoming too dry.

    If using a microwave, use a medium power setting and heat in 30-second intervals. Stir the pasta between each interval to distribute the heat evenly and prevent hot spots that could overcook the shrimp.

    Keep the shrimp in the pan for the minimum time necessary to warm through. Over-reheating shrimp will make them tough and rubbery.

    Make-Ahead Advice

    You can prep several components in advance to save time on busy weeknights. Mince the garlic and chop the parsley a day ahead and store them in small containers.

    Peel and devein the shrimp in advance. Store them in a sealed container in the refrigerator for up to 24 hours before cooking.

    While the sauce cannot be fully made in advance without risk of separation, you can mix the yogurt and broth together and keep them chilled. Remember to bring the mixture to room temperature before adding it to the pan.

    Cook the pasta ahead of time and toss it with a small amount of olive oil to prevent sticking. When ready to serve, simply add it to the sauce during the final combining step.

    Troubleshooting Common Issues

    If the sauce curdles, it is usually due to excessive heat. You can sometimes fix this by whisking in a tablespoon of warm water or broth very quickly over low heat to re-emulsify the mixture.

    If the sauce is too thin, simmer it for an additional minute or two before adding the pasta. You can also stir in an extra tablespoon of parmesan cheese to increase the thickness.

    If the shrimp are not searing but steaming in the pan, the skillet may not be hot enough or the shrimp may be too wet. Pat the shrimp dry with paper towels before adding them to the oil.

    If the high-protein pasta feels too grainy, ensure you are cooking it exactly to the package instructions. Overcooking chickpea pasta can lead to a mushy texture, while undercooking it leaves it gritty.

    Nutritional Component Breakdown

    Chickpea and lentil pastas are superior to traditional white pasta because they offer significantly more fiber and protein. This helps regulate blood sugar levels and keeps you full longer.

    Greek yogurt provides a concentrated source of protein and probiotics. It replaces the saturated fats found in heavy cream while maintaining a thick, satisfying mouthfeel.

    Shrimp is a lean protein that is low in calories but high in essential minerals like selenium and B12. It is an efficient way to increase protein intake without adding excess fat.

    Fresh baby spinach contributes non-heme iron and Vitamin K. Incorporating greens directly into the sauce ensures you get a serving of vegetables without altering the core flavor of the dish.

    Print
    clock clock iconcutlery cutlery iconflag flag iconfolder folder iconinstagram instagram iconpinterest pinterest iconfacebook facebook iconprint print iconsquares squares iconheart heart iconheart solid heart solid icon
    High Protein Creamy Garlic Shrimp Pasta

    High Protein Creamy Garlic Shrimp Pasta


    5 Stars 4 Stars 3 Stars 2 Stars 1 Star

    No reviews

    • Author: imageuploader
    • Total Time: 25 minutes
    • Yield: 4 servings 1x
    • Diet: High Protein

    Description

    A high-protein, creamy garlic shrimp pasta featuring a light Greek yogurt sauce and nutrient-dense chickpea pasta, perfect for a healthy and satisfying weeknight dinner.


    Ingredients

    Scale
    • 8 oz high-protein chickpea or lentil rotini pasta
    • 1 lb large shrimp, peeled and deveined
    • 1 cup plain non-fat Greek yogurt, room temperature
    • 1/2 cup low-sodium chicken broth
    • 4 cloves garlic, minced
    • 1 tbsp extra virgin olive oil
    • 1/2 cup freshly grated parmesan cheese
    • 1 tsp crushed red pepper flakes
    • 1/2 tsp kosher salt
    • 1/4 tsp ground black pepper
    • 2 cups fresh baby spinach
    • 1 tbsp fresh Italian parsley, finely chopped

    Instructions

    1. Step: Bring a large pot of salted water to a boil and cook the high-protein pasta according to package directions until al dente. Drain, reserving 1/4 cup of the pasta cooking water.
    2. Step: Heat olive oil in a large non-stick skillet over medium-high heat.
    3. Step: Season shrimp with salt and pepper, then add to the skillet. Sear for 2 minutes per side or until pink and opaque. Remove shrimp from the pan and set aside.
    4. Step: Reduce the skillet heat to medium. Add the minced garlic and red pepper flakes, sautéing for 60 seconds until fragrant.
    5. Step: Slowly whisk in the chicken broth and Greek yogurt. Maintain medium-low heat to ensure the yogurt does not curdle.
    6. Step: Stir in the grated parmesan cheese until the sauce is smooth and the cheese has melted.
    7. Step: Add the baby spinach to the sauce and stir until the leaves are just wilted.
    8. Step: Return the cooked shrimp and the pasta to the skillet.
    9. Step: Toss all ingredients together to coat thoroughly. If the sauce is too thick, add the reserved pasta water one tablespoon at a time until the desired consistency is reached.
    10. Step: Garnish with chopped parsley and serve immediately.

    Notes

    Use room temperature Greek yogurt to prevent sauce curdling. Pat shrimp dry before searing for a golden crust. Reheat gently on low stove heat with a splash of broth to keep shrimp tender.

    • Prep Time: 10 minutes
    • Cook Time: 15 minutes
    • Category: Main Course
    • Method: Stovetop
    • Cuisine: Mediterranean

    Nutrition

    • Serving Size: 1 serving
    • Calories: 420 kcal
    • Sugar: 6 g
    • Sodium: 610 mg
    • Fat: 8 g
    • Saturated Fat: 3 g
    • Unsaturated Fat: 5 g
    • Trans Fat: 0 g
    • Carbohydrates: 40 g
    • Fiber: 7 g
    • Protein: 28 g
    • Cholesterol: 75 mg