Author: imageuploader

  • Zesty Pressure Cooker Pasta Salad

    Zesty Pressure Cooker Pasta Salad

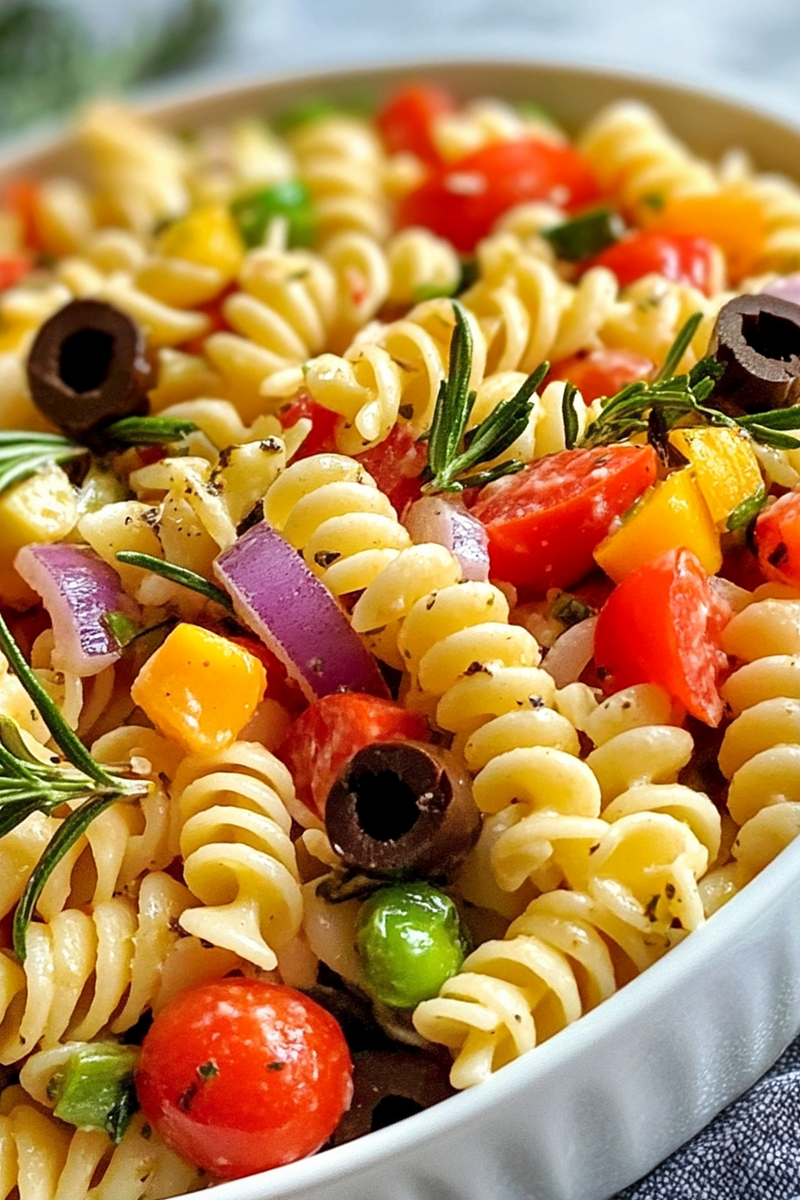
    This fast pasta salad is a refreshing choice for lunches or side dishes. It uses a pressure cooker to speed up the cooking process for a meal ready in minutes.

    Recipe image

    List of ingredients

    • 8 oz pasta (rotini or penne) – provides the hearty base of the salad.
    • 1 cup cherry tomatoes (halved) – adds sweetness and juicy pops of flavor.
    • 1/2 cup black olives (sliced) – contributes a salty and tangy contrast.
    • 1/2 cup cucumber (diced) – adds a cool, refreshing crunch.
    • 1/4 cup red onion (finely chopped) – gives a mild, sharp bite.
    • 1/2 cup feta cheese (crumbled) – adds creamy texture and salty richness.
    • 1/4 cup Italian dressing – binds the ingredients with a herby, tangy taste.
    • Salt to taste – enhances all the natural flavors.
    • Pepper to taste – adds a subtle hint of spice.

    step-by-step instructions

    1. Cook the pasta: Pour pasta into the pressure cooker with enough water to just cover it. Ensure the sealing ring is snug and lock the lid.
    2. Set the timer: Set the cooker to manual mode for 6 minutes to achieve a tender texture with a slight pull.
    3. Release pressure: Use the quick release valve immediately after the timer dings to stop the cooking process.
    4. Cool the noodles: Drain the pasta and rinse it under cold water to prevent mushiness and stop residual cooking.
    5. Combine ingredients: In a large bowl, toss together the cooked pasta, halved cherry tomatoes, sliced black olives, diced cucumber, chopped red onion, and crumbled feta.
    6. Dress the salad: Pour the Italian dressing over the mixture and toss gently to ensure an even coat.
    7. Season: Taste the salad and add salt and pepper according to your preference.
    8. Chill: Place the salad in the refrigerator for at least 15 minutes to allow the flavors to meld and cool.

    Choosing the Right Pasta Shape

    Rotini for Maximum Sauce Adhesion

    Rotini is an excellent choice because the spirals act as traps for the dressing. This ensures that every bite is flavorful and the herbs in the Italian dressing cling to the pasta.

    Penne for a Traditional Texture

    Penne is a classic option that holds its shape well during pressure cooking. Its hollow center allows some of the dressing and small bits of feta to settle inside the noodles.

    Fusilli for Better Ingredient Distribution

    Fusilli is similar to rotini and provides a great grip for the vegetables. The twists help the diced cucumber and onions distribute evenly throughout the bowl.

    Farfalle for Visual Appeal

    Farfalle, or bow-tie pasta, adds a decorative touch to the salad. While it has less surface area for dressing than rotini, it provides a satisfying chew.

    Vegetable Preparation Techniques

    Slicing Cherry Tomatoes for Juiciness

    Halving cherry tomatoes instead of quartering them prevents them from breaking down too quickly. This keeps the salad looking fresh and provides a burst of juice when eaten.

    Dicing Cucumbers for Consistent Crunch

    Dicing cucumbers into small, uniform cubes ensures that you get a bit of crunch in every forkful. Removing the seeds first can help prevent the salad from becoming too watery.

    Mincing Red Onion to Balance Sharpness

    Finely chopping the red onion prevents any single piece from overpowering the other flavors. This method distributes the sharp, pungent taste evenly across the dish.

    Preparing Black Olives for Salty Depth

    Slicing black olives into rings increases the surface area for the dressing to coat. This enhances the salty, briny flavor that contrasts with the sweet tomatoes.

    Mastering the Pressure Cooker Process

    Importance of the Sealing Ring

    The sealing ring must be perfectly seated to maintain the pressure required for fast cooking. A loose ring will cause steam to leak, resulting in undercooked pasta.

    Using Quick Release to Prevent Overcooking

    Quick release is essential for pasta because it stops the cooking process immediately. If left to release naturally, the pasta can easily become overcooked and mushy.

    Calculating the Water Ratio

    Use just enough water to cover the pasta rather than a full pot of boiling water. This prevents the starch from diluting and keeps the cooking time precise.

    Avoiding Pasta Sticking During Cooking

    Tossing the pasta with a small amount of oil before pressure cooking can prevent the noodles from clumping. However, rinsing with cold water afterward usually solves any sticking issues.

    Dressing and Flavor Enhancements

    Using Bottled Italian Dressing for Speed

    Bottled dressing is a convenient way to get a consistent herb and vinegar profile. Look for options with a balance of olive oil and red wine vinegar for the best taste.

    Creating a Custom Vinaigrette

    If you prefer a homemade version, whisk together olive oil, apple cider vinegar, dried oregano, and garlic powder. This allows you to control the amount of sodium and sugar.

    Balancing Acidity with Lemon Juice

    Adding a squeeze of fresh lemon juice just before serving brightens the entire dish. The citric acid cuts through the richness of the feta cheese.

    Adjusting Salt and Pepper for Depth

    Always taste the salad after chilling, as flavors change when cold. Adding a final pinch of salt can wake up the flavors of the fresh vegetables.

    Protein Additions for a Main Course

    Adding Grilled Chicken Breast

    Sliced grilled chicken breast turns this side dish into a filling main meal. Ensure the chicken is cooled completely before adding it to avoid warming the salad.

    Incorporating Canned Chickpeas

    Chickpeas add a plant-based protein boost and a creamy texture. Rinse and drain them thoroughly to maintain the balance of the dressing.

    Using Flaked Tuna

    Canned tuna in water or oil adds a savory, salty element to the mix. This pairing works particularly well with the olives and red onion.

    Adding Hard-Boiled Eggs

    Chopped hard-boiled eggs add richness and extra satiety. They complement the crumbled feta and the acidity of the Italian dressing.

    Storage and Freshness Guidelines

    Best Containers for Long-Term Storage

    Store the salad in glass, airtight containers to keep the air out. This prevents the pasta from drying out and keeps the vegetables crisp for longer.

    Timing the Dressing Addition

    If you are preparing the salad 24 hours in advance, keep the dressing in a separate jar. Toss the dressing in just before serving to prevent the vegetables from wilting.

    Maximum Refrigeration Windows

    Pasta salads typically stay fresh in the fridge for up to four days. However, the texture is best within the first two days of preparation.

    Refreshing the Salad Before Serving

    Stir the salad gently before serving to redistribute the dressing that may have settled at the bottom. A small splash of extra oil or vinegar can revive the glossiness.

    Troubleshooting Common Issues

    Fixing Mushy Pasta Texture

    Mushy pasta is usually caused by overcooking or skipping the cold water rinse. To fix this, ensure you use the quick release valve and rinse immediately.

    Resolving a Bland Flavor Profile

    If the salad tastes flat, it likely needs more acidity or salt. Add a teaspoon of lemon juice or a bit more Italian dressing to brighten the flavor.

    Managing Excess Liquid in the Bowl

    Watery salads often happen when cucumbers or tomatoes release too much moisture. Drain your vegetables in a colander before adding them to the pasta.

    Preventing Onion Overpowering

    If the red onion is too strong, soak the chopped pieces in cold water for ten minutes. Drain and pat dry before adding them to the salad to mellow the flavor.

    Frequently Asked Questions

    Can I use gluten-free pasta?

    Yes, gluten-free pasta works well, but be careful with cooking times. Gluten-free varieties often cook faster or become mushy more quickly in a pressure cooker.

    Is this salad suitable for meal prep?

    Yes, it is an excellent meal prep option. Store portions in individual containers and add fresh herbs or extra cheese on the day of consumption.

    Can I swap feta for another cheese?

    You can use crumbled goat cheese for a tangier taste or fresh mozzarella pearls for a milder flavor. Both options pair well with Italian dressing.

    How do I keep the vegetables crisp?

    Keep the salad chilled until the moment of serving. Avoiding high heat and storing the dressing separately until the last minute are the best ways to maintain crunch.

    Print
    clock clock iconcutlery cutlery iconflag flag iconfolder folder iconinstagram instagram iconpinterest pinterest iconfacebook facebook iconprint print iconsquares squares iconheart heart iconheart solid heart solid icon
    Quick and Easy Pasta Salad

    Zesty Pressure Cooker Pasta Salad


    5 Stars 4 Stars 3 Stars 2 Stars 1 Star

    No reviews

    • Author: imageuploader
    • Total Time: 20 minutes
    • Yield: 4 servings 1x
    • Diet: Vegetarian

    Description

    This quick and easy pasta salad is perfect for a refreshing meal or side dish. Packed with fresh vegetables, tangy feta cheese, and a flavorful Italian dressing, it’s made even faster using a pressure cooker to perfectly cook the pasta.


    Ingredients

    Scale
    • 8 oz pasta (rotini or penne)
    • 1 cup cherry tomatoes, halved
    • 1/2 cup black olives, sliced
    • 1/2 cup cucumber, diced
    • 1/4 cup red onion, finely chopped
    • 1/2 cup feta cheese, crumbled
    • 1/4 cup Italian dressing
    • Salt to taste
    • Pepper to taste

    Instructions

    1. Cook: Pour pasta into the pressure cooker with enough water to just cover it and set to manual for 6 minutes.
    2. Cool: Use quick release to let steam out, drain the pasta, and rinse under cold water.
    3. Mix: In a large bowl, combine pasta, cherry tomatoes, black olives, cucumber, red onion, and feta cheese.
    4. Dress: Pour in Italian dressing and toss gently to combine.
    5. Season: Add salt and pepper to taste.
    6. Chill: Refrigerate for at least 15 minutes before serving.

    Notes

    Store in an airtight container in the fridge for up to 4 days. For best texture, add dressing just before serving or consume within 2 days if pre-mixed. Stir gently before serving to refresh the dressing coat.

    • Prep Time: 10 minutes
    • Cook Time: 10 minutes
    • Category: Salad
    • Method: Pressure Cooking
    • Cuisine: Italian-American

    Nutrition

    • Serving Size: 1 serving
    • Calories: 350 kcal
    • Sugar: 6 g
    • Sodium: 1300 mg
    • Fat: 22 g
    • Saturated Fat: 6 g
    • Unsaturated Fat: 16 g
    • Trans Fat: 0 g
    • Carbohydrates: 50 g
    • Fiber: 4 g
    • Protein: 14 g
    • Cholesterol: 25 mg
  • Crispy Almond Flour Keto Chicken Parmesan

    Crispy Almond Flour Keto Chicken Parmesan

    This low-carb chicken parmesan uses a specialized almond flour and Parmesan crust to achieve a golden, satisfying crunch. It is a quick and practical weeknight meal that delivers classic Italian flavors without the carbohydrates.

    Recipe image

    List of ingredients

    • 4 boneless, skinless chicken breasts – pounded to 1/2 inch thickness for even cooking.
    • 1 cup almond flour – used as the primary low-carb breading base.
    • 1 cup grated Parmesan cheese – divided for the breading and the final topping.
    • 2 large eggs – beaten to act as a binder for the crust.
    • 1 teaspoon garlic powder – adds a savory depth to the breading.
    • 1 teaspoon Italian seasoning – provides traditional herb flavors.
    • 1/2 teaspoon salt – enhances all the overall flavors.
    • 1/4 teaspoon black pepper – adds a subtle hint of spice.
    • 1/2 cup low carb marinara sauce – ensure the label indicates no added sugars.
    • 1 cup shredded mozzarella cheese – for a melted, bubbly topping.
    • 2 tablespoons olive oil or avocado oil – optional for pan-frying, otherwise use cooking spray.

    step-by-step instructions

    1. Prepare Heat: Preheat your oven to 400°F (200°C) and line a baking sheet with parchment paper or grease it lightly. If using an air fryer, preheat it to 375°F (190°C).
    2. Set Up Station: Organize three shallow dishes. Whisk eggs in the first; combine almond flour, 1/2 cup Parmesan, garlic powder, Italian seasoning, salt, and pepper in the second; keep the third empty.
    3. Initial Dip: Dip each pounded chicken breast into the egg mixture, allowing any excess egg to drip off before moving forward.
    4. First Coating: Press the chicken firmly into the almond flour and Parmesan mixture, ensuring both sides are completely coated. Press firmly to help the crust adhere.
    5. Double Coating: For extra crispiness, dip the crusted chicken back into the egg and then roll it in the remaining 1/2 cup of grated Parmesan cheese.
    6. Arrange: Place the crusted chicken breasts in a single layer on the prepared baking sheet or in the air fryer basket.
    7. First Bake: Bake for 15-18 minutes, flipping the chicken halfway through, until the meat is cooked through and the crust is golden brown. If pan-frying, cook in oil for 4-5 minutes per side before transferring to a dish.
    8. Add Sauce: Remove the chicken from the heat and spoon approximately 2 tablespoons of low carb marinara sauce over the top of each breast.
    9. Add Cheese: Top each piece with shredded mozzarella cheese and a final sprinkle of any remaining Parmesan cheese.
    10. Final Melt: Return the chicken to the oven or air fryer and bake for another 3-5 minutes until the cheese is melted and bubbly.
    11. Rest and Serve: Let the chicken rest for a few minutes to lock in juices, then serve immediately with low-carb side dishes.

    Professional Cooking Tips for Maximum Crunch

    Pounding Chicken to a Uniform Half-Inch Thickness

    Use a meat mallet to pound the chicken breasts until they are an even half-inch thick. This ensures that the thinner edges do not dry out while the center is still cooking. Consistent thickness allows the crust to brown evenly across the entire surface.

    Applying a Double-Layer Breaded Coating

    The second dip in egg and Parmesan creates a reinforced barrier that locks in moisture. This technique prevents the breading from separating from the meat during the flipping process. It results in a thicker, more professional crunch that mimics traditional breadcrumbs.

    Controlling Marinara Quantity to Prevent Sogginess

    Spoon the sauce only on the center of the chicken breast rather than covering the entire piece. Leaving the edges exposed ensures that those areas stay crispy throughout the final melting phase. Using too much sauce can penetrate the crust and make it soft.

    Utilizing Parchment Paper for Easier Release

    Lining your baking sheet with parchment paper prevents the Parmesan cheese from sticking to the pan. This makes it much easier to flip the chicken halfway through the cooking process. It also significantly reduces the time spent cleaning the baking sheet after dinner.

    Using the Broiler for a Final Golden Finish

    If the cheese is melted but the crust needs more color, slide the pan under the broiler for 60 seconds. Watch the chicken very closely as almond flour can burn quickly under direct high heat. This provides a deeply caramelized appearance and a sharper snap to the crust.

    Low Carb Ingredient Alternatives

    Substituting Almond Flour with Crushed Pecans

    If almond flour is unavailable, finely crushed pecans or walnut meal can be used as a substitute. These nut flours provide a similar fat content and structure for the breading. The flavor will be slightly nuttier, which pairs well with the sharp Parmesan cheese.

    Selecting a Low Sugar Marinara Sauce

    Carefully check the nutrition label of your marinara to ensure it contains 4 grams of sugar or less per serving. Avoid brands that list corn syrup, honey, or cane sugar in the first few ingredients. A homemade blend of crushed tomatoes, garlic, and oregano is the safest way to control macros.

    Swapping Mozzarella for Provolone Cheese

    For a bolder, sharper flavor profile, replace the mozzarella with sliced or shredded provolone. Provolone melts similarly to mozzarella but offers a more piquant taste. You can also use a blend of both cheeses for a balance of creaminess and tang.

    Choosing High Smoke Point Oils for Frying

    When pan-frying, use avocado oil because of its high smoke point, which prevents the oil from burning at high temperatures. Olive oil is a great choice for baking or light sautéing but may smoke during intense frying. Always keep the oil at a steady medium-high heat for the best sear.

    Recipe Variations and Adaptations

    Creating a Keto Chicken Parmesan Casserole

    To make this family-style, lightly brown the crusted chicken in a pan first. Layer the seared chicken in a baking dish with alternating layers of marinara and mozzarella. Bake until the entire dish is bubbling, resulting in a heartier, gooier meal.

    Using an Air Fryer for Faster Cooking

    The air fryer maximizes airflow, which creates a more consistent crunch on the almond flour crust. Cook the breaded chicken at 375°F for 10 minutes, flip, and then add toppings for a final 3-5 minutes. This method typically reduces the total cooking time compared to the oven.

    Adding Red Pepper Flakes for a Spicy Version

    Mix half a teaspoon of crushed red pepper flakes into the almond flour and Parmesan mixture. You can also add a pinch of cayenne pepper to the egg wash for an extra kick. This adds a spicy contrast to the rich, melted cheese topping.

    Substituting Pesto for Traditional Marinara

    Replace the marinara sauce with a nut-based pesto for a different Italian twist. The basil and garlic in the pesto complement the almond flour crust perfectly. Top with fresh basil leaves after baking to enhance the aromatic profile.

    Recommended Low Carb Side Dishes

    Garlic Butter Zucchini Noodles

    Sauté spiralized zucchini with garlic and butter for 2-3 minutes over medium heat. This provides a pasta-like experience that mimics spaghetti without adding significant carbohydrates. Season with a pinch of salt and pepper to keep the flavors clean.

    Steamed Broccoli with Parmesan

    Steam fresh broccoli florets until tender-crisp and toss them with melted butter and grated Parmesan. The slight bitterness of the broccoli cuts through the richness of the fried chicken. A squeeze of fresh lemon juice can add a bright acidity to the plate.

    Creamy Cauliflower Mash

    Steam cauliflower until very soft, then blend it with a tablespoon of cream cheese and a splash of heavy cream. This creates a smooth, potato-like side that adds a creamy texture to the meal. Season with garlic powder and salt for a savory finish.

    Fresh Arugula and Red Wine Vinaigrette Salad

    Toss baby arugula with extra virgin olive oil, red wine vinegar, and a pinch of salt. The peppery leaves and acidic dressing provide a necessary contrast to the heavy cheese and fried coating. It cleanses the palate between bites of the rich chicken.

    Storage and Reheating Methods

    Airtight Container Storage in the Fridge

    Place leftover chicken in a glass airtight container to prevent moisture from entering the crust. Store the chicken in the refrigerator for up to three days. Ensure the chicken is completely cooled before sealing the lid to avoid creating steam.

    Placing Parchment Paper Between Chicken Pieces

    If you must stack the chicken breasts in a container, place a small piece of parchment paper between each layer. This prevents the cheese and sauce from sticking the pieces together. It also helps maintain a slight separation to keep the crust from softening.

    Reheating with an Oven for Best Texture

    Preheat your oven to 350°F (175°C) and place the chicken on a foil-lined baking sheet. Heat for about 10 minutes, which gently dries the crust and remelts the cheese. This is the most reliable way to preserve the original texture.

    Rapid Reheating in the Air Fryer

    For the fastest results, place the leftovers in an air fryer at 350°F for 4 to 6 minutes. The rapid circulation of dry heat brings the almond flour crust back to life quickly. It is significantly more effective than other quick-heating methods.

    Common Cooking Troubleshooting

    Fixing Breaded Coating That Peels Off

    If the crust separates from the meat, ensure you are patting the chicken completely dry with paper towels before the egg dip. Press the almond flour mixture firmly into the meat using your palms. This creates a tighter bond between the protein and the breading.

    Preventing the Chicken from Drying Out

    Overcooking chicken breasts can lead to a rubbery texture. Use a digital meat thermometer to check that the internal temperature has reached 165°F (74°C). Remove the chicken from the heat immediately once this temperature is hit.

    Solving the Issue of Soggy Bottoms

    Soggy bottoms usually occur when the chicken is placed on a flat pan without enough airflow. Using a wire rack over a baking sheet allows heat to circulate under the chicken. Alternatively, flipping the chicken halfway through the bake is essential for a dry, crisp base.

    Frequently Asked Questions

    Can I use a different nut flour for the crust?

    Yes, you can use crushed pecans or walnut meal as a replacement for almond flour. These options maintain the low-carb profile and provide a similar structural bind. Avoid using coconut flour alone as it absorbs too much moisture and may make the crust crumbly.

    How do I know when the chicken is safely cooked?

    The most accurate method is using a meat thermometer inserted into the thickest part of the breast. The chicken is safe to eat once it reaches an internal temperature of 165°F. The crust should also be a deep golden brown.

    Can I prepare the breaded chicken in advance?

    You can bread the chicken several hours in advance and store it in the refrigerator. However, do not add the sauce and cheese until you are ready to cook the meat. Cooking them fresh ensures the crust remains as crispy as possible.

    Print
    clock clock iconcutlery cutlery iconflag flag iconfolder folder iconinstagram instagram iconpinterest pinterest iconfacebook facebook iconprint print iconsquares squares iconheart heart iconheart solid heart solid icon
    Crispy Almond Flour Keto Chicken Parmesan

    Crispy Almond Flour Keto Chicken Parmesan


    5 Stars 4 Stars 3 Stars 2 Stars 1 Star

    No reviews

    • Author: imageuploader
    • Total Time: 40 minutes
    • Yield: 4 servings 1x
    • Diet: Gluten Free

    Description

    Make this incredibly satisfying Keto Chicken Parmesan using an almond flour and Parmesan crust for maximum crispiness. This low carb Italian classic is perfect for a weeknight dinner.


    Ingredients

    Scale
    • 4 boneless, skinless chicken breasts, pounded to 1/2 inch thickness
    • 1 cup almond flour
    • 1 cup grated Parmesan cheese, divided
    • 2 large eggs
    • 1 teaspoon garlic powder
    • 1 teaspoon Italian seasoning
    • 1/2 teaspoon salt
    • 1/4 teaspoon black pepper
    • 1/2 cup low carb marinara sauce
    • 1 cup shredded mozzarella cheese
    • 2 tablespoons olive oil or avocado oil

    Instructions

    1. Preheat: Preheat your oven to 400°F (200°C) and line a baking sheet with parchment paper; if using an air fryer, preheat to 375°F (190°C).
    2. Prepare Station: Set up three shallow dishes: one with whisked eggs, one with a combination of almond flour, 1/2 cup grated Parmesan, garlic powder, Italian seasoning, salt, and pepper, and one left empty.
    3. First Coating: Dip each pounded chicken breast into the egg mixture, letting excess drip off.
    4. Second Coating: Press the chicken firmly into the almond flour and Parmesan mixture, coating both sides completely.
    5. Extra Crispiness: Dip the crusted chicken back into the egg and then into the remaining 1/2 cup of grated Parmesan cheese.
    6. Arrange: Place the crusted chicken breasts on the prepared baking sheet or in the air fryer basket in a single layer.
    7. Cook: Bake for 15-18 minutes, flipping halfway through, until the chicken is cooked through and the crust is golden brown.
    8. Sauce: Remove the chicken and spoon about 2 tablespoons of low carb marinara sauce over the top of each breast.
    9. Cheese: Top each piece with mozzarella cheese and a sprinkle of the remaining Parmesan cheese.
    10. Final Bake: Return to the oven or air fryer and bake for another 3-5 minutes, or until the cheese is melted and bubbly.
    11. Rest: Let the chicken rest for a few minutes before serving.

    Notes

    For the crispiest texture when baking, place the baking sheet under the broiler for the last minute, watching closely to prevent burning. If you prefer an air fryer method, cook the crusted chicken for 10 minutes, then add toppings and cook for an additional 3-5 minutes until cheese melts. Always check your marinara sauce label for added sugar. Pounding the chicken ensures even cooking and a better crust-to-meat ratio.

    • Prep Time: 15 minutes
    • Cook Time: 25 minutes
    • Category: Dinner
    • Method: Baking
    • Cuisine: Italian American

    Nutrition

    • Serving Size: 1 breast
    • Calories: 450 kcal
    • Sugar: 4 g
    • Sodium: 550 mg
    • Fat: 28 g
    • Saturated Fat: 12 g
    • Unsaturated Fat: 10 g
    • Trans Fat: 0 g
    • Carbohydrates: 7 g
    • Fiber: 2 g
    • Protein: 42 g
    • Cholesterol: 150 mg
  • Savory Baked Egg Muffins with Cheese and Vegetables

    Savory Baked Egg Muffins with Cheese and Vegetables

    These protein-packed egg muffins are a convenient way to prepare healthy breakfasts for the entire week. They combine eggs, fresh vegetables, and melted cheese into portable cups that are easy to reheat and enjoy on the go.

    Recipe image

    List of ingredients

    • 12 large eggs – provides the structural base for the muffins.
    • 1 cup shredded cheddar cheese – adds a rich, salty flavor and creaminess.
    • 1/2 cup red bell pepper, diced – adds a sweet crunch and bright color.
    • 1/2 cup fresh spinach, chopped – contributes essential nutrients and earthy flavor.
    • 1/2 cup cooked and crumbled beef bacon – provides a savory, smoky element.
    • 1/2 teaspoon salt – enhances the overall taste of the egg mixture.
    • 1/4 teaspoon pepper – adds a subtle warmth and seasoning.

    step-by-step instructions

    1. Prepare Oven and Pan: Preheat your oven to 350°F and grease a 12-cup muffin pan thoroughly with non-stick cooking spray to ensure easy removal.
    2. Beat the Eggs: Crack the eggs into a large mixing bowl and beat them until the mixture is light and frothy to help the muffins rise.
    3. Combine Ingredients: Stir in the shredded cheddar cheese, diced red bell pepper, chopped spinach, crumbled beef bacon, salt, and pepper until the ingredients are evenly distributed.
    4. Fill the Cups: Carefully pour the mixture into each muffin cup, leaving a small amount of space at the top to allow for expansion during baking.
    5. Bake and Cool: Bake for 15-20 minutes until the centers are firm and no longer jiggle when touched. Let them cool slightly in the pan before serving.

    Optimization for Baking Results

    Beating Eggs to Create a Lighter Texture

    Whisking the eggs until they are frothy introduces air into the mixture. This aeration is key to achieving a fluffier muffin rather than a dense, rubbery texture. Use a whisk or an electric mixer for a few minutes until small bubbles form on the surface.

    Proper Pan Preparation to Avoid Sticking

    Egg mixtures are prone to sticking to the sides of muffin tins. Using a high-quality non-stick spray or brushing the cups with melted butter ensures the muffins release cleanly. For extra security, you can use silicone muffin liners which are naturally non-stick.

    Mixing Ingredients Gently to Maintain Aeration

    Once the eggs are beaten, fold in the vegetables and cheese using a spatula. Avoid overmixing the batter, as this can deflate the air you whipped into the eggs. Stir just until the add-ins are evenly dispersed throughout the bowl.

    Utilizing Fresh Vegetables for Better Flavor

    Freshly diced bell peppers and chopped spinach provide the best texture and taste. Avoid using pre-cut frozen vegetables if possible, as they release more water during baking. If you must use frozen spinach, squeeze it dry in a kitchen towel first.

    Customizing Your Ingredients

    Replacing Beef Bacon with Different Protein Sources

    While beef bacon adds a great smoky flavor, you can swap it for other proteins. Cooked turkey sausage or diced smoked tofu are excellent alternatives that maintain the savory profile. Ensure any replacement meat is fully cooked before adding it to the egg mixture.

    Integrating Various Vegetable Combinations

    You can vary the nutrients by using different vegetables. Diced zucchini, sautéed mushrooms, or grated carrots work well in this recipe. Keep the total volume of vegetables around one cup to maintain the structural integrity of the muffins.

    Selecting Alternative Cheese Varieties

    Cheddar is a classic choice, but other cheeses can change the flavor profile. Feta provides a tangy, salty contrast, while mozzarella offers a milder taste and a stretchier texture. Use a finely shredded variety for more consistent melting.

    Enhancing Taste with Additional Seasonings

    Beyond salt and pepper, you can add dried herbs or spices. A pinch of paprika, garlic powder, or dried oregano can add depth to the flavor. Add these seasonings directly into the beaten eggs before stirring in the solids.

    Serving and Pairing Ideas

    Pairing with Fresh Seasonal Fruits

    Balance the savory nature of the egg muffins with a side of fresh fruit. Sliced strawberries, blueberries, or melon chunks add a refreshing sweetness and extra vitamins. This combination creates a complete, balanced breakfast plate.

    Adding Fresh Garnishes and Toppings

    Enhance the presentation and taste by adding toppings after baking. A small dollop of fresh salsa or a slice of avocado on top adds creaminess and acidity. Freshly chopped parsley or chives can also provide a bright, herbal finish.

    Serving with Whole Grain Sides

    For a more filling meal, serve the muffins alongside a slice of toasted whole-grain bread. A small side of quinoa or a piece of toasted rye bread adds complex carbohydrates for sustained energy. This makes the meal more satisfying for those with higher caloric needs.

    Choosing Complementary Breakfast Beverages

    These muffins pair well with a variety of drinks. A hot cup of black coffee or herbal tea complements the savory cheese and beef bacon. For a colder option, a fresh green smoothie provides a nutrient-dense accompaniment.

    Storage and Preservation

    Refrigeration Guidelines for Freshness

    Store leftover egg muffins in an airtight container in the refrigerator. They will remain fresh and safe to eat for up to five days. Keeping them sealed prevents the eggs from absorbing other odors from the fridge.

    Freezing and Thawing Techniques

    Egg muffins freeze exceptionally well for long-term meal prep. Flash-freeze them on a baking sheet for one hour before transferring them to a freezer-safe bag. They can be stored in the freezer for up to two months without losing quality.

    Reheating Using a Microwave Oven

    To reheat in the microwave, place one or two muffins on a microwave-safe plate. Heat them on medium power for 30 to 60 seconds until warmed through. Avoid overheating, as this can make the eggs rubbery.

    Reheating Using a Conventional Oven

    For a crispier exterior, reheat the muffins in a preheated oven at 300°F. Place them on a baking sheet for about 5 to 10 minutes. This method is slower but preserves the texture better than the microwave.

    Meal Prep Strategies

    Efficient Batch Cooking Workflow

    Prepare a large batch of these muffins on a Sunday to save time during the week. By using two muffin pans at once, you can double the yield in the same cooking time. This ensures you have breakfast ready for every weekday morning.

    Managing Cooling Times Before Storage

    Allow the muffins to cool completely in the pan before moving them to a container. Placing hot muffins in a sealed container creates steam, which can make the tops soggy. A cooling period of 15 to 20 minutes is usually sufficient.

    Planning Weekly Breakfast Portions

    Divide the muffins into individual snack bags or small containers for easy grabbing. Label each container with the date they were made to track freshness. This organization reduces morning stress and encourages consistent healthy eating.

    Troubleshooting Guide

    Preventing Muffins from Sticking to the Pan

    If your muffins are sticking, try using a combination of butter and flour or a high-heat cooking spray. Ensure the spray reaches the bottom and all sides of the muffin cup. Letting the muffins sit for two minutes after baking also helps them release naturally.

    Eliminating Excess Moisture for a Firmer Set

    Watery muffins are usually caused by vegetables releasing moisture. Sautéing the bell peppers and spinach briefly before adding them to the eggs can remove excess water. This results in a firmer, more cohesive muffin structure.

    Recognizing the Signs of Overcooked Eggs

    Overcooked eggs become rubbery and may puff up excessively and then collapse. If the muffins are browning too quickly on top, lower the oven temperature slightly. Remove them from the oven the moment the center is set and no longer wobbles.

    Ensuring Even Baking Across the Pan

    Different ovens have hot spots that can lead to unevenly cooked muffins. Rotate the muffin pan halfway through the baking process to ensure all cups receive equal heat. Using a baking rack in the center of the oven is also recommended.

    Frequently Asked Questions

    Can I make these muffins without cheese?

    Yes, you can omit the cheese entirely. To compensate for the lost flavor and fat, consider adding a tablespoon of Greek yogurt to the eggs for creaminess or increasing the amount of diced vegetables.

    How do I store them without them getting soggy?

    The key is to let them cool completely before placing them in an airtight container. If you are storing them in the fridge, place a piece of paper towel at the bottom of the container to absorb any stray moisture.

    What is the best way to freeze these muffins?

    Wrap each muffin individually in parchment paper or aluminum foil before placing them in a freezer bag. This prevents them from sticking together and allows you to thaw only the number of muffins you need for that day.

    Can I use egg whites instead of whole eggs?

    You can use egg whites, but the muffins will have a different texture and a lighter color. For the best results, use a mix of whole eggs and whites to maintain some of the richness from the yolks while reducing the fat content.

    How can I tell if the muffins are fully cooked?

    The muffins are done when the tops feel firm to a light touch and the edges have slightly pulled away from the sides of the pan. You can also insert a toothpick into the center; it should come out clean without any liquid egg.

    Print
    clock clock iconcutlery cutlery iconflag flag iconfolder folder iconinstagram instagram iconpinterest pinterest iconfacebook facebook iconprint print iconsquares squares iconheart heart iconheart solid heart solid icon
    Savory Baked Egg Muffins with Cheese and Veggies

    Savory Baked Egg Muffins with Cheese and Vegetables


    5 Stars 4 Stars 3 Stars 2 Stars 1 Star

    No reviews

    • Author: imageuploader
    • Total Time: 30 minutes
    • Yield: 12 muffins 1x
    • Diet: General

    Description

    These quick and versatile breakfast egg muffins are easy to make and packed with flavor and nutrition, perfect for busy mornings.


    Ingredients

    Scale
    • 12 large eggs
    • 1 cup shredded cheddar cheese
    • ½ cup red bell pepper, diced
    • ½ cup fresh spinach, chopped
    • ½ cup cooked and crumbled beef bacon
    • ½ teaspoon salt
    • ¼ teaspoon pepper

    Instructions

    1. Preheat: Preheat the oven to 350°F and prepare a 12-cup muffin pan by spraying it with non-stick spray.
    2. Beat: In a large mixing bowl, crack in the eggs and beat them until they are light and frothy.
    3. Mix: Add the shredded cheddar cheese, diced red bell pepper, chopped spinach, crumbled bacon, salt, and pepper into the beaten eggs. Stir everything together until well combined.
    4. Fill: Carefully fill each muffin cup with the egg mixture, leaving a little room for the muffins to rise.
    5. Bake: Place the muffin pan in the preheated oven and bake for 15-20 minutes until the tops feel firm and no longer jiggle. Allow them to cool slightly before serving.

    Notes

    For best results, use fresh ingredients, avoid overmixing, and store leftovers in an airtight container in the refrigerator for up to 5 days.

    • Prep Time: 10 minutes
    • Cook Time: 20 minutes
    • Category: Breakfast
    • Method: Baking
    • Cuisine: American

    Nutrition

    • Serving Size: 1 muffin
    • Calories: 150 kcal
    • Sugar: 1 g
    • Sodium: 220 mg
    • Fat: 11 g
    • Saturated Fat: 5 g
    • Unsaturated Fat: 6 g
    • Trans Fat: 0 g
    • Carbohydrates: 2 g
    • Fiber: 1 g
    • Protein: 10 g
    • Cholesterol: 185 mg
  • Creamy Cheesy Chicken and Broccoli Orzo

    Creamy Cheesy Chicken and Broccoli Orzo

    This one-pot meal combines tender chicken and broccoli with cheesy orzo pasta for a satisfying dinner. It is a fast, nutritious option that works well for busy weeknights or organized meal planning.

    Recipe image

    List of ingredients

    • 2 cups broccoli florets, bite-sized (about 1-inch pieces), fresh or fully thawed and drained frozen – adds color and nutrients.
    • 2 cups cooked shredded chicken, such as rotisserie chicken – provides a quick protein base.
    • 2 cups shredded cheddar cheese, preferably sharp – creates a rich, tangy flavor.
    • 1 cup heavy cream – ensures a thick and creamy sauce consistency.
    • 1 cup orzo pasta – a small rice-shaped pasta that absorbs flavors.
    • 2 cups chicken broth – the primary cooking liquid for the orzo.
    • 1 tbsp olive oil – used for sautéing vegetables.
    • 1 tbsp butter – adds richness to the base.
    • 1/2 medium onion, chopped – provides a foundational aromatic flavor.
    • 3 cloves garlic, minced – adds pungent depth to the dish.
    • 1/2 tsp Italian seasoning – a blend of herbs for a savory profile.
    • 1 tsp Worcestershire sauce – enhances the umami taste.
    • Salt and pepper to taste – used for final seasoning adjustments.

    step-by-step instructions

    1. Heat the oil and butter: Place a large 12-inch skillet over medium heat. Add the olive oil and butter, stirring until the butter is completely melted.
    2. Sauté the onions: Add the chopped onions to the skillet. Cook for 3 to 4 minutes, stirring occasionally, until they become soft and translucent.
    3. Add broccoli: Toss in the broccoli florets. Sauté for approximately 2 minutes until they turn bright green but remain crisp.
    4. Incorporate garlic and seasoning: Stir in the minced garlic and Italian seasoning. Cook for 30 seconds to release the aromatic oils without burning the garlic.
    5. Toast the orzo: Add the dry orzo pasta to the skillet. Stir it with the vegetables for a few minutes to toast the pasta, which enhances its nutty flavor.
    6. Pour in liquids: Stir in the chicken broth, heavy cream, and Worcestershire sauce. Bring the mixture to a boil, then immediately reduce the heat to a simmer.
    7. Cook the orzo: Let the mixture simmer uncovered for about 10 minutes. Stir frequently to prevent the pasta from sticking to the bottom; if the sauce becomes too dry, stir in an additional 1/4 cup of broth.
    8. Add chicken and cheese: Stir in the shredded chicken until heated through. Remove the skillet from the heat and mix in the shredded cheddar cheese until it is completely melted.
    9. Season and serve: Taste the dish and add salt and pepper as needed. Let the recipe sit for 2 to 3 minutes to allow the sauce to thicken before serving.

    Technical Cooking Tips

    Toast the Orzo for Better Texture

    Toasting the dry orzo in butter and oil before adding liquids creates a toasted flavor profile. This process also helps the pasta maintain its structure, preventing it from becoming overly mushy during the simmering stage.

    Prevent Garlic from Burning

    Add the minced garlic only during the final 30 seconds of sautéing the vegetables. Garlic burns quickly at medium heat, which can introduce a bitter taste to the entire sauce.

    Control Broccoli Doneness

    Sauté the broccoli briefly to sear the edges while keeping the center crisp. If you prefer very soft broccoli, you can add it later in the simmering process, but the initial sauté provides better flavor.

    Emulsify the Cheese Correctly

    Always remove the skillet from the heat source before stirring in the cheddar cheese. Adding cheese to boiling liquid can cause the fats to separate, resulting in a grainy or oily sauce.

    Manage Liquid Levels

    Orzo absorbs liquid at different rates depending on the heat intensity. Keep a small amount of extra chicken broth nearby to stir in if the pasta absorbs the cream too quickly before becoming tender.

    Ingredient Substitutions

    Alternative Creamy Bases

    If heavy cream is unavailable, you can use a mixture of whole milk and a teaspoon of cornstarch. This provides a similar thickness, though the final sauce will be slightly less rich than one made with heavy cream.

    Different Cheese Varieties

    While sharp cheddar provides a classic taste, you can substitute it with Monterey Jack for a milder flavor or Gruyere for a nuttier profile. Using a blend of two cheeses can add complexity to the dish.

    Pasta Shape Swaps

    If you do not have orzo, small pasta shapes like ditalini or shells can be used. Adjust the simmering time based on the specific pasta’s cooking instructions to ensure it is al dente.

    Vegetable Broth Options

    To reduce the amount of chicken products, replace the chicken broth with vegetable broth. This maintains the liquid ratio and salt levels while altering the base flavor slightly.

    Low-Sodium Adjustments

    Use low-sodium chicken broth and reduce the added salt. Since cheddar cheese and Worcestershire sauce both contain significant salt, tasting the dish at the end is essential before adding more.

    Recipe Variations

    Vegetarian Adaptation

    Remove the chicken and replace it with canned chickpeas or sautéed mushrooms for protein. Use vegetable broth instead of chicken broth to ensure the dish is entirely meat-free.

    Low-Carb Modification

    Substitute the orzo pasta with cauliflower rice. Because cauliflower rice does not absorb liquid like pasta, reduce the amount of broth and cream by half to avoid a soup-like consistency.

    Adding Seasonal Vegetables

    Incorporate diced carrots, frozen peas, or fresh spinach into the skillet. Add spinach at the very end along with the cheese, as it wilts quickly and does not require simmering.

    Increasing the Heat Level

    Stir in a pinch of crushed red pepper flakes or finely diced jalapeños during the onion sauté stage. This adds a subtle spicy kick that cuts through the richness of the heavy cream and cheese.

    Adding Fresh Herbs

    Stir in chopped fresh parsley or basil just before serving. Fresh herbs provide a bright contrast to the heavy, cheesy flavors and improve the visual presentation of the dish.

    Serving and Presentation

    Complementary Side Dishes

    Serve this dish with a crisp green salad dressed in a light vinaigrette. The acidity of a lemon or balsamic dressing balances the creamy nature of the cheesy orzo.

    Garnish Options

    Top each serving with a sprinkle of freshly grated parmesan or a dash of paprika. Adding a few whole broccoli florets on top can also make the plating look more professional.

    Family Style Serving

    Transfer the finished orzo to a wide shallow bowl rather than deep plates. This allows the sauce to stay evenly distributed and prevents the pasta from clumping at the bottom.

    Portioning for Meal Prep

    Divide the recipe into airtight glass containers immediately after the thickening period. Allow the containers to cool slightly before sealing them to prevent excess condensation.

    Storage and Reheating

    Refrigeration Guidelines

    Store leftovers in an airtight container in the refrigerator for up to 4 days. Ensure the dish is cooled to room temperature before sealing to maintain the quality of the cheese sauce.

    Freezing Instructions

    Place the cooled orzo in a freezer-safe container and freeze for up to 3 months. Thaw the container in the refrigerator overnight before reheating to ensure an even temperature.

    Restoring Creaminess During Reheating

    When reheating on the stove, add a splash of chicken broth or cream. The pasta continues to absorb moisture while stored, so adding liquid prevents the dish from becoming dry or sticky.

    Microwave Reheating Tips

    Heat in short 30-second intervals, stirring in between. This prevents the cheese from separating and ensures the chicken is heated through without overcooking the broccoli.

    Troubleshooting Common Issues

    Fixing a Grainy Cheese Sauce

    If the cheese separates or looks grainy, it is usually due to overheating. Stir in a tablespoon of warm cream or milk and whisk vigorously over very low heat to re-emulsify the sauce.

    Correcting Mushy Orzo

    Mushy pasta occurs when it is simmered too long or stirred too aggressively. To avoid this, check the texture at the 8-minute mark and remove from heat as soon as the pasta is tender.

    Adjusting a Sauce That Is Too Thick

    If the dish becomes too thick while sitting, stir in a small amount of warm broth. Add the liquid one tablespoon at a time until the desired creamy consistency is restored.

    Balancing Overly Salty Flavors

    If the dish is too salty, add a squeeze of fresh lemon juice or a small amount of unsalted cream. The acidity and fat help neutralize the excess saltiness.

    Frequently Asked Questions

    Can I use uncooked chicken instead of shredded chicken?

    Yes, you can dice raw boneless skinless chicken breast and sauté it with the onions at the beginning. Ensure the chicken is cooked through before adding the liquids and orzo.

    Can I use frozen broccoli instead of fresh?

    Yes, frozen broccoli works well. Ensure it is fully thawed and drained of excess water before adding it to the skillet to avoid watering down the sauce.

    Is there a dairy-free alternative for this recipe?

    You can use a plant-based heavy cream substitute and dairy-free shredded cheese. Ensure the vegan cheese has a good melting point to achieve a similar creamy texture.

    Can I make this recipe in a slow cooker?

    This recipe is designed for a skillet to toast the pasta. For a slow cooker, sauté the aromatics first, then combine all ingredients and cook on low for 3-4 hours, stirring in the cheese at the end.

    Why did my orzo stick to the pan?

    Sticking usually happens if the heat is too high or if the pasta is not stirred frequently during the simmering stage. Using a heavy-bottomed non-stick skillet can help prevent this.

    How do I know when the orzo is perfectly cooked?

    The orzo should be tender but still have a slight firmness in the center. It should be absorbed into a thick sauce rather than swimming in liquid.

    Print
    clock clock iconcutlery cutlery iconflag flag iconfolder folder iconinstagram instagram iconpinterest pinterest iconfacebook facebook iconprint print iconsquares squares iconheart heart iconheart solid heart solid icon
    Cheesy Chicken Broccoli Orzo

    Creamy Cheesy Chicken and Broccoli Orzo


    5 Stars 4 Stars 3 Stars 2 Stars 1 Star

    No reviews

    • Author: imageuploader
    • Total Time: 30 minutes
    • Yield: 4 servings 1x
    • Diet: General

    Description

    A comforting dish combining tender chicken, orzo pasta, fresh broccoli, and melty cheddar cheese, perfect for quick dinners or meal prepping.


    Ingredients

    Scale
    • 2 cups broccoli florets, bite-sized (about 1-inch pieces)
    • 2 cups cooked shredded chicken
    • 2 cups shredded cheddar cheese
    • 1 cup heavy cream
    • 1 cup orzo pasta
    • 2 cups chicken broth
    • 1 tbsp olive oil
    • 1 tbsp butter
    • 1/2 medium onion, chopped
    • 3 cloves garlic, minced
    • 1/2 tsp Italian seasoning
    • 1 tsp Worcestershire sauce
    • Salt and pepper to taste

    Instructions

    1. Heat the oil and butter: Begin by placing a large 12-inch skillet over medium heat. Add the olive oil and butter, allowing them to melt together.
    2. Sauté the onions: Once the oil and butter are hot, add the chopped onions. Sauté the onions for about 3 to 4 minutes or until they become soft and translucent.
    3. Add broccoli: Toss in the broccoli florets and cook them for another 2 minutes. You want them to be bright green but still crisp.
    4. Incorporate garlic and seasoning: Stir in the minced garlic and Italian seasoning, cooking for an additional 30 seconds.
    5. Toast the orzo: Add the orzo pasta to the skillet, stirring it with the vegetables to toast it slightly.
    6. Pour in liquids: Now, pour in the chicken broth, heavy cream, and Worcestershire sauce. Bring the mixture to a boil and then reduce the heat to a simmer.
    7. Cook the orzo: Let the dish simmer uncovered for about 10 minutes. Stir often to prevent the orzo from sticking to the bottom of the skillet.
    8. Add chicken and cheese: Stir in the shredded chicken, ensuring it is evenly heated through. Remove the skillet from the heat and mix in the shredded cheddar cheese until it melts into a creamy sauce.
    9. Season and serve: Taste the dish and season with salt and pepper as needed. Allow it to sit for 2 to 3 minutes to thicken before serving.

    Notes

    Serve the dish as is or with a side salad. Add parsley or red pepper flakes for garnish. Store leftovers in an airtight container in the refrigerator for up to 4 days, or freeze for up to 3 months.

    • Prep Time: 10 minutes
    • Cook Time: 20 minutes
    • Category: Dinner
    • Method: Stovetop
    • Cuisine: American

    Nutrition

    • Serving Size: 1 serving
    • Calories: 600 kcal
    • Sugar: 6 g
    • Sodium: 950 mg
    • Fat: 38 g
    • Saturated Fat: 22 g
    • Unsaturated Fat: 16 g
    • Trans Fat: 0 g
    • Carbohydrates: 32 g
    • Fiber: 4 g
    • Protein: 36 g
    • Cholesterol: 125 mg
  • High-Protein Garlic Steak Bites with Creamy Mac & Cheese

    High-Protein Garlic Steak Bites with Creamy Mac & Cheese

    This nutrient-dense meal combines tender, garlic-seasoned steak with a creamy, high-protein macaroni and cheese base. It is designed for efficient meal prep, providing a balanced ratio of lean protein and carbohydrates to support muscle recovery and satiety.

    Recipe image

    List of ingredients

    • 1.5 lb lean sirloin or top round steak – trimmed and cut into 1-inch cubes
    • 1 tbsp Worcestershire sauce – adds savory depth
    • 1 tbsp low-sodium soy sauce – for umami flavor
    • 1 tbsp minced garlic – approximately 3 cloves
    • ½ tbsp garlic powder – for concentrated garlic taste
    • 1 tsp onion powder – adds savory sweetness
    • 1 tsp smoked paprika – provides a subtle smoky aroma
    • ½ tsp salt – to enhance overall flavors
    • ½ tsp black pepper – for a mild spicy kick
    • Olive oil spray – used for searing the meat
    • 8 oz dry elbow or penne pasta – the carbohydrate base
    • 4 oz low-fat cream cheese – creates a creamy texture
    • ½ cup skim milk – thins the sauce
    • ¾ cup nonfat shredded cheddar cheese – for the classic cheese flavor
    • ½ cup plain nonfat Greek yogurt – increases protein and tanginess
    • ½ tbsp garlic powder – for the cheese sauce
    • 1 tsp onion powder – for the cheese sauce
    • ½ tsp black pepper – for the cheese sauce
    • ¼ tsp salt – for the cheese sauce
    • Chives – for fresh garnish

    step-by-step instructions

    1. Cook the Pasta: Boil a large pot of salted water and cook the elbow or penne pasta according to the package instructions. Drain the pasta thoroughly and set it aside.
    2. Prep the Steak Bites: In a mixing bowl, combine the steak cubes with soy sauce, Worcestershire sauce, minced garlic, garlic powder, onion powder, smoked paprika, salt, and pepper. Toss well to ensure every piece is evenly coated in the marinade.
    3. Cook the Steak: Heat a large skillet over medium-high heat and lightly coat the surface with olive oil spray. Sear the steak bites for 2–3 minutes per side until they are browned and cooked to your preferred level of doneness. Remove the steak from the pan and let it rest.
    4. Make the Low-Cal Mac Sauce: Using the pasta pot or a separate saucepan, whisk together skim milk and low-fat cream cheese over medium heat until the mixture is smooth. Stir in the nonfat shredded cheddar, Greek yogurt, garlic powder, and onion powder until creamy, then season with salt and pepper.
    5. Combine & Serve: Fold the drained pasta into the cheese sauce until fully coated. Divide the mac and cheese into meal prep containers and top each with a portion of the seared steak bites. Garnish with fresh chives or parsley.

    Professional Steak Searing Techniques

    Achieving a Deep Brown Crust

    To get a professional sear, ensure your skillet is very hot before adding the meat. Use a cast iron or stainless steel pan, as these retain heat better than non-stick pans. The meat should sizzle immediately upon contact with the surface.

    Preventing Meat Steaming

    Avoid overcrowding the pan by cooking the steak bites in two or three batches. If too many pieces are added at once, the pan temperature drops and moisture releases, causing the meat to steam rather than sear. Leave space between each cube for maximum browning.

    Selecting the Best Lean Cuts

    Sirloin is ideal for this recipe because it balances lean protein with enough flavor to withstand high heat. Top round is a more budget-friendly alternative but requires careful timing to avoid overcooking. Always trim excess silver skin or gristle before cubing.

    The Importance of Resting Meat

    Allow the steak bites to rest for 3 to 5 minutes after cooking before placing them on the pasta. This allows the juices to redistribute within the muscle fibers. Resting prevents the juices from leaking out into the cheese sauce, which keeps the meat tender.

    Optimizing the High-Protein Cheese Sauce

    Preventing Greek Yogurt Curdling

    Greek yogurt can separate if it is boiled or heated too aggressively. Stir the yogurt into the sauce after you have removed the pan from the direct heat or turned the flame to low. The residual heat is sufficient to incorporate the yogurt without breaking the emulsion.

    Creating a Smooth Texture

    Start by melting the cream cheese and milk together first to create a smooth base. Whisk continuously on medium heat to ensure there are no clumps of cream cheese. This ensures the final sauce is velvety rather than grainy.

    Adjusting Sauce Consistency

    If the sauce becomes too thick after adding the shredded cheese and yogurt, stir in a tablespoon of skim milk or reserved pasta water. Add liquid slowly until the sauce reaches your desired creaminess. Remember that the sauce will thicken further as it cools.

    Maximizing Cheese Flavor with Less Fat

    Using nonfat cheddar can sometimes result in a milder flavor. To compensate, the addition of onion powder and garlic powder mimics the depth of full-fat cheeses. You can also add a pinch of mustard powder for an extra sharp profile.

    Ingredient Substitutions and Customizations

    Alternative Lean Protein Options

    If you prefer a different protein, chicken breast or shrimp are excellent low-calorie substitutes. For chicken, cube it into 1-inch pieces and use the same marinade. Shrimp should be seared for only 1-2 minutes per side to avoid toughness.

    Gluten-Free Pasta Alternatives

    Replace traditional wheat pasta with chickpea or lentil-based pasta to increase fiber and protein content. These pastas often require slightly less boiling time, so monitor them closely. Rinse gluten-free pasta well to remove excess starch that can make the sauce gummy.

    Dairy-Free Sauce Modifications

    For a dairy-free version, use cashew cream or a vegan cream cheese alternative. Replace the skim milk with unsweetened almond or soy milk. Use nutritional yeast and vegan cheddar shreds to maintain the cheesy flavor profile.

    Low-Sodium Flavor Adjustments

    To reduce sodium, replace the soy sauce with coconut aminos and use a salt-free seasoning blend. You can increase the amount of smoked paprika and black pepper to maintain a bold taste without adding salt. Use no-salt-added Worcestershire sauce if available.

    Meal Prep and Storage Guidance

    Optimal Cooling Procedures

    Allow the mac and cheese and steak to cool slightly before sealing them in containers. Sealing steaming hot food creates condensation, which can make the pasta mushy. Leaving the lids slightly cracked for 15 minutes helps maintain texture.

    Choosing the Right Containers

    Use airtight, BPA-free plastic or glass containers to prevent oxidation and odors. Glass containers are preferable for reheating in the microwave as they distribute heat more evenly. Portion the meals equally to ensure consistent calorie tracking.

    Refrigerator Storage Duration

    Store the prepared meals in the refrigerator for up to 4 days. Keep the containers in the coldest part of the fridge, away from the door. If storing for longer, consider freezing the portions immediately after cooling.

    Freezing and Thawing Process

    Freeze the mac and cheese and steak in separate compartments or containers. Thaw the meals in the refrigerator overnight before reheating. This prevents the steak from becoming rubbery during the thawing process.

    Effective Reheating Methods

    Microwave Reheating Strategy

    Heat the meal in 60 to 90-second intervals, stirring the pasta between each burst. To prevent the cheese sauce from drying out, add a splash of skim milk or water before heating. This re-emulsifies the fats and restores the creamy texture.

    Stovetop Reheating Technique

    Place the mac and cheese in a small skillet over low heat with a tablespoon of milk. Stir gently until the sauce is creamy and the pasta is heated through. Add the steak bites at the very end just to warm them, avoiding overcooking.

    Oven Heating Instructions

    Transfer the meal to an oven-safe dish and cover it with foil to trap moisture. Heat at 350°F (175°C) for about 15-20 minutes. Remove the foil for the last 5 minutes if you prefer a slightly crisped top on the pasta.

    Maintaining Steak Tenderness

    Avoid overheating the steak during the reheating process. If using a microwave, place the steak on top of the pasta so it steams slightly rather than cooking further. This prevents the lean beef from becoming tough or dry.

    Serving and Volume-Boosting Ideas

    Integrating Fresh Vegetables

    Stir in fresh baby spinach or steamed broccoli florets into the mac and cheese. These vegetables add volume and micronutrients without significantly increasing the calorie count. Spinach can be stirred in at the end, as it wilts quickly from the heat of the sauce.

    Garnishing for Better Presentation

    Beyond chives, try adding a sprinkle of red pepper flakes for a spicy contrast. A squeeze of fresh lemon juice over the steak bites can brighten the heavy flavors of the cheese. Freshly cracked black pepper adds a final layer of aromatic heat.

    Balanced Side Dish Pairings

    Pair this meal with a side of roasted asparagus or a crisp garden salad. A vinegar-based dressing for the salad helps cut through the richness of the creamy pasta. Roasted zucchini is another low-calorie option that complements garlic steak.

    Increasing Meal Volume

    To make the meal feel larger, mix in riced cauliflower into the macaroni. Use a 50/50 ratio of pasta to cauliflower rice for a significant reduction in calories and an increase in volume. This allows for larger portions while staying within macro goals.

    Troubleshooting Common Problems

    Fixing a Grainy Cheese Sauce

    If the sauce looks grainy, it is likely because the cheese was heated too quickly or the yogurt curdled. Use a whisk or an immersion blender to smooth out the mixture over very low heat. Adding a small amount of warm milk can also help stabilize the emulsion.

    Addressing Tough or Rubbery Steak

    Rubbery steak usually occurs from overcooking or using a cut with too much connective tissue. Ensure you are using lean sirloin and removing all silver skin. Cook the meat quickly over high heat and remove it as soon as the desired internal temperature is reached.

    Correcting Over-Salted Dishes

    If the meal is too salty, stir in an extra dollop of plain Greek yogurt or a splash of lemon juice. The acidity and creaminess help neutralize the perception of salt. Adding more unsalted steamed vegetables can also dilute the overall salt concentration.

    Managing Sticky Pasta

    Pasta that sticks together is often the result of undercooking or not stirring during the boiling process. Ensure you use plenty of water and stir the pasta frequently. If it sticks after reheating, a small amount of milk will loosen the noodles.

    Frequently Asked Questions

    Can I use different pasta shapes?

    Yes, any short pasta such as cavatappi, shells, or rotini works well. These shapes are effective at holding onto the creamy cheese sauce. Avoid long pastas like spaghetti, as they are harder to portion for meal prep.

    Is this suitable for a high-protein diet?

    Yes, this recipe is specifically designed for high protein intake by using lean beef, Greek yogurt, and nonfat cheese. Each serving provides approximately 61g of protein, making it ideal for muscle maintenance and growth.

    How do I keep the steak tender?

    The key is using a lean but tender cut like sirloin and avoiding overcooking. Searing quickly on high heat and letting the meat rest before serving ensures the fibers remain tender and juicy.

    Can I make this in one pot?

    While the steak requires a skillet for a proper sear, you can make the pasta and sauce in one pot. Cook the pasta, drain it, and then build the sauce in the same pot to minimize cleanup.

    Print
    clock clock iconcutlery cutlery iconflag flag iconfolder folder iconinstagram instagram iconpinterest pinterest iconfacebook facebook iconprint print iconsquares squares iconheart heart iconheart solid heart solid icon
    Protein-Packed Garlic Steak and Creamy Mac & Cheese

    High-Protein Garlic Steak Bites with Creamy Mac & Cheese


    5 Stars 4 Stars 3 Stars 2 Stars 1 Star

    No reviews

    • Author: imageuploader
    • Total Time: 35 minutes
    • Yield: 4 servings 1x
    • Diet: High Protein

    Description

    A lighter remix of comfort food, featuring juicy, garlic-forward steak and a creamy, low-calorie mac and cheese base perfect for meal prep.


    Ingredients

    Scale
    • 1.5 lb lean sirloin or top round steak, trimmed and cut into 1-inch cubes
    • 1 tbsp Worcestershire sauce
    • 1 tbsp low-sodium soy sauce
    • 1 tbsp minced garlic (about 3 cloves)
    • ½ tbsp garlic powder
    • 1 tsp onion powder
    • 1 tsp smoked paprika
    • ½ tsp salt
    • ½ tsp black pepper
    • Olive oil spray
    • 8 oz dry elbow or penne pasta
    • 4 oz low-fat cream cheese
    • ½ cup skim milk
    • ¾ cup nonfat shredded cheddar cheese
    • ⅓ cup plain nonfat Greek yogurt
    • ½ tbsp garlic powder
    • 1 tsp onion powder
    • ½ tsp black pepper
    • ¼ tsp salt
    • Chives for garnish

    Instructions

    1. Cook the Pasta: Cook pasta in salted boiling water according to package directions. Drain and set aside.
    2. Prep the Steak Bites: In a bowl, toss steak cubes with soy sauce, Worcestershire, minced garlic, garlic powder, onion powder, smoked paprika, salt, and pepper.
    3. Cook the Steak: Heat a large skillet over medium-high heat. Lightly coat with olive oil spray. Sear steak bites for 2–3 minutes per side until browned and cooked to your preferred doneness. Remove from pan and set aside.
    4. Make the Low-Cal Mac Sauce: In the same pot you used for pasta (or a clean saucepan), whisk together skim milk and low-fat cream cheese over medium heat until smooth. Stir in nonfat cheddar, Greek yogurt, garlic powder, and onion powder until creamy. Season with salt and pepper.
    5. Combine & Serve: Add drained pasta to the cheese sauce and toss to coat. Portion mac & cheese into meal prep containers, then top each with steak bites. Garnish with parsley or chives if desired.

    Notes

    Cook the steak on a hot skillet to lock in juices. Melt the cream cheese fully and whisk in skim milk before adding Greek yogurt off heat to avoid curdling.

    • Prep Time: 15 minutes
    • Cook Time: 20 minutes
    • Category: Main Course
    • Method: Searing
    • Cuisine: American

    Nutrition

    • Serving Size: 1 serving
    • Calories: 594 kcal
    • Sugar: 10 g
    • Sodium: 1536 mg
    • Fat: 14 g
    • Saturated Fat: 6 g
    • Unsaturated Fat: 8 g
    • Trans Fat: 0 g
    • Carbohydrates: 57 g
    • Fiber: 3 g
    • Protein: 61 g
    • Cholesterol: 126 mg
  • Zesty Slow Cooker Lemon Herb Chicken and Rice

    Zesty Slow Cooker Lemon Herb Chicken and Rice

    This slow cooker chicken and rice is a practical solution for healthy weeknight dinners. It combines zesty lemon and aromatic herbs for a flavor-packed meal with minimal active prep time.

    Recipe image

    List of ingredients

    • 4 pieces chicken breasts (boneless and skinless) – provides the lean protein base.
    • 1 lemon (juiced and zested) – adds brightness and citrus acidity.
    • 2 tbsp olive oil – ensures moisture and carries fat-soluble flavors.
    • 1 tsp garlic powder – contributes a savory, earthy depth.
    • 1 tsp dried oregano – adds a Mediterranean herbaceous note.
    • 1 tsp dried thyme – provides a subtle, woody aroma.
    • salt and pepper (to taste) – essential for enhancing overall flavor.
    • 2 cups chicken broth – creates the cooking liquid for the rice.
    • 1 cup long-grain rice – absorbs the broth and seasonings.
    • fresh herbs (for garnish, optional) – adds a fresh finish and color.

    step-by-step instructions

    1. Mix: In a small bowl, combine the lemon juice, zest, olive oil, garlic powder, oregano, thyme, salt, and pepper.
    2. Coat: Place your chicken breasts in the slow cooker, then pour the lemon herb mixture over them.
    3. Add: Pour in the chicken broth and add the long-grain rice to the slow cooker.
    4. Stir: Gently mix the ingredients to ensure that the rice is evenly distributed.
    5. Cover: Secure the lid on your slow cooker. Cook on low for 360 minutes or high for 180 minutes.
    6. Fluff: Once cooked, remove the lid and fluff the rice gently with a fork.

    Cooking Tips for Best Results

    Ensure Thorough Coating

    Coat each chicken breast fully with the marinade to prevent dry spots. Using a brush or tongs helps distribute the oil and herbs evenly across the meat. This ensures every bite is seasoned consistently.

    Achieving the Right Rice Texture

    Distribute the long-grain rice evenly across the bottom of the slow cooker before starting. Avoid over-stirring during the cooking process to keep the grains intact. This prevents the rice from becoming mushy or clumping together.

    Choosing High-Quality Broth

    Use a low-sodium chicken broth to maintain control over the salt levels of the final dish. Homemade broth often provides a richer flavor profile than store-bought versions. Ensure the broth is at room temperature or slightly warm for consistent heating.

    Customizing Seasoning Levels

    Adjust the salt and pepper based on the sodium content of your chosen broth. Taste the marinade before adding it to the chicken to ensure the lemon acidity is balanced. You can add extra black pepper for a slight bite.

    Selecting the Right Cooking Mode

    The low setting is ideal for maximum tenderness and moisture in the chicken breasts. If you are short on time, the high setting works but may result in slightly firmer meat. Always keep the lid closed to retain steam and heat.

    Alternative Ingredients and Swaps

    Using Chicken Thighs for More Moisture

    Replace the chicken breasts with boneless, skinless chicken thighs for a richer taste. Thighs are more forgiving in a slow cooker and remain juicy even if cooked slightly longer. This is a great option for those who prefer a more succulent texture.

    Substituting Rice with Quinoa

    Use quinoa instead of long-grain rice for an increase in protein and fiber. Since quinoa cooks faster than rice, you may need to reduce the total cooking time slightly. Rinse the quinoa thoroughly before adding it to remove any natural bitterness.

    Incorporating Mixed Vegetables

    Add diced carrots, frozen peas, or sliced celery to the pot for extra nutrients. Stir these in during the last 60 to 90 minutes of cooking to prevent them from overcooking. This turns the meal into a complete one-pot dinner.

    Adding Heat with Red Pepper Flakes

    Mix in a pinch of red pepper flakes or diced jalapeños into the marinade for a spicy kick. This complements the lemon acidity and adds depth to the herb profile. Start with a small amount and adjust according to your spice tolerance.

    Using Different Fresh Herbs

    Substitute the dried oregano and thyme with fresh rosemary or basil for a different flavor profile. Fresh herbs should be added toward the end of the cooking process to preserve their bright taste. This variation works well for a more gourmet feel.

    Replacing Broth with Coconut Milk

    Use a combination of coconut milk and a small amount of broth for a creamy, tropical twist. This change pairs exceptionally well with the lemon and creates a richer sauce. It transforms the dish into a creamy lemon-coconut chicken rice.

    Serving Suggestions

    Pairing with Steamed Green Vegetables

    Serve the chicken and rice alongside steamed broccoli or sautéed green beans. These vegetables provide a crunchy texture that contrasts with the soft rice. The green color also makes the plate more visually appealing.

    Adding a Fresh Side Salad

    A crisp mixed green salad with a light lemon vinaigrette balances the richness of the slow cooker meal. Use spinach, arugula, or romaine lettuce for a refreshing side. Add sliced cucumbers and cherry tomatoes for extra crunch.

    Serving with Toasted Garlic Bread

    Warm, buttery garlic bread is excellent for mopping up the flavorful lemon-herb broth left in the pot. Toast the bread in the oven until golden brown for the best experience. This adds a satisfying carb element to the meal.

    Choosing a Refreshing Non-Alcoholic Drink

    Pair this meal with a chilled glass of sparkling cider or a citrus-infused sparkling water. The bubbles and acidity cut through the savory flavors of the chicken and rice. Iced tea with a slice of lemon is another practical option.

    Storage and Preservation

    Safe Cooling Times

    Allow the chicken and rice to cool slightly, but do not leave it at room temperature for more than two hours. Rapidly cooling the food prevents the growth of harmful bacteria. Transfer leftovers to shallow containers to speed up the cooling process.

    Refrigerator Storage Duration

    Store the leftovers in an airtight container in the refrigerator for up to 3 days. Ensure the container is sealed tightly to prevent the rice from drying out. Keep the chicken submerged in any remaining sauce to maintain moisture.

    Freezing Guidelines

    Place portions in freezer-safe bags or containers for up to 3 months. Freeze the rice and chicken together to preserve the combined flavors. Note that the texture of the rice may change slightly upon thawing.

    Proper Thawing Methods

    Thaw frozen portions in the refrigerator overnight for the safest and most consistent results. Avoid thawing at room temperature to maintain food safety standards. You can also use the defrost setting on a microwave for quicker access.

    Reheating Instructions

    Microwave Reheating Technique

    Place a portion in a microwave-safe dish and cover it with a damp paper towel. Heat in short bursts, stirring occasionally, to ensure even warmth. The damp towel creates steam that prevents the rice from becoming hard.

    Stovetop Reheating Method

    Add the chicken and rice to a pan over medium-low heat. Add a tablespoon of water or chicken broth to restore the original consistency. Cover the pan with a lid and heat until steaming throughout.

    Adding Extra Moisture During Reheating

    Rice tends to absorb moisture over time, which can make it feel dry when reheated. Stir in a splash of chicken broth or a small knob of butter before heating. This restores the creamy, fluffy texture of the rice.

    Troubleshooting Common Issues

    Fixing Mushy Rice

    If the rice is too soft, it may be due to overcooking or too much liquid. Next time, reduce the broth slightly or check the rice at the 5-hour mark on low. You can stir in a bit of toasted almond slivers to add texture back to the dish.

    Correcting Undercooked Rice

    If the rice is still firm, add an extra 1/4 cup of broth and cook for another 30 minutes. Ensure the lid is tightly sealed to keep the steam inside. This allows the grains to finish absorbing the liquid.

    Preventing Dry Chicken Breasts

    Ensure the chicken is fully submerged in the liquid and marinade. Avoid using the high setting if you have a tendency to overcook meat. Using skinless chicken thighs is the best way to guarantee juicy results every time.

    Balancing Overly Strong Lemon Flavor

    If the dish tastes too acidic, stir in a small amount of heavy cream or a pinch of sugar. This helps neutralize the sharpness of the lemon juice. Adding a bit more salt can also help balance the citrus notes.

    Frequently Asked Questions

    How long does the dish stay fresh?

    When stored in an airtight container in the refrigerator, the chicken and rice will remain fresh for up to 3 days. Always ensure it is refrigerated within two hours of cooking.

    Can this recipe be frozen?

    Yes, this recipe freezes well for up to 3 months. Use sealed, freezer-grade containers and add a splash of broth when reheating to restore moisture.

    What is the best substitute for chicken breasts?

    Boneless, skinless chicken thighs are the best substitute for a juicier, more flavor-rich result. They are less likely to dry out during the long slow-cooking process.

    Is this recipe gluten-free?

    Yes, this recipe is naturally gluten-free as long as you use a certified gluten-free chicken broth. Ensure your long-grain rice is also processed in a gluten-free facility.

    What side dishes go best with this meal?

    Steamed broccoli, a fresh garden salad, or toasted garlic bread are the best pairings. These sides complement the zesty lemon and savory herb flavors perfectly.

    Print
    clock clock iconcutlery cutlery iconflag flag iconfolder folder iconinstagram instagram iconpinterest pinterest iconfacebook facebook iconprint print iconsquares squares iconheart heart iconheart solid heart solid icon
    Succulent Slow Cooker Lemon Herb Chicken Rice for Busy Nights

    Zesty Slow Cooker Lemon Herb Chicken and Rice


    5 Stars 4 Stars 3 Stars 2 Stars 1 Star

    No reviews

    • Author: imageuploader
    • Total Time: 6 hours 15 minutes
    • Yield: 4 servings 1x
    • Diet: General

    Description

    Enjoy Slow Cooker Lemon Herb Chicken Rice: Easy Healthy Crock Pot Meal, a vibrant dish for busy weeknights.


    Ingredients

    Scale
    • 4 pieces chicken breasts (boneless and skinless)
    • 1 lemon (juiced and zested)
    • 2 tbsp olive oil
    • 1 tsp garlic powder
    • 1 tsp dried oregano
    • 1 tsp dried thyme
    • salt and pepper (to taste)
    • 2 cups chicken broth
    • 1 cup long-grain rice
    • fresh herbs (for garnish, optional)

    Instructions

    1. Step 1: In a small bowl, combine the lemon juice, zest, olive oil, garlic powder, oregano, thyme, salt, and pepper.
    2. Step 2: Place your chicken breasts in the slow cooker, then pour the lemon herb mixture over them.
    3. Step 3: Pour in the chicken broth and add the long-grain rice to the slow cooker.
    4. Step 4: Gently mix the ingredients to ensure that the rice is evenly distributed.
    5. Step 5: Secure the lid on your slow cooker. Cook on low for 360 minutes or high for 180 minutes.
    6. Step 6: Once cooked, remove the lid and fluff the rice gently with a fork.

    Notes

    Ensure each chicken breast is well-coated for maximum flavor. Adjust seasonings based on personal preference.

    • Prep Time: 15 minutes
    • Cook Time: 6 hours
    • Category: Healthy Recipes
    • Method: Slow Cooking
    • Cuisine: American

    Nutrition

    • Serving Size: 1 serving
    • Calories: 450 kcal
    • Sugar: 1 g
    • Sodium: 600 mg
    • Fat: 12 g
    • Saturated Fat: 2 g
    • Unsaturated Fat: 10 g
    • Trans Fat: 0 g
    • Carbohydrates: 50 g
    • Fiber: 2 g
    • Protein: 40 g
    • Cholesterol: 100 mg
  • Juicy Garlic and Herb Baked Chicken Breast

    Juicy Garlic and Herb Baked Chicken Breast

    This healthy baked chicken breast is designed to be juicy, flavorful, and ready in under an hour. It is a versatile protein option that works perfectly for weeknight family dinners or organized meal prep.

    Recipe image

    List of ingredients

    • 4 pieces boneless, skinless chicken breasts – ensure they are high-quality for the best texture.
    • 2 tablespoons olive oil – provides essential moisture and helps the spices adhere.
    • 1 teaspoon garlic powder – adds a warm, aromatic base to the flavor profile.
    • 1 teaspoon onion powder – provides a savory depth that enhances the chicken.
    • 1 teaspoon paprika – adds a mild sweetness and a vibrant golden color.
    • 1 teaspoon salt – essential for drawing out flavors and seasoning the meat.
    • 1/2 teaspoon black pepper – adds a subtle heat and classic spice.
    • 1 lemon, juiced – the acidity tenderizes the fibers and brightens the overall taste.

    step-by-step instructions

    1. Preheat the Oven: Set your oven to 400°F (200°C) to ensure the chicken begins searing immediately upon entry.
    2. Mix the Marinade: In a medium mixing bowl, whisk together the olive oil, garlic powder, onion powder, paprika, salt, black pepper, and fresh lemon juice until well combined.
    3. Coat the Chicken: Place the four chicken breasts into the bowl and toss them thoroughly to ensure every surface is evenly coated in the spice mixture. Let the chicken marinate for at least 15 minutes to allow flavors to penetrate.
    4. Prepare for Baking: Transfer the marinated chicken breasts to a baking dish, leaving enough space between each piece to allow hot air to circulate.
    5. Bake: Place the dish in the center rack of the oven and bake for 25-30 minutes. Use a meat thermometer to confirm the internal temperature has reached 165°F (75°C).
    6. Rest the Meat: Remove the chicken from the oven and let it rest in the pan for 5 minutes before slicing. This allows the juices to redistribute through the meat.

    Cooking Techniques for Maximum Juiciness

    Use a Digital Meat Thermometer for Precision

    The only way to guarantee juicy chicken is to avoid overcooking. Use an instant-read thermometer and insert it into the thickest part of the breast, ensuring you do not hit the bone or the pan. Remove the meat as soon as it hits 165°F (75°C) to prevent the proteins from tightening and squeezing out moisture.

    The Science of the Resting Period

    When chicken cooks, the muscle fibers contract and push juices toward the center of the meat. If you slice into the breast immediately, these juices escape onto the cutting board. Resting for 5 to 10 minutes allows the fibers to relax and reabsorb the liquid, resulting in a much moister slice.

    Standardize the Thickness of the Meat

    Chicken breasts vary in thickness, which often leads to the thin end drying out while the thick end remains raw. Use a meat mallet or a heavy skillet to gently pound the thickest part of the breast until it is an even thickness. This ensures that the entire piece of meat reaches the safe internal temperature at the exact same time.

    Optimizing Oven Airflow

    Avoid crowding the baking dish, as this creates steam rather than roasting the meat. When breasts are too close together, the edges remain pale and the cooking time increases. Leave at least one inch of space between each piece to allow the dry heat of the oven to brown the edges effectively.

    Flavor Customizations and Substitutions

    Integrating Fresh Garden Herbs

    While powders are convenient, adding a tablespoon of chopped fresh rosemary or thyme can elevate the dish. Fresh herbs provide a more complex, floral aroma that pairs exceptionally well with the lemon juice. Stir these into the olive oil marinade just before coating the chicken.

    Adding a Spicy Kick with Cayenne

    For those who prefer a bolder heat, add a teaspoon of cayenne pepper or crushed red pepper flakes to the dry spice mix. This adds a sharp heat that cuts through the richness of the olive oil. Balance this heat by adding a tiny pinch of brown sugar to the marinade.

    Swapping Lemon for Lime Juice

    Using lime juice instead of lemon creates a zesty, tropical profile that works well for summer meals. Lime has a slightly different acidity level that complements the onion and garlic powders. This version is particularly delicious when served alongside cilantro-lime rice.

    Creating a Sweet Honey Glaze

    Whisk one tablespoon of honey into the marinade to create a beautiful caramelization on the surface of the chicken. The sugars in the honey brown quickly under the 400°F heat, creating a sticky, sweet crust. This variation is a favorite for those who enjoy a sweet and savory contrast.

    Enhancing Depth with Smoked Paprika

    Replace standard paprika with smoked paprika to give the chicken a wood-fired, barbecue flavor. Smoked paprika adds a rich, earthy depth that makes the dish taste as though it were grilled outdoors. It is particularly effective when paired with roasted root vegetables.

    Adapting for an Asian-Inspired Profile

    Substitute the olive oil with toasted sesame oil and add two tablespoons of soy sauce to the marinade. This replaces the salt and adds a deep umami flavor to the chicken. This version is best served sliced over a bed of steamed bok choy and jasmine rice.

    Adding Tangy Dijon Mustard

    Incorporate a tablespoon of Dijon mustard into the oil and lemon mixture for a sharp, tangy flavor. Mustard acts as an emulsifier, helping the marinade cling more effectively to the chicken. This adds a gourmet touch that pairs well with a side of steamed asparagus.

    Applying a Nutty Crust for Texture

    After marinating the chicken, press the breasts into a mixture of crushed almonds or pecans before placing them in the baking dish. The nuts toast in the oven, providing a crunchy contrast to the tender meat. This adds healthy fats and a satisfying textural element to the meal.

    Storage and Preservation Guidelines

    Proper Refrigeration Techniques

    Store leftover baked chicken in an airtight glass or plastic container to prevent the meat from absorbing other odors in the fridge. Ensure the chicken has cooled slightly before sealing the lid to avoid trapping excessive steam, which can make the meat soggy. It will remain fresh and safe to eat for up to 3 days.

    Freezing Cooked Chicken for Long-Term Use

    To freeze, wrap individual chicken breasts tightly in foil or place them in a vacuum-sealed bag to prevent freezer burn. Removing as much air as possible is key to maintaining the texture of the meat. Cooked chicken can be stored in the freezer for up to 3 months without significant loss of quality.

    The Best Way to Reheat Without Drying

    Avoid the microwave if possible, as it often overcooks the edges of the meat. Instead, place the chicken in a baking dish with a tablespoon of water or chicken broth and cover it with foil. Reheat at 350°F (175°C) for 15-20 minutes, which gently steams the meat back to temperature.

    Advanced Meal Prep Strategies

    Executing Overnight Marination

    For the most intense flavor, marinate the chicken for 12 to 24 hours in the refrigerator. The acid in the lemon juice has more time to break down the connective tissues, resulting in an even more tender texture. Store the chicken in a sealed zip-top bag to ensure the marinade stays in contact with all surfaces.

    Freezing Marinated Raw Chicken

    You can prepare several batches of marinated chicken and freeze them raw in individual bags. The chicken marinating process continues slowly during the thawing phase in the refrigerator. Simply move a bag from the freezer to the fridge the night before you plan to bake them.

    Batch Cooking for Weekly Lunches

    Bake a larger quantity of breasts on Sunday to use as a base for various meals throughout the week. Sliced cold chicken is excellent for salads, while warmed chicken works well in wraps or grain bowls. By prepping the protein in bulk, you reduce the daily cooking time and ensure healthy choices.

    Troubleshooting and Common Fixes

    Addressing Pink Meat After Baking

    If the chicken appears slightly pink near the bone or in the center, it may not have reached the safe temperature of 165°F. Return the chicken to the oven for 5-minute increments, checking with a thermometer each time. Do not rely on color alone, as some chicken can remain pink even when fully cooked.

    Preventing the Chicken from Drying Out

    If you find your chicken is frequently dry, check your oven calibration with an oven thermometer. Many ovens run hotter than the dial indicates, which can overcook the meat quickly. Additionally, ensure you are using the marinade correctly, as the oil creates a barrier that locks in moisture.

    Managing Uneven Browning

    If the chicken is cooked through but lacks color, turn on the broiler for the last 2-3 minutes of cooking. Watch the meat closely during this time to prevent burning. This adds a professional, golden-brown finish to the top of the breasts without overcooking the interior.

    Frequently Asked Questions

    How can I make sure my chicken breasts stay juicy?

    The key is to marinate the chicken in olive oil and lemon juice for at least 15 minutes and to use a meat thermometer. Pull the chicken out of the oven exactly when it reaches 165°F (75°C) and allow it to rest for 5 minutes before slicing.

    What’s the best way to store leftover baked chicken breasts?

    Store them in an airtight container in the refrigerator for up to 3-4 days. For longer storage, freeze them in a vacuum-sealed bag or tightly wrapped in foil for up to 3 months.

    Can I freeze the marinated chicken breasts?

    Yes, you can freeze them before baking. Place them in a freezer-safe bag and store them for up to 3 months, then thaw them overnight in the refrigerator before cooking.

    What should I do if my chicken breast is still pink after baking?

    Check the internal temperature with a meat thermometer. If it is below 165°F (75°C), return it to the oven in 5-minute intervals until it reaches the safe temperature.

    How many servings does this recipe yield?

    This recipe yields 4 servings, with each serving consisting of one boneless, skinless chicken breast. It is an ideal portion for a main course dinner.

    Are there any dietary considerations with this recipe?

    This recipe is naturally gluten-free and low-carb, making it suitable for ketogenic or paleo diets. To reduce fat, you can reduce the amount of olive oil, though this may slightly affect the juiciness.

    Print
    clock clock iconcutlery cutlery iconflag flag iconfolder folder iconinstagram instagram iconpinterest pinterest iconfacebook facebook iconprint print iconsquares squares iconheart heart iconheart solid heart solid icon
    Garlic and Herb Baked Chicken Breast

    Juicy Garlic and Herb Baked Chicken Breast


    5 Stars 4 Stars 3 Stars 2 Stars 1 Star

    No reviews

    • Author: imageuploader
    • Total Time: 40 minutes
    • Yield: 4 servings 1x
    • Diet: Gluten-free

    Description

    A simple and healthy baked chicken breast recipe that is juicy and flavorful, perfect for any meal.


    Ingredients

    Scale
    • 4 pieces boneless, skinless chicken breasts
    • 2 tablespoons olive oil
    • 1 teaspoon garlic powder
    • 1 teaspoon onion powder
    • 1 teaspoon paprika
    • 1 teaspoon salt
    • 1/2 teaspoon black pepper
    • 1 lemon juiced

    Instructions

    1. Preheat: Preheat the oven to 400°F (200°C).
    2. Combine: In a mixing bowl, whisk together 2 tablespoons of olive oil, 1 teaspoon each of garlic powder, onion powder, paprika, salt, and 1/2 teaspoon black pepper, then add the juice of 1 lemon.
    3. Marinate: Add the 4 pieces of boneless, skinless chicken breasts to your marinade mixture and coat them evenly. Let them soak in those flavors for at least 15 minutes.
    4. Place: Gently transfer your flavorful chicken breasts into a baking dish, ensuring they’re spaced out for even cooking.
    5. Bake: Bake in the preheated oven for 25-30 minutes until its internal temperature reaches 165°F (75°C).
    6. Rest: Once out of the oven, let your beautifully baked chicken rest for about 5 minutes.

    Notes

    Serve with your choice of sides such as vegetables or rice for a complete meal.

    • Prep Time: 15 minutes
    • Cook Time: 25 minutes
    • Category: Main Course
    • Method: Baking
    • Cuisine: American

    Nutrition

    • Serving Size: 1 serving
    • Calories: 220 kcal
    • Sugar: 3 g
    • Sodium: 300 mg
    • Fat: 8 g
    • Saturated Fat: 1 g
    • Unsaturated Fat: 7 g
    • Trans Fat: 0 g
    • Carbohydrates: 5 g
    • Fiber: 1 g
    • Protein: 40 g
    • Cholesterol: 110 mg
  • Zesty Chipotle Lime Shrimp Bowls

    Zesty Chipotle Lime Shrimp Bowls

    These chipotle lime shrimp bowls provide a balanced meal combining smoky heat with fresh citrus notes. This recipe is designed for quick preparation and is highly adaptable for various dietary preferences.

    Recipe image

    List of ingredients

    • 2 tablespoons olive oil – substitute with avocado oil for a higher smoke point.
    • 1 minced chipotle pepper – use smoked paprika for a milder heat level.
    • 1 tablespoon adobo sauce – replace with additional lime juice if unavailable.
    • 3 cloves garlic, minced – fresh garlic provides the best aromatic profile.
    • 1 tablespoon fresh lime juice – freshly squeezed for maximum acidity.
    • 1 teaspoon ground cumin – coriander is a suitable alternative for a different earthiness.
    • 1 teaspoon chili powder – swap with cayenne pepper for increased spice.
    • Salt and black pepper to taste – adjust based on individual preference.
    • 1 pound shrimp, peeled and deveined – skinless chicken or firm tofu can be used instead.
    • 2 cups cooked rice – brown rice increases fiber, while cauliflower rice reduces carbs.
    • 1 cup black beans, drained and rinsed – canned beans are a convenient option.
    • 1 cup corn kernels – frozen corn is a practical and tasty substitute.
    • 1/4 cup chopped cilantro – parsley or green onions can be used as replacements.
    • 1/2 cup sour cream – plain Greek yogurt is a healthier, high-protein alternative.
    • 1 avocado, sliced – adds necessary creaminess and healthy fats.
    • Lime wedges – used for garnish and final seasoning.

    step-by-step instructions

    1. Prepare the Marinade: In a medium bowl, whisk together the olive oil, minced chipotle pepper, adobo sauce, minced garlic, lime juice, ground cumin, chili powder, salt, and black pepper. Mix until the sauce is smooth and the spices are fully integrated.
    2. Marinate the Shrimp: Add the peeled and deveined shrimp to the marinade bowl. Toss until every shrimp is evenly coated, then cover and let rest at room temperature for 10 minutes to allow flavors to penetrate.
    3. Sear the Shrimp: Heat a large skillet over medium-high heat with a small amount of olive oil. Add the shrimp in a single layer and cook for 2-3 minutes per side until they are pink, opaque, and have a slight char. Transfer them to a plate to keep warm.
    4. Warm the Base: Use the same skillet to add the cooked rice, black beans, and corn kernels. Stir occasionally for 3-5 minutes until the ingredients are thoroughly heated and the rice is fluffy.
    5. Assemble the Bowls: Distribute the warm rice, bean, and corn mixture evenly among four serving bowls. Arrange the cooked shrimp on top of the base in organized sections.
    6. Add Final Garnishes: Top each bowl with sliced avocado, chopped cilantro, and a dollop of sour cream or Greek yogurt. Serve immediately with lime wedges on the side for extra zest.

    Protein Selection and Substitutions

    Using Skinless Chicken Breast

    To use chicken, cut the breast into small, uniform 1-inch cubes to ensure they cook quickly. Sauté the marinated chicken over medium heat for 6-8 minutes until the internal temperature reaches 165°F. Avoid overcooking to keep the meat juicy.

    Firm Tofu for Vegetarian Option

    Press extra-firm tofu for 20 minutes to remove excess water before cubing it. Marinate the tofu for at least 30 minutes to ensure the flavors penetrate the dense protein. Pan-fry until the edges are golden brown and crispy.

    Selecting High-Quality Shrimp

    Choose shrimp that are translucent and firm to the touch with a mild, salty scent. Avoid any shrimp with black spots on the shell or a strong fishy odor, as these are signs of age. If using frozen shrimp, thaw them completely in the refrigerator overnight.

    Grain and Base Variations

    Brown Rice for Added Nutrition

    Brown rice provides a nuttier flavor and more fiber compared to white rice. Ensure the brown rice is fully cooked and fluffy before adding it to the skillet. This helps maintain a better texture when mixing with the beans and corn.

    Cauliflower Rice for Low-Carb Diets

    Use riced cauliflower as a substitute for a lighter, low-carbohydrate base. Sauté the cauliflower rice separately for 5 minutes to evaporate excess moisture before adding the other bowl components. This prevents the final dish from becoming watery.

    Quinoa as a Protein-Rich Alternative

    Quinoa serves as an excellent substitute for rice, offering a complete protein source and a slightly crunchy texture. Rinse the quinoa thoroughly before cooking to remove saponins, which can cause a bitter taste. Mix it into the skillet similarly to the rice.

    Vegetable Enhancements

    Adding Diced Bell Peppers

    Red or yellow bell peppers add a sweet crunch and vibrant color to the bowl. Dice them into small pieces and sauté them in the skillet for 3 minutes before adding the rice and beans. This softens the pepper while keeping its structural integrity.

    Incorporating Shredded Carrots

    Shredded carrots introduce a natural sweetness and extra beta-carotene to the meal. You can add them raw as a cold topping or sauté them briefly with the corn. Julienne cuts work best for a more professional presentation.

    Fresh Jalapeños for Increased Heat

    For those who prefer a spicy kick, add thinly sliced fresh jalapeños to the top of the bowl. Remove the seeds and membranes to control the level of heat. This provides a fresh, sharp contrast to the smoky chipotle flavor.

    Storage and Meal Prep Guidance

    Refrigeration and Freshness

    Store the shrimp, rice, and bean mixture in airtight containers in the refrigerator for up to 3 days. Keep the avocado, sour cream, and cilantro in separate containers to maintain their freshness. This prevents the toppings from wilting or discoloring.

    Freezing Components for Long-Term Use

    Freeze the cooked shrimp and rice in separate freezer-safe bags for up to 3 months. Ensure the food is completely cooled before freezing to avoid ice crystal formation. Thaw components in the refrigerator overnight before reheating.

    Optimal Reheating Methods

    Reheat the rice and bean mixture in a microwave or skillet until steaming. To prevent the shrimp from becoming rubbery, reheat them gently in a pan over medium heat for 1-2 minutes. Avoid overcooking the shrimp during the reheating process.

    Advance Marinade Preparation

    The chipotle lime marinade can be prepared up to 24 hours in advance and stored in a jar. When ready to cook, whisk the marinade again to redistribute the spices. Do not marinate shrimp for more than 30 minutes, as the lime juice can break down the protein fibers.

    Serving Suggestions and Pairings

    Homemade Creamy Guacamole

    Blend ripe avocados with lime juice, salt, and diced onions for a rich side. The acidity in the lime juice helps prevent the avocado from oxidizing and turning brown. Serve this as a scoop on top of the shrimp.

    Zesty Cabbage Slaw

    Create a refreshing slaw using shredded green and red cabbage tossed with lime juice and a pinch of salt. The crunch of the cabbage balances the softness of the rice and shrimp. This addition adds a layer of textural contrast to every bite.

    Fresh Mango Salsa

    Combine diced mango, red onion, and cilantro for a sweet and tangy salsa. The sweetness of the mango complements the smokiness of the chipotle peppers perfectly. Spoon this over the shrimp just before serving.

    Crunchy Tortilla Chips

    Serve the bowls with a side of salted corn tortilla chips. These can be used to scoop up the beans and avocado for a more interactive eating experience. Warm the chips in the oven for 2 minutes for a better taste.

    Cooking Troubleshooting and FAQs

    Why did my shrimp become rubbery?

    Rubbery shrimp are usually the result of overcooking. Shrimp cook very quickly and only need about 2-3 minutes per side until they form a ‘C’ shape; an ‘O’ shape indicates they are overdone. Use a timer to ensure precision.

    How can I make this recipe milder?

    To reduce the heat, omit the minced chipotle pepper and adobo sauce. Replace them with smoked paprika, which provides the smoky flavor without the spicy burn. You can also increase the amount of sour cream to cool the dish.

    Can I use frozen shrimp for this dish?

    Yes, frozen shrimp are a great option, but they must be completely thawed. Thawing shrimp under cold running water or in the fridge is recommended. If you cook them while frozen, they will release too much water and steam instead of searing.

    What is a good substitute for adobo sauce?

    If you do not have adobo sauce, combine a teaspoon of tomato paste with a pinch of smoked paprika and a drop of vinegar. This replicates the tangy, smoky, and slightly sweet profile of the original sauce. Adjust the ratios to suit your taste.

    How do I keep the avocado from browning?

    Coat the sliced avocado in fresh lime juice immediately after cutting. The citric acid slows down the enzyme reaction that causes oxidation. Store sliced avocado in an airtight container with a piece of plastic wrap pressed directly against the surface.

    Print
    clock clock iconcutlery cutlery iconflag flag iconfolder folder iconinstagram instagram iconpinterest pinterest iconfacebook facebook iconprint print iconsquares squares iconheart heart iconheart solid heart solid icon
    Chipotle Lime Shrimp Bowl: Quick, Zesty Weeknight Delight

    Zesty Chipotle Lime Shrimp Bowls


    5 Stars 4 Stars 3 Stars 2 Stars 1 Star

    No reviews

    • Author: imageuploader
    • Total Time: 30 minutes
    • Yield: 4 bowls 1x
    • Diet: General

    Description

    This Chipotle Lime Shrimp Bowl is a quick, customizable dinner that bursts with flavor, making it perfect for busy weeknights.


    Ingredients

    Scale
    • 2 tablespoons olive oil
    • 1 minced chipotle pepper
    • 1 tablespoon adobo sauce
    • 3 cloves garlic
    • 1 tablespoon lime juice
    • 1 teaspoon ground cumin
    • 1 teaspoon chili powder
    • salt & black pepper to taste
    • 1 pound shrimp
    • 2 cups cooked rice
    • 1 cup black beans
    • 1 cup corn kernels
    • 1/4 cup chopped cilantro
    • 1/2 cup sour cream
    • sliced avocado
    • lime wedges

    Instructions

    1. Prepare Marinade: In a medium bowl, whisk together olive oil, minced chipotle pepper, adobo sauce, minced garlic, lime juice, ground cumin, chili powder, salt, and black pepper.
    2. Marinate Shrimp: Add peeled and deveined shrimp to the marinade and let rest at room temperature for about 10 minutes.
    3. Cook Shrimp: Heat a large skillet over medium-high heat with olive oil and cook shrimp for 2-3 minutes on each side until pink and opaque.
    4. Warm Sides: In the same skillet, add cooked rice, drained black beans, and corn kernels, stirring for 3-5 minutes.
    5. Assemble Bowls: Divide the warmed rice, beans, and corn mixture among serving bowls and arrange the cooked shrimp on top.
    6. Garnish: Top each bowl with sliced avocado, chopped cilantro, and a dollop of sour cream, serving with lime wedges on the side.

    Notes

    Ensure to marinate the shrimp for at least 10 minutes to absorb the chipotle lime flavors, but it should not exceed 30 minutes to maintain tenderness. Use fresh lime juice and garlic for best flavor.

    • Prep Time: 10 minutes
    • Cook Time: 20 minutes
    • Category: Dinner
    • Method: Sautéing
    • Cuisine: Mexican

    Nutrition

    • Serving Size: 1 bowl
    • Calories: 550 kcal
    • Sugar: 5 g
    • Sodium: 750 mg
    • Fat: 20 g
    • Saturated Fat: 4 g
    • Unsaturated Fat: 16 g
    • Trans Fat: 0 g
    • Carbohydrates: 65 g
    • Fiber: 10 g
    • Protein: 30 g
    • Cholesterol: 200 mg
  • Creamy Chicken Caesar Pasta Salad

    Creamy Chicken Caesar Pasta Salad

    This creamy chicken Caesar pasta salad is a hearty meal perfect for family dinners or potlucks. It combines grilled chicken and al dente pasta with a zesty homemade dressing for a satisfying finish.

    Recipe image

    List of ingredients

    • 2 lbs boneless, skinless chicken breasts, sliced horizontally into 1/2-inch thick cutlets – for quick and even cooking.
    • 2 tbsp olive oil – used for grilling the chicken.
    • 1/2 tsp salt – basic seasoning for the meat.
    • 1/4 tsp black pepper, freshly ground – adds a sharp, fresh heat.
    • 1 tsp garlic powder – provides a consistent savory depth.
    • 12 oz rotini or penne pasta – sturdy shapes that hold dressing well.
    • 1 tbsp olive oil (optional) – prevents the cooked pasta from sticking.
    • 1 tsp salt – for the pasta boiling water.
    • 1/2 cup mayonnaise, full-fat recommended – creates a rich, creamy base.
    • 1/4 cup grated Parmesan cheese, plus extra for garnish – adds saltiness and umami.
    • 2 tbsp fresh lemon juice – provides necessary acidity to balance the richness.
    • 1 tbsp Dijon mustard – adds a tangy, pungent kick.
    • 1 clove garlic, minced – delivers a fresh, sharp garlic flavor.
    • 1 tsp Worcestershire sauce – adds complex, savory depth.
    • 1/2 tsp salt – to season the dressing.
    • 1/4 tsp black pepper, freshly ground – for additional spice in the sauce.
    • 2 tbsp water or milk – used to adjust the dressing consistency.
    • 1 head romaine lettuce, chopped – for a crisp, fresh crunch.
    • 1 cup cherry tomatoes, halved – adds sweetness and color.
    • 1/2 cup croutons, store-bought or homemade – for essential texture.
    • 1/4 cup red onion, thinly sliced (optional) – provides a sharp contrast.
    • 1/4 cup fresh parsley, chopped (optional) – used as a fresh garnish.

    step-by-step instructions

    1. Prepare the Chicken: Pat the chicken cutlets dry with paper towels to ensure a better sear. Season both sides with salt, black pepper, and garlic powder. Heat a grill pan or outdoor grill to medium-high heat and lightly brush with 2 tablespoons of olive oil. Grill the chicken for 4-6 minutes per side, or until the internal temperature reaches 165°F (74°C). Remove from heat, let the meat rest for 5 minutes to retain juices, then slice into bite-sized pieces and let them cool.
    2. Cook the Pasta: Bring a large pot of salted water to a rolling boil. Add the rotini or penne and cook according to the package directions until al dente. Drain the pasta thoroughly and rinse it with cold water immediately to stop the cooking process. Optionally, toss the cooled pasta with 1 tablespoon of olive oil to prevent the noodles from sticking together.
    3. Make the Caesar Dressing: In a medium bowl, whisk together the mayonnaise, grated Parmesan cheese, fresh lemon juice, Dijon mustard, minced garlic, Worcestershire sauce, salt, and black pepper until the mixture is smooth. If the dressing is too thick, add water or milk one tablespoon at a time until you reach the desired consistency.
    4. Assemble the Salad: In a large mixing bowl, combine the cooled pasta, grilled chicken pieces, chopped romaine, halved cherry tomatoes, and thinly sliced red onion if desired. Pour the prepared Caesar dressing over the ingredients and toss gently until everything is evenly coated. Add the croutons and extra grated Parmesan cheese just before serving to maintain crispness. Garnish with fresh chopped parsley if desired.

    Cooking Techniques for Best Results

    Perfecting the Chicken Sear

    To get a golden-brown crust on the chicken, ensure the pan is fully heated before adding the meat. Avoid overcrowding the pan, as this drops the temperature and causes the chicken to steam rather than sear. Patting the meat dry is essential for achieving this effect.

    Achieving Al Dente Texture

    Start tasting the pasta two minutes before the package directions suggest. Al dente pasta should have a slight firmness or ‘bite’ in the center. This prevents the pasta from becoming mushy once it is mixed with the creamy dressing.

    Emulsifying the Caesar Dressing

    Use a whisk to combine the ingredients vigorously, which helps the oil in the mayonnaise and the acid in the lemon juice bond. If the dressing separates, adding a teaspoon of warm water and whisking again can stabilize the emulsion. Ensure the garlic is finely minced to avoid large chunks.

    Ingredient Substitutions and Alternatives

    Alternative Pasta Shapes

    While rotini and penne are ideal, fusilli or farfalle (bow-tie) pasta also work well. These shapes have folds and edges that capture the thick dressing. Avoid long pastas like spaghetti, as they are difficult to toss with the bulky chicken and lettuce.

    Using Greek Yogurt for a Lighter Dressing

    Replace half or all of the mayonnaise with plain Greek yogurt to reduce the calorie count. This adds a bit more tanginess and increases the protein content. You may need an extra teaspoon of lemon juice to balance the thickness of the yogurt.

    Plant-Based Protein Options

    For a vegetarian version, substitute the grilled chicken with roasted chickpeas or firm tofu cubes. Season the tofu with the same garlic powder and pepper blend used for the chicken. Ensure the protein is cooled completely before adding it to the greens.

    Swapping the Greens

    If romaine is unavailable, Little Gem lettuce or chopped kale can provide a similar crunch. Kale should be massaged with a bit of olive oil and lemon juice first to soften the tough fibers. This ensures the salad remains easy to chew.

    Customizing the Flavor Profile

    Adding Extra Vegetables

    Thinly sliced cucumbers, diced red bell peppers, or blanched asparagus tips add more nutrition and color. These additions provide a refreshing contrast to the rich dressing. Add these vegetables at the same time as the romaine.

    Incorporating Different Cheeses

    While Parmesan is traditional, you can add crumbled feta or gorgonzola for a sharper, saltier taste. These cheeses provide a creamy contrast to the crisp vegetables. Mix them in gently at the end to avoid breaking the crumbles.

    Adding a Smoky Element

    To introduce a smoky flavor, add pieces of smoked paprika to the chicken seasoning. Alternatively, you can stir in a small amount of smoked salt to the dressing. This complements the grilled flavor of the chicken and the tang of the mustard.

    Storage and Freshness Guidelines

    Refrigeration Procedures

    Store the assembled salad in an airtight container in the refrigerator for up to 3 days. The chicken and pasta will hold up well, but the lettuce will begin to soften over time. Keep the container tightly sealed to prevent the salad from absorbing other fridge odors.

    Preventing Lettuce Wilt

    If you are preparing the salad for a later event, store the dressing, chicken, and pasta in one container and the romaine and tomatoes in another. Toss the ingredients together only right before serving. This ensures the lettuce stays crisp and doesn’t release excess water.

    Maintaining Crouton Crunch

    Croutons absorb moisture from the dressing and will become soggy if stored within the salad. Keep the croutons in a separate airtight bag or container. Sprinkle them over the top of the salad seconds before it hits the table.

    Serving and Pairing Ideas

    Recommended Side Dishes

    Pair this salad with a light garlic bread or a side of fresh fruit to balance the creaminess. A simple side of roasted root vegetables also works well for a more filling dinner. Avoid other heavy creamy sides to prevent the meal from feeling too rich.

    Plating for Large Groups

    When serving a crowd, use a wide, shallow bowl rather than a deep one. This prevents the ingredients at the bottom from being crushed and allows more surface area for the dressing to coat the pasta. Garnish the top with a heavy sprinkle of fresh parsley and extra Parmesan.

    Ideal Serving Temperatures

    This dish is most refreshing when served chilled, but it is also delicious at room temperature. If the salad has been in the fridge, let it sit out for 10-15 minutes before serving. This allows the flavors of the garlic and lemon to become more pronounced.

    Common Troubleshooting

    Correcting Thick Dressing

    If the dressing feels too heavy or doesn’t coat the pasta smoothly, whisk in water or milk one tablespoon at a time. The goal is a consistency that clings to the pasta without pooling at the bottom of the bowl. Stir slowly to avoid over-thinning.

    Preventing Pasta Sticking

    Pasta often clumps together as it cools, especially once drained. Tossing the noodles with a small amount of olive oil creates a barrier that keeps them separate. Rinsing with cold water is also crucial to remove excess starch that causes sticking.

    Managing Overcooked Chicken

    If the chicken becomes slightly dry from overcooking, slice it thinner to increase the surface area. The creamy Caesar dressing will help rehydrate the meat and mask the dryness. Always use a meat thermometer to ensure you hit 165°F without going over.

    Frequently Asked Questions

    Can I use rotisserie chicken for this recipe?

    Yes, shredded or cubed rotisserie chicken is an excellent time-saving alternative. Ensure the chicken is cooled before adding it to the salad. Since rotisserie chicken is already seasoned, you may want to reduce the salt in the dressing slightly.

    How long does the homemade dressing last?

    The Caesar dressing can be stored in an airtight jar in the refrigerator for up to 5 days. Because it contains fresh garlic and lemon juice, it is best used within this window. Give it a good shake or whisk before using as the ingredients may settle.

    Can this pasta salad be frozen?

    It is not recommended to freeze this salad because the mayonnaise-based dressing and the fresh lettuce do not freeze well. The lettuce will turn mushy, and the dressing may separate. You can freeze the cooked chicken and pasta separately, but the final assembly must be fresh.

    Which type of lemon juice is best to use?

    Freshly squeezed lemon juice is highly recommended for the best brightness and acidity. Bottled lemon juice often contains preservatives and has a more muted flavor. If using bottled, use slightly less to avoid an artificial aftertaste.

    Print
    clock clock iconcutlery cutlery iconflag flag iconfolder folder iconinstagram instagram iconpinterest pinterest iconfacebook facebook iconprint print iconsquares squares iconheart heart iconheart solid heart solid icon
    Hearty Chicken Caesar Pasta Salad

    Creamy Chicken Caesar Pasta Salad


    5 Stars 4 Stars 3 Stars 2 Stars 1 Star

    No reviews

    • Author: imageuploader
    • Total Time: 45 minutes
    • Yield: 6 servings 1x
    • Diet: General

    Description

    A delightful twist on the traditional Caesar salad, this recipe combines tender grilled chicken, al dente pasta, crisp romaine, and a creamy Caesar dressing for a satisfying and flavorful meal perfect for any occasion.


    Ingredients

    Scale
    • 2 lbs boneless, skinless chicken breasts (sliced horizontally into 1/2-inch thick cutlets)
    • 2 tbsp olive oil (for grilling)
    • 1/2 tsp salt
    • 1/4 tsp black pepper (freshly ground)
    • 1 tsp garlic powder
    • 12 oz rotini or penne pasta
    • 1 tbsp olive oil (optional)
    • 1 tsp salt (for pasta water)
    • 1/2 cup mayonnaise
    • 1/4 cup grated Parmesan cheese (plus extra for garnish)
    • 2 tbsp fresh lemon juice
    • 1 tbsp Dijon mustard
    • 1 clove garlic (minced)
    • 1 tsp Worcestershire sauce
    • 1/2 tsp salt
    • 1/4 tsp black pepper (freshly ground)
    • 2 tbsp water or milk
    • 1 head romaine lettuce (chopped)
    • 1 cup cherry tomatoes (halved)
    • 1/2 cup croutons
    • 1/4 cup red onion (thinly sliced, optional)
    • 1/4 cup fresh parsley (chopped, optional)

    Instructions

    1. Prepare the Chicken: Pat chicken cutlets dry, season with salt, black pepper, and garlic powder, grill in 2 tbsp olive oil for 4-6 minutes per side (until 165°F), rest 5 minutes, then slice into bite-sized pieces.
    2. Cook the Pasta: Boil rotini or penne in salted water until al dente, drain, rinse with cold water, and optionally toss with 1 tbsp olive oil.
    3. Make the Caesar Dressing: Whisk together mayonnaise, grated Parmesan cheese, fresh lemon juice, Dijon mustard, minced garlic, Worcestershire sauce, salt, and black pepper; thin with water or milk if needed.
    4. Assemble the Salad: Combine cooled pasta, grilled chicken, chopped romaine lettuce, halved cherry tomatoes, and red onion in a large bowl, toss with Caesar dressing, and top with croutons, extra Parmesan, and parsley.

    Notes

    For a quicker chicken option, use shredded rotisserie chicken. The Caesar dressing can be made a day ahead. To keep croutons crisp, add them just before serving. Store leftovers in an airtight container in the refrigerator for up to 2-3 days.

    • Prep Time: 20 minutes
    • Cook Time: 25 minutes
    • Category: Main Course, Salad
    • Method: Grilling
    • Cuisine: American, Italian-American

    Nutrition

    • Serving Size: 1 serving
    • Calories: 550 kcal
    • Sugar: 8 g
    • Sodium: 980 mg
    • Fat: 32 g
    • Saturated Fat: 9 g
    • Unsaturated Fat: 21 g
    • Trans Fat: 0 g
    • Carbohydrates: 42 g
    • Fiber: 4 g
    • Protein: 38 g
    • Cholesterol: 115 mg
  • High-Protein Viral Ground Beef Bowls for Meal Prep

    High-Protein Viral Ground Beef Bowls for Meal Prep

    These nutrient-dense beef bowls are a practical solution for high-protein meal prepping. They combine savory seasoned beef with fresh vegetables and a creamy spicy sauce for a balanced meal.

    Recipe image

    List of ingredients

    • 1 lb lean ground beef (93% lean) – provides a high-protein base.
    • 1 cup cooked jasmine or brown rice – serves as the energy-providing base.
    • 1 1/2 cups shredded cabbage or slaw mix – adds crunch and fiber.
    • 1/2 cup shredded carrots – adds natural sweetness and vitamins.
    • 2 eggs (fried or soft-boiled) – adds richness and extra protein.
    • 1 tbsp olive oil – used for sautéing.
    • 3 tbsp soy sauce or tamari – provides salt and umami flavor.
    • 1 tbsp brown sugar – balances the salty soy sauce.
    • 2 cloves garlic, minced – adds aromatic depth.
    • 1 tsp sesame oil – provides a nutty finish.
    • 1/2 tsp chili flakes (optional) – adds a hint of heat.
    • 1/4 cup Greek yogurt or mayo – creates a creamy sauce base.
    • 1 tbsp sriracha – provides spicy kick.
    • 1 tsp honey – adds a touch of sweetness to the sauce.
    • Juice of 1/2 lime – adds acidity to brighten the flavor.

    step-by-step instructions

    1. Cook the Rice: Prepare your jasmine or brown rice according to the package instructions until fluffy.
    2. Sauté the Beef: Heat sesame oil in a skillet over medium-high heat. Add ground beef, minced garlic, soy sauce, brown sugar, and chili flakes, cooking until the beef is browned and well-coated in the sauce.
    3. Prepare the Vegetables: While the beef is cooking, shred the cabbage and carrots into thin strips for a crisp texture.
    4. Whisk the Sauce: In a small bowl, combine Greek yogurt or mayo, sriracha, honey, and lime juice, whisking until smooth.
    5. Prepare the Eggs: Fry or soft-boil the eggs according to your preference for the desired yolk consistency.
    6. Assemble the Bowls: Divide the cooked rice among four bowls. Top with the seasoned beef, shredded cabbage, carrots, and a cooked egg. Finish with a generous drizzle of the spicy mayo sauce.

    Pro Tips for Optimal Flavor

    Sear the Beef for Better Caramelization

    Allow the ground beef to sit undisturbed in the pan for a few minutes before breaking it up. This creates brown, caramelized edges that add deeper savory notes to the dish.

    Undercook Rice Slightly for Meal Prep

    If you plan to reheat these bowls, cook the rice slightly under the package directions. This prevents the grains from becoming mushy when microwaved later in the week.

    Layer Seasonings Gradually

    Add salt and pepper to the beef before adding the soy sauce and brown sugar. Layering the seasonings ensures the meat is flavored thoroughly from the inside out.

    Maintain Vegetable Crispness

    Keep the shredded cabbage and carrots raw to provide a temperature and texture contrast against the warm beef and rice.

    Ingredient Substitutions

    Alternative Grain Bases

    Substitute jasmine rice with quinoa for more protein or farro for a chewier texture. For a low-carb option, use cauliflower rice to reduce the overall calorie count.

    Protein Swaps for Beef

    Use ground turkey or ground chicken for a leaner alternative. Ensure you increase the sesame oil slightly as these meats have less natural fat than beef.

    Vegetable Modifications

    Replace cabbage with shredded kale or thinly sliced broccoli stems. You can also add diced red bell peppers or snap peas for extra color and nutrients.

    Creamy Sauce Alternatives

    Use avocado mash mixed with lime and sriracha if you want to avoid yogurt or mayo. This provides a healthy fat source while keeping the spicy profile.

    Creative Recipe Variations

    Asian Umami Version

    Stir in a tablespoon of hoisin sauce and freshly grated ginger during the beef sauté process. Finish the bowl with a sprinkle of toasted sesame seeds and chopped green onions.

    Tex-Mex Fusion Style

    Season the beef with cumin, chili powder, and smoked paprika. Replace the cabbage with corn and black beans, and use a lime-cilantro crema instead of the spicy mayo.

    Low-Carb Keto Modification

    Omit the brown sugar in the beef mixture and use a sugar-free sweetener or omit it entirely. Replace the rice with a bed of sautéed spinach or cauliflower rice.

    Hearty Plant-Based Option

    Substitute the ground beef with cooked brown lentils or plant-based crumbles. Use tamari instead of soy sauce to keep the recipe gluten-free.

    Meal Prep and Storage Guide

    Refrigerator Storage Limits

    Store the assembled bowls in airtight containers for up to 4 days. For the best quality, keep the spicy mayo sauce in a separate small container to prevent the rice from softening.

    Freezing the Protein

    The seasoned ground beef can be frozen for up to 2 months in a sealed freezer bag. Thaw overnight in the fridge before reheating and adding fresh vegetables.

    Optimal Reheating Methods

    Microwave the beef and rice together for 1-2 minutes until steaming. Add the cold vegetables and the fresh egg and sauce after heating to maintain texture.

    Preventing Component Sogginess

    Place the rice at the bottom and the beef on one side, keeping the raw vegetables on the opposite side. This physical separation helps maintain the integrity of each ingredient.

    Serving and Pairing Ideas

    Quick Office Lunch Setup

    Pack the bowls with a side of sliced cucumbers or edamame. These additions provide extra hydration and a refreshing contrast to the savory beef.

    Family-Style Bowl Bar

    Place the cooked beef, rice, and various raw vegetables in separate serving bowls. Allow family members to build their own bowls with their preferred ratio of ingredients.

    Complementary Side Dishes

    Pair these bowls with a light citrus salad or steamed bok choy. A side of pickled ginger or kimchi also adds a fermented tang that complements the seasoned beef.

    Post-Workout Refuel

    Increase the portion of rice and add an extra egg to boost the carbohydrate and protein content. This combination is ideal for muscle recovery after intense exercise.

    Troubleshooting Common Issues

    Preventing Dry Beef

    Avoid overcooking the ground beef beyond the point where it is browned. If the meat looks dry, stir in a tablespoon of water or beef broth during the final minute of cooking.

    Fixing Bland Flavor

    If the dish tastes flat, add an extra squeeze of lime juice or a splash of soy sauce right before serving. Acidity and salt are key to waking up the other flavors.

    Avoiding Mushy Rice

    Rinse the rice thoroughly under cold water before cooking to remove excess starch. This ensures the grains remain separate and fluffy rather than clumping together.

    Reducing Excess Grease

    If the beef releases too much fat, carefully drain the skillet before adding the soy sauce and brown sugar. This prevents the sauce from separating and tasting oily.

    Frequently Asked Questions

    Are these bowls suitable for weight loss?

    Yes, they can be. By using lean beef and increasing the ratio of vegetables to rice, you create a high-volume, low-calorie meal that remains satisfying due to the high protein content.

    How much protein is in one serving?

    Depending on the specific lean percentage of the beef and the addition of the egg, one serving typically provides between 25 and 35 grams of protein.

    Can I use a different oil for sautéing?

    Yes, avocado oil or canola oil can be used as substitutes for olive oil. However, keep the sesame oil in the beef mixture for the characteristic nutty flavor.

    What is the best way to cook the eggs?

    A soft-boiled egg with a runny yolk is recommended, as the yolk acts as a natural sauce that enriches the rice and beef. Fried eggs are a great alternative for added crispness.

    Can the sauce be made in advance?

    The spicy mayo sauce can be whisked together and stored in the refrigerator for up to 5 days. Shake the container well before drizzling it over the bowls.

    Is tamari a good substitute for soy sauce?

    Tamari is an excellent substitute, especially for those avoiding gluten. It has a similar salty, umami profile and works identically in this recipe.

    Print
    clock clock iconcutlery cutlery iconflag flag iconfolder folder iconinstagram instagram iconpinterest pinterest iconfacebook facebook iconprint print iconsquares squares iconheart heart iconheart solid heart solid icon
    High-Protein Viral Ground Beef Bowls for Easy Meal Prep

    High-Protein Viral Ground Beef Bowls for Meal Prep


    5 Stars 4 Stars 3 Stars 2 Stars 1 Star

    No reviews

    • Author: imageuploader
    • Total Time: 25 minutes
    • Yield: 4 servings 1x
    • Diet: High-Protein

    Description

    These viral ground beef bowls are everything you want in a quick, clean, and protein-packed meal. Featuring seasoned ground beef, fluffy rice, crunchy veggies, and a creamy-spicy drizzle, this bowl is bursting with flavor and perfect for weekly meal prep, healthy family dinners, or post-workout recovery.


    Ingredients

    Scale
    • 1 lb lean ground beef (93% lean)
    • 1 cup cooked jasmine or brown rice
    • 1 1/2 cups shredded cabbage (or slaw mix)
    • 1/2 cup shredded carrots
    • 2 eggs (fried or soft-boiled)
    • 1 tbsp olive oil
    • 3 tbsp soy sauce or tamari
    • 1 tbsp brown sugar
    • 2 cloves garlic (minced)
    • 1 tsp sesame oil
    • 1/2 tsp chili flakes (optional)
    • 1/4 cup Greek yogurt or mayo
    • 1 tbsp sriracha
    • 1 tsp honey
    • Juice of 1/2 lime

    Instructions

    1. Cook the Rice: Start your rice according to package instructions.
    2. Sauté the Beef: In a skillet, heat sesame oil. Add ground beef, garlic, soy sauce, brown sugar, and chili flakes. Cook until browned and saucy.
    3. Prep the Veggies: While the beef cooks, shred your cabbage and carrots.
    4. Make the Sauce: In a small bowl, whisk together Greek yogurt, sriracha, honey, and lime juice.
    5. Cook the Eggs: Fry or soft-boil the eggs to your liking.
    6. Assemble Your Bowl: Layer rice, beef, veggies, egg, and a big drizzle of spicy mayo.

    Notes

    Season ground beef generously for richer flavor. Use jasmine or basmati rice for better texture. For meal prep, store beef, rice, veggies, and sauce in separate containers to prevent sogginess.

    • Prep Time: 10 minutes
    • Cook Time: 15 minutes
    • Category: Dinner, Lunch, Meal Prep
    • Method: Stovetop
    • Cuisine: Asian-Inspired, Fusion

    Nutrition

    • Serving Size: 1 bowl
    • Calories: 520 kcal
    • Sugar: 14 g
    • Sodium: 620 mg
    • Fat: 25 g
    • Saturated Fat: 7 g
    • Unsaturated Fat: 18 g
    • Trans Fat: 0 g
    • Carbohydrates: 40 g
    • Fiber: 5 g
    • Protein: 32 g
    • Cholesterol: 150 mg