Master the art of boiling eggs with this consistent, foolproof method. Whether you need a liquid center for dipping or a firm yolk for salads, this guide ensures perfect results every time.
List of ingredients
- 8 large eggs (cold from the fridge) – you may use between 6 and 12 eggs depending on your needs.
- 8 cups cold water – sufficient to cover eggs by one inch in a 3-quart saucepan.
step-by-step instructions
- Combine and Heat: Place the cold eggs into a large 3-quart stainless steel saucepan. Fill the pot with cold water until the water level is exactly 1 inch above the surface of the eggs. Keep the lid off and bring the water to a rolling boil over high heat.
- Simmer and Time: As soon as the water reaches a boil, reduce the heat to maintain a medium boil. Immediately set a timer based on your desired doneness: 2 minutes for liquid centers, 3 minutes for creamy, 4-5 minutes for moist soft, 6-7 minutes for soft hard-boiled, or 8-9 minutes for firm, dry centers.
- Shock and Cool: While the eggs cook, prepare a bowl filled with ice and cold water. Once the timer expires, use a slotted spoon to transfer the eggs immediately into the ice water bath, ensuring they are fully submerged.
- Cool and Store: Allow the eggs to cool completely in the ice bath. You can refrigerate hard-boiled eggs for up to 7 days or soft-boiled eggs for up to 3 days. Peel the shells only when you are ready to use them.
Choosing the Best Eggs for Boiling
The age of the egg significantly impacts how easily the shell peels. Older store-bought eggs are generally easier to peel than farm-fresh eggs. This is because the pH level of the egg white increases as it ages, weakening the bond between the membrane and the shell.
If you are using eggs from a backyard chicken, you may find them more difficult to peel using the boiling method. These eggs often require higher pressure or a different approach to loosen the membrane. For standard store-bought eggs, the cold-start method provided here works efficiently.
Egg size also plays a critical role in cooking times. Large Grade AA eggs are the standard for most recipes and this timing chart. Medium eggs will cook faster, while extra-large or jumbo eggs will require an additional minute or two for the heat to reach the center.
Ensure your eggs are cold from the refrigerator before starting. Starting with cold eggs helps them heat up gradually, which can prevent the shells from cracking due to sudden thermal shock when they hit the boiling water.
Recommended Cooking Tools
Using a stainless steel saucepan is highly recommended for consistent results. Stainless steel distributes heat evenly and allows the water to reach a boil quickly. This predictability helps you maintain the timing chart accurately across different batches.
Avoid using cast iron pots for this specific method. Cast iron retains heat much longer than stainless steel, which can lead to carry-over cooking even after the eggs are removed from the water. This may result in overcooked yolks or the dreaded green ring.
The size of the pot matters for water circulation. A 3-quart saucepan provides enough room for 8 to 12 eggs to move slightly without colliding violently. This reduces the risk of the shells cracking during the rolling boil phase.
A digital timer is an essential tool for this process. Because the difference between a jammy yolk and a hard yolk is only a few minutes, guessing the time often leads to inconsistent results. Always start the timer the moment the water reaches a boil.
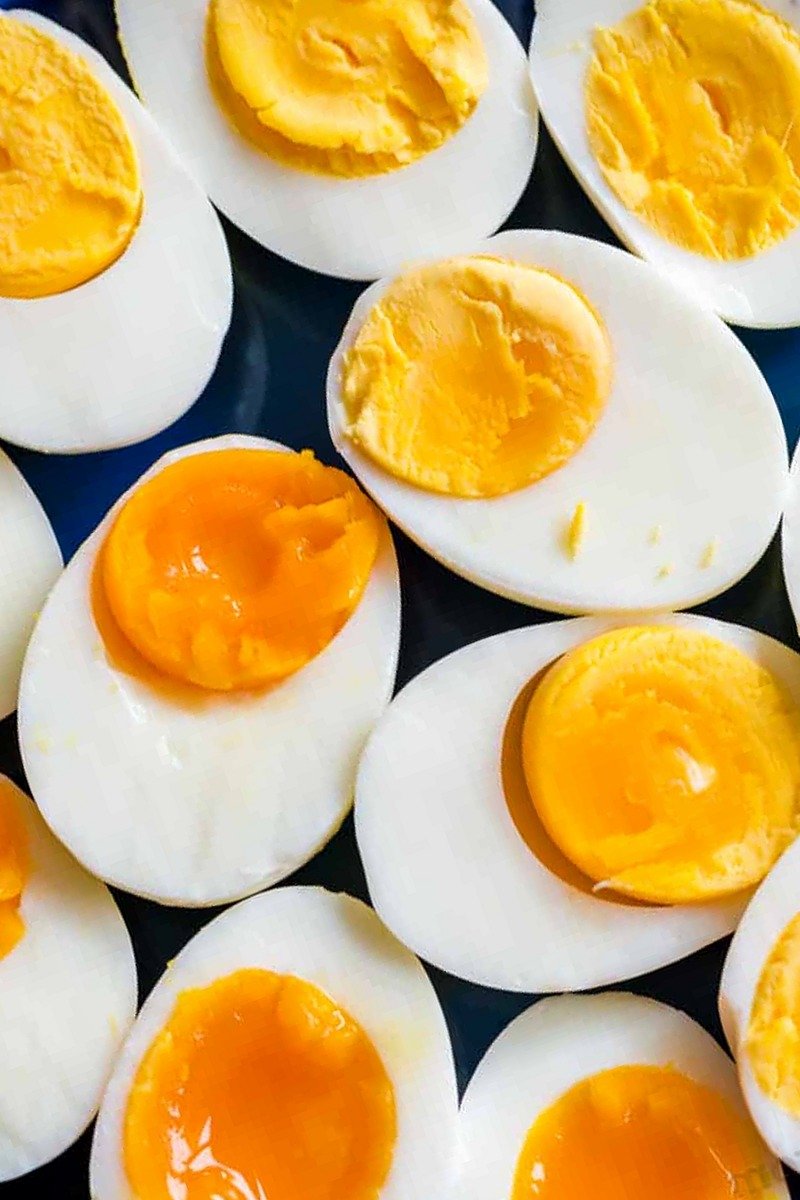
Comprehensive Timing Guide for Egg Doneness
Achieving the perfect texture requires precision. At 2 minutes of boiling, you will have soft-boiled eggs with fully set whites but a completely liquid center. These are ideal for dipping strips of toast or serving in breakfast bowls.
At 3 minutes, the eggs are still soft-boiled, but the center becomes creamy and jammy. This texture is highly prized for ramen toppings or as a rich addition to avocado toast.
For medium-boiled eggs, set your timer for 4 to 5 minutes. The center will be moist and soft, possessing a custard-like consistency that is neither liquid nor fully firm.
Hard-boiled eggs with a soft center are achieved at 6 to 7 minutes. The yolk is set and opaque but remains pale and creamy in the very center. These are excellent for snacking with a pinch of salt.
Fully hard-boiled eggs require 8 to 9 minutes. These have a firm, dry, and bright yellow center. This is the necessary doneness for deviled eggs, egg salads, or Cobb salads where the egg needs to be sliced cleanly.
Advanced Peeling Techniques
The most effective way to peel an egg is to start at the wider end. This is where the air bubble is located, providing a natural starting point to get under the membrane. Once you break the membrane, the shell usually slides off in larger pieces.
Peeling eggs under running cold water is a professional tip for efficiency. The water pressure helps force a thin layer of liquid between the egg white and the membrane. This lubricates the surface and allows the shell to slip away with minimal effort.
Another technique is to gently roll the egg on a flat surface. Apply light pressure with your palm and roll the egg back and forth until the entire shell is covered in a network of fine cracks. This makes it easier to remove the shell in one or two large segments.
Avoid peeling eggs while they are still warm. The ice bath is not just for stopping the cooking; it also causes the egg to shrink slightly inside the shell. This creates a small gap that makes the peeling process significantly smoother.
The Role of Salt and Vinegar in Boiling
Many cooks add vinegar to the boiling water, believing it helps the shells peel more easily. While some find this helpful, the actual chemical difference is minimal. It is an optional addition that does not significantly alter the outcome for most store-bought eggs.
Adding salt to the water serves a different practical purpose. If an egg develops a small crack during the boiling process, salt helps the egg white coagulate faster. This seals the crack and prevents long ribbons of egg white from leaking into the pot.
Neither salt nor vinegar will significantly change the flavor of the egg. Because the shell acts as a barrier, the water additives do not penetrate the yolk or white in any noticeable way. They are purely functional tools for the cooking process.
If you are boiling a very large batch of eggs, salt is particularly useful. With more eggs in the pot, there is a higher likelihood of shells knocking together and cracking, making the salt’s sealing property more valuable.
Proper Storage and Preservation
Food safety is paramount when storing boiled eggs. According to USDA guidelines, eggs should be refrigerated within two hours of cooking. This prevents the growth of bacteria and ensures the eggs remain safe for consumption.
Hard-boiled eggs can be stored in the refrigerator for up to 7 days. It is best to keep them unpeeled during storage. The shell protects the egg from absorbing odors from other foods in the fridge and prevents the white from drying out.
If you prefer to peel the eggs in advance, store them in an airtight container. You can also cover them with a damp paper towel to maintain moisture. Peeled eggs are more susceptible to drying and should be consumed more quickly.
Soft-boiled eggs have a shorter shelf life due to their liquid centers. These should be refrigerated immediately and consumed within 3 days. Always store them in a sealed container to prevent contamination.
Solving Common Boiling Egg Issues
The appearance of a green or grey ring around the yolk is a sign of overcooking. This happens when the sulfur in the egg white reacts with the iron in the yolk. To avoid this, strictly follow the timing chart and use an immediate ice bath.
Rubbery egg whites occur when the eggs are subjected to high heat for too long. This denatures the proteins too far, creating a tough texture. Ensure you reduce the heat to a medium boil after the initial rolling boil to maintain a gentler temperature.
If your eggs are cracking frequently, try lowering them into the pot more gently. Use a slotted spoon to place each egg carefully at the bottom of the pan before adding water. Avoid dropping them from a height.
If you find the shells are still sticking despite the ice bath, your eggs may be too fresh. For farm-fresh eggs, you can try adding a tablespoon of baking soda to the water to increase the alkalinity, which may help loosen the membrane.
Creative Ways to Use Boiled Eggs
Hard-boiled eggs are a versatile protein source for various dishes. For a classic egg salad, mash firm eggs with mayonnaise, Dijon mustard, and chopped celery. This creates a creamy filling perfect for sandwiches or wraps.
Deviled eggs are a popular appetizer. Slice hard-boiled eggs in half, remove the yolks, and whip them with lemon juice, paprika, and a touch of cream. Pipe the mixture back into the whites for a professional presentation.
In salads, sliced hard-boiled eggs add richness and substance. They are a staple in a Salmon Cobb Salad or a traditional Potato Salad with a creamy dressing. The firm yolk provides a nice color contrast to green vegetables.
Soft-boiled eggs are excellent for breakfast. Serve them in an egg cup with toast soldiers for dipping into the liquid yolk. They also make a sophisticated topping for a bowl of quinoa, steamed spinach, and sliced avocado.
Print The Definitive Guide to Perfect Hard Boiled Eggs
- Total Time: 10 minutes
- Yield: 8 eggs 1x
- Diet: General
Description
This method for making hard-boiled eggs (or soft boiled eggs) will get you perfect results every time and it’s really easy!
Ingredients
- 8 large eggs, cold from the fridge
- 8 cups cold water
Instructions
- Step 1: Place cold eggs in a large 3-quart stainless steel saucepan and cover with cold water so water is 1″ above the surface of the eggs. With the lid off, bring to a rolling boil over high heat.
- Step 2: Once at a boil, reduce heat to keep at a medium boil and set a timer for your desired doneness.
- Step 3: Prepare your ice water bath, and as soon as the timer is done, transfer the eggs into ice water so they are fully submerged.
- Step 4: Once the eggs have cooled, you can refrigerate hard-boiled eggs for up to 7 days or soft-boiled eggs for up to 3 days. Peel when ready to use.
Notes
Timing Chart: 2 min: soft boiled with a liquid center; 3 min: soft-boiled with a creamy center; 4-5 min: medium-boiled with a moist, soft center; 6-7 min: hard-boiled eggs with a soft center; 8-9 min: hard-boiled eggs with firm dry center.
- Prep Time: 0 minutes
- Cook Time: 10 minutes
- Category: Appetizer, Breakfast, Side Dish
- Method: Boiling
- Cuisine: American
Nutrition
- Serving Size: 1 egg
- Calories: 63 kcal
- Sugar: 1 g
- Sodium: 75 mg
- Fat: 4 g
- Saturated Fat: 1 g
- Unsaturated Fat: 3 g
- Trans Fat: 0 g
- Carbohydrates: 1 g
- Fiber: 0 g
- Protein: 6 g
- Cholesterol: 164 mg
Leave a Reply